Home › ENGINE › 1GR-FE ENGINE CONTROL SYSTEM › SFI SYSTEMFuel Pump Control Circuit
Circuit diagnosis · Vehicles built from Aug 2014
Versions by build date: Jul 2007 – Nov 2007 Dec 2007 – Jul 2009 Aug 2009 – Oct 2010 Nov 2010 – Jul 2012 Aug 2012 – Oct 2012 Nov 2012 – Jul 2014 from Aug 2014
DESCRIPTION
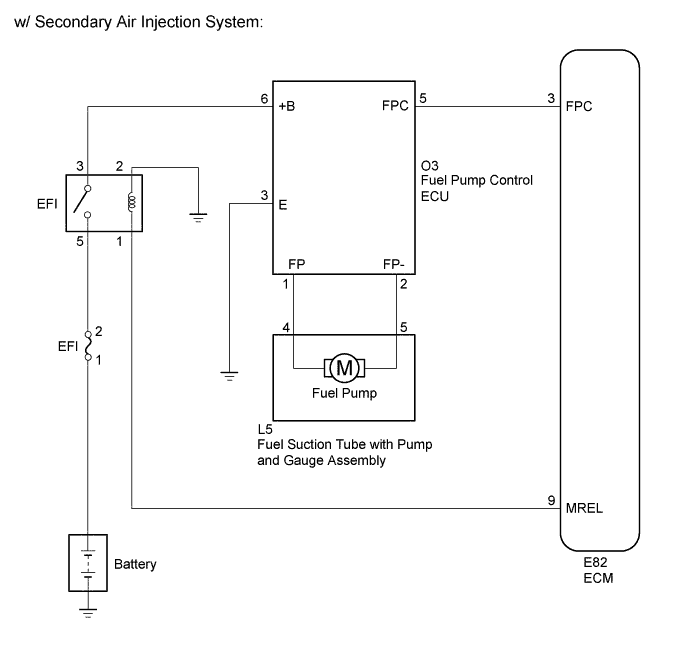
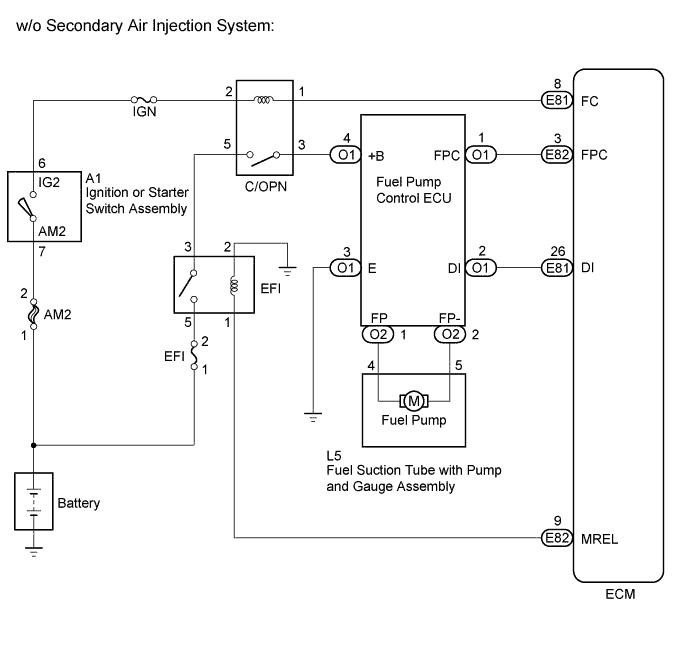
The fuel pump circuit consists of the ECM, fuel pump and fuel pump control ECU (which operates the fuel pump). Based on the engine output, the ECM determines the fuel pump speed. The speed is then converted to a duty signal and sent to the fuel pump control ECU. Based on the signal sent from the ECM, the fuel pump control ECU adjusts the fuel pump operation speed. WIRING DIAGRAM
INSPECTION PROCEDURE
NOTICE:
Inspect the fuses for circuits related to this system before performing the following inspection procedure.
1. PERFORM ACTIVE TEST USING INTELLIGENT TESTER (CONTROL THE FUEL PUMP / SPEED)
Connect the intelligent tester to the DLC3.
Turn the ignition switch to ON and turn the tester on.
Enter the following menus: Powertrain / Engine and ECT / Active Test / Control the Fuel Pump / Speed.
Check whether operating sounds can be heard while operating the fuel pump using the tester.
OK:
Operating sounds can be heard from fuel pump.
Result
Result
Proceed to
NG (w/ Secondary Air Injection System)
A
OK (w/ Secondary Air Injection System)
B
OK (w/o Secondary Air Injection System)
C
NG (w/o Secondary Air Injection System)
D
A
2. INSPECT FUEL PUMP CONTROL ECU (POWER SOURCE VOLTAGE)
Disconnect the fuel pump control ECU connector. Turn the ignition switch to ON.
Measure the voltage according to the value(s) in the table below.
Standard Voltage:
Tester Connection
Switch Condition
Specified Condition
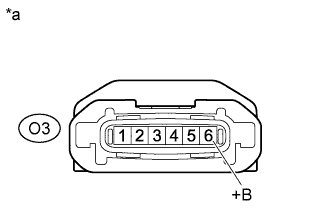
O3-6 (+B) - Body Ground
Ignition switch ON
11 to 14 V
Text in Illustration
*a
Front view of wire harness connector
NG
OK
3. CHECK HARNESS AND CONNECTOR (FUEL PUMP CONTROL ECU - BODY GROUND)
Disconnect the O3 fuel pump control ECU connector.
Measure the resistance according to the value(s) in the table below.
Standard Resistance:
Tester Connection
Condition
Specified Condition
O3-3 (E) - Body Ground
Always
Below 1 Ω
NG
REPAIR OR REPLACE HARNESS OR CONNECTOR
OK
4. CHECK HARNESS AND CONNECTOR (FUEL PUMP - FUEL PUMP CONTROL ECU)
Disconnect the L5 fuel suction tube with pump and gauge assembly connector.
Disconnect the O3 fuel pump control ECU connector.
Measure the resistance according to the value(s) in the table below.
Standard Resistance:
Tester Connection
Condition
Specified Condition
L5-4 - O3-1 (FP)
Always
Below 1 Ω
L5-5 - O3-2 (FP-)
Always
Below 1 Ω
L5-4 or O3-1 (FP) - Body ground
Always
10 kΩ or higher
L5-5 or O3-2 (FP-) - Body ground
Always
10 kΩ or higher
NG
REPAIR OR REPLACE HARNESS OR CONNECTOR
OK
5. INSPECT FUEL PUMP
Inspect the fuel pump (Click here ).
NG
OK
6. CHECK HARNESS AND CONNECTOR (FUEL PUMP CONTROL ECU - ECM)
Disconnect the O3 fuel pump control ECU connector.
Disconnect the E82 ECM connector.
Measure the resistance according to the value(s) in the table below.
Standard Resistance:
Tester Connection
Condition
Specified Condition
O3-5 (FPC) - E82-3 (FPC)
Always
Below 1 Ω
O3-5 (FPC) or E82-3 (FPC) - Body ground
Always
10 kΩ or higher
NG
REPAIR OR REPLACE HARNESS OR CONNECTOR
OK
7. REPLACE FUEL PUMP CONTROL ECU
Replace the fuel pump control ECU (Click here ).
NEXT
8. CONFIRM WHETHER MALFUNCTION HAS BEEN SUCCESSFULLY REPAIRED
Check the fuel pump operation.
OK:
Malfunction has been repaired successfully.
NG
OK
9. CHECK HARNESS AND CONNECTOR (EFI RELAY - FUEL PUMP CONTROL ECU)
Remove the EFI relay from the engine room relay block.
Disconnect the O3 fuel pump control ECU connector.
Measure the resistance according to the value(s) in the table below.
Standard Resistance:
Tester Connection
Condition
Specified Condition
3 (EFI relay holder) - O3-6 (+B)
Always
Below 1 Ω
3 (EFI relay holder) or O3-6 (+B) - Body ground
Always
10 kΩ or higher
NG
REPAIR OR REPLACE HARNESS OR CONNECTOR
OK
10. PERFORM ACTIVE TEST USING INTELLIGENT TESTER (CONTROL THE FUEL PUMP)
Remove the fuel pump (Click here ). Clean the fuel pump to completely remove any remaining fuel.
Connect the fuel pump connector.
CAUTION:
Make sure that there is no fuel remaining inside or on the outside of the fuel pump.
Connect the intelligent tester to the DLC3.
Turn the ignition switch to ON.
Turn the tester on.
Enter the following menus: Powertrain / Engine and ECT / Active Test / Control the Fuel Pump Duty.
Operate the fuel pump using the Active Test function and measure the voltage according to the value(s) in the table below.
Enter the following menus: Powertrain / Engine and ECT / Active Test / Control the Fuel Pump / Speed.
Standard Voltage:
Tester Connection
Switch Condition
Specified Condition
1 - 2
FPC Duty: 25%
3.2 to 4.05 V
FPC Duty: 80%
8.8 to 12.5 V
Operate the fuel pump using the Active Test function and measure the voltage according to the value(s) in the table below.
Standard Voltage:
Tester Connection
Switch Condition
Specified Condition
1 - 2
ON (FPC Duty: 90%)
9.0 to 14.0 V
HINT:
Be sure to measure the voltage with all the connectors connected.
Before performing this inspection, check that the battery voltage is between 11 and 14 V (not depleted).
Text in Illustration
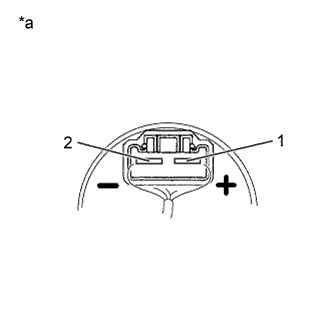
*a
Component with harness connected
NG
OK
11. CHECK HARNESS AND CONNECTOR (FUEL PUMP CONTROL ECU - ECM)
Disconnect the O3 fuel pump control ECU connector.
Disconnect the E82 ECM connector.
Measure the resistance according to the value(s) in the table below.
Standard Resistance:
Tester Connection
Condition
Specified Condition
O3-5 (FPC) - E82-3 (FPC)
Always
Below 1 Ω
O3-5 (FPC) or E82-3 (FPC) - Body ground
Always
10 kΩ or higher
NG
REPAIR OR REPLACE HARNESS OR CONNECTOR
OK
12. REPLACE FUEL PUMP
Replace the fuel pump (Click here ).
NEXT
13. REPLACE FUEL PUMP CONTROL ECU
Replace the fuel pump control ECU (Click here ).
NEXT
14. CONFIRM WHETHER MALFUNCTION HAS BEEN SUCCESSFULLY REPAIRED
Check the fuel pump operation.
OK:
Malfunction has been repaired successfully.
NG
OK
15. CHECK HARNESS AND CONNECTOR (FUEL PUMP CONTROL ECU - ECM, BODY GROUND)
Disconnect the O1 fuel pump control ECU connector.
Disconnect the E82 and E81 ECM connectors.
Measure the resistance according to the value(s) in the table below.
Standard Resistance:
Tester Connection
Condition
Specified Condition
O1-1 (FPC) - E82-3 (FPC)
Always
Below 1 Ω
O1-2 (DI) - E81-26 (DI)
Always
Below 1 Ω
O1-3 (E) - Body ground
Always
Below 1 Ω
O1-1 (FPC) or E82-3 (FPC) - Body ground
Always
10 kΩ or higher
O1-2 (DI) or E81-26 (DI) - Body ground
Always
10 kΩ or higher
NG
REPAIR OR REPLACE HARNESS OR CONNECTOR
OK
16. REPLACE FUEL PUMP CONTROL ECU
Replace the fuel pump control ECU (Click here ).
NEXT
17. CONFIRM WHETHER MALFUNCTION HAS BEEN SUCCESSFULLY REPAIRED
Check the fuel pump operation.
OK:
Malfunction has been repaired successfully.
NG
OK
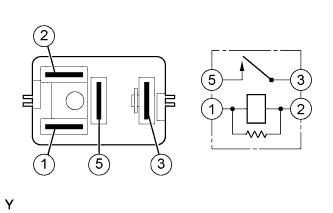
18. INSPECT C/OPN RELAY
Remove the C/OPN relay from the engine room relay block.
Measure the resistance according to the value(s) in the table below.
Standard Resistance:
Tester Connection
Condition
Specified Condition
3 - 5
Battery voltage not applied
10 kΩ or higher
Battery voltage applied to terminals 1 and 2
Below 1 Ω
NG
OK
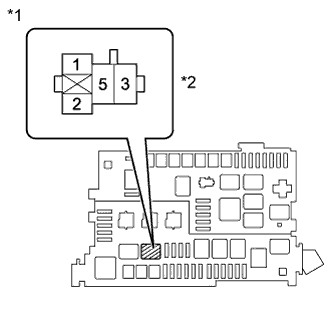
19. INSPECT C/OPN RELAY (POWER SOURCE VOLTAGE)
Remove the C/OPN relay from the engine room relay block.
Turn the ignition switch to ON.
Measure the voltage according to the value(s) in the table below.
Standard Voltage:
Tester Connection
Switch Condition
Specified Condition
2 (C/OPN relay holder) - Body ground
Ignition switch ON
11 to 14 V
5 (C/OPN relay holder) - Body ground
Ignition switch ON
11 to 14 V
Text in Illustration
*1
Engine Room Relay Block
*2
C/OPN Relay Holder
NG
OK
20. CHECK HARNESS AND CONNECTOR (C/OPN RELAY - ECM, FUEL PUMP CONTROL ECU)
Remove the C/OPN relay from the engine room relay block.
Disconnect the E81 ECM connector.
Disconnect the O1 fuel pump control ECU connector.
Measure the resistance according to the value(s) in the table below.
Standard Resistance:
Tester Connection
Condition
Specified Condition
1 (C/OPN relay holder) - E81-8 (FC)
Always
Below 1 Ω
3 (C/OPN relay holder) - O1-4 (+B)
Always
Below 1 Ω
1 (C/OPN relay holder) or E81-8 (FC) - Body ground
Always
10 kΩ or higher
3 (C/OPN relay holder) or O1-4 (+B) - Body ground
Always
10 kΩ or higher
NG
REPAIR OR REPLACE HARNESS OR CONNECTOR
OK
21. CHECK HARNESS AND CONNECTOR (FUEL PUMP - FUEL PUMP CONTROL ECU)
Disconnect the L5 fuel suction tube with pump and gauge assembly connector.
Disconnect the O2 fuel pump control ECU connector.
Measure the resistance according to the value(s) in the table below.
Standard Resistance:
Tester Connection
Condition
Specified Condition
L5-4 - O2-1 (FP)
Always
Below 1 Ω
L5-5 - O2-2 (FP-)
Always
Below 1 Ω
L5-4 or O2-1 (FP) - Body ground
Always
10 kΩ or higher
L5-5 or O2-2 (FP-) - Body ground
Always
10 kΩ or higher
NG
REPAIR OR REPLACE HARNESS OR CONNECTOR
OK
22. INSPECT FUEL PUMP
Inspect the fuel pump.
for Single Tank Type: (Click here )
for Double Tank Type: (Click here )
Result
Result
Proceed to
OK
A
NG (for Single Tank Type)
B
NG (for Double Tank Type)
C
B
C
A
23. CHECK HARNESS AND CONNECTOR (FUEL PUMP CONTROL ECU - ECM, BODY GROUND)
Disconnect the O1 fuel pump control ECU connector.
Disconnect the E82 and E81 ECM connectors.
Measure the resistance according to the value(s) in the table below.
Standard Resistance:
Tester Connection
Condition
Specified Condition
O1-1 (FPC) - E82-3 (FPC)
Always
Below 1 Ω
O1-2 (DI) - E81-26 (DI)
Always
Below 1 Ω
O1-3 (E) - Body ground
Always
Below 1 Ω
O1-1 (FPC) or E82-3 (FPC) - Body ground
Always
10 kΩ or higher
O1-2 (DI) or E81-26 (DI) - Body ground
Always
10 kΩ or higher
NG
REPAIR OR REPLACE HARNESS OR CONNECTOR
OK
24. REPLACE FUEL PUMP CONTROL ECU
Replace the fuel pump control ECU (Click here ).
NEXT
25. CONFIRM WHETHER MALFUNCTION HAS BEEN SUCCESSFULLY REPAIRED
Check the fuel pump operation.
OK:
Malfunction has been repaired successfully.
NG
OK
26. CHECK HARNESS AND CONNECTOR (C/OPN RELAY - EFI RELAY, IGNITION SWITCH)
Remove the C/OPN relay from the engine room relay block.
Remove the EFI relay from the engine room relay block.
Disconnect the A1 ignition switch connector.
Measure the resistance according to the value(s) in the table below.
Standard Resistance:
Tester Connection
Condition
Specified Condition
5 (C/OPN relay holder) - 3 (EFI relay holder)
Always
Below 1 Ω
2 (C/OPN relay holder) - A1-6 (IG2)
Always
Below 1 Ω
5 (C/OPN relay holder) or 3 (EFI relay holder) - Body ground
Always
10 kΩ or higher
2 (C/OPN relay holder) or A1-6 (IG2) - Body ground
Always
10 kΩ or higher
NG
REPAIR OR REPLACE HARNESS OR CONNECTOR
OK