1GD-FTV ENGINE CONTROL ECD SYSTEM(w/ Exhaust Gas Temperature Sensor for EGR) P207F00 Reductant Quality Performance P249E00 Closed Loop Reductant Injection Control At Limit - Flow Too High
DESCRIPTION
| DTC No. | Detection Item | DTC Detection Condition | Trouble Area | MIL | Memory | Note |
|---|---|---|---|---|---|---|
| P207F00 | Reductant Quality Performance | The concentration of the urea solution is low, the purification rate had decreased, and the urea solution feedback has exceeded the threshold (1 trip detection logic). | Urea solution | - | DTC stored | SAE Code: P207F |
| P249E00 | Closed Loop Reductant Injection Control At Limit - Flow Too High | The concentration of the urea solution is low, the purification rate had decreased, and the urea solution feedback has exceeded the threshold (2 trip detection logic). | Urea solution | Class B2 | DTC stored | SAE Code: P249E |
MONITOR DESCRIPTION
When the concentration of urea solution decreases, the NOx purification rate also decreases.
The urea pump control ECU increases the urea solution injection volume to suppress NOx emission.
The urea solution concentration is calculated from the increased amount of urea solution injection volume. If the urea solution concentration is below the threshold, P207F00 is stored. If this condition is detected for a 2nd trip, P249E00 is stored.
CONFIRMATION DRIVING PATTERN
| DTC No. | DTC Detection Drive Pattern |
|---|---|
| P207F00
P249E00 |
Gradually accelerate and decelerate the vehicle from 40 to 60 km/h (25 to 37.5 mph) after PM forced regeneration is performed. |
CAUTION / NOTICE / HINT
- NOTICE:
- Handling urea solution·
Wear protective equipment as necessary (protective glasses and gloves).
·Do not dilute urea solution.
·If urea solution contacts your eyes or skin, immediately wash the contacted area with a large amount of water and consult a doctor as necessary.
·If urea solution dries, it deposits a white powder. Also, if urea solution contacts metals such as copper and aluminum for a long period of time, it may promote corrosion. Therefore, if urea solution is spilled, dampen a cloth or other item and wipe it up or rinse the area with cool or warm water.
- Handling the urea injector set·
The urea injector set is a precision instrument. Take necessary precautions for installation and shipping. Do not use the part if it has been struck or dropped.
·If the urea solution remaining inside the urea injector set dries out, it may become unable to inject urea solution. Therefore, conduct urea tube with heater assembly installation and removal quickly.
·If the urea solution dries out and deposition occurs, urea may cling to the O-ring of the pipe and cause seal problems. Therefore, clean the urea tube with heater assembly and intake port of the urea injector set with water before attaching them.
·Perform this procedure in an environment where urea solution will not freeze.
- HINT:
-
Read freeze frame data using the GTS. Freeze frame data records the engine condition when malfunctions are detected. When troubleshooting, freeze frame data can help determine if the vehicle was moving or stationary, if the engine was warmed up or not, and other data from the time the malfunction occurred.
PROCEDURE
Connect the GTS to the DLC3.
Turn the engine switch on (IG) and turn the GTS on.
Enter the following menus: Powertrain / Engine and Transmission / Trouble Codes.
- Powertrain > Engine and Transmission > Trouble Codes
- 50001 456
Read the DTCs.
- Result:
Result Proceed to DTC P207F00 and/or P249E00 is output A DTC P207F00 and/or P249E00 and other DTCs are output B
A
B
Measure the concentration of urea solution by the urea concentration meter in the urea solution tank.
- NOTICE:
-
Transfer the urea solution in the urea solution tank into a different container, and then measure the concentration.
- Standard:
Condition Specified Condition Urea solution temperature:
-8 to 40°CNormal urea solution concentration:
31.8 to 33.2%
- Result:
Proceed to OK NG
NG
OK
Connect the GTS to the DLC3.
Turn the engine switch on (IG) and turn the GTS on.
Enter the following menus: Powertrain / Engine and Transmission / Active Test / Reductant Pump Check (Backward).
- Powertrain > Engine and Transmission > Active Test
-
Tester Display Reductant Pump Check (Backward) - 50004 456 16
Perform the Active Test.
Enter the following menus: Powertrain / Engine and Transmission / Active Test / Reductant Purge.
- Powertrain > Engine and Transmission > Active Test
-
Tester Display Reductant Purge - 50004 456 17
Perform the Active Test.
- HINT:
-
Perform the Reductant Purge to draw the urea solution back into the urea tank sub-assembly from the urea injector set.
After performing the Active Test, remove the urea tube with heater assembly from the urea injector set.
Click hereEngine / Hybrid System>1GD-FTV (EMISSION CONTROL)>UREA INJECTOR>REMOVAL
- HINT:
-
If the urea solution remaining inside the urea injector set dries out, it may become unable to inject urea solution.
Therefore, seal the urea injector set with an item such as a cover or rubber cap so that the inside does not dry out.
Prepare a bucket or other receptacle for collecting urea solution from the urea tube with heater assembly.
Enter the following menus: Powertrain / Engine and Transmission / Active Test / Reductant Discharge.
- Powertrain > Engine and Transmission > Active Test
-
Tester Display Reductant Discharge - 50004 456 14
Perform the Active Test to drain all the urea solution.
After fully draining the urea solution, refill with AdBlue (conforming to ISO 22241-1).
Click hereEngine / Hybrid System>1GD-FTV (EMISSION CONTROL)>UREA TANK>REFILL
- Result:
Proceed to NEXT
NEXT
- HINT:
-
If there are deposits around the urea injector, injection may be inhibited, reducing purification performance.
Connect the GTS to the DLC3.
Turn the engine switch on (IG) and turn the GTS on.
Enter the following menus: Powertrain / Engine and Transmission / Active Test / Reductant Pump Check (Backward).
- Powertrain > Engine and Transmission > Active Test
-
Tester Display Reductant Pump Check (Backward) - 50004 456 16
Perform the Active Test.
Enter the following menus: Powertrain / Engine and Transmission / Active Test / Reductant Purge.
- Powertrain > Engine and Transmission > Active Test
-
Tester Display Reductant Purge - 50004 456 17
Perform the Active Test.
- HINT:
-
Perform the Reductant Purge to draw the urea solution back into the urea tank sub-assembly from the urea injector set.
After performing the Active Test, remove the urea injector set from the front exhaust pipe assembly.
Click hereEngine / Hybrid System>1GD-FTV (EMISSION CONTROL)>UREA INJECTOR>REMOVAL
- HINT:
-
Do not disconnect the urea injector from the urea tube with heater assembly.
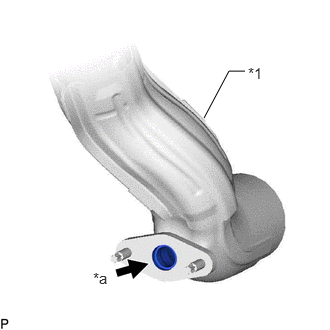
| *a | Exhaust Pipe Connection Area to Check |
| *1 | Front Exhaust Pipe Assembly |
Check that there is no white matter deposited by urea solution on the connection area of the front exhaust pipe.
- HINT:
-
After checking for deposits, use a cover, etc., to prevent foreign matter from entering the front exhaust pipe.
- Result:
Result Proceed to No white matter is deposited by urea solution on connection area of front exhaust pipe A White matter is deposited by urea solution on connection area of front exhaust pipe B
A
B
- HINT:
-
If there is a malfunction in the urea injector set, NOx purification performance will be reduced.
Use a cover, etc., to prevent foreign matter from entering the front exhaust pipe where the urea injector set was removed.
Enter the following menus: Powertrain / Engine and Transmission / Active Test / Reductant Injection Valve.
- Powertrain > Engine and Transmission > Active Test
-
Tester Display Reductant Injection Valve - 50004 456 13
Perform the Active Test and check that operation sounds can be heard from the urea injector set.
- OK:
Sound of urea injector set operation can be heard (a ticking sound).
- HINT:
-
Even after checking is complete, do not install the urea injector removed from the front exhaust pipe yet.
- Result:
Proceed to OK NG
OK
NG
Enter the following menus: Powertrain / Engine and Transmission / Utility / Reductant Injection Valve Check.
- Powertrain > Engine and Transmission > Utility
-
Tester Display Reductant Injection Valve Check - 50005 456 4601
Execute the Reductant Injection Valve Check and check the injection condition of the urea injector set.
- HINT:
- ·
This test performs operations from urea solution refueling up to injection.
·The pressure inside the pipe may increase during urea solution refueling, intermittently opening the urea injector set and causing urea solution to leak out.
·If the urea injector set becomes stuck open during urea solution refueling, once this test starts, intermittent injections will not occur and urea solution will leak out.
·Urea solution is intermittently injected by the urea injector set.
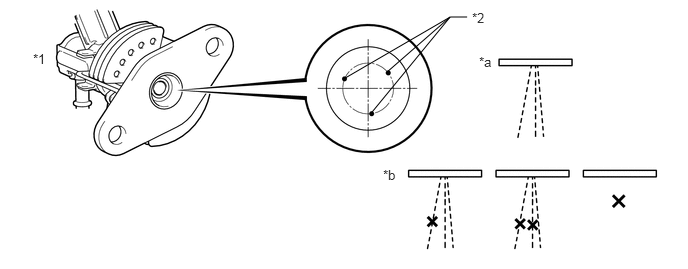
| *1 | Urea Injector Set | *2 | Spray Hole |
| *a | Urea injector set normal | *b | Urea injector set abnormal |
- Result:
Result Proceed to Urea injector set normal A Urea injector set abnormal B
- HINT:
-
Even after checking is complete, do not install the urea injector removed from the front exhaust pipe yet.
Wash off any matter deposited by the urea solution.
- NOTICE:
- ·
Do not damage the urea injector set when washing it.
·Make sure to leave the connector connected when washing to prevent water from entering via the connector.
·Sufficiently wipe the area so that no urea solution remains on the flange sealing surface.
·After completing work, check that 3 streams of liquid are sprayed from the urea injector set.
A
B
Connect the GTS to the DLC3.
Turn the engine switch on (IG) and turn the GTS on.
Enter the following menus: Powertrain / Engine and Transmission / Active Test / Reductant Pump Check (Backward).
- Powertrain > Engine and Transmission > Active Test
-
Tester Display Reductant Pump Check (Backward) - 50004 456 16
Perform the Active Test.
Enter the following menus: Powertrain / Engine and Transmission / Active Test / Reductant Purge / Data List / Diesel Exhaust / Reductant Pressure.
- Powertrain > Engine and Transmission > Active Test
-
Active Test Display Reductant Purge -
Data List Display Reductant Pressure - 50004 456 17 137
After executing the Active Test, check the Reductant Pressure.
- Standard:
Approximately 0 kPa
Enter the following menus: Powertrain / Engine and Transmission / Active Test / Reductant Filling (Pressure Keep) / Data List / Diesel Exhaust / Reductant Pressure.
- Powertrain > Engine and Transmission > Active Test
-
Active Test Display Reductant Filling (Pressure Keep) -
Data List Display Reductant Pressure - 50004 456 15 137
After executing the Active Test, check the Reductant Pressure.
- HINT:
-
Perform the Active Test until the pressure stabilizes (may take from 5 to 60 seconds).
- OK:
400 to 600 kPa
- Result:
Proceed to OK NG
OK
NG
- HINT:
- ·
When the No. 1 nitrogen oxides sensor output deviates toward the low side, the NOx purification rate decreases.
·When the No. 2 nitrogen oxides sensor output deviates toward the high side, the NOx purification rate decreases.
Check that the engine switch is off.
Use an air blow gun to blow air from the mounting hole of the urea injector set toward the No. 1 nitrogen oxides sensor and No. 2 nitrogen oxides sensor, expelling remaining NOx in the exhaust pipe.
Install the urea injector set.
Click hereEngine / Hybrid System>1GD-FTV (EMISSION CONTROL)>UREA INJECTOR>INSTALLATION
Turn the engine switch on (IG) and turn the GTS on.
Enter the following menus: Powertrain / Engine and Transmission / Utility / NOx Sensor Check.
- Powertrain > Engine and Transmission > Utility
-
Tester Display NOx Sensor Check - 50005 456 4600
Perform the NOx Sensor Check.
Check the "NOx Density B1S1" and "NOx Density B1S2" output values.
- Standard:
Below approximately 20 ppm
- HINT:
-
Blowing air expels the NOx in the exhaust pipe. Therefore, if a large volume of NOx is detected, the sensor may be malfunctioning.
- Result:
Result Proceed to Both "NOx Density B1S1" and "NOx Density B1S2" values are normal. A "NOx Density B1S1" is abnormal. B "NOx Density B1S2" is abnormal. C Both "NOx Density B1S1" and "NOx Density B1S2" values are abnormal. D
A
B
C
D
Connect the GTS to the DLC3.
Turn the engine switch on (IG) and turn the GTS on.
Clear the DTCs.
- Powertrain > Engine and Transmission > Clear DTCs
- 50002 456
Warm up the engine (engine coolant temperature is 75°C (167°F) or higher).
Perform PM forced regeneration.
Click hereEngine / Hybrid System>1GD-FTV (EMISSION CONTROL)>EMISSION CONTROL SYSTEM>ON-VEHICLE INSPECTION
Drive the vehicle and gradually accelerate and decelerate from 40 to 60 km/h (25 to 37.5 mph) repeatedly.
Enter the following menus: Powertrain / Engine and Transmission / Trouble Codes.
- Powertrain > Engine and Transmission > Trouble Codes
- 50001 456
Confirm that the DTCs are not output again.
- Result:
Proceed to OK NG
OK
NG
Replace the urea injector set.
Click hereEngine / Hybrid System>1GD-FTV (EMISSION CONTROL)>UREA INJECTOR>REMOVAL
- Result:
Proceed to NEXT
NEXT
Replace the urea pump.
Click hereEngine / Hybrid System>1GD-FTV (EMISSION CONTROL)>UREA PUMP>REMOVAL
- Result:
Proceed to NEXT
NEXT
Clean any deposits from communicating portions of the front exhaust pipe.
- HINT:
-
After washing, make sure to wipe off the flange surface so that no urea solution remains.
- Result:
Proceed to NEXT
NEXT
Replace the No. 1 nitrogen oxides sensor assembly.
Click hereEngine / Hybrid System>1GD-FTV (ENGINE CONTROL)>NITROGEN OXIDES SENSOR>REMOVAL
- HINT:
-
Perform "A/F Sensor Compensation Reset" after replacing the No. 1 nitrogen oxides sensor.
- Result:
Proceed to NEXT
NEXT
Replace the No. 2 nitrogen oxides sensor.
Click hereEngine / Hybrid System>1GD-FTV (ENGINE CONTROL)>NITROGEN OXIDES SENSOR>REMOVAL
- Result:
Proceed to NEXT
NEXT
Replace the No. 1 nitrogen oxides sensor.
Click hereEngine / Hybrid System>1GD-FTV (ENGINE CONTROL)>NITROGEN OXIDES SENSOR>REMOVAL
- HINT:
-
Perform "A/F Sensor Compensation Reset" after replacing the No. 1 nitrogen oxides sensor.
Replace the No. 2 nitrogen oxides sensor.
Click hereEngine / Hybrid System>1GD-FTV (ENGINE CONTROL)>NITROGEN OXIDES SENSOR>REMOVAL
- Result:
Proceed to NEXT
NEXT