AXLE AND DIFFERENTIAL REAR DIFFERENTIAL CARRIER ASSEMBLY REMOVAL
PROCEDURE

 1.DRAIN DIFFERENTIAL OIL
42305
2.REMOVE REAR AXLE CARRIER SUB-ASSEMBLY LH
42340B
3.REMOVE REAR DRIVE SHAFT ASSEMBLY LH
42360A
4.REMOVE REAR DRIVE SHAFT SNAP RING LH
42305
5.TEMPORARILY INSTALL REAR AXLE CARRIER SUB-ASSEMBLY LH
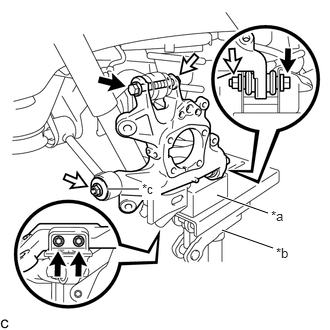
| *a | Wooden Block |
| *b | Jack |
| *c | Spacer |

|
Bolt |

|
Nut |
Using a jack and wooden block, jack up the rear No. 2 suspension arm assembly LH to replicate standard vehicle height conditions.
- CAUTION:
-
Do not jack up the rear No. 2 suspension arm assembly LH too high as the vehicle may fall.
Temporarily install the rear axle carrier sub-assembly LH with the 4 bolts, 3 nuts and spacer to the rear No. 1 suspension arm assembly LH, rear No. 2 suspension arm assembly LH, rear upper control arm assembly LH and rear lower shock absorber bracket sub-assembly LH.
Lower the jack.
42304
6.REMOVE REAR AXLE CARRIER SUB-ASSEMBLY RH
- HINT:
-
Use the same procedure for the RH side and LH side.
-
Click hereDrivetrain>AXLE AND DIFFERENTIAL>REAR AXLE CARRIER(for AWD)>REMOVAL
42330
7.REMOVE REAR DRIVE SHAFT ASSEMBLY RH
- HINT:
-
Use the same procedure for the RH side and LH side.
-
Click hereDrivetrain>DRIVE SHAFT / PROPELLER SHAFT>REAR DRIVE SHAFT ASSEMBLY(for AWD)>REMOVAL
42360A
8.REMOVE REAR DRIVE SHAFT SNAP RING RH
- HINT:
-
Use the same procedure for the RH side and LH side.
-
Click hereDrivetrain>DRIVE SHAFT / PROPELLER SHAFT>REAR DRIVE SHAFT ASSEMBLY(for AWD)>REMOVAL
42304
9.TEMPORARILY INSTALL REAR AXLE CARRIER SUB-ASSEMBLY RH
- HINT:
-
Use the same procedure for the RH side and LH side.
51442
10.REMOVE NO. 2 ENGINE UNDER COVER
58166
11.REMOVE FRONT FLOOR COVER LH
58167A
12.REMOVE FRONT CENTER FLOOR COVER
13.REMOVE WIRING HARNESS CLAMP BRACKET
51569F
14.REMOVE PROPELLER SHAFT GUARD (for Front Side)
51569G
15.REMOVE PROPELLER SHAFT GUARD (for Rear Side)
37100
16.REMOVE PROPELLER WITH CENTER BEARING SHAFT ASSEMBLY
17430
17.REMOVE TAIL EXHAUST PIPE ASSEMBLY
48802
18.REMOVE STABILIZER LINK SUB-ASSEMBLY LH
48802
19.REMOVE STABILIZER LINK SUB-ASSEMBLY RH
- HINT:
-
Use the same procedure for the RH side and LH side.
-
Click hereSuspension>REAR SUSPENSION>REAR COIL SPRING>REMOVAL
48812
20.REMOVE REAR STABILIZER BAR
52380
21.LOOSEN NO. 1 REAR DIFFERENTIAL SUPPORT
- HINT:
-
Loosen the bolts only when removal of the No. 1 rear differential support is required.
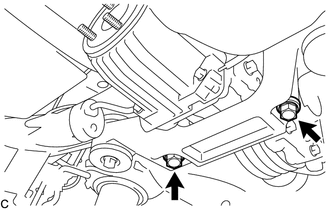
Loosen the 2 bolts.
22.REMOVE REAR DIFFERENTIAL CARRIER ASSEMBLY WITH DIFFERENTIAL SUPPORT
- NOTICE:
- ·
Do not damage the contact surface when removing the rear differential carrier assembly with differential support.
·The remaining oil may leak out when removing the rear differential carrier assembly with differential support.
·Securely support the rear differential carrier assembly with differential support while performing this step to avoid excessively tilting or dropping the rear differential carrier assembly with differential support.
·Remove the bolts and nuts with the rear differential carrier assembly with differential support secured.
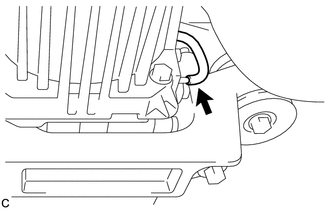
Disconnect the vacuum hose from the electro magnetic control coupling sub-assembly.
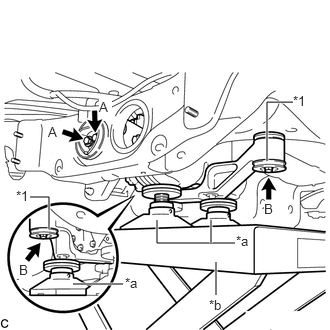
| *1 | Lower Rear Differential Mount Stopper |
| *a | Attachment |
| *b | Engine Lifter |
Support the rear differential carrier assembly with differential support with an engine lifter using 3 attachments or equivalent tools as shown in the illustration.
Remove the 2 bolts (A).
Remove the 2 bolts (B), 2 nuts and 2 lower rear differential mount stoppers from the No. 1 rear differential support.
- HINT:
-
The nuts have tabs to prevent them from rotating.
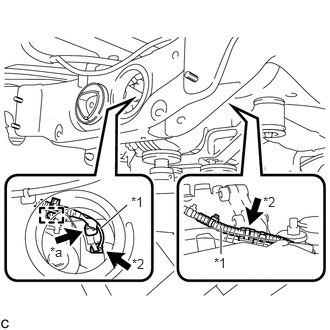
| *1 | Vacuum Hose |
| *2 | Clamp |
| *a | Connector |
Slightly lower the rear differential carrier assembly with differential support, remove the vacuum hose from the 2 clamps, disconnect the connector, and remove the clamp from the connector bracket.
Lower the rear differential carrier assembly with differential support slowly to remove the rear differential carrier assembly with differential support.
- NOTICE:
-
Do not damage the vacuum hose and electro magnetic control coupling wire harness.
52391B
23.REMOVE DIFFERENTIAL SUPPORT
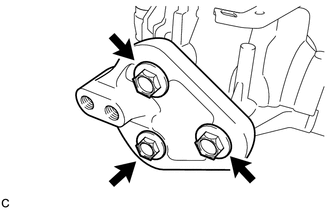
Remove the 3 bolts and rear differential support from the rear differential carrier assembly.
41653
24.REMOVE UPPER REAR DIFFERENTIAL MOUNT STOPPER
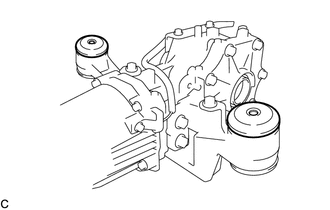
Remove the 2 upper rear differential mount stoppers from the No. 1 rear differential support.
52380
25.REMOVE NO. 1 REAR DIFFERENTIAL SUPPORT
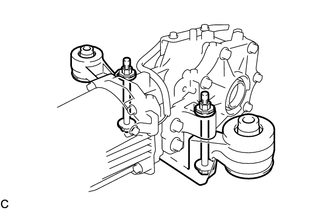
Remove the 2 bolts, 2 nuts and No. 1 rear differential support.
- HINT:
-
The nuts have tabs to prevent them from rotating.