AXLE AND DIFFERENTIAL REAR AXLE CARRIER(for 2WD) INSTALLATION
CAUTION / NOTICE / HINT
- HINT:
- ·
Use the same procedure for the RH side and LH side.
·The procedure listed below is for the LH side.
PROCEDURE

 48759
1.INSTALL LOWER CONTROL ARM PIN
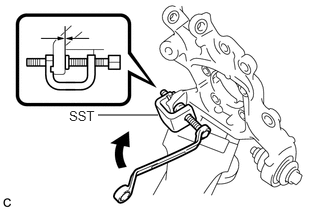
Secure the rear axle carrier sub-assembly in a vise using aluminum plates.
- NOTICE:
-
Do not overtighten the vise.
Using SST, install a new lower control arm pin to the rear axle carrier sub-assembly as shown in the illustration.
- SST
- 09650-17011
42305
2.TEMPORARILY INSTALL REAR AXLE CARRIER SUB-ASSEMBLY
Secure the rear axle carrier sub-assembly in a vise using aluminum plates.
- NOTICE:
-
Do not overtighten the vise.
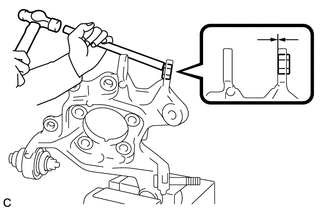
Using a brass bar and a hammer, push out the bushing until it is positioned as shown in the illustration.
- HINT:
-
Pushing out the bushing makes it easier to install the rear axle carrier sub-assembly.
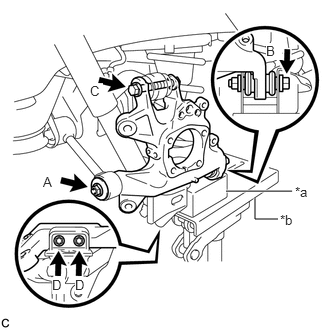
| *a | Wooden Block |
| *b | Jack |
Temporarily install the rear axle carrier sub-assembly to the rear No. 1 suspension arm assembly with the spacer and nut (A).
- NOTICE:
-
Fully tighten the nut (A) after stabilizing the suspension.
Install the rear axle carrier sub-assembly to the rear No. 2 suspension arm assembly with the bolt (B) and nut.
- Torque:
- 100 N*m (1020 kgf*cm, 74 ft.*lbf)
- NOTICE:
- ·
Insert the bolt with the threaded end facing the front of the vehicle.
·Because the nut has its own stopper, do not turn the nut. Tighten the bolt with the nut secured.
Install the rear axle carrier sub-assembly to the rear upper control arm assembly with the bolt (C) and nut.
- Torque:
- 145 N*m (1479 kgf*cm, 107 ft.*lbf)
- NOTICE:
- ·
Insert the bolt with the threaded end facing the rear of the vehicle.
·Because the nut has its own stopper, do not turn the nut. Tighten the bolt with the nut secured.
Install the rear axle carrier sub-assembly to the rear lower shock absorber bracket sub-assembly with the 2 bolts (D).
- Torque:
- 100 N*m (1020 kgf*cm, 74 ft.*lbf)
Slowly lower the rear No. 2 suspension arm assembly.
3.TEMPORARILY INSTALL PARKING BRAKE ASSEMBLY
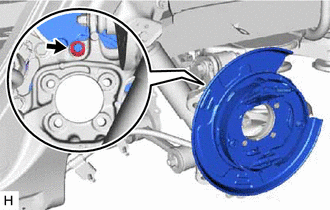
Temporarily install the parking brake assembly to the rear axle carrier sub-assembly with the nut.
- NOTICE:
- ·
Do not twist the parking brake cable when installing the parking brake assembly.
·Fully tighten the nut after installing the rear trailing arm assembly.
48780E
4.INSTALL REAR TRAILING ARM ASSEMBLY
5.INSTALL PARKING BRAKE ASSEMBLY
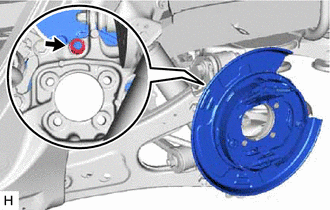
Install the parking brake assembly with the nut.
- Torque:
- 160 N*m (1632 kgf*cm, 118 ft.*lbf)
42450B
6.INSTALL REAR AXLE HUB AND BEARING ASSEMBLY
89516B
7.INSTALL SKID CONTROL SENSOR WIRE
42431
8.INSTALL REAR DISC
42491
9.INSTALL PARKING BRAKE SHOE ADJUSTING HOLE PLUG
10.INSTALL REAR DISC BRAKE CALIPER ASSEMBLY
Install the rear disc brake caliper assembly to the rear axle carrier sub-assembly with the 2 bolts.
- Torque:
- 95 N*m (969 kgf*cm, 70 ft.*lbf)
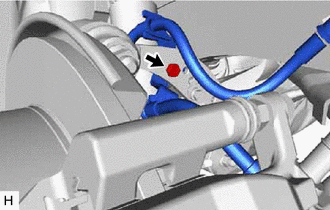
Install the rear flexible hose to the rear upper control arm assembly with the bolt.
- Torque:
- 18.8 N*m (192 kgf*cm, 14 ft.*lbf)
- NOTICE:
- ·
Do not twist the rear flexible hose when installing it.
·Do not damage the rear flexible hose when installing it.
·If the rear flexible hose is damaged, replace it with a new one.
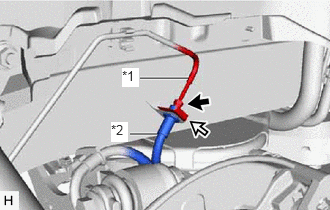
| *1 | Rear Brake Tube |
| *2 | Rear Flexible Hose |

|
Clip |
Install the rear flexible hose with a new clip.
- NOTICE:
-
Install the clip as far as it will go.
Using a union nut wrench, connect the rear flexible hose to the rear brake tube while holding the rear flexible hose with a wrench.
- Torque:
- 15.2 N*m (155 kgf*cm, 11 ft.*lbf)
- NOTICE:
- ·
Do not kink or damage the brake line.
·Do not allow any foreign matter such as dirt or dust to enter the brake line from the connecting parts.
·Use the formula to calculate special torque values for situations where the union nut wrench is combined with a torque wrench.
Click hereGeneral>INTRODUCTION>REPAIR INSTRUCTION>PRECAUTION
11. BLEED BRAKE LINE
12.STABILIZE SUSPENSION
48720A
13.INSTALL REAR NO. 1 SUSPENSION ARM ASSEMBLY
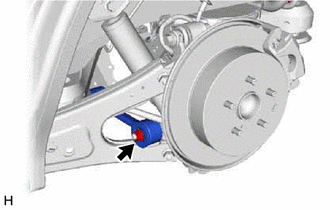
Install the rear No. 1 suspension arm assembly with the nut.
- Torque:
- 145 N*m (1479 kgf*cm, 107 ft.*lbf)
14.ADJUST PARKING BRAKE
15.INSTALL REAR WHEEL
- Torque:
- 103 N*m (1050 kgf*cm, 76 ft.*lbf)
16.INSPECT AND ADJUST REAR WHEEL ALIGNMENT
17.CHECK FOR SPEED SENSOR SIGNAL