A25A-FXS, A25B-FXS ENGINE MECHANICAL ENGINE ON-VEHICLE INSPECTION
CAUTION / NOTICE / HINT
- CAUTION:
-
-
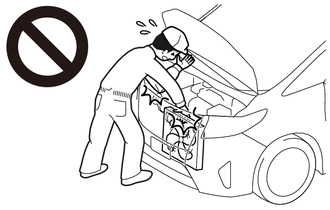
To prevent injury due to contact with an operating cooling fan, keep your hands and clothing away from the cooling fans when working in the engine compartment with the engine running or the ignition switch ON.
PROCEDURE

 1.INSPECT ENGINE COOLANT (for Engine)
2.INSPECT ENGINE OIL
3.INSPECT AUXILIARY BATTERY
19100P
4.INSPECT SPARK PLUG
17801
5.INSPECT AIR CLEANER FILTER ELEMENT SUB-ASSEMBLY
Remove the air cleaner filter element sub-assembly.
Visually check that the air cleaner filter element sub-assembly is not damaged or excessively oily.
- HINT:
- ·
If there is any dirt or clogs in the air cleaner filter element sub-assembly, clean it with compressed air.
·If any dirt or clogs remain even after cleaning the air cleaner filter element sub-assembly with compressed air, replace it.
Install the air cleaner filter element sub-assembly.
13750
6.INSPECT VALVE LASH ADJUSTER ASSEMBLY NOISE
Put the engine in inspection mode.
Click hereGeneral>INTRODUCTION>REPAIR INSTRUCTION>INSPECTION MODE PROCEDURE
Rev up the engine several times. Check that the engine does not emit unusual noises.
If unusual noises occur, warm up the engine and idle it for 30 minutes or more, then perform the inspection.
- HINT:
-
If any defects or problems are found during the inspection, perform valve lash adjuster assembly inspection.
-
Click hereEngine / Hybrid System>A25A-FXS, A25B-FXS (ENGINE MECHANICAL)>ENGINE UNIT>INSPECTION
7.INSPECT IGNITION TIMING
- NOTICE:
- ·
Check the ignition timing with the cooling fan off.
·Turn off all electrical systems and the A/C.
·When checking the ignition timing, the transaxle should be in park.
Put the engine in inspection mode.
Click hereGeneral>INTRODUCTION>REPAIR INSTRUCTION>INSPECTION MODE PROCEDURE
Warm up and stop the engine.
Put the engine in inspection mode.
Click hereGeneral>INTRODUCTION>REPAIR INSTRUCTION>INSPECTION MODE PROCEDURE
Monitor Ignition Timing Cylinder #1 of the Data List.
- Powertrain > Engine > Data List
-
Tester Display Ignition Timing Cylinder #1 - 50003 372 213
- Standard Ignition Timing:
-2 to 14° BTDC at idle
Check that the ignition timing advances immediately when the engine speed is increased.
Monitor Ignition Timing Cylinder #1 of the Data List.
- Powertrain > Engine > Active Test
-
Active Test Display Activate the TC Terminal -
Data List Display Ignition Timing Cylinder #1 - 50004 372 22 213
- Standard Ignition Timing:
8 to 12° BTDC at idle
8.INSPECT ENGINE IDLE SPEED
- NOTICE:
- ·
Check the engine idle speed with the cooling fan off.
·Turn off all electrical systems and the A/C.
·When checking the engine idle speed, the transaxle should be in park.
Put the engine in inspection mode.
Click hereGeneral>INTRODUCTION>REPAIR INSTRUCTION>INSPECTION MODE PROCEDURE
Warm up and stop the engine.
Put the engine in inspection mode.
Click hereGeneral>INTRODUCTION>REPAIR INSTRUCTION>INSPECTION MODE PROCEDURE
Read the value displayed on the GTS.
- Powertrain > Engine > Data List
-
Tester Display Engine Speed - 50003 372 211
- Standard Idle Speed:
1050 to 1150 rpm
9.INSPECT COMPRESSION
- NOTICE:
-
Keep the spark plug holes free of foreign matter when measuring the compression pressure.
Put the engine in inspection mode.
Click hereGeneral>INTRODUCTION>REPAIR INSTRUCTION>INSPECTION MODE PROCEDURE
Warm up and stop the engine.
Check for DTCs.
Click hereEngine / Hybrid System>A25A-FXS, A25B-FXS (ENGINE CONTROL)>SFI SYSTEM>DTC CHECK / CLEAR
Remove the front wheel opening extension pad LH.
Click hereEngine / Hybrid System>A25A-FXS, A25B-FXS (ENGINE MECHANICAL)>ENGINE ASSEMBLY>REMOVAL
Remove the front wheel opening extension pad RH.
Click hereEngine / Hybrid System>A25A-FXS, A25B-FXS (ENGINE MECHANICAL)>ENGINE ASSEMBLY>REMOVAL
Remove the No. 1 engine under cover.
Click hereEngine / Hybrid System>A25A-FXS, A25B-FXS (ENGINE MECHANICAL)>ENGINE ASSEMBLY>REMOVAL
Remove the cool air intake dust seal.
Click hereVehicle Exterior>EXTERIOR PANELS / TRIM>FRONT BUMPER>REMOVAL
Remove the intake air cleaner assembly.
Click hereEngine / Hybrid System>HYBRID / BATTERY CONTROL>INVERTER WITH CONVERTER>REMOVAL
Remove the air cleaner cap with air cleaner hose.
Click hereEngine / Hybrid System>A25A-FXS, A25B-FXS (ENGINE CONTROL)>THROTTLE BODY>REMOVAL
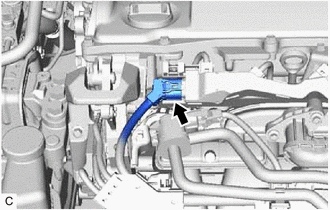
Disconnect the fuel injector connector (for Port Injection).
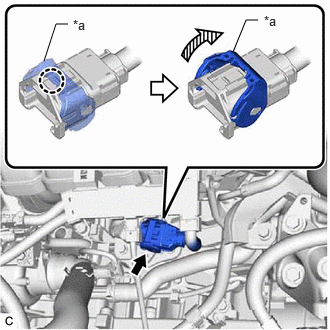
| *a | Lock Lever |
Disengage the claw and raise the lock lever to disconnect the No. 6 engine wire connector as shown in the illustration.
- NOTICE:
-
Perform this step in order to stop fuel injection and prevent damage to the catalyst due to unburned fuel.
Remove the 4 spark plugs.
Click hereGeneral>MAINTENANCE>A25A-FXS, A25B-FXS SPARK PLUG>REMOVAL
- NOTICE:
-
DTCs will be stored if the inspection is performed with the ignition coil assembly connectors disconnected. Make sure that the ignition coil assembly connectors are connected during the inspection.
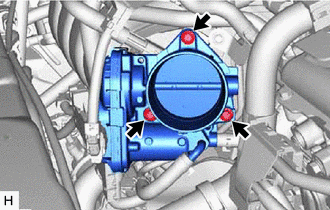
Using an 8 mm socket wrench, remove the 3 bolts to disconnect the throttle body assembly from the intake manifold.
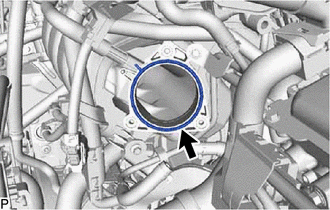
Remove the throttle body gasket from the intake manifold.
Check the cylinder compression pressure.
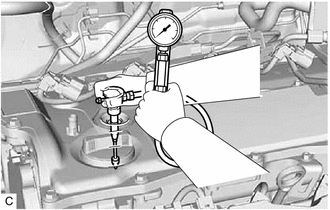
Insert a compression gauge into the spark plug hole.
Depress and hold the brake pedal, and turn the ignition switch to ON (READY). Then check the compression pressure.
- Powertrain > Hybrid Control > Active Test
-
Tester Display Compression Test - 50004 397 42000
- Standard Compression Pressure:
870 kPa (8.9 kgf/cm2, 126 psi)
- Minimum Compression Pressure:
700 kPa (7.1 kgf/cm2, 102 psi)
- Pressure Difference between Each Cylinder:
200 kPa (2.0 kgf/cm2, 29 psi) or less
- NOTICE:
- ·
Check the HV battery voltage in the Data List to ensure that the auxiliary battery is fully charged.
·Noise may be emitted from the hybrid vehicle transaxle assembly. However, this is not a malfunction.
·Inspect all cylinders in the same way.
·Measure the compression pressure as quickly as possible.
If the cylinder compression pressure is low, pour a small amount of engine oil into the cylinder through the spark plug hole and inspect it again.
- HINT:
- ·
If adding oil increases the compression pressure, the piston rings and/or cylinder bore may be worn or damaged.
·If the compression pressure stays low, a valve may be stuck or seated improperly, or there may be leaks in the cylinder head gasket.
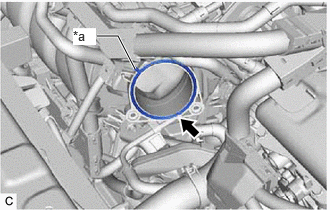
| *a | Protrusion |
Install a new throttle body gasket to the intake manifold with the protrusions of the throttle body gasket oriented as shown in the illustration.
Using an 8 mm socket wrench, connect the throttle body assembly to the intake manifold with the 3 bolts.
- Torque:
- 10 N*m (102 kgf*cm, 7 ft.*lbf)
Install the 4 spark plugs.
Click hereGeneral>MAINTENANCE>A25A-FXS, A25B-FXS SPARK PLUG>INSTALLATION
Install the air cleaner cap with air cleaner hose.
Click hereEngine / Hybrid System>A25A-FXS, A25B-FXS (ENGINE CONTROL)>THROTTLE BODY>INSTALLATION
Install the inlet air cleaner assembly.
Click hereEngine / Hybrid System>HYBRID / BATTERY CONTROL>INVERTER WITH CONVERTER>INSTALLATION
Install the cool air intake dust seal.
Click hereVehicle Exterior>EXTERIOR PANELS / TRIM>FRONT BUMPER>INSTALLATION
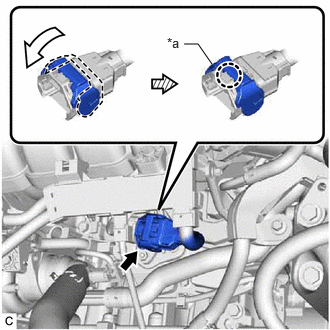
| *a | Lock Lever |
Connect the No. 6 engine wire connector and push down the lock lever to engage the claw as shown in the illustration.
Connect the fuel injector connector (for Port Injection).
Install the No. 1 engine under cover.
Click hereEngine / Hybrid System>A25A-FXS, A25B-FXS (ENGINE MECHANICAL)>ENGINE ASSEMBLY>INSTALLATION
Install the front wheel opening extension pad LH.
Click hereEngine / Hybrid System>A25A-FXS, A25B-FXS (ENGINE MECHANICAL)>ENGINE ASSEMBLY>INSTALLATION
Install the front wheel opening extension pad RH.
Click hereEngine / Hybrid System>A25A-FXS, A25B-FXS (ENGINE MECHANICAL)>ENGINE ASSEMBLY>INSTALLATION
Clear the DTCs.
Click hereEngine / Hybrid System>A25A-FXS, A25B-FXS (ENGINE CONTROL)>SFI SYSTEM>DTC CHECK / CLEAR
- NOTICE:
-
After performing the inspection, clear the DTCs and confirm that DTCs are not stored again or that the normal system code is output if using a check wire.
10.INSPECT CO/HC
- HINT:
-
This check determines whether or not the idle CO/HC complies with regulations.
Put the engine in inspection mode.
Click hereGeneral>INTRODUCTION>REPAIR INSTRUCTION>INSPECTION MODE PROCEDURE
Run the engine speed at 2500 rpm for approximately 180 seconds.
Insert a CO/HC meter testing probe at least 40 cm (1.31 ft.) into the tailpipe during idle.
Immediately check the CO/HC concentration at idle and then at an engine speed of 2500 rpm.
- HINT:
-
When performing a 2 mode test (with the engine idling/running at 2500 rpm), the measurement procedures are determined by applicable local regulations.
-
If the CO/HC concentration does not comply with the regulations, perform troubleshooting in the order given below.
Check for DTCs.
Click hereEngine / Hybrid System>A25A-FXS, A25B-FXS (ENGINE CONTROL)>SFI SYSTEM>DTC CHECK / CLEAR
See the following table for possible causes, then inspect the applicable parts and repair them if necessary.
| CO | HC | Problem | Cause |
|---|---|---|---|
| Normal | High | Rough idle | 1.
Faulty ignition: -
Incorrect valve timing -
Fouled, shorted or improperly gapped spark plugs 2.
Incorrect valve clearance (valve lash adjuster assembly) 3.
Leaks in intake or exhaust valves 4.
Leaks in cylinders 5.
Faulty EGR |
| Low | High | Rough idle (Fluctuating HC reading) | 1.
Vacuum leaks: -
PCV hoses -
Intake manifold -
Throttle body with motor assembly 2.
Lean mixture causing misfire 3.
Faulty EGR |
| High | High | Rough idle (Black smoke from exhaust) | 1.
Restricted air cleaner filter element sub-assembly 2.
Plugged PCV valve 3.
Faulty SFI systems: -
Fuel pressure regulator assembly -
Engine coolant temperature sensor -
Mass air flow meter sub-assembly -
ECM -
Fuel injector assemblies -
Throttle position sensor (built into throttle body with motor assembly) 4.
Faulty EGR |