Black Smoke Emitted
Circuit diagnosis · Vehicles built from Aug 2014
Versions by build date: Jun 2011 – Jul 2012 Aug 2012 – Jul 2013 Aug 2013 – Jul 2014 from Aug 2014
DESCRIPTION
| Faults and Symptoms of Common Rail Diesel Components |
Engine Control
Intake System Symptom: Main fault
- Lack of power (no black smoke): air filter blockage, Air duct is crushed/leaking
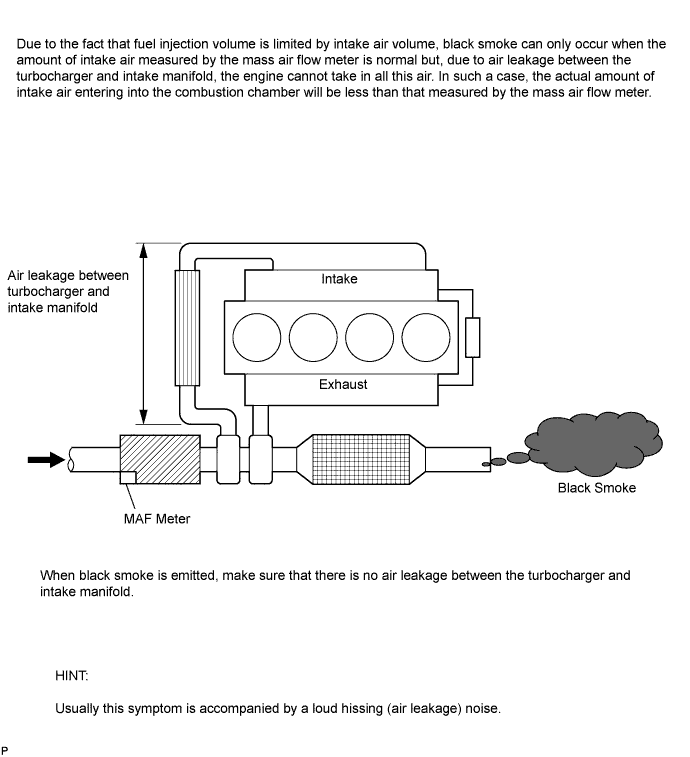
- Black smoke (no lack of power): Leakage between the turbo and intake manifold
Data List
- MAP (inside intake air pressure)
- Target Booster Pressure
When the accelerator is fully depressed, if the MAP is 20 kPa lower than Target Booster Pressure for more than 5 seconds then a lack of power will be felt.
Turbocharger System Main fault
- Air leak in the turbocharged air passage
- Turbo motor driver not operating well
- Turbocharger (turbine, bearing)
Symptoms
Lack of power (when vehicle starting, when heavy load)
(Black smoke is not emitted when racing while vehicle stopped)
Data List
MAP (inside intake air pressure), Target Booster Pressure - When the accelerator is fully depressed, if MAP is 20 kPa lower than Target Booster Pressure for more than 5 seconds then a lack of power will be felt.
- With the ignition switch ON or during idling, MAP = atmospheric pressure (standard atmospheric pressure = 101 kPa). When the engine speed is about 1500 rpm or more, the turbocharger starts to take effect and MAP becomes higher than atmospheric pressure.
- Atmospheric pressure decreases 1 kPa each time altitude increases by 100 m, and is also affected by the current weather conditions.
- 0%: Vanes fully open (drive rod contracts)
- Over 90%: Vanes fully closed (drive rod expands and turbo operates effectively)
Glow System Main fault
Open circuit, glow plug relay fault
Symptoms
Difficult to start, rough idle, knocking, white smoke (when cold)
Data List
Check the glow plug indicator light
Diagnostic Point
Try to measure the resistance of the glow plug
Engine Main fault
Loss of compression
Symptoms
Rough idle (lack of power always)
Data List
Engine Speed of Cyl - When cranking during the "Check the Cylinder Compression" Active Test, if there is a high speed cylinder, approx. 100 rpm more than the other cylinders, that cylinder may lose compression.
- If Injection Feedback Val is more than 3 mm3/st, the cylinder may have a fault.
- Lack of power (no black smoke): air filter blockage, Air duct is crushed/leaking
Diesel Injection
Fuel Supply Pump Main fault
-
Symptoms
Difficult to start, engine stalling, rough idle, lack of power
Data List
Fuel Press, Target Common Rail Pressure, Target Pump SCV Current - At a stable condition (e.g. Idling), Fuel Press is within +/-5000 kPa of "Target Common Rail Pressure".
- If the fuel pressure is 20000 kPa below the target pressure then a lack of power will be felt.
- If the fuel pressure is below 25000 kPa then idling will be rough.
- HINT:
- The fuel pressure changes at engine starting, but is approx. 25000 kPa at engine start after the engine is warmed up.
- When Target Pump SCV Current is 3000 mA or more, the suction control valve has a tendency to become stuck.
- The fuel pressure changes at engine starting, but is approx. 25000 kPa at engine start after the engine is warmed up.
Diagnostic Trouble Code
Even if Fuel Press is less than Target Common Rail Pressure, a DTC will not be stored.
Fuel Injector Main fault
Blockage
Symptoms
Rough idle, lack of power, black smoke, white smoke, knocking
Data List
Injection Feedback Val - When an Injection Feedback Val is more than 3 mm3/st, the cylinder is not normal. This can be read after idling for 1 minute with the engine warmed up (engine coolant temperature is more than 70°C (158°F)).
- HINT:
- When the sliding resistance of the internal parts of the injectors (i.e. armature shaft, command piston and plunger) has increased due to internal contamination, injection quantity will increase at high common rail pressure due to a delay in injector closing.
- When black smoke occurs due to contamination of the injectors, there are usually other symptoms, such as engine knocking noise at cold idling, rough idling, difficult to start, etc. which are also present at low common rail pressure.
- When the sliding resistance of the internal parts of the injectors (i.e. armature shaft, command piston and plunger) has increased due to internal contamination, injection quantity will increase at high common rail pressure due to a delay in injector closing.
Injector Driver (EDU) Main fault
Circuit fault: The fuel injector does not open.
Symptoms
Difficult to start, rough idle, lack of power, black smoke, white smoke, knocking
Data List
Same as fuel injector
Diagnostic Trouble Code
When the EDU has a fault, some DTCs may be stored.
Fuel Pressure Sensor Main fault
Open circuit, decrease in performance (foreign matter is stuck)
Symptoms
Difficult to start, rough idle, engine stall, lack of power
Data List
Fuel Press, Target Common Rail Pressure - Slowly raise the engine speed from idling to 3000 rpm with the vehicle stopped, and check that Fuel Press follows Target Common Rail Pressure. If the fuel pressure sensor malfunctions, the actual fuel pressure may deviate from the target fuel pressure (however, the value may not deviate even when a malfunction is present).
Diagnostic Trouble Code
When the fuel pressure sensor has a fault, some DTCs may be stored.
Irregular Fuel Main fault
-
Symptoms
Difficult to start, rough idle (especially when cold)
- At a stable condition (e.g. Idling), Fuel Press is within +/-5000 kPa of "Target Common Rail Pressure".
Diesel EGR
EGR System Main fault
- Does not move smoothly
- Does not close completely
Symptoms
- Rough idle
- EGR valve stuck closed: A loud turbocharger sound.
- EGR valve stuck open: Difficult to start (does not stall), black smoke, lack of power (if there is an excess in the quantity of EGR and there is a heavy load, when the vehicle starts moving, a lack of power will be felt).
Data List
Actual EGR Valve Pos., Target EGR Pos. - Generally, Actual EGR Valve Pos. = Target EGR Pos. +/-5% (fully closed 0%, fully open 100%).
- Using EGR valve Active Test, check whether Actual EGR Valve Pos. follows Target EGR Pos. (the engine coolant temperature and intake air temperature should be considered when a malfunction occurs).
- EGR valve is fully closed when the ignition switch is turned to ON (engine stopped).
- EGR valve opens to the halfway point at idling after the engine is warmed up.
- When leaving the vehicle idling, when EGR Close Lrn. Status is OK, the normal range of EGR Close Lrn. Val. is 3.75 to 4.8 V.
- In cases when EGR Close Lrn. Status. is NG or EGR Close Lrn. Val. is out of the normal range (3.75 to 4.8 V), it is possible that the EGR valve cannot completely close.
- Does not move smoothly
Diesel Throttle
Diesel Throttle System Main fault
Stuck, does not move smoothly
Symptoms
- Stuck closed: Lack of power, difficult to start, rough idle, engine stall, black smoke. These may occur when stuck almost fully closed.
- Stuck open: Turbocharger sound increases. When the engine is stopped, engine vibrations may occur.
Data List
- Actual Throttle Position
0%: Fully open
100%: Fully closed
- When the ignition switch is ON (the engine is stopped), the diesel throttle is fully open. When idling, the diesel throttle is at the halfway point. When the ignition switch is turned from ON to off, the throttle is temporarily closed fully.
- Stuck closed: Lack of power, difficult to start, rough idle, engine stall, black smoke. These may occur when stuck almost fully closed.
| Data List Related to Black Smoke |
- Engine Speed
- MAP
- MAF
- Intake Air
- Coolant Temp
- Engine Speed of Cyl #1 (to #4)
- Target Common Rail Pressure
- Fuel Press
- Target Pump SCV Current
- Injection Feedback Val #1 (to #4)
- Injection Volume
- Actual Throttle Position
- Target EGR Position
- Actual EGR Valve Pos.
- EGR Close Lrn. Status
- EGR Close Lrn. Val.
INSPECTION PROCEDURE
- NOTICE:
- After replacing the ECM, the new ECM needs registration (Click here) and initialization (Click here).
- After replacing a fuel supply pump, the ECM needs initialization (Click here).
- After replacing a fuel injector, the ECM needs registration (Click here).
- After replacing the ECM, the new ECM needs registration (Click here) and initialization (Click here).
- HINT:
- Specified values in the following troubleshooting flowchart are for reference only. Variations in the Data List values may occur depending on the measuring conditions or the vehicle age. Do not assume the vehicle to be normal when the Data List outputs standard values. There may be concealed factors of the malfunction.
| Explanation of Symptom |
| Black Smoke |
The fuel used in diesel engines has a higher boiling point and evaporates much slower than that used in gasoline engines. Additionally, the fuel is injected directly, so the air fuel mixture in diesel engines is formed in a very short period of time and is less homogenous. This is why diesel engines must operate with excess air fuel ratio across the entire operating range. An insufficient quantity of air, results in imperfect combustion and increased particulate (soot) emission. When the accelerator pedal is depressed, a lot of fuel is injected. As a result, the air fuel ratio becomes rich. In this relatively rich environment, fuel droplets lacking in oxygen burn imperfectly producing soot, which is emitted as black smoke. In order to prevent black smoke production, the maximum injection quantity for a given intake air mass is limited (final injection quantity is limited by MAF). Black smoke is emitted either when:
|
| 1. READ OUTPUT DTC (RELATING TO ENGINE) |

Connect the intelligent tester to the DLC3.
Turn the ignition switch to ON and turn the tester on.
Enter the following menus: Powertrain / Engine and ECT / DTC.
Read pending DTCs.
Result Result
Proceed to
No DTCs are output
A
Engine related DTCs are output
B
|
|
||||

| A | |
 |
| 2. CHECK WIRE HARNESS AND CONNECTION IN ENGINE COMPARTMENT |
Check the wire harness and connector connections of common rail system components.
- OK:
- The wire harnesses and connectors are connected securely.
|
|
||||
| OK | |
|
| 3. TAKE SNAPSHOT DURING IDLING AND 3000 RPM |
Connect the intelligent tester to the DLC3.
Start the engine and turn the tester on.
Enter the following menus: Powertrain / Engine and ECT / Data List / All Data.
Take a snapshot of the following Data List items.
- HINT:
- A snapshot can be used to compare vehicle data from the time of the malfunction to normal data and is very useful for troubleshooting. The data in the list below is that of a normal vehicle, but as the data varies between individual vehicles, this data should only be used for reference.
- Graphs like the ones shown below can be displayed by transferring the stored snapshot data from the tester to a PC. Intelligent Viewer must be installed on the PC.
- Check the Data List at idling and at 3000 rpm with no load after the engine is warmed up.
- A snapshot can be used to compare vehicle data from the time of the malfunction to normal data and is very useful for troubleshooting. The data in the list below is that of a normal vehicle, but as the data varies between individual vehicles, this data should only be used for reference.
| NEXT | |
|
| 4. CHECK SNAPSHOT (TARGET PUMP SCV CURRENT) |
Check Target Pump SCV Current in the snapshot taken when the engine was idling and at 3000 rpm with no load.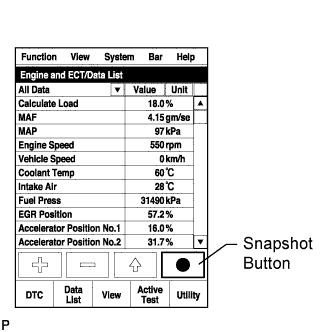

Result Result
Proceed to
Target Pump SCV Current is less than 3000 mA
A
Target Pump SCV Current is 3000 mA or more
B
|
|
||||

| A | |
|
| 5. CHECK FUEL INJECTOR COMPENSATION CODE |
Read the fuel injector compensation codes.
- OK:
- Compensation codes stored in the ECM match the compensation codes of the installed fuel injectors.
|
|
||||
| OK | |
|
| 6. CHECK SNAPSHOT (INJECTION FEEDBACK VAL #1 to #4) |
Check Injection Feedback Val # and Injection Volume in the snapshot taken after the engine is warmed up and has been idling for 1 minute.
Result Result
Proceed to
Injection Feedback Val #1 to #4 are 3 mm3/st or less
Injection Volume is 10 mm3/st or less
A
Injection Feedback Val #1 to #4 are 3 mm3/st or less
Injection Volume is more than 10 mm3/st
B*
Injection Feedback Val #1 to #4 are more than 3 mm3/st - HINT:
- There may be a malfunction in the corresponding cylinder.
C
- HINT:
- *: When case "B" occurs, usually symptoms may be noticeable, such as difficult starting, rough idling, knocking or black smoke at high common rail pressure.
|
|
||||
|
|
||||
| A | |
|
| 7. CHECK EGR VALVE ASSEMBLY |
Check the EGR valve assembly (Click here).
|
|
||||
| OK | |
|
| 8. INSPECT ENGINE COOLANT TEMPERATURE SENSOR |
Inspect the engine coolant temperature sensor (Click here).
|
|
||||
| OK | |
|
| 9. READ VALUE USING INTELLIGENT TESTER (MAP AND ATMOSPHERE PRESSURE) |
Connect the intelligent tester to the DLC3.
Turn the ignition switch to ON and turn the tester on.
Enter the following menus: Powertrain / Engine and ECT / Data List / MAP and Atmosphere Pressure.
Compare MAP to Atmosphere Pressure when the ignition switch is ON (engine stopped).
- HINT:
- If MAP and Atmosphere Pressure have the same value, both are normal. If there is a difference of 10 kPa or more, compare the values to the atmospheric pressure for that day. The sensor whose deviation is the greatest is malfunctioning.
- Standard atmospheric pressure is 101 kPa. For every 100 m increase in altitude, pressure drops by 1 kPa. Varies by weather (high atmospheric pressure, low atmospheric pressure).
- If MAP and Atmosphere Pressure have the same value, both are normal. If there is a difference of 10 kPa or more, compare the values to the atmospheric pressure for that day. The sensor whose deviation is the greatest is malfunctioning.
Result Result
Proceed to
Atmosphere Pressure is different from actual atmospheric pressure
A
MAP is different from actual atmospheric pressure
B
MAP and Atmosphere Pressure have the same value
C
|
|
||||
|
|
||||
| C | |
|
| 10. READ VALUE USING INTELLIGENT TESTER (ACCEL POSITION) |
Connect the intelligent tester to the DLC3.
Turn the ignition switch to ON and turn the tester on.
Enter the following menus: Powertrain / Engine and ECT / Data List / Accel Position.
Read the value.
- Standard Value:
Condition
Standard Value
Accelerator pedal released
0%
Accelerator pedal depressed
100%
Accelerator pedal released → depressed - HINT:
- Make sure the Accel Position opening angle changes smoothly.
0 to 100%
|
|
||||
| OK | |
|
| 11. READ VALUE USING INTELLIGENT TESTER (INTAKE AIR AND INTAKE AIR TEMP (TURBO)) |
Connect the intelligent tester to the DLC3.
Soak the engine for a long time.
Turn the ignition switch to ON and turn the tester on.
Enter the following menus: Powertrain / Engine and ECT / Data List / Intake Air, Intake Air Temp (Turbo).
- OK:
- Intake Air is the same as Intake Air Temp (Turbo).
|
|
||||
| OK | |
|
| 12. TAKE SNAPSHOT WHILE ACCELERATING WITH ACCELERATOR FULLY OPEN |
Connect the intelligent tester to the DLC3.
Start the engine and turn the tester on.
Enter the following menus: Powertrain / Engine and ECT / Data List / All Data.
Take a snapshot of the following Data List items.
- HINT:
- A snapshot can be used to compare vehicle data from the time of the malfunction to normal data and is very useful for troubleshooting. The data in the illustration below is that of a normal vehicle, but as the data varies between individual vehicles, this data should only be used for reference.
- Graphs like the ones shown below can be displayed by transferring the stored snapshot from the tester to a PC. Intelligent Viewer must be installed on the PC.
- Move the shift lever to 2nd gear and accelerate the vehicle with the accelerator fully open (obey all laws and regulations, and pay attention to driving conditions while driving the vehicle).
- A snapshot can be used to compare vehicle data from the time of the malfunction to normal data and is very useful for troubleshooting. The data in the illustration below is that of a normal vehicle, but as the data varies between individual vehicles, this data should only be used for reference.
| NEXT | |
|
| 13. CHECK SNAPSHOT (MAP AND TARGET BOOSTER PRESSURE) |
Check the condition of the vehicle using the snapshot.
Result Result
Proceed to
MAP is less than "Target Booster Pressure - 20 kPa" when accelerating with accelerator fully open
A
MAP and Target Booster Pressure values are almost the same
B
|
|
||||
| A | |
|
| 14. INSPECT VACUUM HOSE |
Check the vacuum hose connection (manifold absolute pressure sensor).
- OK:
- Vacuum hose is connected securely.
|
|
||||
| OK | |
|
| 15. CHECK INTAKE SYSTEM |
Check for air leakage between the turbocharger and intake manifold.
Check for air leakage at intake manifold.
- HINT:
- Check that there are no disconnected, or leaking hoses or pipes.
- Check that there are no modifications made by the user.
- Check that there are no disconnected, or leaking hoses or pipes.
- OK:
- No leakage.
|
|
||||
| OK | |
|
| 16. CHECK TURBOCHARGER SUB-ASSEMBLY (MECHANICAL PROBLEM) |
Check the turbocharger sub-assembly (Click here).
|
|
||||
| OK | |
|
| 17. PERFORM ENGINE SPEED ACCELERATION (CHECK FOR BLACK SMOKE) |
Start the engine and drive the vehicle until the engine coolant temperature reaches 60°C (140°F) or higher.
Stop the vehicle and allow the engine to idle.
Fully depress the accelerator pedal for 5 seconds and then release it.*1
Repeat the above procedure *1 10 times.*2
Check for black smoke emission during procedures *1 and *2.
- OK:
- Black smoke is emitted less than 5 times.
- HINT:
- Even if the black smoke is very thin, count the black smoke emission if there is any visible smoke.
|
|
||||
| OK | ||
 |
||
| ||
| 18. BASIC INSPECTION |
Check the fuel quality.
Check the fuel for air.
Check the fuel system for blockages.
Check the air filter.
Check the engine oil.
Check the engine coolant.
Check the engine idling speed and maximum engine speed.
Check the vacuum pump.
- OK:
- Each inspection result is normal.
|
|
||||
| OK | |
|
| 19. CHECK INTAKE SYSTEM DEPOSIT |
Check carbon has accumulated on the intake manifold, cylinder head, etc. and if so, clean it off.
| NEXT | |
|
| 20. CONFIRM WHETHER MALFUNCTION HAS BEEN SUCCESSFULLY REPAIRED |
- HINT:
- Symptoms may have appeared due to carbon deposits, etc.
| NEXT | ||
|
||
| ||
| 21. CHECK HARNESS AND CONNECTOR (SUCTION CONTROL VALVE - ECM) |
Disconnect the S8 suction control valve connector.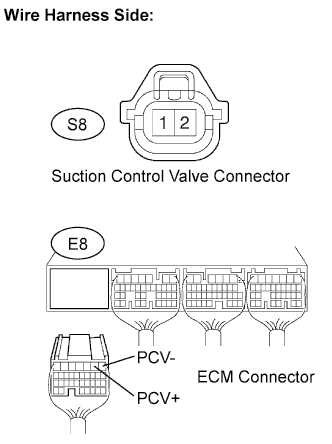
Disconnect the E8 ECM connector.
Measure the resistance according to the value(s) in the table below.
- Standard Resistance (Check for Open):
Tester Connection
Condition
Specified Condition
S8-1 - E8-2 (PCV+)
Always
Below 1 Ω
S8-2 - E8-1 (PCV-)
Always
Below 1 Ω
- Standard Resistance (Check for Short):
Tester Connection
Condition
Specified Condition
S8-1 or E8-2 (PCV+) - Body ground
Always
10 kΩ or higher
S8-2 or E8-1 (PCV-) - Body ground
Always
10 kΩ or higher
Reconnect the suction control valve connector.
Reconnect the ECM connector.
|
|
||||
| OK | |
|
| 22. CHECK IF FUEL IS BEING SUPPLIED TO FUEL SUPPLY PUMP |
Disconnect the inlet hose from the fuel supply pump.
Operate the priming pump and check that fuel is being supplied to the fuel supply pump.
- OK:
- Fuel is properly supplied to the fuel supply pump when the priming pump is operated.
- HINT:
- When lack of fuel, fuel pressure drops.
- Inspect for fuel filter clogging.
(Check that the fuel filter is not clogged)
- When lack of fuel, fuel pressure drops.
|
|
||||
| OK | |
|
| 23. REPLACE SUPPLY PUMP |
Replace the supply pump (Click here).
| NEXT | |
|
| 24. BLEED AIR FROM FUEL SYSTEM |
Bleed the air from the fuel system (Click here).
| NEXT | |
|
| 25. PERFORM FUEL SUPPLY PUMP INITIALIZATION |
Perform supply pump initialization (Click here).
| NEXT | |
|
| 26. CONFIRM WHETHER MALFUNCTION HAS BEEN SUCCESSFULLY REPAIRED |
| NEXT | ||
|
||
| ||
| 27. REPLACE FUEL INJECTOR OF ALL CYLINDERS |
Replace the fuel injectors (Click here).
| NEXT | |
|
| 28. BLEED AIR FROM FUEL SYSTEM |
Bleed the air from the fuel system (Click here).
| NEXT | |
|
| 29. REGISTER INJECTOR COMPENSATION CODE AND PERFORM PILOT QUANTITY LEARNING |
Register the injector compensation codes (Click here).
Perform the fuel injector pilot quantity learning (Click here).
| NEXT | |
|
| 30. CONFIRM WHETHER MALFUNCTION HAS BEEN SUCCESSFULLY REPAIRED |
| NEXT | ||
|
||
| ||
| 31. PERFORM ACTIVE TEST USING INTELLIGENT TESTER (CONTROL THE CYLINDER #1 TO #4 FUEL CUT) |
- HINT:
- Use this Active Test to determine the malfunctioning cylinder.
Connect the intelligent tester to the DLC3.
Start the engine and turn the tester on.
Enter the following menus: Powertrain / Engine and ECT / Active Test / Control the Cylinder #1 to #4 Fuel Cut.
- HINT:
- If the engine idle speed does not change when a fuel injector is disabled, the cylinder being tested is malfunctioning. Record any malfunctioning cylinders.
- If the cylinder being tested is normal, there will be a significant change in idle speed when the fuel injection is stopped for that cylinder.
- If the engine idle speed does not change when a fuel injector is disabled, the cylinder being tested is malfunctioning. Record any malfunctioning cylinders.
| NEXT | |
|
| 32. PERFORM ACTIVE TEST USING INTELLIGENT TESTER (CHECK THE CYLINDER COMPRESSION) |
- HINT:
- Use this Active Test to help determine whether a cylinder has compression loss or not.
Connect the intelligent tester to the DLC3.
Start the engine and turn the tester on.
Enter the following menus: Powertrain / Engine and ECT / Active Test / Check the Cylinder Compression / Data List / Compression / Engine Speed of Cyl #1 to #4.
Check the engine speed during the Active Test.
Result Result
Proceed to
Except below
A
The values of Engine Speed Cyl #1 to #4 are within +/-10 rpm of each other.
B
- HINT:
- When cranking, if the speed of a cylinder is approximately 100 rpm more than the other cylinders, there is probably a complete loss of compression in that cylinder.
|
|
||||
| A | |
|
| 33. CHECK CYLINDER COMPRESSION PRESSURE OF MALFUNCTIONING CYLINDER |
|
|
||||
| OK | |
|
| 34. REPLACE FUEL INJECTOR OF MALFUNCTIONING CYLINDER |
Replace the fuel injector of the malfunctioning cylinder (Click here).
| NEXT | |
|
| 35. BLEED AIR FROM FUEL SYSTEM |
Bleed the air from the fuel system (Click here).
| NEXT | |
|
| 36. REGISTER INJECTOR COMPENSATION CODE AND PERFORM PILOT QUANTITY LEARNING |
Register the injector compensation code (Click here).
Perform the fuel injector pilot quantity learning (Click here).
| NEXT | |
|
| 37. CONFIRM WHETHER MALFUNCTION HAS BEEN SUCCESSFULLY REPAIRED |
| NEXT | ||
|
||
| ||
| 38. CHECK AND REPLACE CLOGGED FUEL PIPE (INCLUDING FUEL FREEZING) (FUEL TANK - FUEL SUPPLY PUMP) |
Check and replace the clogged fuel pipe.
| NEXT | |
|
| 39. BLEED AIR FROM FUEL SYSTEM |
Bleed the air from the fuel system (Click here).
| NEXT | |
|
| 40. CONFIRM WHETHER MALFUNCTION HAS BEEN SUCCESSFULLY REPAIRED |
| NEXT | ||
|
||
| ||