Engine Knocking or Rattling
Circuit diagnosis · Vehicles built Jun 2011 – Jul 2012
Versions by build date: Jun 2011 – Jul 2012 Aug 2012 – Jul 2013 Aug 2013 – Jul 2014 from Aug 2014
DESCRIPTION
| Malfunction Condition |
Main Trouble Area |
Related Trouble Area |
|
|
|
- HINT:
- Specified values in the following troubleshooting flowchart are for reference only. Variations in the Data List values may occur depending on the measuring conditions or the vehicle's age. Do not judge the vehicle to be normal even when the Data List values indicate a standard level. There are possibly some concealed factors of the malfunction.
- Check that the vehicle has not been modified in any way prior to the vehicle inspection.
- Specified values in the following troubleshooting flowchart are for reference only. Variations in the Data List values may occur depending on the measuring conditions or the vehicle's age. Do not judge the vehicle to be normal even when the Data List values indicate a standard level. There are possibly some concealed factors of the malfunction.
INSPECTION PROCEDURE
- HINT:
- This troubleshooting procedure checks for knocking and rattling.
- Knocking is most likely to occur while the engine is idling.
- This troubleshooting procedure checks for knocking and rattling.
- NOTICE:
- After replacing the ECM, the new ECM needs registration (Click here) and initialization (Click here).
| 1. CHECK SOUND AREA |

Find the source of the abnormal sound using a mechanic's stethoscope.
- Result:
Result
Proceed to
Combustion noise from engine
A
Noise from specific part
B
|
|
||||

| A | |
 |
| 2. CHECK HARNESS AND CONNECTOR IN ENGINE COMPARTMENT |
Check the harness and connector connections of common rail system components.
- OK:
- The wire harnesses and connectors are connected securely.
|
|
||||
| OK | |
|
| 3. CHECK AIR INDUCTION SYSTEM (PROCEDURE 3) |
Check the air induction system (turbocharger, MAP sensor, EGR valve etc.).
- OK:
- All hoses are connected securely, and also there are no leaks or blockage from air induction system.
|
|
||||
| OK | |
|
| 4. READ DTCS OUTPUT (RELATING TO ENGINE) |
Connect the intelligent tester to the DLC3.
Turn the ignition switch to ON and turn the tester on.
Enter the following menus: Powertrain / Engine and ECT / DTC.
Read DTCs.
- Result:
Result
Proceed to
No output
A
Engine related DTCs
B
|
|
||||
| A | |
|
| 5. READ VALUE USING INTELLIGENT TESTER (MAP AND ATMOSPHERE PRESSURE) |
Connect the intelligent tester to the DLC3.
Turn the ignition switch to ON and turn the tester on.
Enter the following menus: Powertrain / Engine and ECT / Data List / MAP and Atmosphere Pressure.
Compare MAP to Atmosphere Pressure when the ignition switch is ON (do not start the engine).
- Standard:
- Difference between the MAP and the Atmosphere Pressure is less than 8 kPa.
- HINT:
- If MAP and Atmosphere Pressure have the same value, both are normal. If there is a difference of 8 kPa or more, compare the values to the atmospheric pressure for that day. The sensor whose deviation is the greatest is malfunctioning.
- Standard atmospheric pressure is 101 kPa. For every 100 m increase in altitude, pressure drops by 1 kPa. This varies by weather.
- If MAP and Atmosphere Pressure have the same value, both are normal. If there is a difference of 8 kPa or more, compare the values to the atmospheric pressure for that day. The sensor whose deviation is the greatest is malfunctioning.
- Result:
Result
Proceed to
MAP and Atmosphere Pressure have the same value
A
MAP is different from actual atmospheric pressure
B
Atmosphere Pressure is different from actual atmospheric pressure
C
|
|
||||
|
|
||||
| A | |
|
| 6. PERFORM ACTIVE TEST USING INTELLIGENT TESTER (TEST THE FUEL LEAK) |
- HINT:
- By performing this Active Test, the engine speed is maintained at high RPM and the common rail internal fuel pressure is raised to the maximum operating pressure. As a result, a fuel leak check can be conducted while retaining the high common rail pressure.
Connect the intelligent tester to the DLC3.
Turn the ignition switch to ON and turn the tester on.
Enter the following menus: Powertrain / Engine and ECT / Active Test / Test the Fuel Leak / Data List / Fuel Press, Target Common Rail Pressure, and Target Pump SCV Current.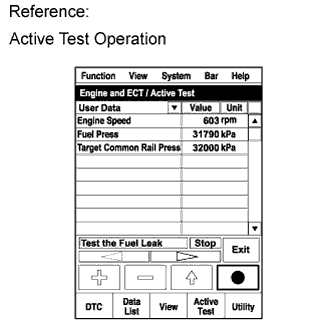

Take a snapshot with the intelligent tester during the Active Test.
- HINT:
- Detailed graphs can be displayed by transferring the stored snapshot from the tester to a PC (personal computer) with Intelligent Viewer installed.
Measure the difference between the target fuel pressure (Target Common Rail Pressure) and the actual fuel pressure (Fuel Press) when the "Test the Fuel Leak" Active Test is performed.
- HINT:
- In order to obtain an exact measurement, perform the Active Test 5 times and measure the difference once each time the Active Test is performed.
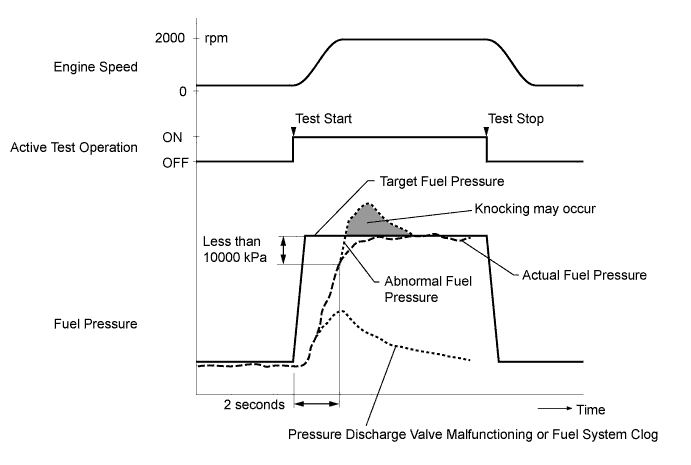
- OK:
- The difference between the target fuel pressure and the actual fuel pressure 2 seconds after the Active Test starts is less than 10000 kPa.
- HINT:
- Target Common Rail Pressure means the target fuel pressure controlled by the ECM.
- Fuel Press means the actual fuel pressure.
- If the pressure discharge valve mounted on the common rail is malfunctioning, the actual fuel pressure will change as indicated by "Pressure Discharge Valve Malfunctioning" in the illustration.
- If the pump is controlled using the Active Test "Test the Fuel Leak", when the Active Test is stopped, the actual fuel pressure may drop below the target common rail pressure, but this is normal and does not indicate a malfunction.
- Target Common Rail Pressure means the target fuel pressure controlled by the ECM.
Read the value of Target Pump SCV Current in the Data List when the "Test the Fuel Leak" Active Test is performed.
- Standard:
- Target Pump SCV Current is between 800 mA and 3000 mA.
- HINT:
- If the value of Target Pump SCV Current stored in the snapshot is higher than the standard, the intermittent suction control valve is probably stuck.
Result Result
Proceed to
Both results are within standard range
A
Fuel pressure exceeds "Target Common Rail Pressure + 15000 kPa"
and/or
Target Pump SCV Current value is out of standard range
B
Fuel pressure does not reach "Target Common Rail Pressure - 15000 kPa" within 2 seconds
C
|
|
||||
|
|
||||

| A | |
|
| 7. CHECK INJECTOR COMPENSATION CODE |
- NOTICE:
- Injector compensation codes are unique, 30-digit, and alphanumeric values printed on the head portion of each injector. If an incorrect injector compensation code is input into the ECM, the engine may rattle or engine idling may become rough. In addition, engine failure may occur and the life of the engine may be shortened.
Check the injector compensation code (Click here).
- OK:
- Compensation codes of the installed injectors are the same as the compensation codes registered in the ECM.
|
|
||||
| OK | |
|
| 8. RESET ECM |
Disconnect the cable from the negative (-) battery terminal for at least 2 minutes.
Reconnect the cable to the negative (-) battery terminal.
Check whether the malfunction has been successfully repaired.
- OK:
- Malfunction has been repaired successfully.
|
|
||||
| OK | ||
 |
||
| ||
| 9. PERFORM ACTIVE TEST USING INTELLIGENT TESTER (ACTIVATE THE EGR VALVE CLOSE) |
Connect the intelligent tester to the DLC3.
Start the engine and warm it up, and make sure the A/C switch and all accessory switches are off.
Turn the ignition switch off. Wait for 30 seconds, and then restart the engine.
Turn the tester on.
Enter the following menus: Powertrain / Engine and ECT / Data List / MAF.
Read the MAF value displayed on the tester while the engine is idling.
Enter the following menus: Powertrain / Engine and ECT / Active Test / Activate the EGR Valve Close.
Read the MAF value when the EGR valve is closed using the Active Test function.
- HINT:
- If idling continues for 15 minutes or more, the EGR valve target opening angle becomes 0% (EGR valve fully closed). As this makes diagnosis impossible, it becomes necessary to drive the vehicle or to restart the engine.
- Before performing the diagnosis, confirm that the EGR valve target opening angle is not 0%.
- When "Coolant Temp" is 75°C (167°F) or higher during idling, the exhaust gas flows through the EGR cooler. If MAF does not change when the EGR is cut even though the EGR valve is operating normally, the EGR cooler may be clogged.
- When idling while warming up the engine, the actuator operates and the EGR cooler is bypassed. However, if the connector of the VSV for the EGR cooler is disconnected, the EGR cooler is not bypassed and it is possible to check how clogged the EGR cooler is.
- If idling continues for 15 minutes or more, the EGR valve target opening angle becomes 0% (EGR valve fully closed). As this makes diagnosis impossible, it becomes necessary to drive the vehicle or to restart the engine.
Result Active Test
Result
Proceed to
Activate the EGR Valve Close:
Off (Open) to On (Closed)
MAF value does not change
B
MAF value changes
A
- NOTICE:
- As the measured values may differ from those shown below due to factors such as differences in measuring environments and changes in vehicle condition due to aging, do not use these values to determine whether the vehicle is malfunctioning or not.
- HINT:
- The problem may be a temporary one, due to the entry of deposits or foreign matter. Check that there are no deposits or foreign matter in the electric vacuum regulating valve assembly or mass air flow meter.
- Reference:
EGR Valve Condition (Opening)
Measuring Condition
MAF (Reference)
Open (55%)
- Atmosphere pressure: 101 kPa
- Intake air temperature: 30°C (86°F)
- Engine coolant temperature: 88°C (190°F)
3.0 to 9.0 gm/s
Closed (0%)
15 to 22 gm/s
- Atmosphere pressure: 101 kPa
|
|
||||
| A | |
|
| 10. READ VALUE USING INTELLIGENT TESTER (EGR CLOSE LEARN VAL. AND EGR CLOSE LRN. STATUS) |
Turn the ignition switch to ON.
Turn the ignition switch to off, and wait for 15 seconds or more.
Connect the intelligent tester to the DLC3.
Turn the ignition switch to ON and turn the tester on.
Enter the following menus: Powertrain / Engine and ECT / Data List / EGR Close Learn Val. and EGR Close Lrn. Status.
Read the values.
- Standard:
- EGR Close Lrn. Status is OK
- HINT:
- When the EGR Close Lrn. Status is NG, the value of the EGR Close Learn Val. is unavailable because the EGR fully closed learn value is out of the standard range.
- When the EGR Close Lrn. Status is NG, the ECM suspends the learn value update. The value indicated on the tester is the past data when the EGR valve works properly or the initialized data remaining from when the battery cable was reconnected, i.e., the value is not current data.
- As the EGR valve opens, the sensor output voltage decreases.
- If the amount of EGR is insufficient, engine knocking may occur.
- When the EGR Close Lrn. Status is NG, the value of the EGR Close Learn Val. is unavailable because the EGR fully closed learn value is out of the standard range.
|
|
||||
| OK | |
|
| 11. INSPECT DIESEL THROTTLE BODY ASSEMBLY |
Inspect the diesel throttle body assembly (using intelligent tester).
Turn the ignition switch to ON.
Turn the ignition switch to off and wait for 5 seconds or more.
- HINT:
- Be sure to turn off the ignition switch before performing this inspection. The fully closed position of the diesel throttle valve is learned when the ignition switch is turned off.
Connect the intelligent tester to the DLC3.
Turn the ignition switch to ON and turn the tester on.
Enter the following menus: Powertrain / Engine and ECT / Data List / Actual Throttle Position.
Read the values.
- Standard:
Engine Condition
Specified Condition
Ignition switch ON
-5 to 5%
Idling (after engine warmed up, at an altitude near sea level)
55 to 90%
Accelerator pedal fully depressed
-5 to 5%
and value changes smoothly in transition
- HINT:
- The Actual Throttle Position in the Data List items is indicated as follows:
Throttle Valve Condition
Actual Throttle Position
Fully closed
100%
Fully open
0%
Enter the following menus: Powertrain / Engine and ECT / Data List / Throttle Close Learning Val. and Diesel Throttle Learn Status.
Read the values when the ignition switch is ON.
- OK:
- Diesel Throttle Learn Status is OK.
- NOTICE:
- Extremely cold conditions might cause the throttle valve movement to be delayed.
- HINT:
- When the Diesel Throttle Learn Status is NG, the value of the Throttle Close Learning Val. is unavailable because the throttle fully closed learn value is out of the standard range.
- When the Diesel Throttle Learn Status is NG, the ECM suspends the learn value update. The value indicated on the tester is the past data when the diesel throttle works properly or the initialized data remaining from when the battery cable was reconnected. i.e., the value is not current data.
- If the diesel throttle condition is normal the fully closed position is learned when the ignition switch is turned off and 5 seconds or more elapse.
- When the Diesel Throttle Learn Status is NG, the value of the Throttle Close Learning Val. is unavailable because the throttle fully closed learn value is out of the standard range.
Inspect the diesel throttle body assembly (does not use intelligent tester).
Inspect throttle valve operation visually.
- OK:
- No malfunction.
|
|
||||
| OK | |
|
| 12. CHECK THE TEMPERATURE WHEN KNOCKING OCCURS |
Check the temperature when knocking trouble occurs.
- Result:
Result
Proceed to
Knocking only for cold engine
A
Knocking both for cold and warmed up engine
B
|
|
||||
| A | |
|
| 13. CHECK ENGINE COOLANT TEMPERATURE SENSOR |
After warming up the engine, the engine coolant temperature should be 70°C (158°F) or more. After leaving the vehicle overnight, the engine coolant temperature should be nearly equal to the intake air temperature.
- OK:
- The engine coolant temperature is nearly equal to the intake air temperature.
- HINT:
- If the engine coolant temperature sensor output is less than the actual engine coolant temperature, engine knocking may occur.
|
|
||||
| OK | |
|
| 14. INSPECT GLOW PLUG ASSEMBLY (RESISTANCE) |
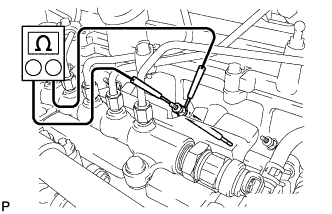 |
Disconnect the glow plug connector.
Measure the resistance according to the value(s) in the table below.
- Standard Resistance:
Tester Connection
Condition
Specified Condition
Glow plug terminal - Body ground
20°C (68°F)
Approximately 0.95 Ω
- HINT:
- If any of the glow plugs has an open circuit, the engine power will be insufficient only when the engine is cold.
- NOTICE:
- Exercise extreme care not to damage the glow plug pipes. Damaging them could cause an open circuit or shorten the life of the glow plugs.
- Keep the glow plugs free of oil and fuel while cleaning.
- Wipe any oil off of the terminal and Bakelite washer with a clean, dry cloth during inspection.
- Do not apply more than 11 V to the glow plugs as it may cause an open circuit.
- Exercise extreme care not to damage the glow plug pipes. Damaging them could cause an open circuit or shorten the life of the glow plugs.
|
|
||||
| OK | |
|
| 15. READ VALUE USING INTELLIGENT TESTER (INJECTION FEEDBACK VAL #1 TO #4) |
- HINT:
- Read the values of the Injector Feedback Val. #1 to #4 when the engine is cold.
- If the engine coolant temperature is more than 40°C, leave the vehicle until the engine coolant reaches almost the same temperature as the atmosphere temperature.
- Read the values of the Injector Feedback Val. #1 to #4 when the engine is cold.
Connect the intelligent tester to the DLC3.
Turn the ignition switch to ON and the tester on.
Enter the following menus: Powertrain / Engine and ECT / Data List / Injector Feedback Val. #1 to #4.
Start the engine.
Read the values during engine idling when it is cold, and write them down.
- Standard:
Tester Display
Condition
Specified Condition
Injector Feedback Val. #1
Injector Feedback Val. #2
Injector Feedback Val. #3
Injector Feedback Val. #4
Idling with cold engine
Less than 3.0 mm3/st
- NOTICE:
- If any of the Injector Feedback Values are outside of the specified range, and there is no problem with the cylinder compression pressure, replace all of the fuel injectors together.
|
|
||||
| OK | |
|
| 16. READ VALUE USING INTELLIGENT TESTER (MAP AND MAF) |
Connect the intelligent tester to the DLC3.
Turn the ignition switch to ON and the tester on.
Enter the following menus: Powertrain / Engine and ECT / Data List / MAP and MAF.
- Standard:
Item
Engine Speed*1
Standard Range
Description
MAP*2
Ignition switch ON (engine stopped)
Same as atmospheric pressure
Intake manifold internal pressure detected by manifold absolute pressure sensor
Idling
95 to 105 kPa (713 to 788 mmHg, 28.0 to 31.0 in.Hg)
3000 rpm (no engine load)
100 to 125 kPa (750 to 938 mmHg, 29.5 to 36.9 in.Hg)
3500 rpm (driving with full throttle acceleration)
Min.: 175 kPa (1,313 mmHg, 51.7 in.Hg)
MAF*2, *3
Ignition switch ON (engine stopped)
Less than 0.35 g/s
Intake air volume detected by mass air flow meter
Idling
5 to 12 g/s
3000 rpm (no engine load)
75 to 95 g/s
3500 rpm (driving with full throttle acceleration)
Min.: 120 g/s
- Result:
Item
Result
Proceed to
MAP and MAF
Within standard range
A
MAP and MAF
Outside standard range
B
Only MAP
Outside standard range
C
Only MAF
Outside standard range
D
- HINT:
- *1: The A/C switch and all accessory switches should be OFF with a fully warm engine.
- *2: This value is indicated when the ambient temperature is 25°C (77°F) and the atmospheric pressure is 101 kPa (758 mmHg, 29.83 in.Hg), and a stable boost pressure is maintained for approximately 10 seconds.
- *3: When the mass air flow meter malfunctions, the MAF output may deviate from the standard (referential) range when the engine idles and is accelerated from 3000 to 4000 rpm with full throttle acceleration.
- *1: The A/C switch and all accessory switches should be OFF with a fully warm engine.
|
|
||||
|
|
||||
|
|
||||
| A | |
|
| 17. INSPECT EGR VALVE ASSEMBLY |
Remove the EGR valve assembly.
Check that the EGR valve is fully closed.
- OK:
- The EGR valve fully closes.
- HINT:
- Hold the EGR valve to a light and confirm that the valve contacts with the valve seat securely.
- If light leaks out from the valve, the EGR valve does not close completely.
- Remove the deposit if there is much deposit in the EGR valve or the passage of the intake manifold.
- Hold the EGR valve to a light and confirm that the valve contacts with the valve seat securely.
|
|
||||
| OK | |
|
| 18. BASIC INSPECTION |
Check the fuel quality.
Check the fuel for air.
Check the fuel system for blockages.
Check the air filter.
Check the engine oil.
Check the engine idling speed and the maximum engine speed.
Check the vacuum pump.
|
|
||||
| OK | |
|
| 19. CONFIRM WHETHER MALFUNCTION HAS BEEN SUCCESSFULLY REPAIRED |
Check whether the knocking has been successfully repaired.
|
|
||||
| OK | ||
|
||
| ||
| 20. READ VALUE USING INTELLIGENT TESTER (INJECTION VOLUME AND INJECTION FEEDBACK VAL #1 TO #4) |
Connect the intelligent tester to the DLC3.
Start the engine and warm it up until the engine coolant temperature reaches 75°C (167°F) or higher.
Allow the engine to idle for 1 minute or more.
- HINT:
- The A/C switch and all accessory switches should be OFF with a fully warm engine.
Turn the tester on.
Enter the following menus: Powertrain / Engine and ECT / Data List / Injection Volume and Injector Feedback Val. #1 to #4.
Read the values during engine idling.
- Standard:
Tester Display
Condition
Specified Condition
Injection Volume
Idling
Less than 10.0 mm3/st
Injector Feedback Val. #1
Injector Feedback Val. #2
Injector Feedback Val. #3
Injector Feedback Val. #4
Idling
Less than 3.0 mm3/st
- NOTICE:
- If any of the Injector Feedback Val. is out of specified condition, replace all of the fuel injectors together.
|
|
||||
| OK | ||
|
||
| ||
| 21. BLEED AIR FROM FUEL SYSTEM |
Using the hand pump mounted on the fuel filter cap, bleed the air from the fuel system. Continue pumping until the pump resistance increases.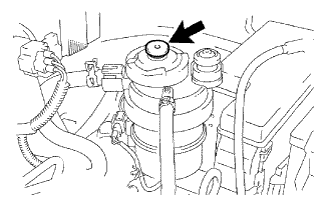
- NOTICE:
- Hand pump pumping speed: Max. 2 strokes/sec.
- The hand pump must be pushed with a full stroke during pumping.
- When the fuel pressure at the supply pump inlet port reaches a saturated pressure, the hand pump resistance increases.
- If pumping is interrupted during the air bleeding process, fuel in the fuel line may return to the fuel tank. Continue pumping until the hand pump resistance increases.
- If the hand pump resistance does not increase despite consecutively pumping 200 times or more, there may be a fuel leak between the fuel tank and fuel filter, the hand pump may be malfunctioning, or the vehicle may have run out of fuel.
- If a large amount of air remains inside the fuel system, the common rail pressure does not rise to the pressure range necessary for normal use, and the engine cannot be started.
- Hand pump pumping speed: Max. 2 strokes/sec.
Start the engine.
- NOTICE:
- If a large amount of air remains inside the fuel system, the starter may need to be cranked for 10 seconds or more to start the engine.
- Do not crank the engine continuously for more than 20 seconds. The battery may be discharged.
- Use a fully-charged battery.
- If a large amount of air remains inside the fuel system, the starter may need to be cranked for 10 seconds or more to start the engine.
When the engine can be started, proceed to the next step.
If the engine cannot be started, bleed the air again using the hand pump until the hand pump resistance increases. Then start the engine.
Turn the ignition switch off.
Connect the intelligent tester to the DLC3.
Turn the ignition switch to ON and turn the tester ON.
Start the engine.
Enter the following menus: Powertrain / Engine and ECT / Active Test / Test the Fuel Leak.
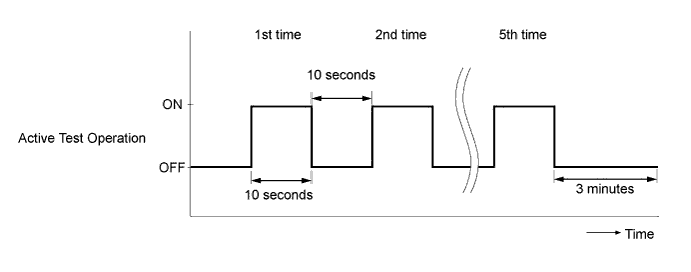
Perform the following test 5 times with on/off intervals of 10 seconds: Active Test / Test the Fuel Leak.
Allow the engine to idle for 3 minutes or more after performing the Active Test for the fifth time.
| NEXT | |
|
| 22. PERFORM ACTIVE TEST USING INTELLIGENT TESTER (FUEL LEAK TEST) |
- HINT:
- By performing this Active Test, the engine speed is maintained at high RPM and the common rail internal fuel pressure is raised to the maximum operating pressure. As a result, a fuel leak check can be conducted while retaining the high common rail pressure.
Connect the intelligent tester to the DLC3.
Turn the ignition switch to ON and turn the tester on.
Enter the following menus: Powertrain / Engine and ECT / Active Test / Test the Fuel Leak / Data List / Fuel Press, Target Common Rail Pressure, and Target Pump SCV Current.
Take a snapshot with the intelligent tester during the Active Test.
- HINT:
- Detailed graphs can be displayed by transferring the stored snapshot from the tester to a PC (personal computer) with Intelligent Viewer installed.
Measure the difference between the target fuel pressure (Target Common Rail Pressure) and the actual fuel pressure (Fuel Press) when the "Test the Fuel Leak" Active Test is performed.
- HINT:
- In order to obtain an exact measurement, perform the Active Test 5 times and measure the difference once each time the Active Test is performed.
- OK:
- The difference between the target fuel pressure and the actual fuel pressure 2 seconds after the Active Test starts is less than 10000 kPa.
- HINT:
- Target Common Rail Pressure means the target fuel pressure controlled by the ECM.
- Fuel Press means the actual fuel pressure.
- If the pressure discharge valve mounted on the common rail is malfunctioning, the actual fuel pressure will change as indicated by "Pressure Discharge Valve Malfunctioning" in the illustration.
- If the pump is controlled using the Active Test "Test the Fuel Leak", when the Active Test is stopped, the actual fuel pressure may drop below the target common rail pressure, but this is normal and does not indicate a malfunction.
- Target Common Rail Pressure means the target fuel pressure controlled by the ECM.
|
|
||||
| OK | |
|
| 23. CONFIRM WHETHER MALFUNCTION HAS BEEN SUCCESSFULLY REPAIRED |
Check whether the knocking has been successfully repaired.
| NEXT | ||
|
||
| ||
| 24. CONFIRM IF FUEL BEING SUPPLIED TO FUEL SUPPLY PUMP |
Disconnect the inlet hose from the fuel supply pump.
Operate the hand pump and check that fuel is being supplied to the fuel supply pump.
- OK:
- Fuel is properly supplied to the fuel supply pump when the hand pump is operated.
- HINT:
- When there is a lack of fuel, fuel pressure drops.
- Check that the fuel filter is not clogged.
- When there is a lack of fuel, fuel pressure drops.
|
|
||||
| OK | |
|
| 25. REPLACE SUPPLY PUMP ASSEMBLY |
Replace the fuel supply pump assembly (Click here).
| NEXT | |
|
| 26. BLEED AIR FROM FUEL SYSTEM |
Bleed the air from the fuel system (Click here).
| NEXT | |
|
| 27. PERFORM FUEL SUPPLY PUMP INITIALIZATION |
Perform fuel supply pump initialization (Click here).
| NEXT | |
|
| 28. PERFORM ACTIVE TEST USING INTELLIGENT TESTER (FUEL LEAK TEST) |
- HINT:
- By performing this Active Test, the engine speed is maintained at high RPM and the common rail internal fuel pressure is raised to the maximum operating pressure. As a result, a fuel leak check can be conducted while retaining the high common rail pressure.
Connect the intelligent tester to the DLC3.
Turn the ignition switch to ON and turn the tester on.
Enter the following menus: Powertrain / Engine and ECT / Active Test / Test the Fuel Leak / Data List / Fuel Press, Target Common Rail Pressure, and Target Pump SCV Current.
Take a snapshot with the intelligent tester during the Active Test.
- HINT:
- Detailed graphs can be displayed by transferring the stored snapshot from the tester to a PC (personal computer) with Intelligent Viewer installed.
Measure the difference between the target fuel pressure (Target Common Rail Pressure) and the actual fuel pressure (Fuel Press) when the "Test the Fuel Leak" Active Test is performed.
- HINT:
- In order to obtain an exact measurement, perform the Active Test 5 times and measure the difference once each time the Active Test is performed.
- OK:
- The difference between the target fuel pressure and the actual fuel pressure 2 seconds after the Active Test starts is less than 10000 kPa.
- HINT:
- Target Common Rail Pressure means the target fuel pressure controlled by the ECM.
- Fuel Press means the actual fuel pressure.
- If the pressure discharge valve mounted on the common rail is malfunctioning, the actual fuel pressure will change as indicated by "Pressure Discharge Valve Malfunctioning" in the illustration.
- If the pump is controlled using the Active Test "Test the Fuel Leak", when the Active Test is stopped, the actual fuel pressure may drop below the target common rail pressure, but this is normal and does not indicate a malfunction.
- Target Common Rail Pressure means the target fuel pressure controlled by the ECM.
- Result:
Result
Proceed to
Outside standard range
A
Within standard range
B
|
|
||||
| A | |
|
| 29. REPLACE COMMON RAIL ASSEMBLY |
Replace the common rail assembly (Click here).
| NEXT | |
|
| 30. BLEED AIR FROM FUEL SYSTEM |
Bleed the air from the fuel system (Click here).
| NEXT | |
|
| 31. CONFIRM WHETHER MALFUNCTION HAS BEEN SUCCESSFULLY REPAIRED |
Check whether the knocking has been successfully repaired by starting the engine.
| NEXT | ||
|
||
| ||
| 32. REPLACE FUEL INJECTOR ASSEMBLY |
Replace all of the fuel injector assembly (Click here).
| NEXT | |
|
| 33. REGISTER INJECTOR COMPENSATION CODE AND PERFORM PILOT QUANTITY LEARNING |
Register the injector compensation code (Click here).
Perform the fuel injector pilot quantity learning (Click here).
| NEXT | |
|
| 34. BLEED AIR FROM FUEL SYSTEM |
Bleed the air from the fuel system (Click here).
| NEXT | |
|
| 35. CONFIRM WHETHER MALFUNCTION HAS BEEN SUCCESSFULLY REPAIRED |
Check whether the knocking has been successfully repaired by starting the engine.
| NEXT | ||
|
||
| ||