Air Conditioning Compressor Magnetic Clutch Circuit
Circuit diagnosis · Vehicles built Jun 2011 – Jul 2012
Versions by build date: Jun 2011 – Jul 2012 Aug 2012 – Jul 2013 from Aug 2013
DESCRIPTION
The air conditioning amplifier assembly outputs the magnet clutch on request signal to the ECM. The ECM sends a magnet clutch on permission signal to the air conditioning amplifier assembly. The air conditioning amplifier assembly turns the magnet clutch on based on the signal.WIRING DIAGRAM
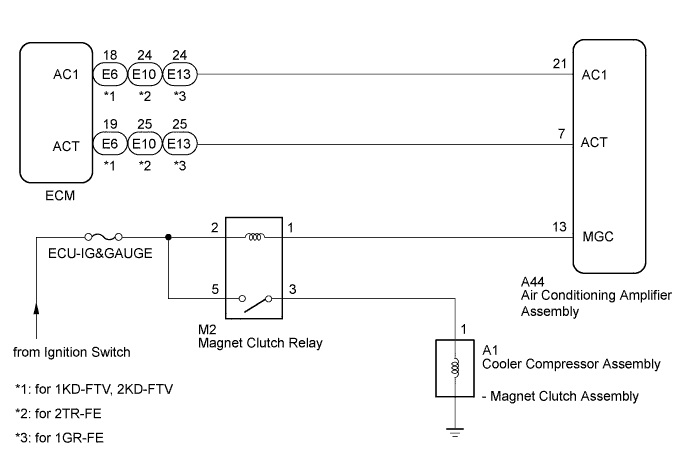

INSPECTION PROCEDURE
- NOTICE:
- Inspect the fuses for circuits related to this system before performing the following inspection procedure.
| 1. READ VALUE USING INTELLIGENT TESTER (A/C SIGNAL) |

Use the Data List to check if the magnet clutch on request signal is functioning properly (Click here).
ECM Tester Display
Measurement Item/Range
Normal Condition
Diagnostic Note
A/C Signal
Magnet clutch on request signal / ON or OFF
ON: A/C switch on
OFF: A/C switch off
Check this item with the engine idling and the blower switch on (LO level).
- OK:
- Display is as specified in normal condition.
|
|
||||

| OK | |
 |
| 2. INSPECT MAGNET CLUTCH RELAY |
Remove the magnet clutch relay.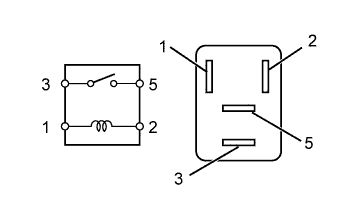
Measure the resistance according to the value(s) in the table below.
- Standard Resistance:
Tester Connection
Condition
Specified Condition
3 - 5
Battery voltage is not applied to terminals 1 and 2
10 kΩ or higher
Battery voltage is applied to terminals 1 and 2
Below 1 Ω
|
|
||||

| OK | |
|
| 3. CHECK HARNESS AND CONNECTOR (AIR CONDITIONING AMPLIFIER - BATTERY) |
Disconnect the A44 air conditioning amplifier assembly connector.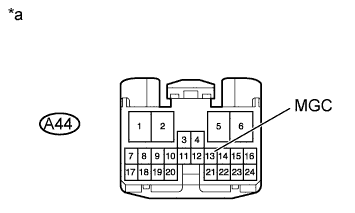
Measure the voltage according to the value(s) in the table below.
- Standard Voltage:
Tester Connection
Switch Condition
Specified Condition
A44-13 (MGC) - Body ground
Ignition switch ON
11 to 14 V
Ignition switch off
Below 1 V
Text in Illustration *a
Front view of wire harness connector
(to Air Conditioning Amplifier Assembly)
|
|
||||
| OK | |
|
| 4. CHECK AIR CONDITIONING AMPLIFIER ASSEMBLY |
Remove the air conditioning amplifier assembly with its connectors still connected (Click here).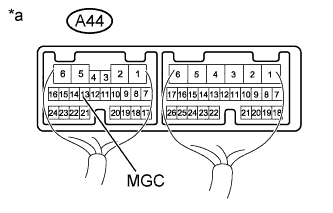
Measure the voltage according to the value(s) in the table below.
- Standard Voltage:
Tester Connection
Condition
Specified Condition
A44-13 (MGC) - Body ground
- Engine idling
- A/C switch on
Below 1 V
- Engine idling
- A/C switch off
11 to 14 V
- Engine idling
Text in Illustration *a
Component with harness connected
(Air Conditioning Amplifier Assembly)
|
|
||||
| OK | |
|
| 5. INSPECT MAGNET CLUTCH ASSEMBLY |
Remove the cooler compressor assembly.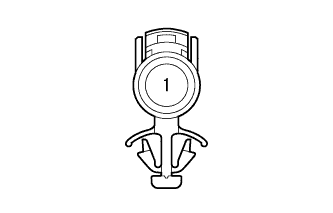
- for 1KD-FTV, 2KD-FTV: Click here.
- for 2TR-FE: Click here.
- for 1GR-FE: Click here.
- for 1KD-FTV, 2KD-FTV: Click here.
Apply battery voltage to the magnet clutch and check operation of the magnet clutch.
- OK:
Measurement Connection
Specified Condition
Battery positive (+) → Terminal 1
Battery negative (-) → Ground wire
Magnet clutch engages
Result Result
Proceed to
OK
A
NG (for 1KD-FTV, 2KD-FTV)
B
NG (for 2TR-FE)
C
NG (for 1GR-FE)
D
|
|
||||
|
|
||||
|
|
||||
| A | |
|
| 6. CHECK HARNESS AND CONNECTOR (MAGNET CLUTCH RELAY - COOLER COMPRESSOR ASSEMBLY AND BATTERY) |
Disconnect the A1 compressor connector.
Remove the magnet clutch relay.
Measure the voltage according to the value(s) in the table below.
- Standard Voltage:
Tester Connection
Switch Condition
Specified Condition
M2-5 - Body ground
Ignition switch ON
11 to 14 V
Ignition switch off
Below 1 V
Measure the resistance according to the value(s) in the table below.
- Standard Resistance:
Tester Connection
Condition
Specified Condition
M2-3 - A1-1
Always
Below 1 Ω
|
|
||||
| OK | ||
 |
||
| ||
| 7. CHECK HARNESS AND CONNECTOR (AIR CONDITIONING AMPLIFIER - ECM) |
Disconnect the A44 air conditioning amplifier assembly connector.
Disconnect the E6*1, E10*2 or E13*3 ECM connector.
- *1: for 1KD-FTV, 2KD-FTV
- *2: for 2TR-FE
- *3: for 1GR-FE
- *1: for 1KD-FTV, 2KD-FTV
Measure the resistance according to the value(s) in the table below.
- Standard Resistance:
for 1KD-FTV, 2KD-FTV Tester Connection
Condition
Specified Condition
A44-7 (ACT) - E6-19 (ACT)
Always
Below 1 Ω
A44-7 (ACT) - Body ground
Always
10 kΩ or higher
for 2TR-FE Tester Connection
Condition
Specified Condition
A44-7 (ACT) - E10-25 (ACT)
Always
Below 1 Ω
A44-7 (ACT) - Body ground
Always
10 kΩ or higher
for 1GR-FE Tester Connection
Condition
Specified Condition
A44-7 (ACT) - E13-25 (ACT)
Always
Below 1 Ω
A44-7 (ACT) - Body ground
Always
10 kΩ or higher
|
|
||||
| OK | |
|
| 8. CHECK AIR CONDITIONING AMPLIFIER ASSEMBLY |
Remove the air conditioning amplifier assembly with its connectors still connected (Click here).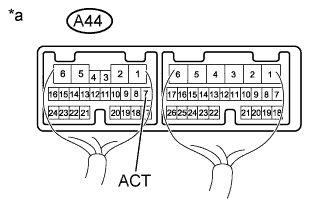
Measure the voltage according to the value(s) in the table below.
- Standard Voltage:
Tester Connection
Condition
Specified Condition
A44-7 (ACT) - Body ground
- Engine idling
- Blower switch on (LO level)
- A/C switch on
11 to 14 V
- Engine idling
- Blower switch on (LO level)
- A/C switch off
Below 1 V
- Engine idling
Text in Illustration *a
Component with harness connected
(Air Conditioning Amplifier Assembly)
- HINT:
- If replacing the ECM, refer to the procedures below.
- for 1KD-FTV (except DPF): Click here
- for 1KD-FTV (for DPF): Click here
- for 2KD-FTV (except DPF): Click here
- for 2KD-FTV (for DPF): Click here
- for 2TR-FE: Click here
- for 1GR-FE: Click here
- for 1KD-FTV (except DPF): Click here
|
|
||||
| OK | ||
|
||
| ||
| 9. CHECK HARNESS AND CONNECTOR (AIR CONDITIONING AMPLIFIER - ECM) |
Disconnect the A44 air conditioning amplifier assembly connector.
Disconnect the E6*1, E10*2 or E13*3 ECM connector.
- *1: for 1KD-FTV, 2KD-FTV
- *2: for 2TR-FE
- *3: for 1GR-FE
- *1: for 1KD-FTV, 2KD-FTV
Measure the resistance according to the value(s) in the table below.
- Standard Resistance:
for 1KD-FTV, 2KD-FTV Tester Connection
Condition
Specified Condition
A44-21 (AC1) - E6-18 (AC1)
Always
Below 1 Ω
A44-21 (AC1) - Body ground
Always
10 kΩ or higher
for 2TR-FE Tester Connection
Condition
Specified Condition
A44-21 (AC1) - E10-24 (AC1)
Always
Below 1 Ω
A44-21 (AC1) - Body ground
Always
10 kΩ or higher
for 1GR-FE Tester Connection
Condition
Specified Condition
A44-21 (AC1) - E13-24 (AC1)
Always
Below 1 Ω
A44-21 (AC1) - Body ground
Always
10 kΩ or higher
|
|
||||
| OK | |
|
| 10. CHECK AIR CONDITIONING AMPLIFIER ASSEMBLY |
Remove the air conditioning amplifier assembly with its connectors still connected (Click here).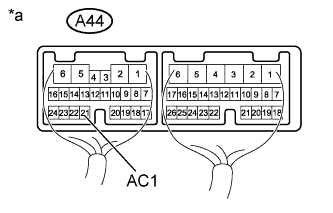
Measure the voltage according to the value(s) in the table below.
- Standard Voltage:
Tester Connection
Condition
Specified Condition
A44-21 (AC1) - Body ground
- Engine idling
- Blower switch on (LO level)
- A/C switch on (magnet clutch on)
Below 1 V
- Engine idling
- Blower switch on (LO level)
- A/C switch off or on (magnet clutch off)
11 to 14 V
- Engine idling
Text in Illustration *a
Component with harness connected
(Air Conditioning Amplifier Assembly)
- HINT:
- If replacing the ECM, refer to the procedures below.
- for 1KD-FTV (except DPF): Click here
- for 1KD-FTV (for DPF): Click here
- for 2KD-FTV (except DPF): Click here
- for 2KD-FTV (for DPF): Click here
- for 2TR-FE: Click here
- for 1GR-FE: Click here
- for 1KD-FTV (except DPF): Click here
|
|
||||
| OK | ||
|
||
| ||