2GD-FTV ENGINE MECHANICAL CAMSHAFT(w/o EGR Cooler) INSTALLATION
CAUTION / NOTICE / HINT
- NOTICE:
- ·
When replacing the parts in the following chart (A), replace the No. 1 injection pipe sub-assembly, No. 2 injection pipe sub-assembly and/or fuel inlet pipe sub-assembly with new ones.
Replaced Parts (A) Pipes Requiring New Replacement Injector assembly (including shuffling the injector assemblies between the cylinders) ·No. 1 injection pipe sub-assembly
·No. 2 injection pipe sub-assembly
Supply pump assembly Fuel inlet pipe sub-assembly ·Common rail assembly
·Cylinder block sub-assembly
·Cylinder head sub-assembly
·Cylinder head gasket
·Timing chain case assembly
·No. 1 injection pipe sub-assembly
·No. 2 injection pipe sub-assembly
·Fuel inlet pipe sub-assembly
·After removing the No. 1 injection pipe sub-assembly, No. 2 injection pipe sub-assembly and/or fuel inlet pipe sub-assembly, clean them with a brush and compressed air.
·The injector assembly is a precision instrument. Do not use the injector assembly if it is struck or dropped.
·Make sure foreign matter does not enter the fuel path.
PROCEDURE

 1.INSTALL CAMSHAFT
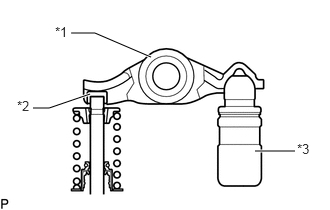
| *1 | Valve Rocker Arm Sub-assembly |
| *2 | Valve Stem Cap |
| *3 | Valve Lash adjuster assembly |
Check that the valve rocker arm sub-assembly is firmly set to the valve lash adjuster assembly.
Apply a light coat of engine oil to the camshaft journals of the cylinder head sub-assembly and the thrust portion of the camshaft.
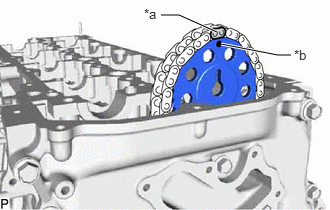
| *a | Paint Mark |
| *b | Timing Mark |
Align the paint mark of the No. 2 chain sub-assembly and timing mark of the camshaft timing sprocket, and install the camshaft timing sprocket to the No. 2 chain sub-assembly.
- HINT:
-
Make sure the timing mark of the camshaft timing sprocket face the front side.
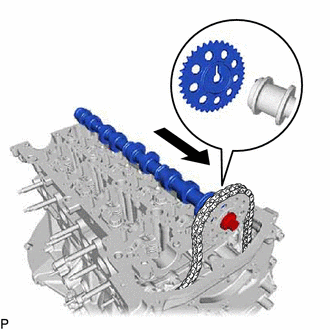
Align the knock pin of the No. 1 camshaft to the groove of the sprocket and install the No. 1 camshaft to the camshaft timing sprocket, and set the bolt.
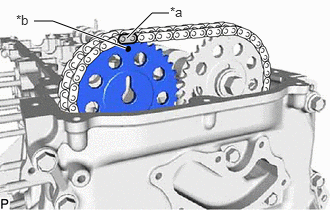
| *a | Paint Mark |
| *b | Timing Mark |
Align the paint mark of the No. 2 chain sub-assembly and timing mark of the camshaft timing sprocket, and install the camshaft timing sprocket to the No. 2 chain sub-assembly.
- HINT:
-
Make sure the timing mark of the camshaft timing sprocket face the front side.
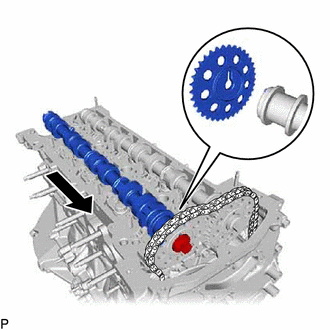
Align the knock pin of the No. 2 camshaft to the groove of the sprocket and install the No. 2 camshaft to the camshaft timing sprocket, and set the bolt.
- HINT:
-
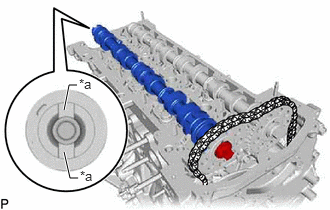 0.667,1.583 0.729,1.854 0.729,1.854 0.813,1.854 true 0.667,1.146 0.719,0.885 0.719,0.885 0.802,0.885 true 0.833,1.75 1.146,1.948 0.313,0.198 10 false *a 0.823,0.792 1.135,0.99 0.313,0.198 10 false *a
*a Groove
-
Groove is at the rear end of the No. 2 camshaft.
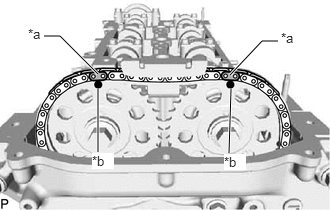
| *a | Paint Mark |
| *b | Timing Mark |
Check the timing mark of the camshaft timing sprocket and paint mark of the No. 2 chain sub-assembly.
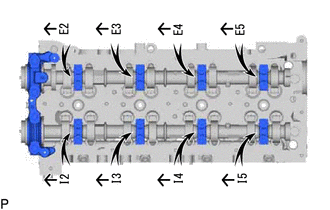
Set the No. 1 camshaft bearing cap and 8 No. 2 camshaft bearing caps to the cylinder head sub-assembly as shown in the illustration.
Temporarily install the 20 bolts.
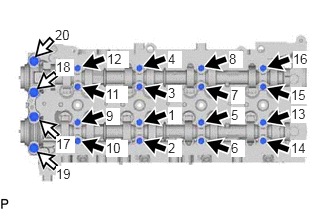

|
Bolt A |

|
Bolt B |
Uniformly tighten the 20 bolts in several steps in the order shown in the illustration.
- Torque:
- for bolt A : 10 N*m (102 kgf*cm, 7 ft.*lbf)
- for bolt B : 21 N*m (214 kgf*cm, 15 ft.*lbf)
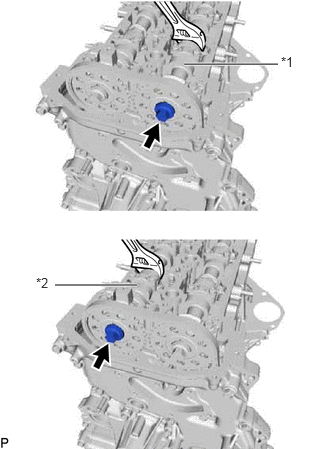
| *1 | No. 1 Camshaft |
| *2 | No. 2 Camshaft |
Hold the hexagonal portion of the No. 1 camshaft and No. 2 camshaft with a wrench, and tighten the 2 bolts.
- Torque:
- 81 N*m (826 kgf*cm, 60 ft.*lbf)
- NOTICE:
-
Be careful not to damage the cylinder head sub-assembly with the wrench.
Remove the pin from the No. 2 chain tensioner assembly.
Install a new gasket and the oil pump relief valve plug to the timing chain cover.
- Torque:
- 46 N*m (469 kgf*cm, 34 ft.*lbf)
13566B
2.INSTALL TIMING CHAIN GUIDE
Install the timing chain guide to the cylinder head sub-assembly with the bolt.
- Torque:
- 10 N*m (102 kgf*cm, 7 ft.*lbf)
11382C
3.INSTALL CAMSHAFT OIL SEAL RETAINER
29300
4.TEMPORARILY INSTALL VACUUM PUMP ASSEMBLY
5.INSTALL NO. 3 CAMSHAFT BEARING CAP
Clean and degrease the contact surfaces of the cylinder head sub-assembly and No. 3 camshaft bearing cap.
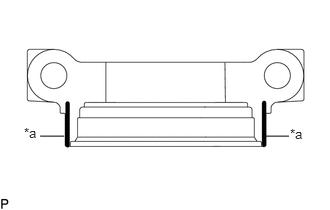
| *a | Seal Packing |
Apply seal packing to the specified areas as shown in the illustration.
- Seal packing:
Toyota Genuine Seal Packing Black, Three Bond 1207B or equivalent
- Standard seal diameter:
3.0 mm (0.118 in.)
- NOTICE:
- ·
Do not allow seal packing to contact the oil passage of the No. 3 camshaft bearing cap.
·After applying seal packing, install the No. 3 camshaft bearing cap within 3 minutes and tighten the bolts within 10 minutes.
·Do not start the engine for at least 2 hours after installation.
Install the No. 3 camshaft bearing cap with the 2 bolts.
- Torque:
- 21 N*m (214 kgf*cm, 15 ft.*lbf)
Wipe off excess seal packing from between No. 3 camshaft bearing cap and cylinder head sub-assembly.
29300
6.INSTALL VACUUM PUMP ASSEMBLY
11201
7.INSTALL CYLINDER HEAD COVER SUB-ASSEMBLY
23682
8.INSTALL NOZZLE HOLDER GASKET
23670
9.TEMPORARILY INSTALL INJECTOR ASSEMBLY
10.TEMPORARILY INSTALL NO. 1 INJECTION PIPE SUB-ASSEMBLY AND NO. 2 INJECTION PIPE SUB-ASSEMBLY
23670
11.TIGHTEN INJECTOR ASSEMBLY
12.TIGHTEN NO. 1 INJECTION PIPE SUB-ASSEMBLY AND NO. 2 INJECTION PIPE SUB-ASSEMBLY
23760
13.INSTALL NOZZLE LEAKAGE PIPE ASSEMBLY
14.INSTALL HARNESS BRACKET
15.INSTALL WIRING HARNESS CLAMP BRACKET
25624
16.INSTALL EGR VALVE ADAPTER
25800
17.INSTALL ELECTRIC EGR CONTROL VALVE ASSEMBLY
25612
18.INSTALL NO. 2 EGR PIPE
25625
19.INSTALL EGR VALVE BRACKET
82121
20.CONNECT ENGINE WIRE
23300
21.CONNECT FUEL FILTER ASSEMBLY
12632
22.INSTALL NO. 2 ENGINE COVER BRACKET
44763C
23.INSTALL NO. 2 HOSE TO HOSE TUBE
89421C
24.INSTALL TURBO PRESSURE SENSOR
23265C
25.INSTALL GAS FILTER
16278
26.INSTALL NO. 2 WATER BY-PASS PIPE
26100G
27.INSTALL DIESEL THROTTLE BODY ASSEMBLY
17363K
28.INSTALL INTERCOOLER AIR TUBE
16400
29.INSTALL RADIATOR ASSEMBLY
16572D
30.CONNECT NO. 2 RADIATOR HOSE
16711
31.INSTALL FAN SHROUD
32941
32.CONNECT NO. 1 OIL COOLER INLET HOSE (for Automatic Transmission)
32942
33.CONNECT NO. 1 OIL COOLER OUTLET HOSE (for Automatic Transmission)
16470
34.INSTALL RADIATOR RESERVE TANK ASSEMBLY
44369A
35.INSTALL NO. 1 OIL RESERVOIR BRACKET
44360
36.CONNECT VANE PUMP OIL RESERVOIR ASSEMBLY
16571C
37.INSTALL NO. 1 RADIATOR HOSE
17362B
38.INSTALL NO. 2 AIR TUBE
17344E
39.INSTALL NO. 4 AIR HOSE
16593
40.INSTALL NO. 1 RADIATOR AIR GUIDE
12601B
41.INSTALL NO. 1 ENGINE COVER SUB-ASSEMBLY
42.INSTALL FRONT BUMPER
51410
43.INSTALL NO. 1 ENGINE UNDER COVER ASSEMBLY (for 4WD)
44.CONNECT CABLE TO NEGATIVE BATTERY TERMINAL
- NOTICE:
-
When disconnecting the cable, some systems need to be initialized after the cable is reconnected.
-
Click hereGeneral>INTRODUCTION>REPAIR INSTRUCTION>INITIALIZATION
45.ADD ENGINE COOLANT
46.INSPECT FOR COOLANT LEAK
47.BLEED AIR FROM FUEL SYSTEM
48.INSPECT FOR FUEL LEAK