B15C3 Speaker Output Short
Diagnostic trouble codes · Vehicles built Aug 2013 – Jul 2014
Versions by build date: Aug 2013 – Jul 2014 from Aug 2014
DESCRIPTION
This DTC is stored when a malfunction occurs in the speakers.| DTC Code |
DTC Detection Condition |
Trouble Area |
| B15C3 |
A short is detected in the speaker output circuit. |
|
WIRING DIAGRAM
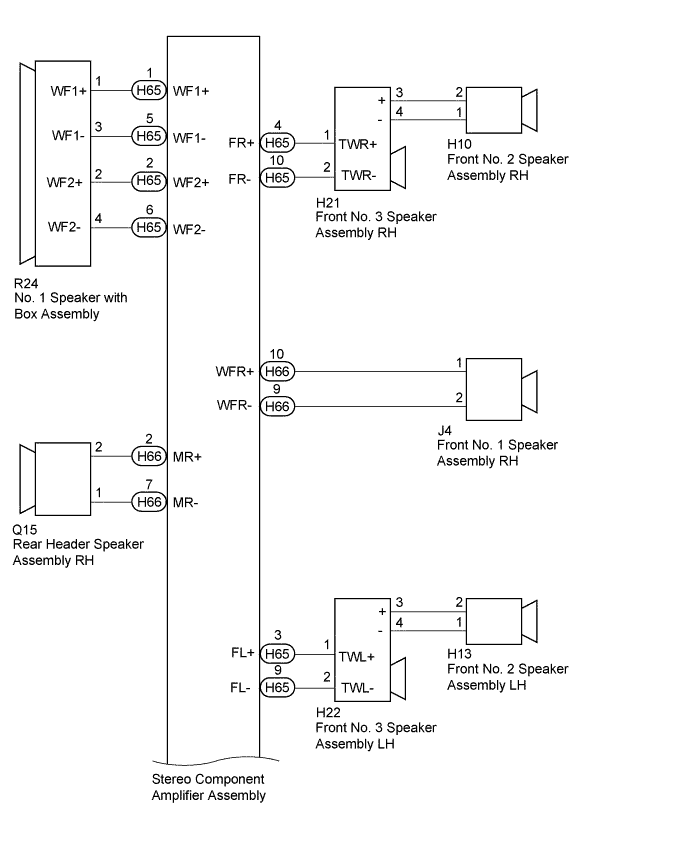

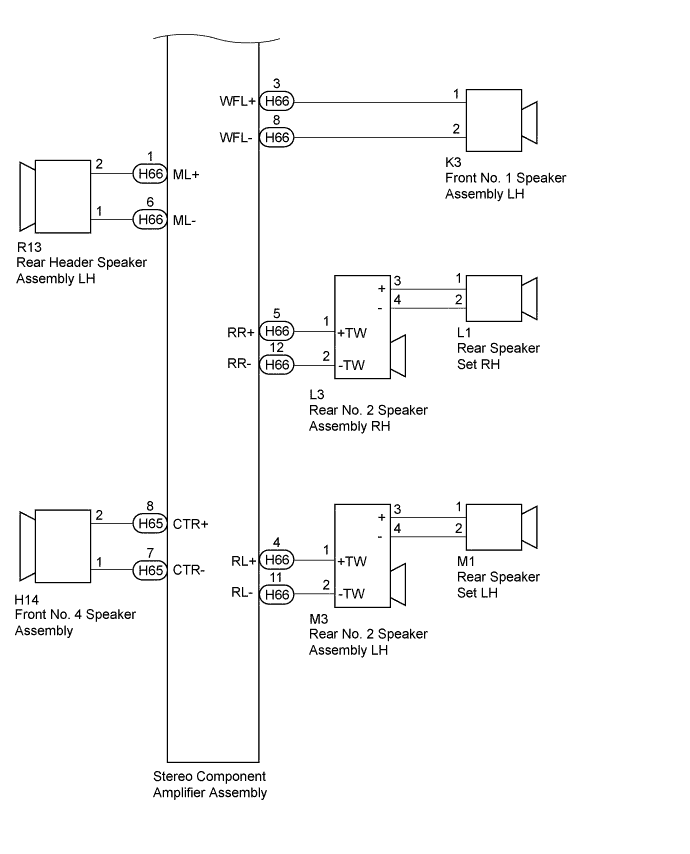
INSPECTION PROCEDURE
| 1. CHECK FOR DTC |

Clear the DTCs (Click here).
Check for DTCs (Click here).
- OK:
- No DTCs are output.
|
|
||||

| OK | ||
 |
||
| ||
| 2. CHECK HARNESS AND CONNECTOR (SPEAKER CIRCUIT) |
- *1: for RH Side
- *2: for LH Side
Disconnect the J4*1 and/or K3*2 front No. 1 speaker assembly connector.
Disconnect the H10*1 and/or H13*2 front No. 2 speaker assembly connector.
Disconnect the H21*1 and/or H22*2 front No. 3 speaker assembly connector.
Disconnect the H14 front No. 4 speaker assembly connector.
Disconnect the L1*1 and/or M1*2 rear speaker set connector.
Disconnect the L3*1 and/or M3*2 rear No. 2 speaker assembly connector.
Disconnect the Q15*1 and/or R13*2 rear header speaker assembly connector.
Disconnect the R24 No. 1 speaker with box assembly connector.
Disconnect the H65 and H66 stereo component amplifier assembly connectors.
Measure the resistance according to the value(s) in the table below.
- Standard Resistance:
Tester Connection
Condition
Specified Condition
H65-4 (FR+) - H21-1 (TWR+)*1
Always
Below 1 Ω
H65-10 (FR-) - H21-2 (TWR-)*1
Always
Below 1 Ω
H21-3 (+) - H10-2*1
Always
Below 1 Ω
H21-4 (-) - H10-1*1
Always
Below 1 Ω
H66-10 (WFR+) - J4-1*1
Always
Below 1 Ω
H66-9 (WFR-) - J4-2*1
Always
Below 1 Ω
H65-3 (FL+) - H22-1 (TWL+)*2
Always
Below 1 Ω
H65-9 (FL-) - H22-2 (TWL-)*2
Always
Below 1 Ω
H22-3 (+) - H13-2*2
Always
Below 1 Ω
H22-4 (-) - H13-1*2
Always
Below 1 Ω
H65-1 (WF1+) - R24-1 (WF1+)
Always
Below 1 Ω
H65-5 (WF1-) - R24-3 (WF1-)
Always
Below 1 Ω
H65-2 (WF2+) - R24-2 (WF2+)
Always
Below 1 Ω
H65-6 (WF2-) - R24-4 (WF2-)
Always
Below 1 Ω
H66-2 (MR+) - Q15-2*1
Always
Below 1 Ω
H66-7 (MR-) - Q15-1*1
Always
Below 1 Ω
H66-3 (WFL+) - K3-1*2
Always
Below 1 Ω
H66-8 (WFL-) - K3-2*2
Always
Below 1 Ω
H66-5 (RR+) - L3-1 (+TW)*1
Always
Below 1 Ω
H66-12 (RR-) - L3-2 (-TW)*1
Always
Below 1 Ω
L3-3 (+) - L1-1*1
Always
Below 1 Ω
L3-4 (-) - L1-2*1
Always
Below 1 Ω
H66-4 (RL+) - M3-1 (+TW)*2
Always
Below 1 Ω
H66-11 (RL-) - M3-2 (-TW)*2
Always
Below 1 Ω
M3-3 (+) - M1-1*2
Always
Below 1 Ω
M3-4 (-) - M1-2*2
Always
Below 1 Ω
H66-1 (ML+) - R13-2*2
Always
Below 1 Ω
H66-6 (ML-) - R13-1*2
Always
Below 1 Ω
H65-8 (CTR+) - H14-2
Always
Below 1 Ω
H66-7 (CTR-) - H14-1
Always
Below 1 Ω
H65-4 (FR+) - Body ground*1
Always
10 kΩ or higher
H65-10 (FR-) - Body ground*1
Always
10 kΩ or higher
H21-3 (+) - Body ground*1
Always
10 kΩ or higher
H21-4 (-) - Body ground*1
Always
10 kΩ or higher
H66-10 (WFR+) - Body ground*1
Always
10 kΩ or higher
H66-9 (WFR-) - Body ground*1
Always
10 kΩ or higher
H65-3 (FL+) - Body ground*2
Always
10 kΩ or higher
H65-9 (FL-) - Body ground*2
Always
10 kΩ or higher
H22-3 (+) - Body ground*2
Always
10 kΩ or higher
H22-4 (-) - Body ground*2
Always
10 kΩ or higher
H65-1 (WF1+) - Body ground
Always
10 kΩ or higher
H65-5 (WF1-) - Body ground
Always
10 kΩ or higher
H65-2 (WF2+) - Body ground
Always
10 kΩ or higher
H65-6 (WF2-) - Body ground
Always
10 kΩ or higher
H66-2 (MR+) - Body ground*1
Always
10 kΩ or higher
H66-7 (MR-) - Body ground*1
Always
10 kΩ or higher
H66-3 (WFL+) - Body ground*2
Always
10 kΩ or higher
H66-8 (WFL-) - Body ground*2
Always
10 kΩ or higher
H66-5 (RR+) - Body ground*1
Always
10 kΩ or higher
H66-12 (RR-) - Body ground*1
Always
10 kΩ or higher
L3-3 (+) - Body ground*1
Always
10 kΩ or higher
L3-4 (-) - Body ground*1
Always
10 kΩ or higher
H66-4 (RL+) - Body ground*2
Always
10 kΩ or higher
H66-11 (RL-) - Body ground*2
Always
10 kΩ or higher
M3-3 (+) - Body ground*2
Always
10 kΩ or higher
M3-4 (-) - Body ground*2
Always
10 kΩ or higher
H66-1 (ML+) - Body ground*2
Always
10 kΩ or higher
H66-6 (ML-) - Body ground*2
Always
10 kΩ or higher
H65-8 (CTR+) - Body ground
Always
10 kΩ or higher
H66-7 (CTR-) - Body ground
Always
10 kΩ or higher
|
|
||||

| OK | |
 |
| 3. INSPECT FRONT NO. 1 SPEAKER ASSEMBLY |
Remove the front No. 1 speaker assembly (Click here).
Inspect the front No. 1 speaker assembly (Click here).
|
|
||||
| OK | |
|
| 4. INSPECT FRONT NO. 2 SPEAKER ASSEMBLY |
Remove the front No. 2 speaker assembly (Click here).
Inspect the front No. 2 speaker assembly (Click here).
|
|
||||
| OK | |
|
| 5. CHECK FRONT NO. 3 SPEAKER ASSEMBLY |
Replace the front No. 3 speaker assembly with a known good one (Click here).
Check that the malfunction disappears.
- NOTICE:
- Connect all the connectors that were disconnected to the front No. 3 speaker assemblies.
- Perform the above inspection on both LH and RH sides.
- Connect all the connectors that were disconnected to the front No. 3 speaker assemblies.
- OK:
- Malfunction disappears.
|
|
||||
| OK | ||
|
||
| ||
| 6. CHECK FRONT NO. 4 SPEAKER ASSEMBLY |
Replace the front No. 4 speaker assembly with a known good one (Click here).
Check that the malfunction disappears.
- OK:
- Malfunction disappears.
|
|
||||
| OK | ||
|
||
| ||
| 7. INSPECT REAR SPEAKER SET |
Remove the rear speaker set with a known good one (Click here).
Inspect the rear speaker set with a known good one (Click here).
|
|
||||
| OK | |
|
| 8. CHECK REAR NO. 2 SPEAKER ASSEMBLY |
Replace the rear No. 2 speaker assembly with a known good one (Click here).
Check that the malfunction disappears.
- NOTICE:
- Connect all the connectors that were disconnected to the rear No. 2 speaker assemblies.
- Perform the above inspection on both LH and RH sides.
- Connect all the connectors that were disconnected to the rear No. 2 speaker assemblies.
- OK:
- Malfunction disappears.
|
|
||||
| OK | ||
|
||
| ||
| 9. CHECK REAR HEADER SPEAKER ASSEMBLY |
Replace the rear header speaker assembly with a known good one (Click here).
Check that the malfunction disappears.
- NOTICE:
- Connect all the connectors that were disconnected to the rear header speaker assemblies.
- Perform the above inspection on both LH and RH sides.
- Connect all the connectors that were disconnected to the rear header speaker assemblies.
- OK:
- Malfunction disappears.
|
|
||||
| OK | ||
|
||
| ||
| 10. INSPECT NO. 1 SPEAKER WITH BOX ASSEMBLY |
Remove the No. 1 speaker with box assembly (Click here).
Inspect the No. 1 speaker with box assembly (Click here).
|
|
||||
| OK | |
|
| 11. CHECK STEREO COMPONENT AMPLIFIER ASSEMBLY |
Replace the stereo component amplifier assembly with a known good one (Click here).
Check that the malfunction disappears.
- OK:
- Malfunction disappears.
|
|
||||
| OK | ||
|
||
| ||