2TR-FE ENGINE MECHANICAL CAMSHAFT INSTALLATION
CAUTION / NOTICE / HINT
- HINT:
-
Perform "Inspection After Repairs" after replacing the camshaft, No. 2 camshaft, camshaft timing gear assembly or camshaft timing exhaust gear assembly (See page Engine / Hybrid System>2TR-FE (ENGINE CONTROL)>SFI SYSTEM>INITIALIZATION).
PROCEDURE

 13070A
1.INSTALL CAMSHAFT TIMING EXHAUST GEAR ASSEMBLY
- HINT:
-
Perform "Inspection After Repairs" after replacing the camshaft timing exhaust gear assembly (See page Engine / Hybrid System>2TR-FE (ENGINE CONTROL)>SFI SYSTEM>INITIALIZATION).
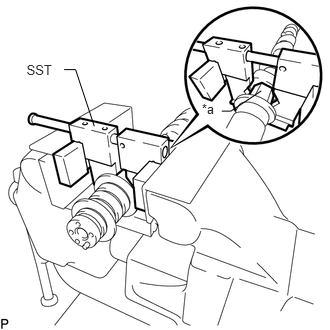
Using SST, grip the hexagonal portion, and then secure SST and No. 2 camshaft in a vise as shown in the illustration.
- SST
- 09212-31010
| *a | Hexagonal Portion |
- NOTICE:
- ·
Do not damage the No. 2 camshaft.
·Never grip areas other than the hexagonal portion, as this may cause damage.
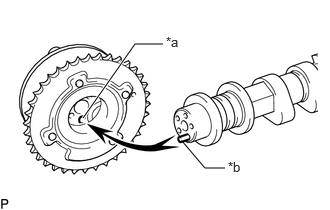
Align and attach the straight pin of the No. 2 camshaft with the straight pin hole of the camshaft timing exhaust gear assembly.
| *a | Straight Pin Hole |
| *b | Straight Pin |
Fix the camshaft timing exhaust gear assembly with the flange bolt.
- Torque:
- 78 N*m (795 kgf*cm, 58 ft.*lbf)
13050
2.INSTALL CAMSHAFT TIMING GEAR ASSEMBLY
- HINT:
-
Perform "Inspection After Repairs" after replacing the camshaft timing gear assembly (See page Engine / Hybrid System>2TR-FE (ENGINE CONTROL)>SFI SYSTEM>INITIALIZATION).
Using SST, grip the hexagonal portion, and then secure SST and camshaft in a vise as shown in the illustration.
- SST
- 09212-31010
| *a | Hexagonal Portion |
- NOTICE:
- ·
Do not damage the camshaft.
·Never grip areas other than the hexagonal portion, as this may cause damage.
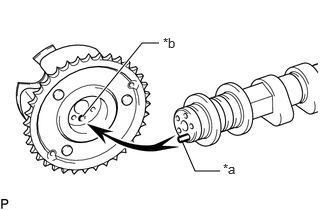
Align the straight pin hole and straight pin and install the camshaft timing gear assembly to the camshaft.
| *a | Straight Pin |
| *b | Straight Pin Hole |
Lightly press the gear against the camshaft and turn the gear. Push further at the position where the straight pin enters the straight pin hole.
- NOTICE:
-
Be sure not to turn the camshaft timing gear assembly in the retard direction (the right angle).
With the camshaft timing gear assembly fixed in place, install the flange bolt.
- Torque:
- 78 N*m (795 kgf*cm, 58 ft.*lbf)
Check that the camshaft timing gear assembly can move in the retard direction (the right angle), and is locked at the most retarded position.
13511
3.INSTALL CAMSHAFT AND NO. 2 CAMSHAFT
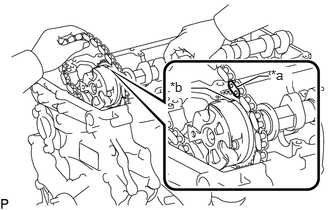
Apply clean engine oil to the camshaft cams and cylinder head journals.
Install the chain sub-assembly to the camshaft timing gear assembly with the paint mark of the link aligned with the timing mark of the camshaft timing gear assembly.
| *a | Paint Mark |
| *b | Timing Mark |
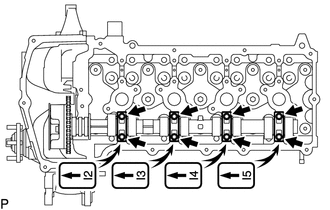
Temporarily install the 4 No. 2 camshaft bearing caps using the 8 bolts as shown in the illustration.
Install the chain sub-assembly to the No. 2 camshaft, and then install the No. 2 camshaft to the cylinder head sub-assembly.
- HINT:
-
Place the chain sub-assembly on the camshaft timing gear assembly but do not engage the teeth of the sprocket and the chain sub-assembly.
Move the camshaft in the direction shown in the illustration to loosen the chain sub-assembly, and align the paint mark on the camshaft timing gear assembly and chain sub-assembly and connect the chain sub-assembly to the camshaft timing gear assembly.
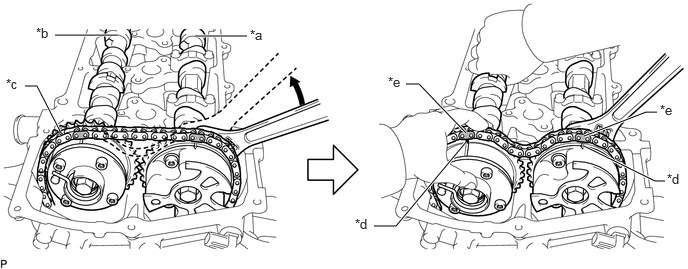
| *a | Camshaft | *b | No. 2 Camshaft |
| *c | Chain Sub-assembly | *d | Timing Mark |
| *e | Paint Mark | - | - |
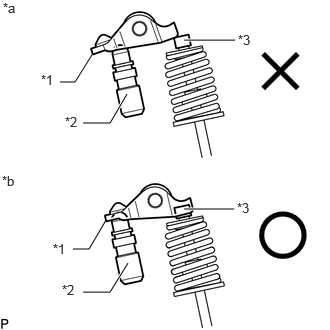
Make sure that the No. 1 valve rocker arm sub-assemblies are installed as shown in the illustration.
| *1 | No. 1 Valve Rocker Arm Sub-assembly |
| *2 | Valve Lash Adjuster Assembly |
| *3 | Valve Stem Cap |
| *a | INCORRECT |
| *b | CORRECT |
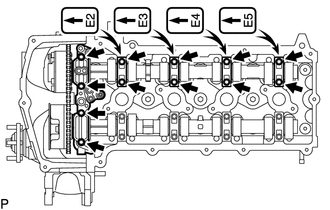
Temporarily install the No. 1 camshaft bearing cap and 4 No. 2 camshaft bearing caps using the 12 bolts.
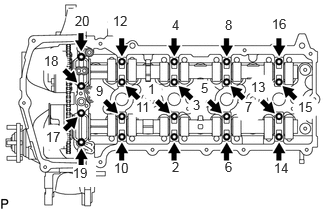
Install the 20 bolts in the order shown in the illustration.
- Torque:
- 16 N*m (158 kgf*cm, 11 ft.*lbf)
13540
4.INSTALL NO. 1 CHAIN TENSIONER ASSEMBLY
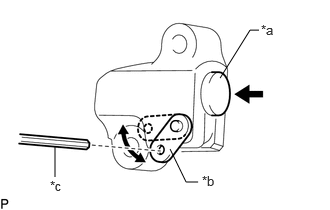
Move the stopper plate upward to release the lock and push the plunger deep into the tensioner.
| *a | Plunger |
| *b | Stopper Plate |
| *c | Hexagon Wrench |
Move the stopper plate downward to set the lock and insert a hexagon wrench into the hole of the stopper plate.
Install a new gasket and the No. 1 chain tensioner assembly with the bolt and nut.
- Torque:
- 10 N*m (102 kgf*cm, 7 ft.*lbf)
- NOTICE:
-
Remove the hexagon wrench after installing the timing chain guide.
Install a new gasket to the timing chain cover plate.
Install the timing chain cover plate to the timing chain cover sub-assembly with the 2 bolts.
- Torque:
- 9.0 N*m (92 kgf*cm, 80 in.*lbf)
5.CHECK NO. 1 CYLINDER TO TDC/COMPRESSION
Check that the No. 1 cylinder is set to TDC/compression.
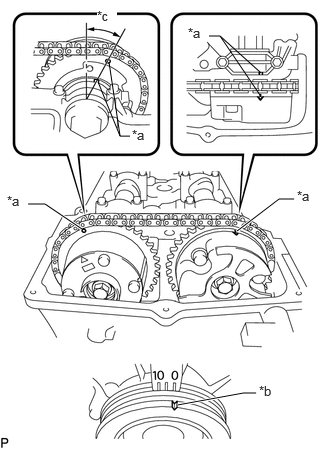
Rotate the crankshaft two full rotations, and then check that all timing marks are in the position shown in the illustration.
If the timing marks do not match, set the chain sub-assembly again.
| *a | Timing Mark |
| *b | Groove |
| *c | Approximately 13° |
13566B
6.INSTALL TIMING CHAIN GUIDE
11204
7.INSTALL CYLINDER HEAD COVER CONNECTOR SUB-ASSEMBLY
11201
8.INSTALL CYLINDER HEAD COVER SUB-ASSEMBLY
19500
9.INSTALL IGNITION COIL ASSEMBLY
16711
10.INSTALL FAN SHROUD
16470
11.INSTALL RADIATOR RESERVOIR
17861
12.INSTALL INTAKE AIR CONNECTOR
17705
13.INSTALL AIR CLEANER CAP SUB-ASSEMBLY
14.CONNECT CABLE TO NEGATIVE BATTERY TERMINAL
- NOTICE:
-
When disconnecting the cable, some systems need to be initialized after the cable is reconnected (See page General>INTRODUCTION>REPAIR INSTRUCTION>INITIALIZATION).
16.INSPECT FOR OIL LEAK
17.INSPECT ENGINE OIL LEVEL
18.INSPECT IGNITION TIMING
19.INSPECT ENGINE IDLE SPEED
53292A
20.INSTALL UPPER RADIATOR SUPPORT SEAL
51405A
21.INSTALL NO. 1 ENGINE UNDER COVER SUB-ASSEMBLY
52129B
22.INSTALL FRONT BUMPER COVER LOWER