Home › Engine / Hybrid System › 2TR-FE (LUBRICATION) › OIL PUMP
RM27T0E _51 Engine / Hybrid System _053686 2TR-FE LUBRICATION _0260684 OIL PUMP A

2TR-FE LUBRICATION  OIL PUMP  INSTALLATION  


PROCEDURE

Hide 16100 1.INSTALL ENGINE WATER PUMP ASSEMBLY

a.

Install a new gasket and the engine water pump assembly with the 8 bolts.

Torque:
8.9 N*m (91 kgf*cm, 79 in.*lbf)


Hide 11302 2.INSTALL TIMING CHAIN COVER SUB-ASSEMBLY

a.

Install 3 new O-rings to the timing chain cover sub-assembly.


b.

Clean and degrease the contact surfaces of the timing chain cover sub-assembly, cylinder head sub-assembly and cylinder block.


c.

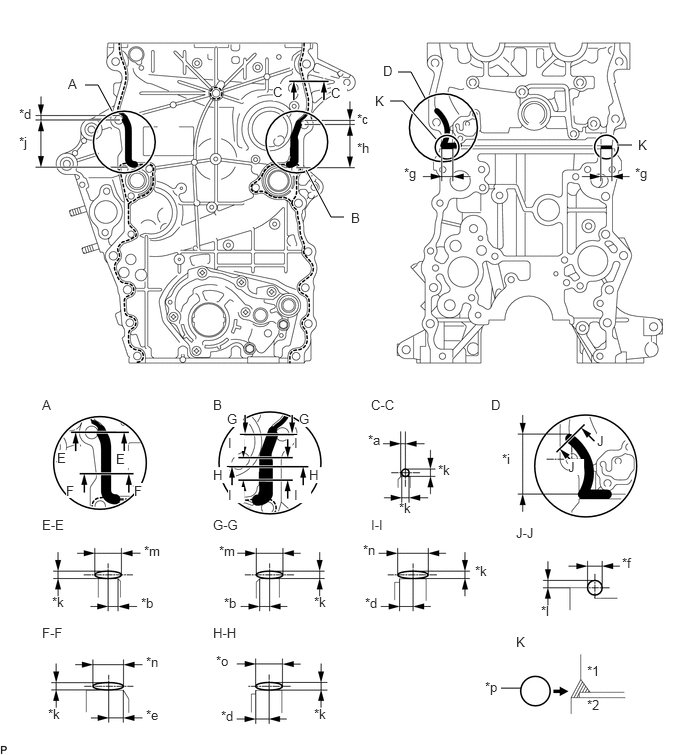
Apply seal packing as shown in the illustration.

Seal packing:

Toyota Genuine Seal Packing Black, Three Bond 1207B or equivalent

A336787E04
1.167,1.156 1.021,0.885 1.021,0.885 0.885,0.885 true 3.188,1.771 3.448,2.26 3.448,2.26 3.583,2.26 true 4.427,1.021 4.281,0.75 4.281,0.75 4.146,0.75 false 5.427,7.167 5.219,7.167 false 4.542,1.448 4.198,1.052 4.198,1.052 4.063,1.052 true 6.427,1.51 6.583,1.51 true 0.708,0.792 0.917,0.958 0.208,0.167 10 false A 3.656,2.188 3.885,2.375 0.229,0.188 10 false B 3.448,0.885 3.615,1.052 0.167,0.167 10 true C 2.844,0.875 3,1.052 0.156,0.177 10 true C 3.99,0.656 4.188,0.854 0.198,0.198 10 false D 0.198,1.104 0.365,1.271 0.167,0.167 10 false *d 0.198,1.396 0.365,1.563 0.167,0.167 10 false *j 3.719,1.156 3.885,1.323 0.167,0.167 10 false *c 3.719,1.458 3.885,1.625 0.167,0.167 10 false *h 4.208,1.719 4.427,1.938 0.219,0.219 10 false *g 6.615,1.719 6.844,1.948 0.229,0.229 10 false *g 0.438,4.135 0.604,4.302 0.167,0.167 10 false A 2.219,4.135 2.385,4.302 0.167,0.167 10 false B 3.865,4.135 4.156,4.344 0.292,0.208 10 false C-C 5.115,4.135 5.281,4.302 0.167,0.167 10 false D 0.438,5.385 0.719,5.552 0.281,0.167 10 false E-E 2.219,5.385 2.552,5.552 0.333,0.167 10 false G-G 3.865,5.385 4.115,5.552 0.25,0.167 10 false I-I 5.375,5.469 5.625,5.635 0.25,0.167 10 false J-J 5.375,6.604 5.625,6.771 0.25,0.167 10 false K 2.219,6.51 2.51,6.719 0.292,0.208 10 false H-H 0.438,6.51 0.688,6.677 0.25,0.167 10 false F-F 0.594,4.688 0.76,4.854 0.167,0.167 10 true E 1.208,4.698 1.406,4.875 0.198,0.177 10 true E 0.688,5.031 0.844,5.188 0.156,0.156 10 true F 1.396,5.031 1.563,5.198 0.167,0.167 10 true F 0.542,6.188 0.708,6.354 0.167,0.167 10 false *k 0.5,7.354 0.667,7.521 0.167,0.167 10 false *k 1.5,5.656 1.729,5.823 0.229,0.167 10 false *m 1.469,6.198 1.635,6.365 0.167,0.167 10 false *b 2.333,6.198 2.5,6.365 0.167,0.167 10 false *b 2.302,7.375 2.469,7.542 0.167,0.167 10 false *d 1.521,6.813 1.75,6.979 0.229,0.167 10 false *n 1.521,7.365 1.688,7.531 0.167,0.167 10 false *e 2.365,4.281 2.531,4.448 0.167,0.167 10 true G 3.219,4.865 3.385,5.031 0.167,0.167 10 true H 3.115,4.281 3.281,4.448 0.167,0.167 10 true G 2.281,5.656 2.5,5.823 0.219,0.167 10 false *m 3.271,6.188 3.438,6.354 0.167,0.167 10 false *k 3.271,7.354 3.438,7.521 0.167,0.167 10 false *k 2.25,6.802 2.458,7.01 0.208,0.208 10 false *o 3.833,4.5 4,4.667 0.167,0.167 10 false *a 4.156,5.208 4.323,5.375 0.167,0.167 10 false *k 4.563,4.813 4.729,4.979 0.167,0.167 10 false *k 3.781,5.646 3.948,5.813 0.167,0.167 10 false *n 4.948,5.865 5.115,6.031 0.167,0.167 10 false *k 3.802,6.198 3.969,6.365 0.167,0.167 10 false *d 5.229,4.698 5.396,4.865 0.167,0.167 10 false *i 5.917,4.781 6.083,4.948 0.167,0.167 10 true J 6.219,4.51 6.385,4.677 0.167,0.167 10 true J 5.635,6.281 5.844,6.448 0.208,0.167 10 false *l 6.479,5.781 6.646,5.948 0.167,0.167 10 false *f 5.052,7.073 5.219,7.24 0.167,0.167 10 false *p 6.115,6.906 6.281,7.073 0.167,0.167 10 false *1 6.115,7.26 6.281,7.427 0.167,0.167 10 false *2 3.906,0.969 4.104,1.156 0.198,0.188 10 false K 6.646,1.427 6.844,1.625 0.198,0.198 10 false K 2.375,4.531 2.542,4.698 0.167,0.167 10 true I 3.063,4.531 3.229,4.698 0.167,0.167 10 true I 2.375,5.073 2.542,5.24 0.167,0.167 10 true I 3.063,5.073 3.24,5.24 0.177,0.167 10 true I 2.219,4.865 2.385,5.031 0.167,0.167 10 true H

Text in Illustration
*1 Cylinder Head Sub-assembly *2 Cylinder Block
*a 2.0 mm (0.0787 in.) *b 2.5 mm (0.0984 in.)
*c 5.0 mm (0.197 in.) *d 6.0 mm (0.236 in.)
*e 7.0 mm (0.276 in.) *f 8.0 mm (0.315 in.) or more
*g 20 mm (0.787 in.) *h 54 mm (2.13 in.)
*i 56.5 mm (2.22 in.) *j 58 mm (2.28 in.)
*k 2.5 to 4.0 mm (0.0984 to 0.157 in.) *l 2.0 to 3.0 mm (0.0787 to 0.118 in.)
*m 9.0 to 13 mm (0.354 to 0.512 in.) *n 10 to 14 mm (0.394 to 0.551 in.)
*o 12 to 16 mm (0.472 to 0.630 in.) *p Seal Packing

NOTICE:
·

Remove any oil from the contact surface.

·

When the contact surfaces are wet, wipe them with an oil-free cloth before applying seal packing.

·

Install the timing chain cover sub-assembly within 3 minutes and tighten the bolts within 10 minutes after applying seal packing.

·

Do not start the engine for at least 4 hours after the installation.


d.
A336788

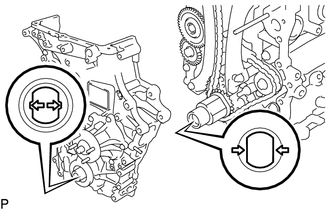
Align the width of the joint portion of the oil pump drive rotor and the crankshaft timing gear, and then install the timing chain cover sub-assembly.


e.

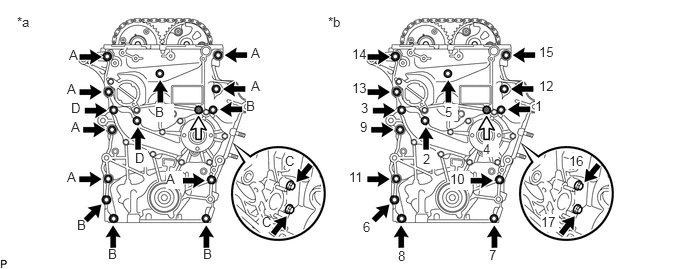
Temporarily install the timing chain cover sub-assembly with the 16 bolts and nut.
U147713E04
0.177,0.146 0.427,0.365 0.25,0.219 10 false *a 3.417,0.146 3.615,0.313 0.198,0.167 10 false *b 0.719,0.49 0.844,0.646 0.125,0.156 10 false A 0.698,0.844 0.844,1.01 0.146,0.167 10 false A 2.615,0.469 2.802,0.635 0.188,0.167 10 false A 2.615,0.813 2.802,0.979 0.188,0.167 10 false A 1.729,1.781 1.906,1.969 0.177,0.188 10 true A 2.115,2.563 2.302,2.729 0.188,0.167 10 false B 1.125,2.563 1.26,2.729 0.135,0.167 10 false B 0.802,2.26 0.927,2.427 0.125,0.167 10 false B 0.74,1.24 0.875,1.406 0.135,0.167 10 false A 0.698,1.76 0.833,1.927 0.135,0.167 10 false A 0.74,1.042 0.885,1.208 0.146,0.167 10 false D 1.406,1.563 1.542,1.74 0.135,0.177 10 true D 2.729,2.229 2.885,2.396 0.156,0.167 10 false C 1.615,1.083 1.813,1.271 0.198,0.188 10 true B 2.563,1.021 2.75,1.188 0.188,0.167 10 true B 3.667,0.479 3.854,0.646 0.188,0.167 10 false 14 3.667,0.833 3.854,1 0.188,0.167 10 false 13 5.615,0.458 5.802,0.625 0.188,0.167 10 false 15 5.615,0.813 5.802,0.979 0.188,0.167 10 false 12 4.688,1.781 4.896,1.979 0.208,0.198 10 true 10 5.094,2.573 5.26,2.74 0.167,0.167 10 false 7 4.146,2.583 4.313,2.76 0.167,0.177 10 false 8 3.781,2.281 3.938,2.479 0.156,0.198 10 false 6 3.75,1.24 3.917,1.458 0.167,0.219 10 false 9 3.635,1.76 3.854,1.969 0.219,0.208 10 false 11 3.76,1.042 3.875,1.208 0.115,0.167 10 false 3 4.406,1.573 4.552,1.76 0.146,0.188 10 true 2 5.635,2.229 5.823,2.396 0.188,0.167 10 true 17 5.927,1.594 6.115,1.76 0.188,0.167 10 true 16 4.635,1.083 4.771,1.26 0.135,0.177 10 true 5 5.031,1.469 5.198,1.635 0.167,0.167 10 true 4 5.573,1.021 5.76,1.188 0.188,0.167 10 true 1 2.969,1.594 3.115,1.76 0.146,0.167 10 true C

Text in Illustration
*a Types of nut and bolt *b Tightening Order
V100135

Bolt
V100136

Nut

Torque:
for bolt A : 57 N*m (581 kgf*cm, 42 ft.*lbf)
for bolt B and nut : 23 N*m (235 kgf*cm, 17 ft.*lbf)
for bolt C : 21 N*m (214 kgf*cm, 15 ft.*lbf)
for bolt D : 25 N*m (255 kgf*cm, 18 ft.*lbf)

Bolt Length:
Item Length Thread Diameter
Bolt A 75 mm (2.95 in.) 10 mm (0.394 in.)
Bolt B 75 mm (2.95 in.) 8.0 mm (0.315 in.)
Bolt C 40 mm (1.57 in.) 8.0 mm (0.315 in.)
Bolt D 90 mm (3.54 in.) 8.0 mm (0.315 in.)


NOTICE:
·

Make sure that there is no oil on the threads of bolts.

·

Check the bolts and bolt holes, and clean and degrease them.


f.
A336790

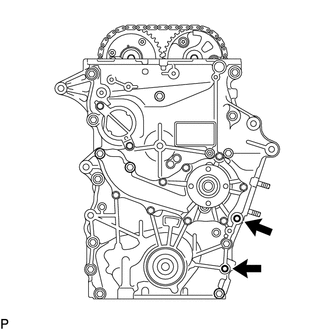
Remove the seal packing from the 2 bolt holes for the No. 1 compressor mounting bracket.

NOTICE:

Do not use any cleaners to remove the seal packing.


Hide 16620D 3.INSTALL V-RIBBED BELT TENSIONER ASSEMBLY
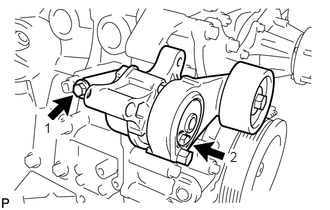
a.
U147676E03
0.458,1.25 0.635,1.448 0.177,0.198 10 true 1 2.396,1.552 2.573,1.76 0.177,0.208 10 true 2

Temporarily install the V-ribbed belt tensioner assembly with the 2 bolts.

HINT:

Make sure that the V-ribbed belt tensioner assembly is in contact with the timing chain cover sub-assembly.


b.

Install the V-ribbed belt tensioner assembly by tightening the 2 bolts in the order shown in the illustration.

Torque:
for bolt 1 : 40 N*m (408 kgf*cm, 30 ft.*lbf)
for bolt 2 : 23 N*m (235 kgf*cm, 17 ft.*lbf)


Hide 12101 4.INSTALL OIL PAN SUB-ASSEMBLY

a.

Install a new gasket to the oil strainer sub-assembly.


b.

Clean and degrease the contact surfaces of the oil pan sub-assembly and cylinder block sub-assembly.
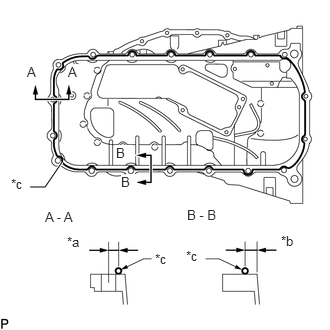

c.
A341261E05
0.313,1.948 0.469,1.948 0.469,1.948 0.646,1.688 true 0.281,0.667 0.469,0.844 0.188,0.177 10 false A 1.26,1.813 1.427,2 0.167,0.188 10 true B 1.208,1.51 1.385,1.688 0.177,0.177 10 true B 0.708,0.667 0.865,0.854 0.156,0.188 10 true A 0.469,2.177 0.854,2.375 0.385,0.198 10 false A - A 1.948,2.156 2.333,2.354 0.385,0.198 10 false B - B 0.115,1.833 0.323,2.01 0.208,0.177 10 false *c 0.698,2.438 0.885,2.635 0.188,0.198 10 false *a 2.927,2.427 3.115,2.615 0.188,0.188 10 false *b 1.615,2.615 1.802,2.802 0.188,0.188 10 false *c 1.938,2.583 2.135,2.76 0.198,0.177 10 false *c

Apply seal packing as shown in the illustration.

Seal packing:

Toyota Genuine Seal Packing Black, Three Bond 1207B or equivalent


Standard seal diameter:

2.0 to 3.0 mm (0.0787 to 0.118 in.)


Text in Illustration
*a 8.0 mm (0.315 in.)
*b 6.5 mm (0.256 in.)
*c Seal Packing

NOTICE:
·

Remove any oil from the contact surface.

·

Install the oil pan sub-assembly within 3 minutes and tighten the bolts within 10 minutes after applying seal packing.

·

Do not start the engine for at least 4 hours after the installation.


d.

Install a new gasket to the oil strainer sub-assembly.
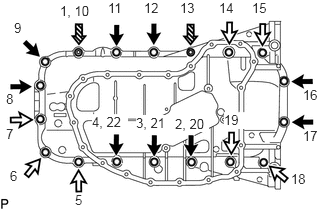

e.
A337667E07
0.063,0.948 0.24,1.125 0.177,0.177 10 false 8 0.063,1.313 0.229,1.5 0.167,0.188 10 false 7 0.104,1.75 0.292,1.958 0.188,0.208 10 false 6 0.781,2 0.938,2.177 0.156,0.177 10 false 5 0.958,1.188 1.333,1.365 0.375,0.177 10 true 4, 22 1.417,1.198 1.75,1.375 0.333,0.177 10 true 3, 21 0.625,0.031 1.01,0.208 0.385,0.177 10 false 1, 10 0.146,0.208 0.271,0.375 0.125,0.167 10 false 9 3.156,1.333 3.385,1.51 0.229,0.177 10 false 17 3.156,0.906 3.385,1.083 0.229,0.177 10 false 16 2.625,0 2.823,0.167 0.198,0.167 10 false 15 2.281,0 2.479,0.167 0.198,0.167 10 false 14 1.875,0 2.073,0.167 0.198,0.167 10 false 13 1.5,0 1.698,0.167 0.198,0.167 10 false 12 1.125,0 1.323,0.167 0.198,0.167 10 false 11 2.333,1.167 2.594,1.344 0.26,0.177 10 true 19 3.031,1.781 3.26,1.979 0.229,0.198 10 false 18 1.823,1.208 2.177,1.375 0.354,0.167 10 true 2, 20

Temporarily install the oil pan sub-assembly with the 16 bolts and 2 nuts.

Bolt Length:
Item Length
Bolt A 20 mm (0.787 in.)
Bolt B 40 mm (1.57 in.)


Text in Illustration
V100135

Bolt A
V100136

Bolt B
V100137

Nut


f.

Uniformly tighten the 16 bolts and 2 nuts in the order shown in the illustration.

Torque:
26 N*m (265 kgf*cm, 19 ft.*lbf)


Hide 12102A 5.INSTALL NO. 2 OIL PAN SUB-ASSEMBLY

a.

Clean and degrease the contact surfaces of the oil pan sub-assembly and No. 2 oil pan sub-assembly.
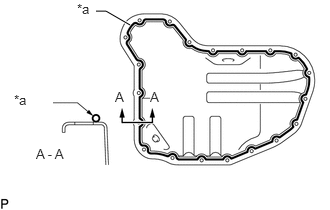

b.
A101343E10
1,0.115 1.104,0.115 1.104,0.115 1.354,0.26 true 1.198,0.927 1.323,1.083 0.125,0.156 10 false A 0.375,1.521 0.792,1.708 0.417,0.188 10 false A - A 1.563,0.927 1.719,1.094 0.156,0.167 10 true A 0.802,0.01 0.969,0.177 0.167,0.167 10 false *a 0.146,0.958 0.552,1.167 0.406,0.208 10 true *a

Apply seal packing in a continuous line as shown in the illustration.

Seal packing:

Toyota Genuine Seal Packing Black, Three Bond 1207B or equivalent


Seal packing diameter:

3.0 to 4.0 mm (0.118 to 0.157 in.)


Text in Illustration
*a Seal Packing

NOTICE:
·

Remove any oil from the contact surface.

·

Install the No. 2 oil pan sub-assembly within 3 minutes and tighten the bolts within 10 minutes after applying seal packing.

·

Do not start the engine for at least 4 hours after the installation.
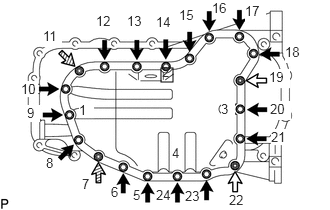


c.
A350014E04
1.677,0.708 1.802,0.854 0.125,0.146 0.448,0.292 0.646,0.49 0.198,0.198 10 true 11 1,0.135 1.219,0.333 0.219,0.198 10 false 12 1.323,0.135 1.542,0.333 0.219,0.198 10 false 13 1.625,0.146 1.844,0.344 0.219,0.198 10 false 14 2.969,0.458 3.188,0.656 0.219,0.198 10 true 18 2.802,0.719 3.021,0.917 0.219,0.198 10 true 19 2.813,1.052 3.031,1.25 0.219,0.198 10 true 20 2.823,1.344 3.042,1.51 0.219,0.167 10 true 21 2.385,2 2.583,2.167 0.198,0.167 10 false 22 1.927,1.958 2.115,2.115 0.188,0.156 10 false 23 1.625,1.948 1.813,2.125 0.188,0.177 10 false 24 2.208,0 2.406,0.167 0.198,0.167 10 false 16 2.552,0.031 2.771,0.229 0.219,0.198 10 true 17 1.385,1.948 1.51,2.115 0.125,0.167 10 false 5 1.156,1.917 1.271,2.104 0.115,0.188 10 false 6 0.854,1.833 0.969,2.021 0.115,0.188 10 false 7 0.479,1.615 0.615,1.813 0.135,0.198 10 false 8 0.823,1.063 0.979,1.229 0.156,0.167 10 true 1 1.688,0.667 1.823,0.865 0.135,0.198 10 false 2 2.302,1.052 2.448,1.219 0.146,0.167 10 true 3 0.281,1.094 0.417,1.271 0.135,0.177 10 true 9 1.865,0.073 2.083,0.271 0.219,0.198 10 false 15 1.792,1.51 1.906,1.698 0.115,0.188 10 false 4 0.219,0.844 0.396,1.01 0.177,0.167 10 true 10

Temporarily install the No. 2 oil pan sub-assembly with the 16 bolts and 2 adjusting screws, 2 nuts.

Text in Illustration
V100135

Bolt
V100136

Nut
V100137

Adjusting Screw


d.

Uniformly tighten the 16 bolts and 2 adjusting screws, 2 nuts in the order shown in the illustration.

Torque:
9.0 N*m (92 kgf*cm, 80 in.*lbf)


e.

Install a new gasket and the oil pan drain plug.

Torque:
38 N*m (382 kgf*cm, 28 ft.*lbf)


Hide 12144 6.INSTALL OIL PAN COVER SILENCER

a.

Install the oil pan cover silencer with the 2 No. 1 oil pan plugs.

Torque:
7.0 N*m (71 kgf*cm, 62 in.*lbf)


Hide 11201 9.INSTALL CYLINDER HEAD COVER SUB-ASSEMBLY

a.

Clean and degrease the contact surfaces of the cylinder head cover sub-assembly, timing chain cover sub-assembly and cylinder head sub-assembly.
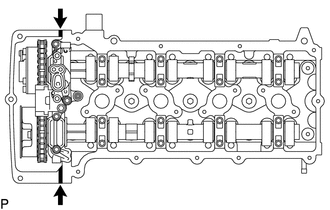

b.
A337640

Apply seal packing as shown in the illustration.

Seal packing:

Toyota Genuine Seal Packing Black, Three Bond 1207B or equivalent


Seal packing diameter:

4.0 mm (0.157 in.)


Text in Illustration
V100135

Seal Packing

NOTICE:
·

Install the cylinder head cover sub-assembly within 3 minutes and tighten the bolts within 15 minutes after applying seal packing.

·

Do not add the engine oil for at least 4 hours after the installation.

·

Do not start the engine for at least 4 hours after the installation.


c.

Install a new No. 1 camshaft bearing cap oil hole gasket to the cylinder head cover spacer.


d.

Install a new gasket to the cylinder head cover sub-assembly.
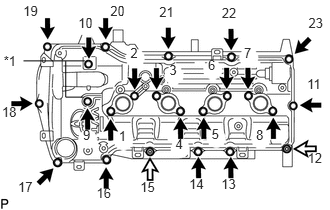

e.
U147729E01
1.237,1.338 1.349,1.508 0.112,0.170 10 1 1.358,0.471 1.470,0.641 0.112,0.170 10 2 1.764,0.65 1.876,0.820 0.112,0.170 10 3 1.827,1.419 1.939,1.589 0.112,0.170 10 4 2.204,1.311 2.316,1.481 0.112,0.170 10 5 2.166,0.597 2.278,0.766 0.112,0.170 10 6 2.541,0.466 2.653,0.636 0.112,0.170 10 7 2.667,1.323 2.779,1.493 0.112,0.170 10 8 0.864,1.32 0.976,1.490 0.112,0.170 10 9 0.815,0.152 1.010,0.327 0.195,0.174 10 10 3.199,0.79 3.395,0.965 0.195,0.174 10 11 3.204,1.565 3.399,1.739 0.195,0.174 10 12 2.305,1.833 2.500,2.007 0.195,0.174 10 13 1.97,1.835 2.165,2.009 0.195,0.174 10 14 1.461,1.861 1.656,2.035 0.195,0.174 10 15 1.005,1.932 1.200,2.107 0.195,0.174 10 16 0.188,1.868 0.383,2.043 0.195,0.174 10 17 0.02,1.084 0.215,1.259 0.195,0.174 10 18 0.242,0.034 0.437,0.208 0.195,0.174 10 19 1.149,0.029 1.344,0.204 0.195,0.174 10 20 1.659,0.038 1.854,0.213 0.195,0.174 10 21 2.31,0.049 2.505,0.223 0.195,0.174 10 22 3.213,0.16 3.408,0.335 0.195,0.174 10 23 0.038,0.549 0.218,0.724 0.180,0.176 10 *1 0.884,0.634 0.244,0.634 false 0.869,1.011 0.684,1.011 0.684,1.011 0.684,0.636 false

Install the cylinder head cover sub-assembly, 2 plate washers and 2 seal washers with the 21 bolts and 2 nuts, and tighten the 21 bolts and 2 nuts in the sequence shown in the illustration.

Torque:
9.0 N*m (92 kgf*cm, 80 in.*lbf)

Text in Illustration
*1 Plate Washer and Seal Washer
V100135

Seal Packing
V100136

Nut

NOTICE:

Make sure that the metal face of the seal washer is facing upward.


f.

Connect the PCV hose to the PCV valve sub-assembly and slide the clip to secure the hose.


Hide 16268 10.INSTALL NO. 1 WATER BY-PASS PIPE

a.

Install a new gasket and the No. 1 water by-pass pipe with the 2 nuts and bolt.

Torque:
18 N*m (178 kgf*cm, 13 ft.*lbf)


b.

w/ Engine Oil Cooler:

Connect the No. 6 water by-pass hose to the No. 1 water by-pass pipe and slide the clip to secure the hose.


Hide 11101J 12.INSTALL CAMSHAFT TIMING OIL CONTROL VALVE ASSEMBLY (for Exhaust Side)

Hide 11301M 13.INSTALL CAMSHAFT POSITION SENSOR (for Exhaust Side)

Hide 11301M 14.INSTALL CAMSHAFT POSITION SENSOR (for Intake Side)

Hide 16603 15.INSTALL NO. 1 IDLER PULLEY SUB-ASSEMBLY

a.

Install the spacer and No. 1 idler pulley sub-assembly with the bolt.

Torque:
43 N*m (438 kgf*cm, 32 ft.*lbf)


Hide 88431 18.INSTALL NO. 1 COMPRESSOR MOUNTING BRACKET