DOOR / HATCH BACK DOOR REASSEMBLY
CAUTION / NOTICE / HINT
- HINT:
-
A bolt without a torque specification is shown in the standard bolt chart (See page General>SPECIFICATIONS>STANDARD BOLT>SPECIFIED TORQUE FOR STANDARD BOLTS).
PROCEDURE

 81270
1.INSTALL LICENSE PLATE LIGHT ASSEMBLY
w/o Back Door Tire Carrier:
Install the license plate light assembly (See page Vehicle Exterior>LIGHTING (EXT)>LICENSE PLATE LIGHT ASSEMBLY(w/o Tire Carrier)>INSTALLATION).
w/ Back Door Tire Carrier:
Install the license plate light assembly (See page Vehicle Exterior>LIGHTING (EXT)>LICENSE PLATE LIGHT ASSEMBLY(w/ Tire Carrier)>INSTALLATION).
84945
2.INSTALL BACK DOOR ELECTRICAL KEY SWITCH (w/ Back Door Tire Carrier)
84945
3.INSTALL BACK DOOR ELECTRICAL KEY SWITCH (w/o Back Door Tire Carrier)
75132
4.INSTALL REAR LICENSE LIGHT COVER
76826A
5.INSTALL NO. 1 BACK DOOR GARNISH RETAINER (w/o Back Door Tire Carrier)
81275A
6.INSTALL LICENSE PLATE LIGHT CORD (w/o Entry and Start System)
w/o Back Door Tire Carrier:
Install the license plate light cord (See page Vehicle Exterior>EXTERIOR PANELS / TRIM>BACK DOOR OUTSIDE GARNISH (w/o Tire Carrier)>REASSEMBLY).
w/ Back Door Tire Carrier:
Install the license plate light cord (See page Vehicle Exterior>EXTERIOR PANELS / TRIM>BACK DOOR OUTSIDE GARNISH(w/ Tire Carrier)>REASSEMBLY).
7.INSTALL BACK DOOR OUTSIDE GARNISH SUB-ASSEMBLY
w/o Back Door Tire Carrier:
Install the back door outside garnish (See page Vehicle Exterior>EXTERIOR PANELS / TRIM>BACK DOOR OUTSIDE GARNISH (w/o Tire Carrier)>INSTALLATION).
w/ Back Door Tire Carrier:
Install the back door outside garnish (See page Vehicle Exterior>EXTERIOR PANELS / TRIM>BACK DOOR OUTSIDE GARNISH(w/ Tire Carrier)>INSTALLATION).
68948
8.INSTALL BACK DOOR LOWER DAMPER STAY BRACKET LH
Bumper side:
Install a new back door check to the back door lower damper stay bracket.
Back door side:
Install a new back door check to a new back door lower damper stay bracket.
Check that the back door check is securely attached to the ball joint and cannot be pulled off.
69411
9.INSTALL BACK DOOR CHECK
Bumper side:
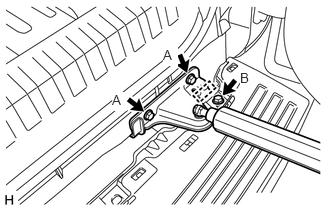
Install the back door check with back door lower damper stay bracket with the 2 bolts labeled A.
- Torque:
- 30 N*m (306 kgf*cm, 22 ft.*lbf)
Install the bolt labeled B.
- Torque:
- 8.0 N*m (82 kgf*cm, 71 in.*lbf)
Attach the wire harness.
Back door side:
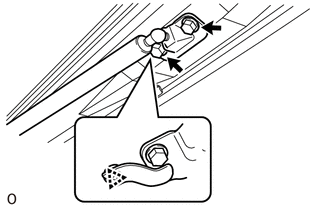
Attach the clip to install the back door check with back door lower damper stay bracket.
Install the 2 bolts.
- Torque:
- 30 N*m (306 kgf*cm, 22 ft.*lbf)
10.INSTALL BACK DOOR CUSHION (w/ Back Door Tire Carrier)
Install the 3 back door cushions.
68131
11.INSTALL BACK DOOR GLASS (w/o Back Door Tire Carrier)
68940
12.INSTALL BACK WINDOW STAY ASSEMBLY LH (w/o Back Door Tire Carrier)
68930
13.INSTALL BACK WINDOW STAY ASSEMBLY RH (w/o Back Door Tire Carrier)
- HINT:
-
Use the same procedure described for the LH side.
69415E
14.INSTALL BACK DOOR LOCK STRIKER COVER (w/o Back Door Tire Carrier)
When replacing the back door stay bolt with a new one:
Clean the threaded portion on the vehicle body with a non-residue solvent.
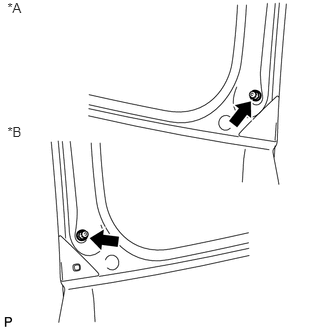
Install the 2 back door stay bolts.
- Torque:
- 22 N*m (224 kgf*cm, 16 ft.*lbf)
| *A | for RH Side |
| *B | for LH Side |
When reusing the back door stay bolt:
Clean the threaded portion on the vehicle body with a non-residue solvent.
Apply adhesive to the threads of the back door stay bolt.
- Adhesive:
Toyota Genuine Adhesive 1324, Three Bond 1324 or equivalent
Install the 2 back door stay bolts.
- Torque:
- 22 N*m (224 kgf*cm, 16 ft.*lbf)
67381A
15.INSTALL NO. 1 BACK WINDOW WIPER MOTOR BRACKET (w/ Back Door Tire Carrier)
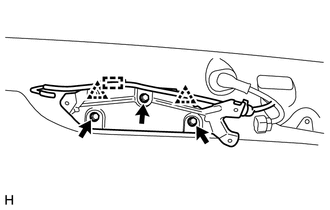
Attach the 2 clips to install the No. 1 back window wiper motor bracket.
Install the 3 bolts.
Attach the washer hose clamp.
85110R
16.INSTALL REAR WIPER MOTOR ASSEMBLY
85241A
17.INSTALL REAR WIPER ARM
85035R
18.INSTALL REAR WASHER NOZZLE SUB-ASSEMBLY
67981
19.INSTALL NO. 2 BACK DOOR STIFFENER (w/ Back Door Tire Carrier)
76085
20.INSTALL REAR SPOILER SUB-ASSEMBLY
w/o Back Door Tire Carrier:
Install the rear spoiler sub-assembly (See page Vehicle Exterior>EXTERIOR PANELS / TRIM>REAR SPOILER(w/o Tire Carrier)>INSTALLATION).
w/ Back Door Tire Carrier:
Install the rear spoiler sub-assembly (See page Vehicle Exterior>EXTERIOR PANELS / TRIM>REAR SPOILER(w/ Tire Carrier)>INSTALLATION).
76893E
21.INSTALL REAR SPOILER COVER RH
76893
22.INSTALL REAR NO. 1 SPOILER COVER (w/o Back Door Tire Carrier)
69370E
23.INSTALL BACK WINDOW LOCK ASSEMBLY (w/o Back Door Tire Carrier)
67005B
24.INSTALL BACK DOOR PANEL CUSHION (w/o Back Door Tire Carrier)
Install the 4 back door panel cushions.
67282
25.INSTALL BACK DOOR NO. 1 STOPPER
Attach the 2 claws to install a new back door No. 1 stopper.
67272F
26.INSTALL BACK DOOR NO. 2 STOPPER CUSHION
Attach the claw to install the back door No. 2 stopper cushion.
69404A
27.INSTALL BACK DOOR SIDE FEMALE STOPPER SUB-ASSEMBLY LH
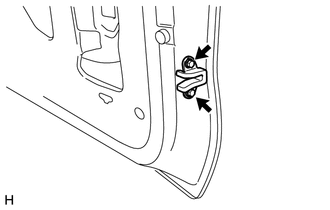
Install the back door side female stopper sub-assembly with the 2 bolts .
- Torque:
- 7.0 N*m (71 kgf*cm, 62 in.*lbf)
67882C
28.INSTALL NO. 2 BACK DOOR WEATHERSTRIP (w/o Back Door Tire Carrier)
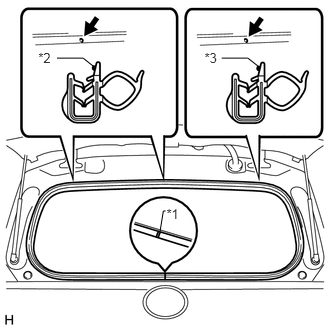
Align the alignment mark on the weatherstrip with the protruding portion on the body indicated by the arrow in the illustration and install the No. 2 back door weatherstrip.
| *1 | Joint of Weatherstrip |
| *2 | Paint Mark (White) |
| *3 | Paint Mark (Light Blue) |
- NOTICE:
-
After installation, check that the corners fit correctly.
84947B
29.INSTALL SWITCH COVER (w/o Back Door Tire Carrier)
84840F
30.INSTALL GLASS HATCH OPENER SWITCH ASSEMBLY (w/o Back Door Tire Carrier)
76806
31.INSTALL LOWER BACK DOOR GARNISH SUB-ASSEMBLY OUTSIDE LH (w/o Back Door Tire Carrier)
76805
32.INSTALL LOWER BACK DOOR GARNISH SUB-ASSEMBLY OUTSIDE RH (w/o Back Door Tire Carrier)
Clean the vehicle body surface.
Using a heat light, heat the vehicle body surface.
| Item | Temperature |
|---|---|
| Vehicle body | 40 to 60°C (104 to 140°F) |
- NOTICE:
-
Do not heat the vehicle body excessively.
Wipe off any tape adhesive residue with cleaner.
Install a new rear lower back door garnish sub-assembly outside RH.
Using a heat light, heat the vehicle body and a new rear lower back door garnish sub-assembly outside RH.
Remove the release paper from the face of the rear lower back door garnish sub-assembly outside RH.
- HINT:
-
After removing the release paper, keep the exposed adhesive free from foreign matter.
Attach the 4 claws to install the rear lower back door garnish sub-assembly outside RH, and then install the screw.
76816
33.INSTALL LOWER BACK DOOR OUTSIDE GARNISH MOULDING LH (w/o Back Door Tire Carrier)
76815
34.INSTALL LOWER BACK DOOR OUTSIDE GARNISH MOULDING RH (w/o Back Door Tire Carrier)
Attach the 5 claws to install the lower back door outside garnish moulding RH.
76827A
35.INSTALL NO. 2 BACK DOOR GARNISH RETAINER (w/o Back Door Tire Carrier, w/o Rear View Monitor System)
Install the No. 2 back door garnish retainer to the door panel with the 2 screws.
86790D
36.INSTALL REAR TELEVISION CAMERA ASSEMBLY (w/o Back Door Tire Carrier, w/ Rear View Monitor System)
82186
37.INSTALL REAR NO. 1 WINDOW WIRE (w/ Back Door Tire Carrier, w/ Rear View Monitor System)
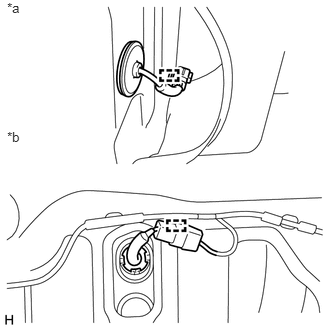
Attach the 2 clamps to install the rear No. 1 window wire.
| *a | Outer Side |
| *b | Inner Side |
Connect the connector.
64680
38.INSTALL BACK DOOR LOCK CONTROL CABLE ASSEMBLY
Install the cable.
69350
39.INSTALL BACK DOOR LOCK ASSEMBLY
69212
40.INSTALL BACK DOOR OUTSIDE HANDLE LH
w/ Back Door Tire Carrier:
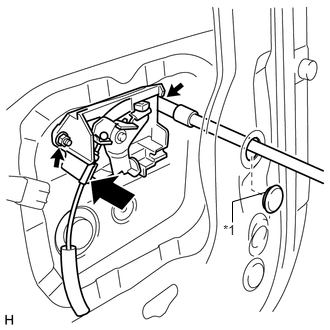
Connect the cable.
Install the back door outside handle with the 2 nuts.
- Torque:
- 5.0 N*m (51 kgf*cm, 44 in.*lbf)
Install the hole plug.
| *1 | Hole Plug |
w/o Back Door Tire Carrier:
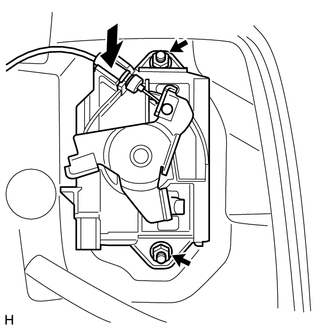
Connect the cable.
Install the back door outside handle with the 2 nuts.
- Torque:
- 5.0 N*m (51 kgf*cm, 44 in.*lbf)
67847A
41.INSTALL BACK DOOR SERVICE HOLE COVER
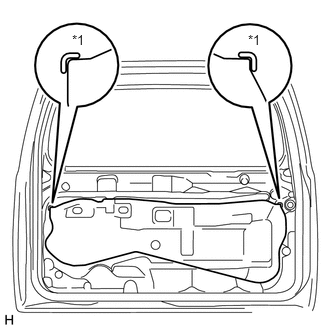
Apply new butyl tape to the back door panel.
Attach the rear door service hole cover using to the reference points on the rear door panel.
| *1 | Reference Point |
- NOTICE:
- ·
There should be no wrinkles or folds after attaching the service hole cover.
·After attaching the service hole cover, check the seal quality.
75221B
42.INSTALL TOOL BOX BRACKET
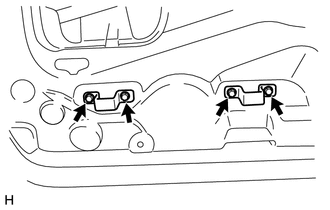
Install the 2 tool box brackets with the 4 bolts.
69205F
43.INSTALL BACK DOOR INSIDE HANDLE SUB-ASSEMBLY (for Face to Face Seat Type)
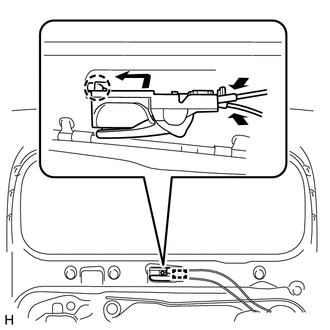
Connect the 2 cables to the inside handle sub-assembly.
Attach the claws and guide to install the inside handle sub-assembly.
64780A
44.INSTALL BACK DOOR TRIM PANEL ASSEMBLY
w/o Back Door Tire Carrier:
Attach the 15 clips to install the back door trim panel assembly.
Install the bolt.
w/ Back Door Tire Carrier:
Attach the 16 clips to install the back door trim panel assembly.
Install the bolt.
for Face to Face Seat Type:
Attach the 15 clips to install the back door trim panel assembly.
Install the bolt.
Install the screw.
Attach the claw to install the cover.
69783B
45.INSTALL BACK DOOR INSIDE HANDLE BEZEL (for Face to Face Seat Type)
Attach the 5 claws to install the back door inside handle bezel.
Install the screw.
64798
46.INSTALL BACK DOOR LOCK COVER (w/o Back Door Tire Carrier)
Attach the 6 claws to install the back door lock cover.
09120A
47.INSTALL TOOL CASE
Attach the 2 claws to install the tool case.
75202B
48.INSTALL UPPER TOOL BOX PANEL SUB-ASSEMBLY
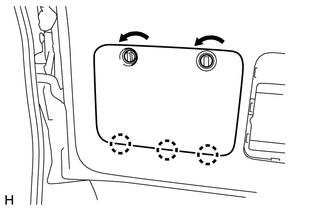
Attach the 3 claws.
Install the upper tool box panel sub-assembly as shown in the illustration.
67761A
49.INSTALL BACK DOOR TRIM COVER
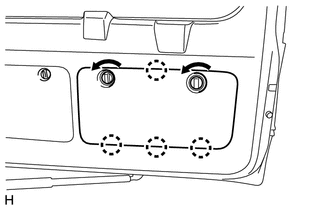
Attach the 4 claws.
Install the back door trim cover as shown in the illustration.
67938A
50.INSTALL BACK DOOR SIDE GARNISH LH
Attach the 2 clips and claw to install the back door side garnish.
67937B
51.INSTALL BACK DOOR SIDE GARNISH RH
Attach the 2 clips and claw to install the back door side garnish.
67939B
52.INSTALL BACK DOOR CENTER GARNISH
Attach the 4 clips to install the back door center garnish.
51908
53.INSTALL SPARE WHEEL CARRIER BRACKET SUB-ASSEMBLY (w/ Back Door Tire Carrier)
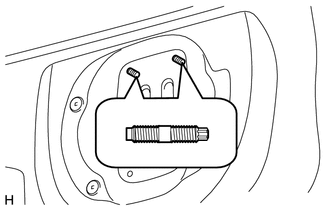
Using an E10 "TORX" socket wrench, install the 2 stud bolts.
- Torque:
- 42 N*m (428 kgf*cm, 31 ft.*lbf)
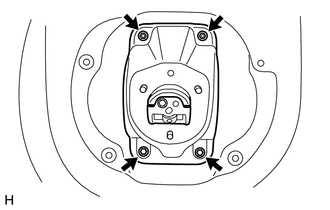
Install the spare wheel carrier bracket sub-assembly with the 2 bolts and 2 nuts.
- Torque:
- 48 N*m (489 kgf*cm, 35 ft.*lbf)
for bolt and nut
86790D
54.INSTALL REAR TELEVISION CAMERA ASSEMBLY (w/ Back Door Tire Carrier, w/ Rear View Monitor System)
86791
55.INSTALL TELEVISION CAMERA BRACKET (w/ Back Door Tire Carrier, w/o Rear View Monitor System)
64773A
56.INSTALL NO. 2 SPARE WHEEL COVER (w/ Back Door Tire Carrier)
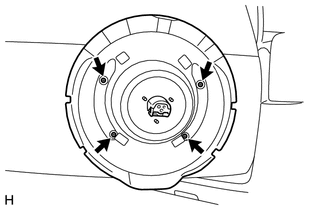
Install the No. 2 spare wheel cover with the 4 screws.
57.INSTALL SPARE TIRE (w/ Back Door Tire Carrier)
64771
58.INSTALL SPARE WHEEL COVER (w/ Back Door Tire Carrier)
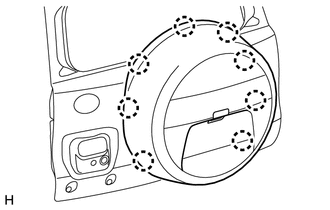
Attach the 8 claws to install the spare wheel cover.
Move the lever.
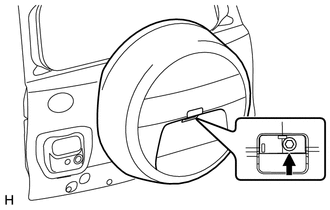
Install the bolt.
- Torque:
- 14 N*m (143 kgf*cm, 10 ft.*lbf)
64772B
59.INSTALL SPARE WHEEL COVER PAD (w/ Back Door Tire Carrier)
Attach the 7 claws to install the wheel cover pad.