1KD-FTV ENGINE CONTROL ECD SYSTEM P2006 Intake Manifold Runner Control Stuck Closed (Bank 1)
DESCRIPTION
The swirl control valve is mounted on the intake manifold. The vacuum switching valve is used to change the vacuum to control the swirl control valve.
The ECM determines the opening angle of the swirl control valve, and uses the vacuum switching valve (for swirl control valve) to change the vacuum applied to the actuator's diaphragm to open and close the swirl control valve.
| DTC Detection Drive Pattern | DTC Detection Condition | Trouble Area |
|---|---|---|
| After warming up engine, drive vehicle at an engine speed of 3200 rpm or more with high load for 1 minute or more.* | When actual intake air volume detected by mass air flow meter continues to be smaller than volume estimated from boost pressure and intake air temperature sensor, ECM determines that swirl control valve is stuck closed (1 trip detection logic). | ·
Vacuum switching valve (for swirl control valve) ·
Open or short in vacuum switching valve (for swirl control valve) circuit ·
Intake manifold (swirl control valve) ·
Electric EGR control valve assembly ·
Turbocharger sub-assembly ·
Mass air flow meter ·
Air cleaner hose ·
Vacuum hose ·
Air cleaner element is clogged ·
Intake hose is disconnected ·
ECM |
- HINT:
-
*: When the above driving pattern cannot be performed due to road conditions, etc., the swirl control valve can be determined to be functioning normally if mass air flow is 84 g/sec. or more and MAP is 114 kPa or higher when the engine speed is at 4000 rpm with no load. However, no DTCs are stored when inspecting the vehicle with this method.
-
The above values were measured under standard atmospheric pressure. The values are influenced by elevation, weather conditions, etc.
-
Standard atmospheric pressure is 101 kPa. For every 100 m increase in elevation, pressure drops by 1 kPa. This varies by weather.
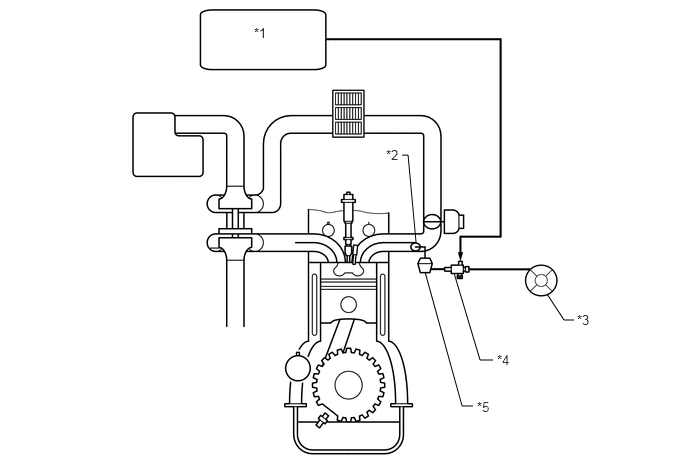
| *1 | ECM | *2 | Swirl Control Valve |
| *3 | Vacuum Pump | *4 | Vacuum Switching Valve (for Swirl Control Valve) |
| *5 | Swirl Control Valve Actuator | - | - |
WIRING DIAGRAM
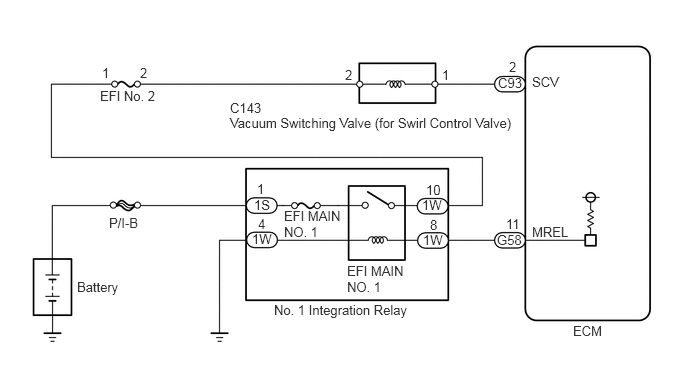
CAUTION / NOTICE / HINT
- HINT:
-
Read freeze frame data using the intelligent tester. Freeze frame data records the engine condition when a malfunction is detected. When troubleshooting, freeze frame data can help determine if the vehicle was moving or stationary, if the engine was warmed up or not, and other data from the time the malfunction occurred.
PROCEDURE
Connect the intelligent tester to the DLC3.
Turn the ignition switch to ON and turn the tester on.
Enter the following menus: Powertrain / Engine / DTC.
Read the DTCs.
| Result | Proceed to |
|---|---|
| P2006 | A |
| P2006 and other DTCs | B |
- HINT:
-
When MAP, mass air flow, Intake Air, and/or Intake Air Temp (Turbo)-related DTCs are stored along with P2006, perform troubleshooting for those DTCs first.
-
MAP-related DTCs: P0107 and P0108 (See page Engine / Hybrid System>1KD-FTV (ENGINE CONTROL)>ECD SYSTEM>P0107).
-
MAF-related DTCs: P0102 and P0103 (See page Engine / Hybrid System>1KD-FTV (ENGINE CONTROL)>ECD SYSTEM>P0102).
-
Intake Air-related DTCs: P0112 and P0113 (See page Engine / Hybrid System>1KD-FTV (ENGINE CONTROL)>ECD SYSTEM>P0112).
-
Intake Air Temp (Turbo)-related DTCs: P007C and P007D (See page Engine / Hybrid System>1KD-FTV (ENGINE CONTROL)>ECD SYSTEM>P007C).
A
B
Check for air leaks and blockages between the air cleaner case and turbocharger, and between the turbocharger and intake manifold.
| Result | Proceed to |
|---|---|
| Leaks and/or blockages exist in the intake system | A |
| No leaks or blockages in the intake system | B |
- HINT:
- ·
Inspect the air intake system, especially hoses and pipes between the air cleaner and turbocharger.
·Check if the air cleaner element is significantly dirty.
·Check for abnormal disconnections, pipe and hose squashing, and any damage in the intake system.
·Using your hand, check whether the pipes and hoses in the intake system are securely connected.
·By applying soapy water and revving up the engine, air leaks from the intake system can be checked by checking for bubbles.
·Check for any modifications in the intake system made by the user.
A
B
Repair or replace the malfunctioning part in the air intake system.
NEXT
Check the movement of the swirl control valve immediately after starting the engine.
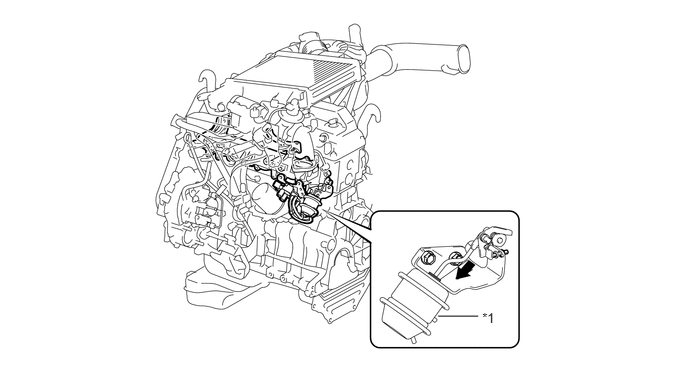
| *1 | Swirl control valve | - | - |
- OK:
Swirl control valve rod moves smoothly in the direction indicated by the arrow in the illustration.
OK
NG
Connect the intelligent tester to the DLC3.
Start the engine and turn the tester on.
Warm up the engine (engine coolant temperature is 70°C (158°F) or higher).
Enter the following menus: Powertrain / Engine and ECT / Data List / MAP and MAF.
Take a snapshot when the engine speed is maintained at 4000 rpm with no load.
Read the values of "MAP" and "MAF" in the Data List using the snapshot review function.
| Result | Proceed to |
|---|---|
| MAF 84 g/sec. or more and MAP 114 kPa or higher | C |
| MAP below 90 kPa | B |
| Except above | A |
- HINT:
- ·
The shift lever should be in neutral and the A/C switch and all accessory switches should be off.
·The above values were measured under standard atmospheric pressure. The values are influenced by elevation, weather conditions, etc.
Standard atmospheric pressure is 101 kPa. For every 100 m increase in elevation, pressure drops by 1 kPa. This varies by weather.
A
B
C
Remove any deposits adhering to the mass air flow meter.
NEXT
Check the turbocharger sub-assembly (See page Engine / Hybrid System>1KD-FTV (INTAKE / EXHAUST)>EXHAUST MANIFOLD W/ TURBOCHARGER>INSPECTION).
Replace the turbocharger sub-assembly (See page Engine / Hybrid System>1KD-FTV (INTAKE / EXHAUST)>EXHAUST MANIFOLD W/ TURBOCHARGER>REMOVAL).
- HINT:
-
It is only necessary to replace the part when the results of the inspection indicate a problem.
NEXT
Check the connection of the swirl control valve system vacuum hose.
OK
NG
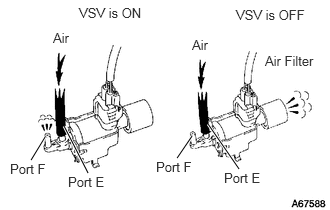
Disconnect the vacuum hoses from the VSV for swirl control valve.
Connect the intelligent tester to the DLC3.
Turn the ignition switch to ON and turn the tester on.
Enter the following menus: Powertrain / Engine / Active Test / Activate the VSV for Swirl Control Valve.
Check the VSV operation when it is operated using the intelligent tester.
- OK:
Tester Operation Specified Condition VSV ON Air from port E flows out through port F VSV OFF Air from port E flows out through air filter
Reconnect the vacuum hoses.
OK
NG
Inspect the electric EGR control valve assembly (See page Engine / Hybrid System>1KD-FTV (EMISSION CONTROL)>EGR VALVE>INSPECTION).
- HINT:
- ·
If there are any deposits adhering to the valve, clean the valve. When cleaning the valve, use diesel fuel or kerosene.
·When inspecting the electric EGR control valve assembly, make sure that the valve is fully closed.
OK
NG
Replace the electric EGR control valve assembly (See page Engine / Hybrid System>1KD-FTV (EMISSION CONTROL)>EGR VALVE>REMOVAL).
NEXT
Inspect the intake manifold (swirl control valve) (See page Engine / Hybrid System>1KD-FTV (INTAKE / EXHAUST)>INTAKE MANIFOLD>INSPECTION).
- HINT:
- ·
If there are any deposits adhering to the valve, clean the valve.
·If there are any deposits adhering to the valve, clean the valve. When cleaning the valve, use diesel fuel or kerosene.
·Apply vacuum to the diaphragm of the swirl control valve and check that the valve opens and closes smoothly.
OK
NG
Repair or replace the vacuum hose.
NEXT
Replace the intake manifold (swirl control valve) (See page Engine / Hybrid System>1KD-FTV (INTAKE / EXHAUST)>INTAKE MANIFOLD>REMOVAL).
NEXT
Replace the vacuum control valve set (See page Engine / Hybrid System>1KD-FTV (INTAKE / EXHAUST)>INTAKE MANIFOLD>REMOVAL).
- HINT:
-
Before replacing the vacuum control valve set, perform a wire harness inspection and if there are any problems with the wire harness, repair or replace it.
NEXT
Disconnect the vacuum hoses from the vacuum switching valve (for Swirl Control Valve).
Connect the intelligent tester to the DLC3.
Turn the ignition switch to ON and turn the tester on.
Enter the following menus: Powertrain / Engine / Active Test / Activate the VSV for Swirl Control Valve.
Check the VSV operation when it is operated using the intelligent tester.
- OK:
Tester Operation Specified Condition VSV ON Air from port E flows out through port F VSV OFF Air from port E flows out through air filter
Reconnect the vacuum hoses.
OK
NG
Replace the ECM (See page Engine / Hybrid System>1KD-FTV (ENGINE CONTROL)>ECM>REMOVAL).
NEXT
Connect the intelligent tester to the DLC3.
Start the engine and turn the tester on.
Warm up the engine (engine coolant temperature is 70°C (158°F) or higher).
Enter the following menus: Powertrain / Engine and ECT / Data List / MAP and MAF.
Take a snapshot when the engine speed is maintained at 4000 rpm with no load.
Read the values of "MAP" and "MAF" in the Data List using the snapshot review function.
- OK:
MAF is 84 g/sec. or more and MAP is 114 kPa or higher.
- HINT:
- ·
The shift lever should be in neutral and the A/C switch and all accessory switches should be off.
·The above values were measured under standard atmospheric pressure. The values are influenced by elevation, weather conditions, etc.
Standard atmospheric pressure is 101 kPa. For every 100 m increase in elevation, pressure drops by 1 kPa. This varies by weather.
NEXT