1GD-FTV ENGINE MECHANICAL CAMSHAFT(w/o EGR Cooler) REMOVAL
CAUTION / NOTICE / HINT
- NOTICE:
- ·
When replacing the parts in the following chart (A), replace the No. 1 injection pipe sub-assembly, No. 2 injection pipe sub-assembly and/or fuel inlet pipe sub-assembly with new ones.
Replaced Parts (A) Pipes Requiring New Replacement Injector assembly (including shuffling the injector assemblies between the cylinders) ·No. 1 injection pipe sub-assembly
·No. 1 injection pipe sub-assembly
Supply pump assembly Fuel inlet pipe sub-assembly ·Common rail assembly
·Cylinder block sub-assembly
·Cylinder head sub-assembly
·Cylinder head gasket
·Timing chain case assembly
·No. 1 injection pipe sub-assembly
·No. 2 injection pipe sub-assembly
·Fuel inlet pipe sub-assembly
·After removing the No. 1 injection pipe sub-assembly, No. 2 injection pipe sub-assembly and/or fuel inlet pipe sub-assembly, clean them with a brush and compressed air.
·The injector assembly is a precision instrument. Do not use the injector assembly if it is struck or dropped.
·The supply pump assembly is a precision instrument. Do not use the supply pump assembly if it is struck or dropped.
·Hold the supply pump assembly itself during removal and installation. Do not hold the pre-stroke control valve or fuel pipe, etc.
·Make sure foreign matter does not enter the fuel path.
PROCEDURE

 1.REMOVE ENGINE ASSEMBLY
29300
2.REMOVE VACUUM PUMP ASSEMBLY
11382C
3.REMOVE CAMSHAFT OIL SEAL RETAINER
16278
4.REMOVE NO. 2 WATER BY-PASS PIPE
12633
5.REMOVE NO. 3 ENGINE COVER BRACKET
12632
6.REMOVE NO. 2 ENGINE COVER BRACKET
12261
7.REMOVE PCV HOSE (except Cold Area Specification Vehicles)
12203
8.REMOVE PCV PIPE SUB-ASSEMBLY (for Cold Area Specification Vehicles)
77246C
9.REMOVE FUEL MAIN TUBE SUPPORT
26100G
10.REMOVE DIESEL THROTTLE BODY ASSEMBLY
23265C
11.REMOVE GAS FILTER
89421C
12.REMOVE TURBO PRESSURE SENSOR
25625
13.REMOVE EGR VALVE BRACKET (w/ EGR System)
25612
14.REMOVE NO. 2 EGR PIPE (w/ EGR System)
25800
15.REMOVE ELECTRIC EGR CONTROL VALVE ASSEMBLY (w/ EGR System)
25624
16.REMOVE EGR VALVE ADAPTER SUB-ASSEMBLY
17.REMOVE WIRING HARNESS CLAMP BRACKET
18.REMOVE HARNESS BRACKET
23760
19.REMOVE NOZZLE LEAKAGE PIPE ASSEMBLY
20.REMOVE NO. 1 INJECTION PIPE SUB-ASSEMBLY AND NO. 2 INJECTION PIPE SUB-ASSEMBLY
23670
21.REMOVE INJECTOR ASSEMBLY
23682
22.REMOVE NOZZLE HOLDER GASKET
11301M
23.REMOVE CAMSHAFT POSITION SENSOR
11201
24.REMOVE CYLINDER HEAD COVER SUB-ASSEMBLY
25.SET NO. 1 CYLINDER TO TDC/COMPRESSION
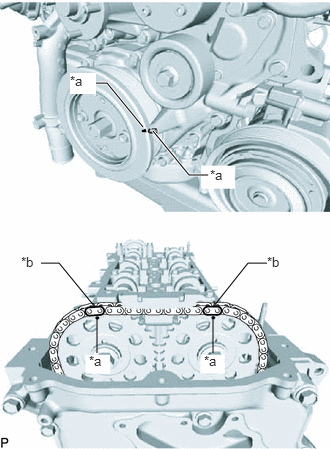
Align the timing mark of the crankshaft pulley and timing chain cover by rotating the crankshaft clockwise.
| *a | Timing Mark |
| *b | Paint Mark |
Make sure that the timing mark of the camshaft timing sprocket is at the top.
- HINT:
-
If the timing mark is not at the top, turn the crankshaft pulley 1 revolution so that the timing mark is at the top (set the No. 1 piston to TDC/ compression).
Place paint marks on the No. 2 chain sub-assembly.
13566B
26.REMOVE TIMING CHAIN GUIDE
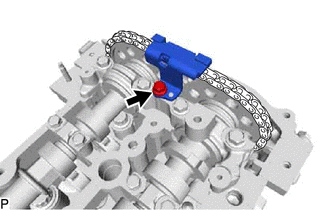
Remove the bolt and timing chain guide from the cylinder head sub-assembly.
27.REMOVE CAMSHAFT
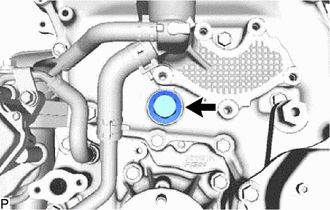
Remove the oil pump relief valve plug and gasket from timing chain cover.
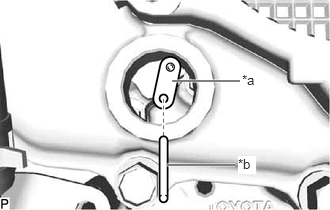
Insert a pin into stopper plate hole of the No. 2 chain tensioner assembly and lock the No. 2 chain tensioner assembly.
| *a | Stopper Plate |
| *b | Pin |
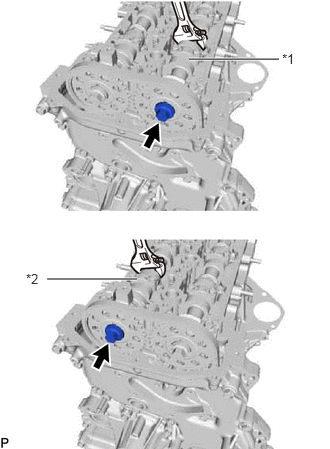
Hold the hexagonal portion of the camshaft with a wrench and loosen the 2 bolts from the No. 1 camshaft and No. 2 camshaft.
- CAUTION:
-
Be careful not to damage the cylinder head sub-assembly with the wrench.
| *1 | No. 1 Camshaft |
| *2 | No. 2 Camshaft |
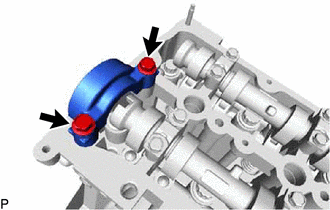
Remove the 2 bolts and No. 3 camshaft bearing cap from the cylinder head sub-assembly.
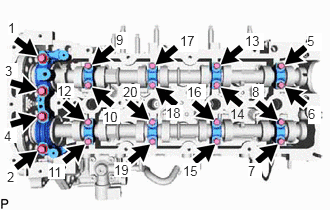
Using several steps, and remove the 20 bolt, No. 1 camshaft bearing cap and 8 No. 2 camshaft bearing caps from the cylinder head sub-assembly.
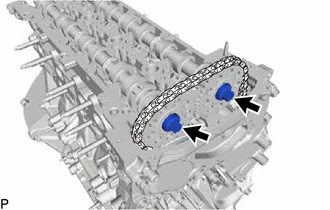
Raise the No. 1 camshaft and remove the bolt from the No. 1 camshaft.
Raise the No. 2 camshaft and remove the bolt from the No. 2 camshaft.
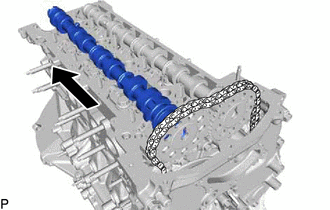
Remove the No. 2 camshaft from the camshaft timing sprocket.
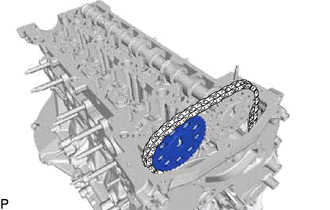
Remove the camshaft timing sprocket from the No. 2 chain sub-assembly.
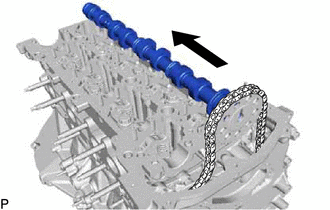
Remove the No. 1 camshaft from the camshaft timing sprocket.
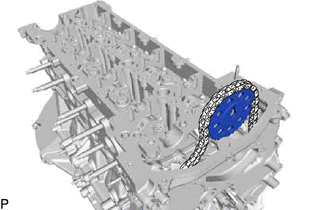
Remove the camshaft timing sprocket from the No. 2 chain sub-assembly.
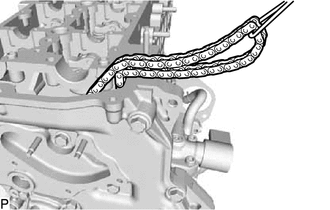
Suspend the No. 2 chain sub-assembly with a string or equivalent.
- HINT:
-
Be careful not to drop the No. 2 chain sub-assembly inside the timing chain cover assembly.