1GD-FTV ENGINE MECHANICAL ENGINE ASSEMBLY REMOVAL
CAUTION / NOTICE / HINT
The necessary procedures (adjustment, calibration, initialization, or registration) that must be performed after parts are removed, installed, or replaced during the engine assembly removal/installation are shown below.
| Replaced Part or Performed Procedure | Necessary Procedure | Effect/Inoperative Function when Necessary Procedure not Performed | Link |
|---|---|---|---|
| Battery terminal is disconnected/reconnected | Correction of steering angle neutral point | Multi-terrain monitor system | ( ) |
- HINT:
-
When the cable is disconnected/reconnected to the auxiliary battery terminal, systems temporarily stop operating. However, each system has a function that completes learning the first time the system is used.
- ·
Learning completes when vehicle is driven
Effect/Inoperative Function When Necessary Procedures are not Performed Necessary Procedures Link Lane departure alert system Drive the vehicle straight ahead at 40 km/h (25 mph) or more for 10 seconds or more. ( )
Pre-collision system Lighting system (EXT) (for LED Headlight) Stop and start system Drive the vehicle until stop and start control is permitted (approximately 5 to 60 minutes) ( )
Vehicle stability control system (for Hydraulic brake booster) Drive the vehicle straight ahead at 40 km/h (25 mph) or more for at least 10 seconds. ( )
PROCEDURE

 1. PRECAUTION
- NOTICE:
-
After turning the ignition switch off, waiting time may be required before disconnecting the cable from the battery terminal (See page General>INTRODUCTION>REPAIR INSTRUCTION>PRECAUTION).
2.DISCONNECT CABLE FROM NEGATIVE BATTERY TERMINAL
53301
3.REMOVE HOOD SUB-ASSEMBLY
Disconnect the washer nozzle hose.
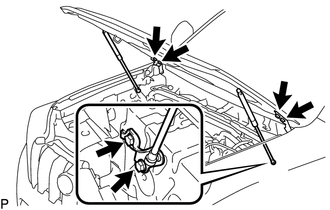
Remove the 8 bolts and hood sub-assembly.
- NOTICE:
-
If the hood support is detached from the ball joint, it become non-reusable. Therefore, do not detach the hood support from the ball joint unless replacing it.
55781E
4.REMOVE COWL TOP VENTILATOR LOUVER SUB-ASSEMBLY
52129B
5.REMOVE FRONT BUMPER LOWER COVER
Remove the clip, 5 bolts and front bumper lower cover.
51405A
6.REMOVE NO. 1 ENGINE UNDER COVER SUB-ASSEMBLY
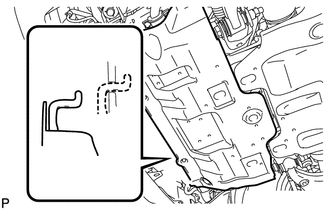
Remove the 4 bolts and No. 1 engine under cover sub-assembly.
51495
7.REMOVE TRANSMISSION UNDER COVER
Remove the 2 bolts and transmission under cover.
51450
8.REMOVE REAR ENGINE UNDER COVER ASSEMBLY
Remove the 4 bolts and rear engine under cover assembly.
9.DRAIN ENGINE COOLANT
10.DRAIN ENGINE COOLANT (w/ Urea SCR System)
11.DRAIN ENGINE OIL
12.DRAIN MANUAL TRANSMISSION OIL (for Manual Transmission)
13.DRAIN AUTOMATIC TRANSMISSION FLUID (for Automatic Transmission)
16400
14.REMOVE RADIATOR ASSEMBLY
82121
15.DISCONNECT ENGINE WIRE
Remove the ECM (See page Engine / Hybrid System>1GD-FTV (ENGINE CONTROL)>ECM>REMOVAL).
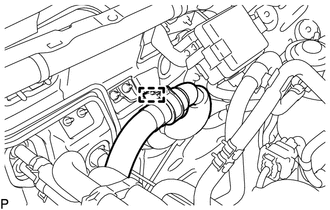
Detach the clamp and disconnect the engine wire from the bracket.
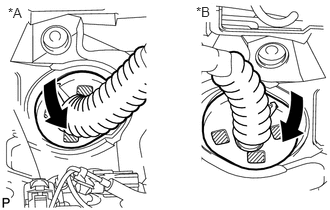
Detach the grommet from the wire harness support.
| *A | for LHD |
| *B | for RHD |
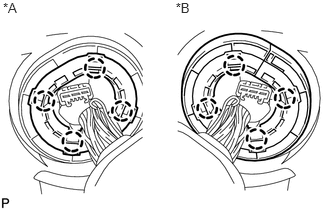
Detach the 4 claws and remove the wire harness support from the vehicle, and then pull out the ECM connector to remove it from the vehicle.
| *A | for LHD |
| *B | for RHD |
12601B
16.REMOVE NO. 1 ENGINE COVER SUB-ASSEMBLY (w/o Urea SCR System)
17940D
17.REMOVE INTERCOOLER ASSEMBLY (w/ Urea SCR System)
18.REMOVE AIR CLEANER CAP WITH AIR CLEANER HOSE
17801
19.REMOVE AIR CLEANER FILTER ELEMENT SUB-ASSEMBLY
20.REMOVE AIR CLEANER CASE
17341K
21.REMOVE INTERCOOLER AIR HOSE (w/o Urea SCR System)
17342F
22.REMOVE NO. 2 INTERCOOLER AIR HOSE (w/o Urea SCR System)
77820
23.DISCONNECT UREA TANK FILLER PIPE ASSEMBLY (w/ Urea SCR System)
44306
24.DISCONNECT VANE PUMP OIL RESERVOIR SUB-ASSEMBLY
23271H
25.DISCONNECT NO. 1 FUEL HOSE
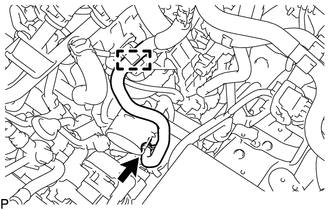
Disconnect the clamp from the No. 1 fuel hose.
Slide the clamp and disconnect the No. 1 fuel hose from the No. 2 fuel pipe.
23273H
26.DISCONNECT NO. 2 FUEL HOSE
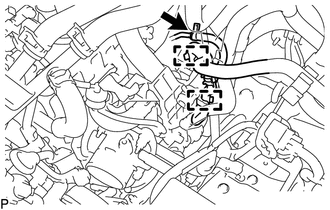
Disconnect the 2 clamps from the No. 2 fuel hose.
Slide the clamp and disconnect the No. 2 fuel hose from the No. 3 nozzle leakage pipe.
82121
27.DISCONNECT ENGINE WIRE
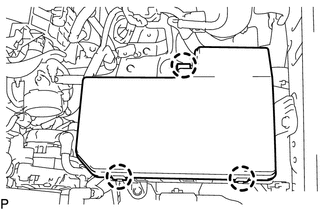
Detach the 3 claws and remove the No. 1 relay block cover upper from the engine room relay block.
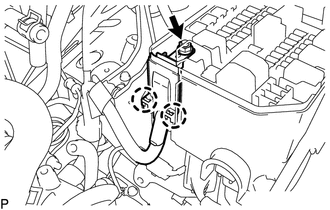
Remove the nut and detach 2 claws.
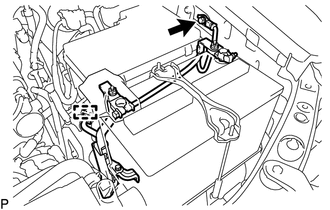
Remove the bolt.
Detach the clamp and disconnect the No. 2 engine wire.
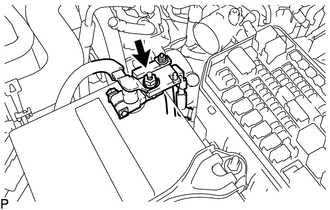
Remove the nut and disconnect the engine room main wire from the battery.
74481
28.REMOVE BATTERY HOLD DOWN CLAMP
Loosen the 2 nuts and remove the battery hold down clamp from the body.
28800
29.REMOVE BATTERY
74431
30.REMOVE BATTERY TRAY
87209
31.REMOVE WATER HOSE SUB-ASSEMBLY
44310
32.DISCONNECT VANE PUMP ASSEMBLY
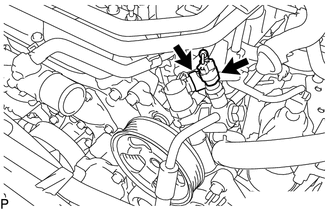
w/ Power Steering Oil Pressure Switch:
Disconnect the 2 connectors from the vane pump assembly.
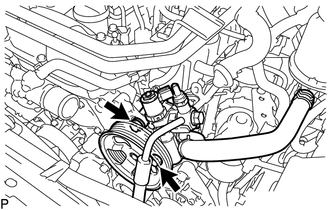
Remove the 2 bolt and disconnect the vane pump assembly from the generator bracket.
27020
33.REMOVE GENERATOR ASSEMBLY
88320
34.DISCONNECT COOLER COMPRESSOR ASSEMBLY
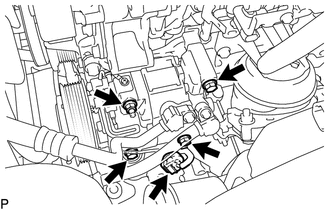
Disconnect the connector from the cooler compressor assembly.
Remove the 3 bolts and nut.
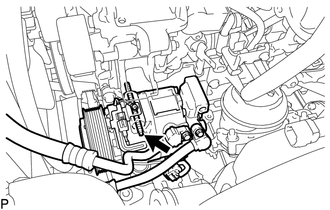
Using an E8 "TORX" socket wrench, remove the stud bolt and disconnect the cooler compressor assembly from the compressor mounting bracket.
87209B
35.REMOVE WATER HOSE SUB-ASSEMBLY B (w/ Viscous Heater)
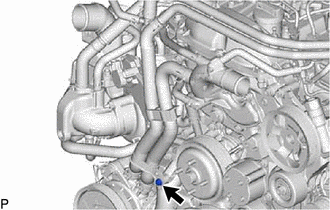
Remove the bolt and disconnect the water hose sub-assembly B from the water inlet.
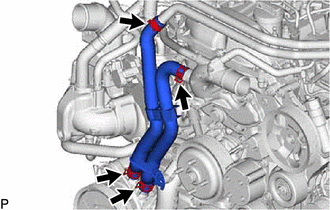
Slide the 4 clamps and remove the water hose sub-assembly B from the No. 2 water pipe and water outlet sub-assembly.
87120G
36.REMOVE VISCOUS HEATER WITH MAGNET CLUTCH ASSEMBLY (w/ Viscous Heater)
Disconnect the connector from the viscous heater with magnet clutch assembly.
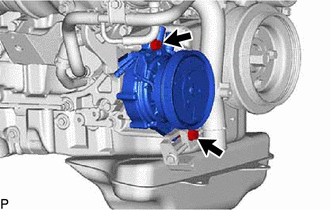
Remove the 2 bolts and viscous heater with magnet clutch assembly from No. 1 viscous heater bracket.
17410
37.REMOVE FRONT EXHAUST PIPE ASSEMBLY
37140
38.REMOVE FRONT PROPELLER SHAFT ASSEMBLY
37110
39.REMOVE PROPELLER SHAFT ASSEMBLY
33030
40.REMOVE MANUAL TRANSMISSION UNIT ASSEMBLY (for Manual Transmission)
32101A
41.REMOVE DRIVE PLATE AND TORQUE CONVERTER CLUTCH SETTING BOLT (for Automatic Transmission)
35000
42.REMOVE AUTOMATIC TRANSMISSION ASSEMBLY (for Automatic Transmission)
31210
43.REMOVE CLUTCH COVER ASSEMBLY (for Manual Transmission)
31250
44.REMOVE CLUTCH DISC ASSEMBLY (for Manual Transmission)
13405
45.REMOVE FLYWHEEL SUB-ASSEMBLY
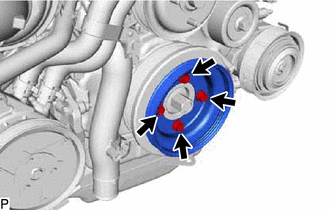
w/ Viscous Heater:
Remove the 4 bolts, viscous heater crankshaft pulley and crankshaft pulley cover from the crankshaft pulley.
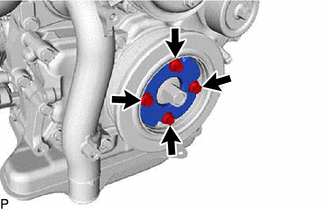
w/o Viscous Heater:
Remove the 4 bolts and crankshaft pulley cover from the crankshaft pulley.
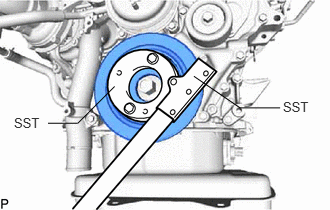
Using SST, hold the crankshaft pulley.
- SST
- 09213-58014
09330-00021
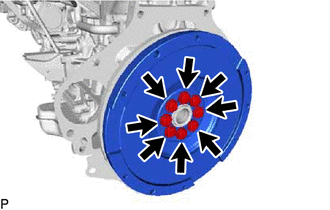
for Manual Transmission:
Remove the 8 bolts and flywheel sub-assembly from the crankshaft.
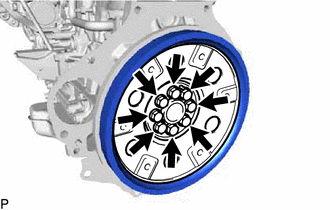
for Automatic Transmission:
Remove the 8 bolts, rear drive plate spacer, pump impeller drive plate and flywheel sub-assembly from the crankshaft.
11355
46.REMOVE REAR END PLATE
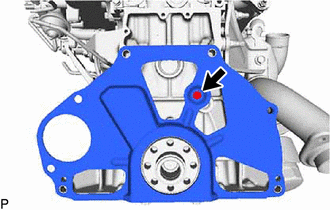
Remove the bolt and rear end plate from the cylinder block sub-assembly.
47.INSTALL ENGINE HANGER
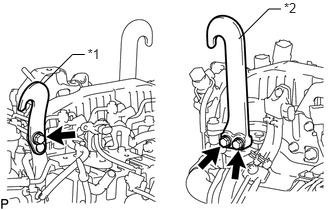
Install the No. 1 engine hanger upper and No. 2 engine hanger with the 3 bolts as shown in the illustration.
- Torque:
- for No. 1 engine hanger upper : 29 N*m (296 kgf*cm, 21 ft.*lbf)
- for No. 2 engine hanger : 26 N*m (265 kgf*cm, 19 ft.*lbf)
- HINT:
No. 1 Engine Hanger Upper 12284-11010 No. 2 Engine Hanger 12282-11080 Bolt 91671-80835 or 90119-08474 and 91552-81025
| *1 | No. 1 Engine Hanger Upper |
| *2 | No. 2 Engine Hanger |
48.REMOVE ENGINE ASSEMBLY
Attach an engine sling device and hang the engine assembly with a chain block.
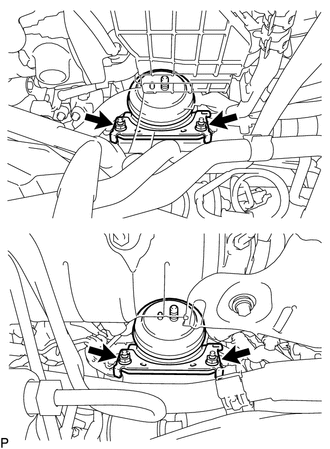
Remove the 4 bolts and 4 nuts from the body.
Lift the engine assembly out from the vehicle slowly and carefully.
- NOTICE:
- ·
Make sure that the engine assembly is clear of all wiring and hoses.
·While lowering the engine assembly from the vehicle, do not allow it to contact the vehicle.
49.INSTALL ENGINE ASSEMBLY TO ENGINE STAND
- NOTICE:
- ·
Pay attention to the angle of the sling device as the engine assembly or engine hangers may be damaged or deformed if the angle is incorrect.
·With the exception of installing the engine assembly to an engine stand or removing the engine assembly from an engine stand, do not perform any work on the engine assembly while it is suspended, as doing so is dangerous.
Install the engine assembly to engine stand with the bolts.
Remove the 3 bolts, No. 1 engine hanger upper and No. 2 engine hanger.
82121
50.REMOVE ENGINE WIRE
Remove the engine wire from the engine assembly.
12361
51.REMOVE FRONT ENGINE MOUNTING INSULATOR (for LH Side)
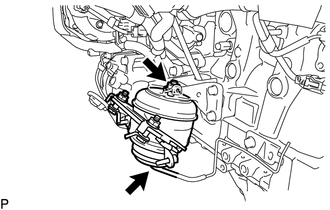
Disconnect the vacuum hose from the front engine mounting insulator.
Remove the nut and front engine mounting insulator from the front engine mounting bracket.