1GD-FTV INTAKE / EXHAUST INTAKE MANIFOLD INSTALLATION
CAUTION / NOTICE / HINT
- NOTICE:
- ·
When replacing the parts in the following chart (A), replace the No. 1 injection pipe subassembly, No. 2 injection pipe sub-assembly and/or fuel inlet pipe sub-assembly with new ones
Replaced Parts (A) Pipes Requiring New Replacement Injector assembly (including shuffling the injector assemblies between the cylinders) ·No. 1 injection pipe sub-assembly
·No. 2 injection pipe sub-assembly
Supply pump assembly Fuel inlet pipe sub-assembly ·Common rail assembly
·Cylinder block sub-assembly
·Cylinder head sub-assembly
·Cylinder head gasket
·Timing chain case assembly
·No. 1 injection pipe sub-assembly
·No. 2 injection pipe sub-assembly
·Fuel inlet pipe sub-assembly
·After removing the No. 1 injection pipe sub-assembly, No. 2 injection pipe sub-assembly and/or fuel inlet pipe sub-assembly, clean them with a brush and compressed air.
PROCEDURE

 17111
1.INSTALL INTAKE MANIFOLD
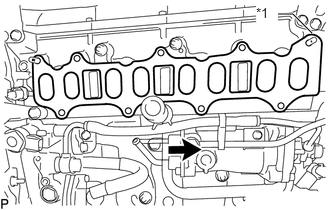
| *1 | Protrusion |

|
Rear side |
Install a new gasket to the cylinder head sub-assembly.
- HINT:
-
Install the gasket with the protrusion the rear side of the vehicle as shown in the illustration.
Temporarily install the intake manifold with the 7 bolts and 2 nuts.
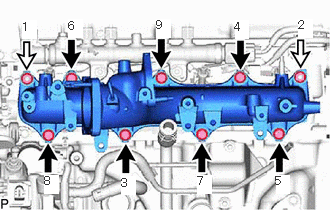
|
|
Bolt |

|
Nut |
Tighten the 7 bolts and 2 nuts in the order shown in the illustration.
- Torque:
- 23 N*m (235 kgf*cm, 17 ft.*lbf)
Connect the wire harness bracket A, B and C with the 3 bolts.
- Torque:
- 13 N*m (133 kgf*cm, 10 ft.*lbf)
23770
2.INSTALL NO. 2 NOZZLE LEAKAGE PIPE ASSEMBLY
Install the No. 2 nozzle leakage pipe assembly with the 2 bolts.
- Torque:
- 10 N*m (102 kgf*cm, 7 ft.*lbf)
Connect the No. 6 fuel hose to the No. 3 nozzle leakage pipe assembly and slide the clamp to secure the hoses.
Install the No. 4 fuel hose and No. 5 fuel hose to the No. 2 nozzle leakage pipe assembly, and slide the 4 clamps to secure the hose.
23804C
3.INSTALL FUEL INLET PIPE SUB-ASSEMBLY
- NOTICE:
-
When replacing the fuel supply pump assembly, it is necessary to replace the fuel inlet pipe subassembly, No. 1 injection pipe clamp and No. 2 injection pipe clamp with a new one. Keep the fuel inlet pipe sub-assembly free of foreign matter.
When replacing the No. 1 injection pipe clamp and No. 2 injection pipe clamp with new ones:
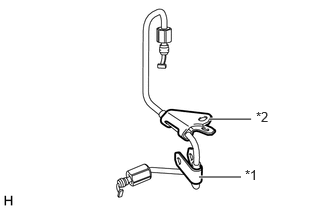
| *1 | No. 1 Injection Pipe Clamp |
| *2 | No. 2 Injection Pipe Clamp |
Set a new No. 1 injection pipe clamp and No. 2 injection pipe clamp on the fuel inlet pipe sub-assembly.
- NOTICE:
-
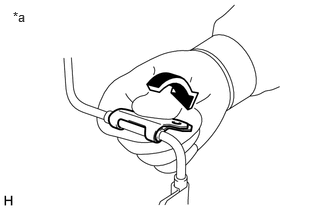 0.135,0.094 0.448,0.25 0.313,0.156 10 false *a
*a INCORRECT
-
When installing, do not pinch together the No. 1 injection pipe clamp or No. 2 injection pipe clamp.
Temporarily install the fuel inlet pipe sub-assembly by turning its union nut by hand until it stops.
When reusing the No. 1 injection pipe clamp and No. 2 injection pipe clamp:
Install the No. 1 injection pipe clamp and No. 2 injection pipe clamp with the 2 bolts.
- Torque:
- 10 N*m (102 kgf*cm, 7 ft.*lbf)
When replacing the No. 1 injection pipe clamp and No. 2 injection pipe clamp with new ones:
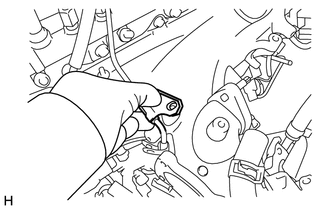
Pinch together the clamp while aligning it with the bolt installation hole of the No. 2 injection pipe clamp by hand, and then install the bolt to the intake manifold.
- NOTICE:
- ·
Do not pinch together the No. 2 injection pipe clamp while tightening the bolt.
·Pinch together the No. 2 injection pipe clamp by hand, and then install the bolt.
·Do not forcibly align the position of the hole using the bolt.
- Torque:
- 10 N*m (102 kgf*cm, 7 ft.*lbf)
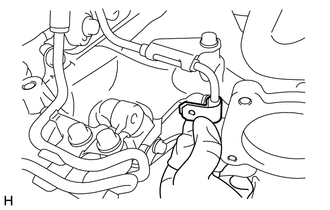
Pinch together the clamp while aligning it with the bolt installation hole of the No. 1 injection pipe clamp by hand, and then install the bolt to the intake manifold.
- NOTICE:
- ·
Do not pinch together the No. 1 injection pipe clamp while tightening the bolt.
·Pinch together the No. 1 injection pipe clamp by hand, and then install the bolt.
·Do not forcibly align the position of the hole using the bolt.
- Torque:
- 10 N*m (102 kgf*cm, 7 ft.*lbf)
With Common Rail Side Number Mark (24N):
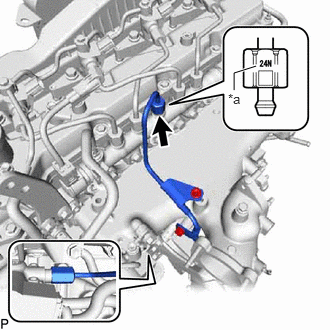
| *a | Number Mark (24N) |
Make sure that the "24N" mark faces the common rail side of the fuel inlet pipe sub-assembly at the position shown in the illustration.
- NOTICE:
-
Check for the number mark and tighten the parts to the specified tightening torque.
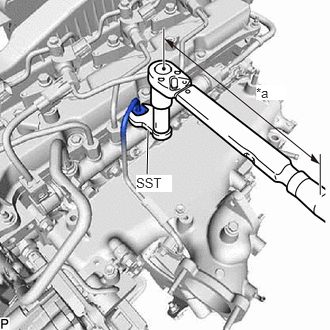
| *a | Torque Wrench Fulcrum Length |
Using SST, tighten the fuel inlet pipe sub-assembly union nut on the common rail side sub-assembly.
- SST
- 09245-11010
- Torque:
- Specified tightening torque : 24 N*m (245 kgf*cm, 18 ft.*lbf)
- HINT:
- ·
Calculate the torque wrench reading when changing the fulcrum length of the torque wrench.
·When using SST (fulcrum length of 50 mm (1.97 in.)) + torque wrench (fulcrum length of 180 mm (7.09 in.)): 18.8 N*m (192 kgf*cm, 14 ft.*lbf)
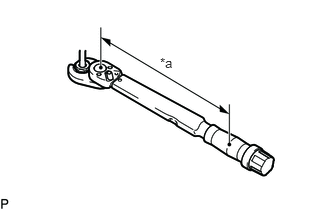
| *a | Torque Wrench Fulcrum Length |
Using a 19 mm union nut wrench, tighten the fuel inlet pipe sub-assembly union nut on the fuel supply pump assembly side.
- Torque:
- Specified tightening torque : 28 N*m (286 kgf*cm, 21 ft.*lbf)
- HINT:
- ·
Calculate the torque wrench reading when changing the fulcrum length of the torque wrench.
·When using a union nut wrench (fulcrum length of 30 mm (1.18 in.)) + torque wrench (fulcrum length of 180 mm (7.09 in.)): 24 N*m (245 kgf*cm, 18 ft.*lbf)
Without Common Rail Side Number Mark (24N):
| *a | Torque Wrench Fulcrum Length |
Using SST, tighten the fuel inlet pipe sub-assembly union nut on the common rail side sub-assembly.
- SST
- 09245-11010
- Torque:
- Specified tightening torque : 40 N*m (408 kgf*cm, 30 ft.*lbf)
- HINT:
- ·
Calculate the torque wrench reading when changing the fulcrum length of the torque wrench.
·When using SST (fulcrum length of 50 mm (1.97 in.)) + torque wrench (fulcrum length of 180 mm (7.09 in.)): 31 N*m (316 kgf*cm, 23 ft.*lbf)
| *a | Torque Wrench Fulcrum Length |
Using a 19 mm union nut wrench, tighten the fuel inlet pipe sub-assembly union nut on the fuel supply pump assembly side.
- Torque:
- Specified tightening torque : 48 N*m (489 kgf*cm, 35 ft.*lbf)
- HINT:
- ·
Calculate the torque wrench reading when changing the fulcrum length of the torque wrench.
·When using a union nut wrench (fulcrum length of 30 mm (1.18 in.)) + torque wrench (fulcrum length of 180 mm (7.09 in.)): 41 N*m (418 kgf*cm, 30 ft.*lbf)
23815D
4.INSTALL NO. 3 FUEL PIPE
Temporarily install the No. 3 fuel pipe and 2 new gaskets with the union bolt and supply pump hollow screw.
Tighten the union bolt and supply pump hollow screw.
- Torque:
- 42 N*m (428 kgf*cm, 31 ft.*lbf)
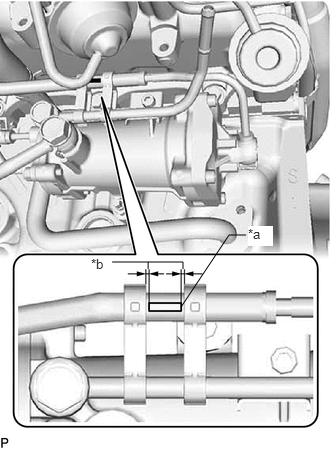
| *a | Torque Wrench Fulcrum Length |
| *b | 0 to 2 mm (0 to 0.787 in.) |
Install the 2 fuel pipe clamps to the No. 3 fuel pipe and fuel filter.
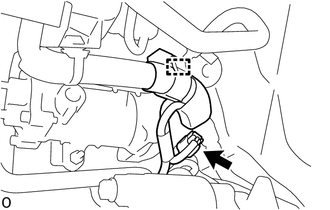
Connect the connector.
Attach the clamp to connect the wire harness.
23804D
5.INSTALL NO. 4 FUEL PIPE SUB-ASSEMBLY
Temporarily install the No. 4 fuel pipe sub-assembly and 2 new gaskets with the 2 union bolts and bolt.
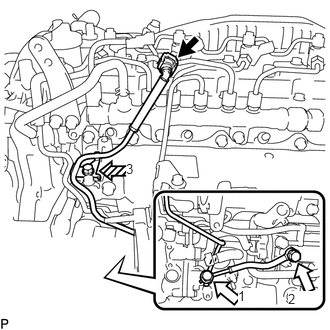
|
|
Union Bolt |

|
Bolt |
Tighten the 2 union bolts and bolts in the order shown in the illustration.
- Torque:
- union bolt : 42 N*m (428 kgf*cm, 31 ft.*lbf)
- bolt : 10 N*m (102 kgf*cm, 7 ft.*lbf)
Connect the No. 4 fuel pipe sub-assembly to the No. 1 fuel pipe.
Click hereEngine / Hybrid System>1GD-FTV (FUEL)>FUEL SYSTEM>PRECAUTION
17118
6.INSTALL MANIFOLD STAY
Install the manifold stay with the 2 bolts.
- Torque:
- 21 N*m (214 kgf*cm, 15 ft.*lbf)
Install the wiring harness clamp bracket with the bolt.
- Torque:
- 8.0 N*m (82 kgf*cm, 71 in.*lbf)
7.INSTALL WIRING HARNESS CLAMP BRACKET
Install the wiring harness clamp bracket with the bolt.
- Torque:
- 10 N*m (102 kgf*cm, 7 ft.*lbf)
Attach the 2 wire harness clamps.
Connect the diesel throttle body assembly connector and pre-stroke control valve connector.
23812D
8.INSTALL NO. 2 FUEL PIPE
Connect the No. 2 fuel pipe and with the bolt.
- Torque:
- 10 N*m (102 kgf*cm, 7 ft.*lbf)
11409
9.REMOVE ENGINE OIL LEVEL DIPSTICK GUIDE
Apply a light coat of engine oil to a new O-ring and grommet.
Install the O-ring to the engine oil level dipstick guide.
Install the engine oil level dipstick guide with the bolt.
- Torque:
- 10 N*m (102 kgf*cm, 7 ft.*lbf)
Connect the vacuum hose to the intake manifold.
Install the engine oil level dipstick.
w/ No. 2 Fuel Pipe Clamp:
Attach the No. 2 fuel pipe clamp to the engine oil level dipstick guide.
25624
10.INSTALL EGR VALVE ADAPTER (w/o EGR Cooler)
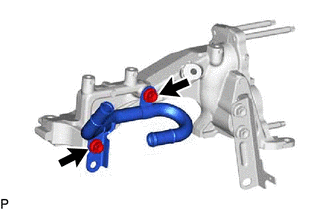
Install the EGR pipe stay to the EGR valve adapter with the 2 bolts.
- Torque:
- 25 N*m (255 kgf*cm, 18 ft.*lbf)
Temporarily install the EGR valve adapter to the intake manifold with the 4 bolts.
Tighten the 4 bolts in the order shown in the illustration.
- NOTICE:
-
Make sure to tighten the bolts in the correct order.
- Torque:
- 21 N*m (214 kgf*cm, 15 ft.*lbf)
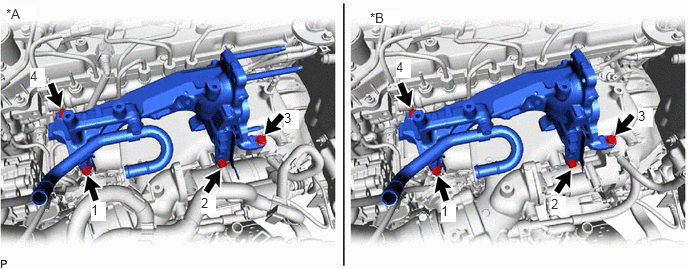
| *A | w/ EGR System | *B | w/o EGR System |
w/ EGR System:
Install a new gasket and connect the No. 1 EGR pipe sub-assembly to the EGR valve adapter with 2 new nuts.
- Torque:
- 29 N*m (296 kgf*cm, 21 ft.*lbf)
w/ EGR System:
Connect the No. 4 water by-pass pipe sub-assembly to the intake manifold with the 2 bolts.
- Torque:
- 10 N*m (102 kgf*cm, 7 ft.*lbf)
Connect the water hose to the EGR valve adapter, and slide the clamp to secure the hose.
Connect the No. 7 water by-pass hose to the EGR pipe stay, and slide the clamp to secure the hose.
w/o EGR System:
Connect the No. 4 water by-pass pipe sub-assembly to the intake manifold with the 2 bolts.
- Torque:
- 10 N*m (102 kgf*cm, 7 ft.*lbf)
Connect the No. 7 water by-pass hose to the EGR pipe stay, and slide the clamp to secure the hose.
w/ EGR System:
Install the No. 3 water by-pass pipe sub-assembly to the EGR valve adapter with the 2 bolts.
- Torque:
- 10 N*m (102 kgf*cm, 7 ft.*lbf)
Connect the No. 8 water by-pass hose to the No. 3 water by-pass pipe sub-assembly, and slide the clamp to secure the hose.
w/o EGR System:
Install the No. 3 water by-pass pipe sub-assembly to the EGR valve adapter with the 2 bolts.
- Torque:
- 10 N*m (102 kgf*cm, 7 ft.*lbf)
Connect the No. 4 fuel hose to the No. 3 water by-pass pipe sub-assembly.
82121
11.CONNECT ENGINE WIRE (w/o EGR System)
Attach the 3 clamps and install the bolt.
- Torque:
- 10 N*m (102 kgf*cm, 7 ft.*lbf)
Connect the 3 connectors.
Attach the 2 clamps and install the 3 bolts.
- Torque:
- 10 N*m (102 kgf*cm, 7 ft.*lbf)
Connect the connector to the sensor wire of the common rail assembly.
Connect the connector to the glow plug connector.
Connect the 4 connectors to the 4 injector assemblies.
Connect the connector to the camshaft position sensor.
Attach the 2 clamps and connect the 2 connectors to the turbocharger sub-assembly.
44306
12.CONNECT VANE PUMP OIL RESERVOIR SUB-ASSEMBLY
Connect the vane pump oil reservoir sub-assembly to the body with the 2 bolts.
- Torque:
- 13.5 N*m (138 kgf*cm, 10 ft.*lbf)
12632
13.INSTALL NO. 2 ENGINE COVER BRACKET (w/o EGR System)
Install the No. 2 engine cover bracket to the No. 3 water by-pass pipe sub-assembly and No. 2 EGR valve assembly with the 2 bolts.
- Torque:
- 10 N*m (102 kgf*cm, 7 ft.*lbf)
12633
14.INSTALL NO. 3 ENGINE COVER BRACKET (w/o EGR System)
Install the No. 3 engine cover bracket to the engine cover bracket and No. 2 engine cover bracket with the 2 bolts.
- Torque:
- 21 N*m (214 kgf*cm, 15 ft.*lbf)
89421C
15.INSTALL TURBO PRESSURE SENSOR (w/o EGR System)
Install the turbo pressure sensor to the No. 3 water by-pass pipe sub-assembly with the bolt.
- Torque:
- 10 N*m (102 kgf*cm, 7 ft.*lbf)
Connect the connector to the turbo pressure sensor.
23265C
16.INSTALL GAS FILTER (w/o EGR System)
Install the gas filter to the gas filter bracket.
Connect the 2 vacuum hoses to the turbo pressure sensor and intake manifold.
16278
17.INSTALL NO. 2 WATER BY-PASS PIPE (w/o EGR System)
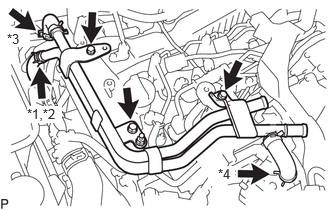
| *1 | Water Hose Sub-assembly |
| *2 | No. 13 Water By-pass Hose |
| *3 | No. 15 Water By-pass Hose |
| *4 | No. 16 Water By-pass Hose |
Install the No. 2 water by-pass pipe to the cylinder head cover sub-assembly, No. 3 water by-pass pipe sub-assembly and No. 2 engine cover bracket with the 3 bolts.
- Torque:
- 10 N*m (102 kgf*cm, 7 ft.*lbf)
Connect the No. 16 water by-pass hose to the No. 1 EGR cooler, and slide the clamp to secure the hose.
Connect the No. 15 water by-pass hose to the water by-pass pipe, and slide the clamp to secure the hose.
w/o Viscous Heater:
Connect the No. 13 water by-pass hose to the No. 2 water by-pass pipe, and slide the clamp to secure the hose.
w/ Viscous Heater:
Connect the water hose sub-assembly to the No. 2 water by-pass pipe, and slide the clamp to secure the hose.
87209
18.CONNECT WATER HOSE SUB-ASSEMBLY (w/o EGR System)
Connect the water hose sub-assembly to the No. 2 water by-pass pipe, and slide the 2 clamps to secure the hose.
26100G
19.INSTALL DIESEL THROTTLE BODY ASSEMBLY (w/o EGR System)
25800
20.INSTALL ELECTRIC EGR CONTROL VALVE ASSEMBLY (w/ EGR System without EGR Cooler)
25800
21.INSTALL EGR COOLER ASSEMBLY (w/ EGR Cooler)
53737A
22.INSTALL FRONT NO. 1 FENDER APRON TO FRAME SEAL LH
23.CONNECT CABLE TO NEGATIVE BATTERY TERMINAL
24. INITIALIZATION AFTER RECONNECTING BATTERY TERMINAL
Click hereGeneral>SETUP>WHEN DISCONNECTING OR RECONNECTING BATTERY TERMINAL>WORK PROCEDURE
- HINT:
-
When disconnecting and reconnecting the battery, there is an automatic learning function that completes learning when the respective system is used.
-
Click hereGeneral>SETUP>WHEN DISCONNECTING OR RECONNECTING BATTERY TERMINAL>AUTOMATIC LEARNING CHART
25.ADD ENGINE COOLANT (for Water Cooled Type Intercooler)
26.ADD ENGINE COOLANT
27.BLEED AIR FROM FUEL SYSTEM
28.INSPECT ENGINE OIL LEVEL
29.INSPECT FOR COOLANT LEAK (for Water Cooled Type Intercooler)
30.INSPECT FOR COOLANT LEAK
31.INSPECT FOR OIL LEAK
32.INSPECT FOR FUEL LEAK