B15C3 Speaker Output Short
Diagnostic trouble codes · Vehicles built from Jan 2012
Versions by build date: Sep 2011 – Dec 2011 from Jan 2012
DESCRIPTION
| DTC Code |
DTC Detection Condition |
Trouble Area |
| B15C3 |
A short is detected in the speaker output circuit. |
|
WIRING DIAGRAM
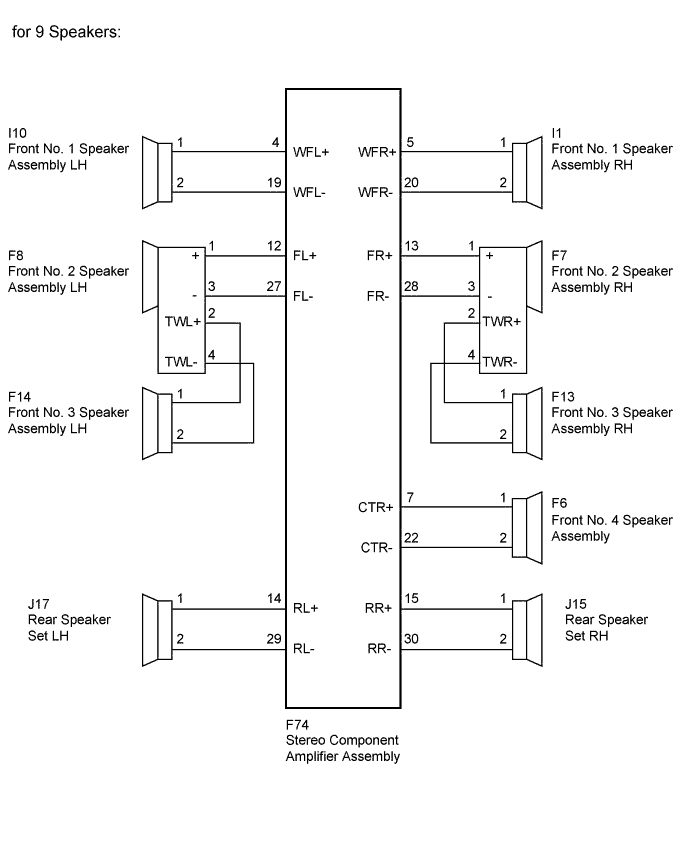

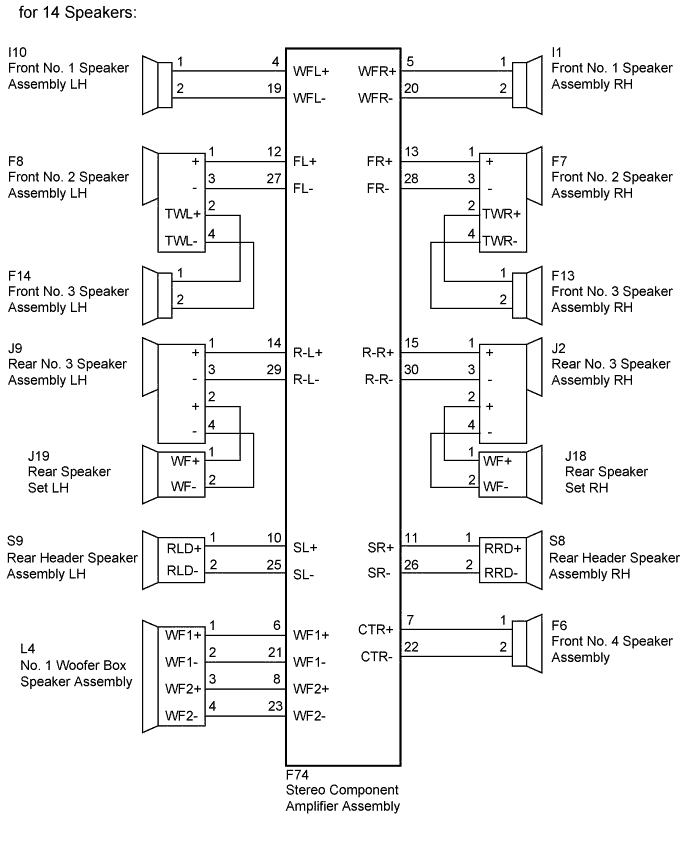
INSPECTION PROCEDURE
- HINT:
- After the inspection is completed, clear the DTCs.
| 1. CHECK DTC |

Clear the DTC (Click here).
| NEXT | |
 |
| 2. CHECK DTC |
Recheck for DTCs and check if the same DTC is output again (Click here).
- OK:
- DTC B15C3 is not output.
|
|
||||

| OK | ||
 |
||
| ||
| 3. CHECK HARNESS AND CONNECTOR (STEREO COMPONENT AMPLIFIER ASSEMBLY - SPEAKERS) |
- *1: for RH Side
- *2: for LH Side
- *3: for 14 Speakers
- *4: for 9 Speakers
Disconnect the F74 stereo component amplifier assembly connector.
Disconnect the I1*1 and/or I10*2 front No. 1 speaker assembly connector.
Disconnect the F7*1 and/or F8*2 front No. 2 speaker assembly connector.
Disconnect the F6 front No. 4 speaker assembly connector.
Disconnect the J15*1 and/or J17*2 rear speaker set connector*4.
Disconnect the J2*1 and/or J9*2 rear No. 3 speaker connector*3.
Disconnect the S8*1 and/or S9*2 rear header speaker assembly connector*3.
Disconnect the L4 No. 1 woofer box speaker connector.*3
Measure the resistance according to the value(s) in the table below.
- Standard Resistance:
Tester Connection
Condition
Specified Condition
F74-5 (WFR+) - I1-1*1
Always
Below 1 Ω
F74-20 (WFR-) - I1-2*1
Always
Below 1 Ω
F74-4 (WFL+) - I10-1*2
Always
Below 1 Ω
F74-19 (WFL-) - I10-2*2
Always
Below 1 Ω
F74-13 (FR+) - F7-1 (+)*1
Always
Below 1 Ω
F74-28 (FR-) - F7-3 (-)*1
Always
Below 1 Ω
F74-12 (FL+) - F8-1 (+)*2
Always
Below 1 Ω
F74-27 (FL-) - F8-2 (-)*2
Always
Below 1 Ω
F74-7 (CTR+) - F6-1
Always
Below 1 Ω
F74-22 (CTR-) - F6-2
Always
Below 1 Ω
F74-15 (RR+) - J15-1*1, *4
Always
Below 1 Ω
F74-30 (RR-) - J15-2*1, *4
Always
Below 1 Ω
F74-14 (RL+) - J17-1*2, *4
Always
Below 1 Ω
F74-29 (RL-) - J17-2*2, *4
Always
Below 1 Ω
F74-15 (R-R+) - J2-1 (+)*1, *3
Always
Below 1 Ω
F74-30 (R-R) - J2-3 (-)*1, *3
Always
Below 1 Ω
F74-14 (R-L+) - J9-1 (+)*2, *3
Always
Below 1 Ω
F74-29 (R-L-) - J9-3 (-)*2, *3
Always
Below 1 Ω
F74-11 (SR+) - S8-1 (RRD+)*1, *3
Always
Below 1 Ω
F74-26 (SR-) - S8-2 (RRD-)*1, *3
Always
Below 1 Ω
F74-10 (SL+) - S9-1 (RLD+)*2, *3
Always
Below 1 Ω
F74-25 (SL-) - S9-2 (RLD-)*2, *3
Always
Below 1 Ω
F74-6 (WF1+) - L4-1 (WF1+)*3
Always
Below 1 Ω
F74-21 (WF1-) - L4-2 (WF1-)*3
Always
Below 1 Ω
F74-8 (WF2+) - L4-3 (WF2+)*3
Always
Below 1 Ω
F74-23 (WF2-) - L4-4 (WF2-)*3
Always
Below 1 Ω
F74-5 (WFR+) - Body ground
Always
10 kΩ or higher
F74-20 (WFR-) - Body ground
Always
10 kΩ or higher
F74-4 (WFL+) - Body ground
Always
10 kΩ or higher
F74-19 (WFL-) - Body ground
Always
10 kΩ or higher
F74-13 (FR+) - Body ground
Always
10 kΩ or higher
F74-28 (FR-) - Body ground
Always
10 kΩ or higher
F74-12 (FL+) - Body ground
Always
10 kΩ or higher
F74-27 (FL-) - Body ground
Always
10 kΩ or higher
F74-7 (CTR+) - Body ground
Always
10 kΩ or higher
F74-22 (CTR-) - Body ground
Always
10 kΩ or higher
F74-15 (RR+) - Body ground
Always
10 kΩ or higher
F74-30 (RR-) - Body ground
Always
10 kΩ or higher
F74-14 (RL+) - Body ground
Always
10 kΩ or higher
F74-29 (RL-) - Body ground
Always
10 kΩ or higher
F74-15 (R-R+) - Body ground
Always
10 kΩ or higher
F74-30 (R-R) - Body ground
Always
10 kΩ or higher
F74-14 (R-L+) - Body ground
Always
10 kΩ or higher
F74-29 (R-L-) - Body ground
Always
10 kΩ or higher
F74-11 (SR+) - Body ground
Always
10 kΩ or higher
F74-26 (SR-) - Body ground
Always
10 kΩ or higher
F74-10 (SL+)- Body ground
Always
10 kΩ or higher
F74-25 (SL-) - Body ground
Always
10 kΩ or higher
F74-6 (WF1+) - Body ground
Always
10 kΩ or higher
F74-21 (WF1-) - Body ground
Always
10 kΩ or higher
F74-8 (WF2+) - Body ground
Always
10 kΩ or higher
F74-23 (WF2-) - Body ground
Always
10 kΩ or higher
|
|
||||

| OK | |
|
| 4. INSPECT FRONT NO. 1 SPEAKER ASSEMBLY |
Disconnect the front No. 1 speaker assembly connector.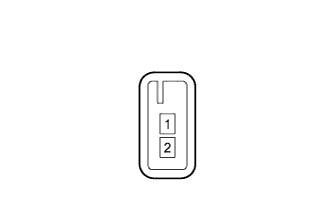
Measure the resistance according to the value(s) in the table below.
- Standard Resistance:
for 14 Speakers Tester Connection
Condition
Specified Condition
1 - 2
Always
1.8 to 2.6 Ω
for 9 Speakers Tester Connection
Condition
Specified Condition
1 - 2
Always
3 Ω
Result Result
Proceed to
OK (for 14 Speakers)
A
OK (for 9 Speakers)
B
NG
C
|
|
||||
|
|
||||
| A | |
|
| 5. INSPECT FRONT NO. 2 SPEAKER ASSEMBLY |
Disconnect the front No. 2 speaker assembly connector.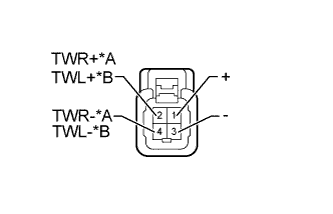
Measure the resistance according to the value(s) in the table below.
- Standard Resistance:
for RH Side Tester Connection
Condition
Specified Condition
1 (+) - 2 (TWR+)
Always
Below 1 Ω
3 (-) - 4 (TWR-)
Always
Below 1 Ω
2 (TWR+) - 4 (TWR-)
Always
1.5 to 2.5 Ω
for LH Side Tester Connection
Condition
Specified Condition
1 (+) - 2 (TWL+)
Always
Below 1 Ω
3 (-) - 4 (TWL-)
Always
Below 1 Ω
2 (TWL+) - 4 (TWL-)
Always
1.5 to 2.5 Ω
Text in Illustration *A
for RH Side
*B
for LH Side
|
|
||||
| OK | |
|
| 6. CHECK FRONT NO. 3 SPEAKER ASSEMBLY |
Temporarily replace the front No. 3 speaker assembly with a new or normally functioning one (Click here).
Check for DTCs and check if the same DTCs is output (Click here).
- OK:
- No DTCs are output.
|
|
||||
| OK | ||
|
||
| ||
| 7. CHECK FRONT NO. 2 SPEAKER ASSEMBLY |
Temporarily replace the front No. 2 speaker assembly with a new or normally functioning one (Click here).
Check for DTCs and check if the same DTCs is output (Click here).
- OK:
- No DTCs are output.
|
|
||||
| A | ||
|
||
| ||
| 8. INSPECT FRONT NO. 3 SPEAKER ASSEMBLY |
Disconnect the front No. 3 speaker assembly connector.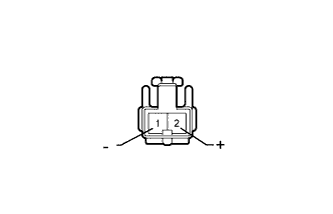
Measure the resistance according to the value(s) in the table below.
- Standard Resistance:
Tester Connection
Condition
Specified Condition
1 (-) - 2 (+)
Always
4 Ω
|
|
||||
| OK | |
|
| 9. CHECK HARNESS AND CONNECTOR (FRONT NO. 2 SPEAKER - FRONT NO. 3 SPEAKER) |
- *1: for RH Side
- *2: for LH Side
Disconnect the F7*1 and/or F8*2 front No. 2 speaker assembly connector.
Disconnect the F13*1 and/or F14*2 front No. 3 speaker assembly connector.
Measure the resistance according to the value(s) in the table below.
- Standard Resistance:
for RH Side Tester Connection
Condition
Specified Condition
F7-2 (TWR+) - F13-1
Always
Below 1 Ω
F7-4 (TWR-) - F13-2
Always
Below 1 Ω
F7-2 (TWR+) - Body ground
Always
10 kΩ or higher
F7-4 (TWR-) - Body ground
Always
10 kΩ or higher
for LH Side Tester Connection
Condition
Specified Condition
F8-2 (TWL+) - F14-1
Always
Below 1 Ω
F8-4 (TWL-) - F14-2
Always
Below 1 Ω
F8-2 (TWL+) - Body ground
Always
10 kΩ or higher
F8-4 (TWL-) - Body ground
Always
10 kΩ or higher
|
|
||||
| OK | |
|
| 10. INSPECT FRONT NO. 4 SPEAKER ASSEMBLY |
Disconnect the front No. 4 speaker assembly connector.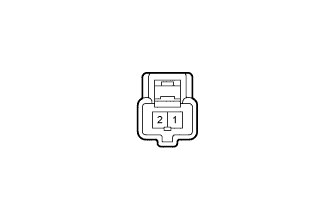
Measure the resistance according to the value(s) in the table below.
- Standard Resistance:
for 14 Speakers Tester Connection
Condition
Specified Condition
1 - 2
Always
1.5 to 2.5 Ω
for 9 Speakers Tester Connection
Condition
Specified Condition
1 - 2
Always
6 Ω
|
|
||||
| OK | |
|
| 11. INSPECT REAR SPEAKER SET |
Disconnect the rear speaker set connector.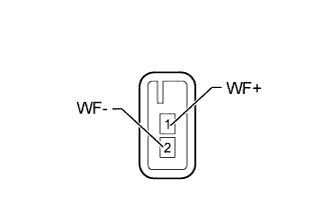
Measure the resistance according to the value(s) in the table below.
- Standard Resistance:
for 14 Speakers Tester Connection
Condition
Specified Condition
1 (WF+) - 2 (WF-)
Always
1.5 to 2.3 Ω
for 9 Speakers (for FUJITSU TEN Made) Tester Connection
Condition
Specified Condition
1 (WF+) - 2 (WF-)
Always
4 Ω
for 9 Speakers (for PIONEER Made) Tester Connection
Condition
Specified Condition
1 (WF+) - 2 (WF-)
Always
5 Ω
Result Result
Proceed to
OK (for 14 Speakers)
A
OK (for 9 Speakers)
B
NG
C
|
|
||||
|
|
||||
| A | |
|
| 12. CHECK HARNESS AND CONNECTOR (REAR NO. 3 SPEAKER - REAR SPEAKER SET) |
- *1: for RH Side
- *2: for LH Side
Disconnect the J2*1 and/or J9*2 front No. 3 speaker assembly connector.
Disconnect the J18*1 and/or J19*2 rear speaker set connector.
Measure the resistance according to the value(s) in the table below.
- Standard Resistance:
for RH Side Tester Connection
Condition
Specified Condition
J2-2 (+) - J18-1 (WF+)
Always
Below 1 Ω
J2-4 (-) - J18-2 (WF-)
Always
Below 1 Ω
J2-2 (+) - Body ground
Always
10 kΩ or higher
J2-4 (-) - Body ground
Always
10 kΩ or higher
for LH Side Tester Connection
Condition
Specified Condition
J9-2 (+) - J19-1 (WF+)
Always
Below 1 Ω
J9-4 (-) - J19-2 (WF-)
Always
Below 1 Ω
J9-2 (+) - Body ground
Always
10 kΩ or higher
J9-4 (-) - Body ground
Always
10 kΩ or higher
|
|
||||
| OK | |
|
| 13. INSPECT REAR HEADER SPEAKER ASSEMBLY |
Disconnect the rear header assembly connector.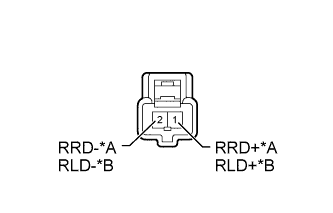
Measure the resistance according to the value(s) in the table below.
- Standard Resistance:
for RH Side Tester Connection
Condition
Specified Condition
1 (RRD+) - 2 (RRD-)
Always
1.5 to 2.5 Ω
for LH Side Tester Connection
Condition
Specified Condition
1 (RLD+) - 2 (RLD-)
Always
1.5 to 2.5 Ω
Text in Illustration *A
for RH Side
*B
for LH Side
|
|
||||
| OK | |
|
| 14. CHECK REAR NO. 3 SPEAKER ASSEMBLY |
Temporarily replace the rear No. 3 speaker assembly with a new or normally functioning one (Click here).
Check for DTCs and check if the same DTCs is output (Click here).
- OK:
- No DTCs are output.
|
|
||||
| OK | ||
|
||
| ||
| 15. INSPECT NO. 1 WOOFER BOX SPEAKER ASSEMBLY |
Disconnect the No. 1 woofer box speaker assembly speaker connector.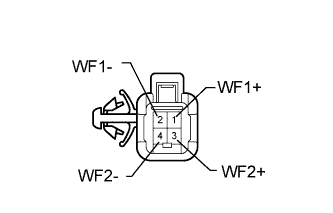
Measure the resistance according to the value(s) in the table below.
- Standard Resistance:
for LH Side Tester Connection
Condition
Specified Condition
1 (WF1+) - 2 (WF1-)
Always
1.6 to 2.4 Ω
for RH Side Tester Connection
Condition
Specified Condition
3 (WF2+) - 4 (WF2-)
Always
1.6 to 2.4 Ω
|
|
||||
| OK | ||
|
||
| ||