Home › Vehicle Interior › INTERIOR PANELS / TRIM › INSTRUMENT PANEL SAFETY PADREMOVAL
Removal / installation · Vehicles built from Jan 2012
Versions by build date: Sep 2011 – Dec 2011 from Jan 2012
HINT:
Use the same procedure for RHD and LHD vehicles.
The procedure listed below is for LHD vehicles.
1.
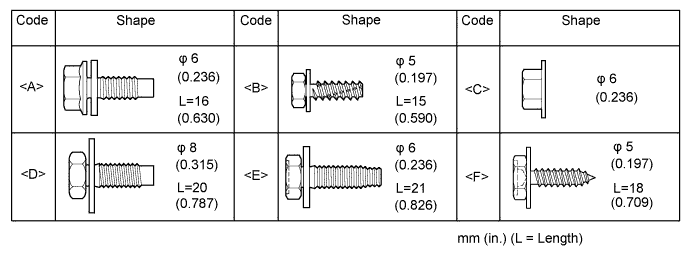
TABLE OF BOLT, SCREW AND NUT
HINT:
All bolts, screws and nuts relevant to installing and removing the instrument panel are shown along with their alphabet code in the table below.
2.
RECOVER REFRIGERANT FROM REFRIGERATION SYSTEM (w/ Cool Box)
Start the engine.
Turn the A/C switch on.
Operate the cooler compressor while the engine speed is approximately 1000 rpm for 5 to 6 minutes to circulate the refrigerant and collect the compressor oil remaining in each component into the cooler compressor.
Stop the engine.
Recover the refrigerant from the A/C system using a refrigerant recovery unit.
3.
PRECAUTION
NOTICE:
After turning the ignition switch off, waiting time may be required before disconnecting the cable from the battery terminal. Therefore, make sure to read the disconnecting the cable from the battery terminal notice before proceeding with work (Click here ).
4.
DISCONNECT CABLE FROM NEGATIVE BATTERY TERMINAL
for Power Tilt and Power Telescopic Steering Column:
Disable the Autoaway/Return function by changing the customize parameter (Click here ).
NOTICE:
Record the current customize parameter setting (whether the Autoaway/Return function is enabled or disabled) in order to restore the current setting after finishing the operation.
HINT:
Performing the above operation causes the Autoaway/Return function to be disabled when the engine switch is turned off.
Turn the engine switch on (IG). Operate the tilt and telescopic switch to fully extend and lower the steering column.
Turn the engine switch off and disconnect the cable from the negative (-) battery terminal.
CAUTION:
Wait at least 90 seconds after disconnecting the cable from the negative (-) battery terminal to disable the SRS system.
NOTICE:
When disconnecting the cable, some systems need to be initialized after the cable is reconnected (Click here ).
5.
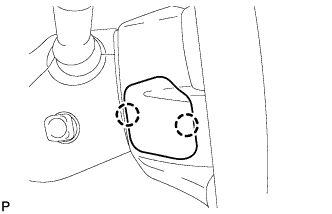
REMOVE LOWER NO. 3 STEERING WHEEL COVER
Detach the 2 claws and remove the steering wheel cover.
6.
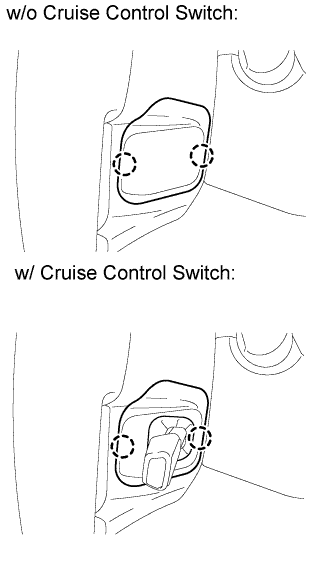
REMOVE LOWER NO. 2 STEERING WHEEL COVER
Detach the 2 claws and remove the steering wheel cover.
7.
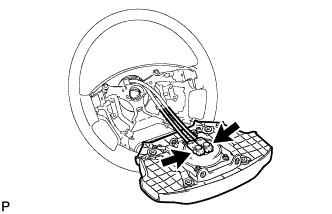
REMOVE STEERING PAD
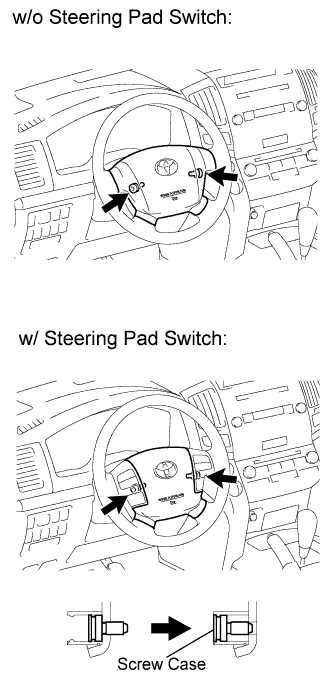
Using a T30 "TORX" socket wrench, loosen the 2 screws until the groove along the screw circumference catches on the screw case.
Pull out the steering pad from the steering wheel, as shown in the illustration. Then support the steering pad with one hand.
NOTICE:
When removing the steering pad, do not pull the airbag wire harness.
Disconnect the horn connector.
Disconnect the 2 connectors and remove the steering pad.
NOTICE:
When handling the airbag connector, take care not to damage the airbag wire harness.
8.
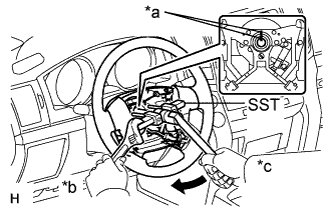
REMOVE STEERING WHEEL ASSEMBLY
Remove the steering wheel set nut.
Put matchmarks on the steering wheel and main shaft.
Text in Illustration
*a
Matchmark
*b
Hold
*c
Turn
Using SST, remove the steering wheel assembly.
SST
09950-50013
(09951-05010, 09952-05010, 09953-05020, 09954-05011)
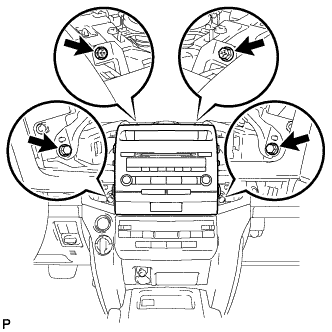
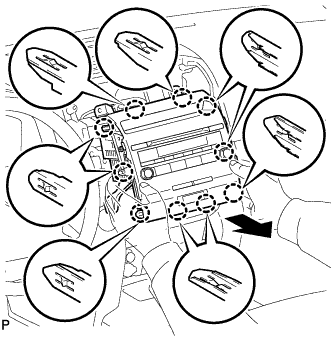
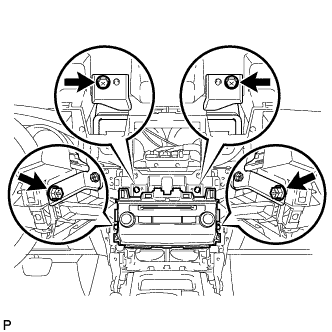
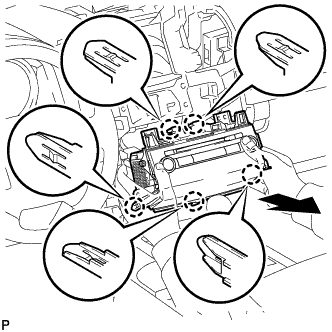
9.
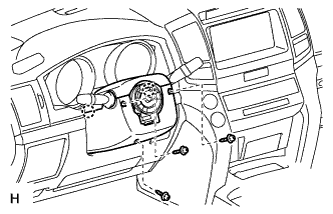
REMOVE LOWER STEERING COLUMN COVER (for Power Tilt and Power Telescopic Steering Column)
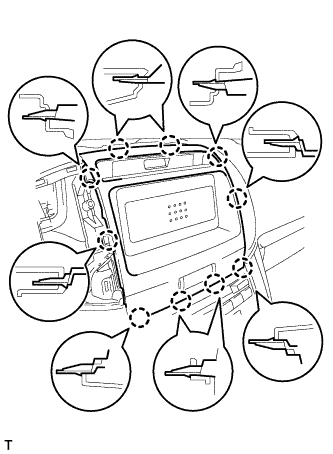
Remove the 3 screws. Detach the 2 claws to remove the lower steering column cover.
NOTICE:
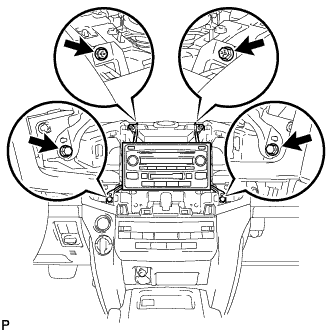
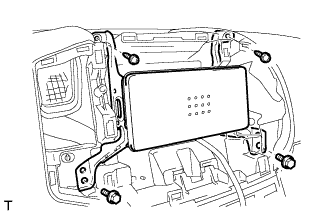
Do not damage the tilt and telescopic switch.
10.
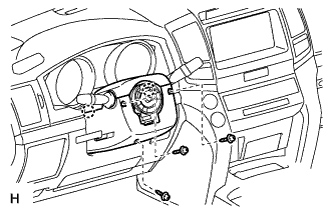
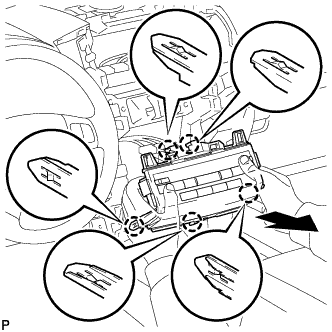
REMOVE LOWER STEERING COLUMN COVER (for Manual Tilt and Manual Telescopic Steering Column)
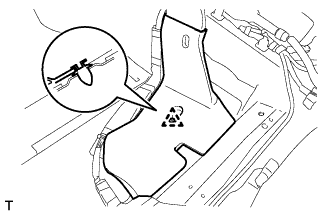
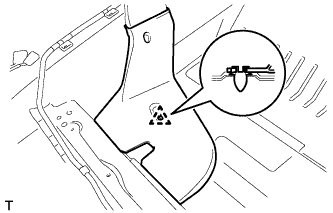
Remove the 3 screws. Detach the 2 claws to remove the lower steering column cover.
NOTICE:
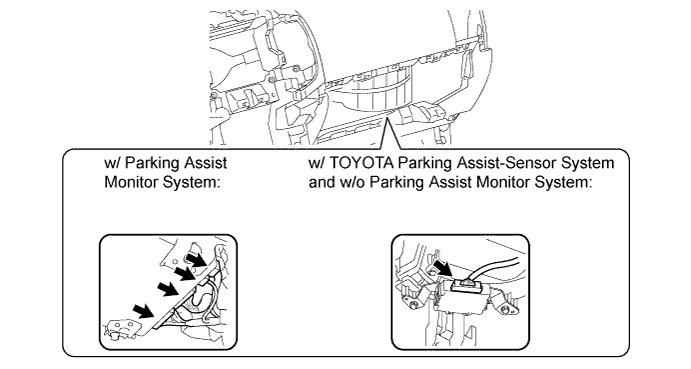
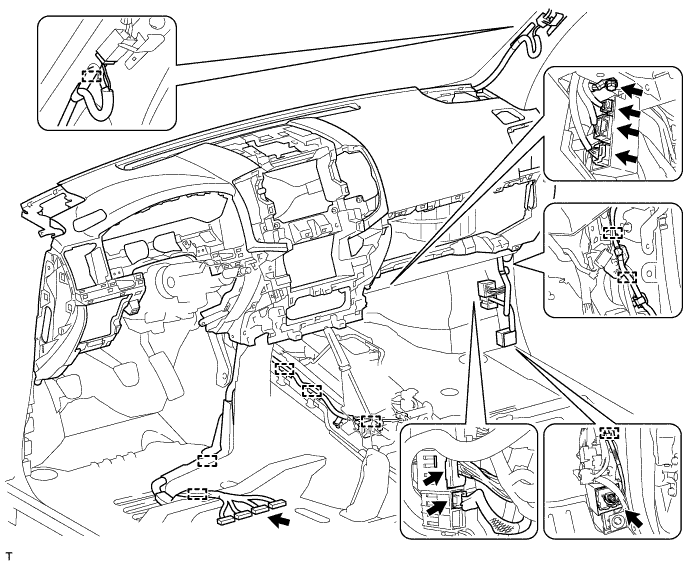
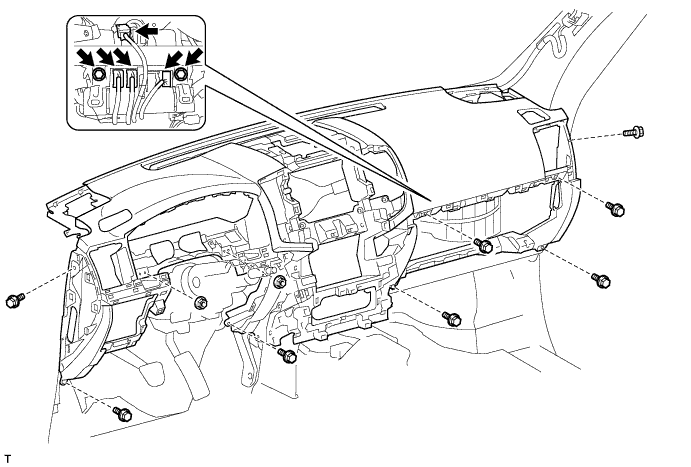
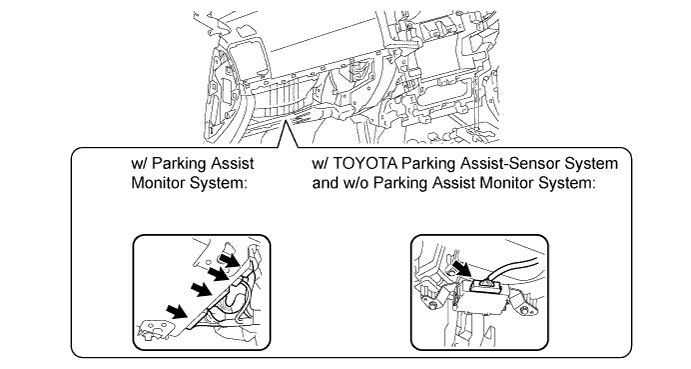
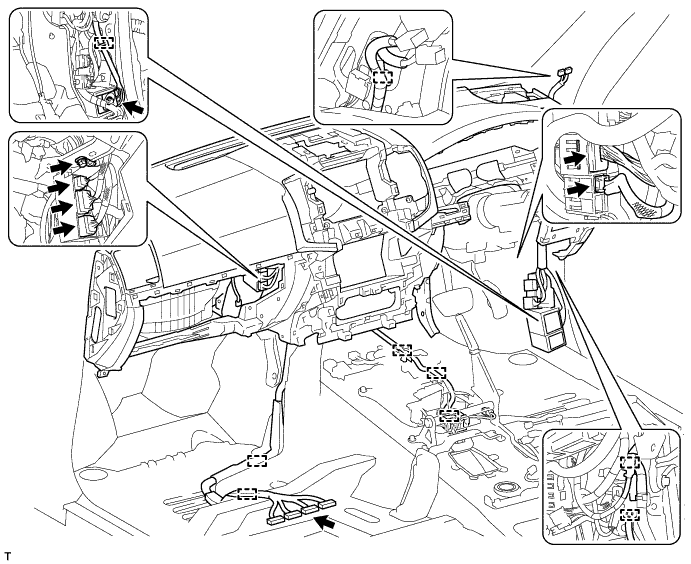
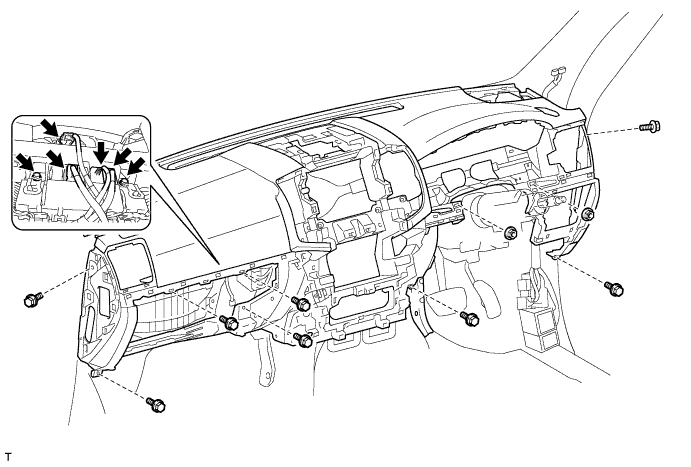
Do not damage the tilt and telescopic switch.
11.
REMOVE UPPER STEERING COLUMN COVER (for Power Tilt and Power Telescopic Steering Column)
Detach the 4 clips. Detach the claw to remove the upper steering column cover.
12.
REMOVE UPPER STEERING COLUMN COVER (for Manual Tilt and Manual Telescopic Steering Column)
Detach the 4 clips. Detach the claw to remove the upper steering column cover.
13.
REMOVE TILT AND TELESCOPIC SWITCH (for Power Tilt and Power Telescopic Steering Column)
Disconnect the switch connector. Using a screwdriver, detach the claw and pull out the switch.
NOTICE:
Pushing on the claw too hard will break the claw.
HINT:
Tape the screwdriver tip before use.
14.
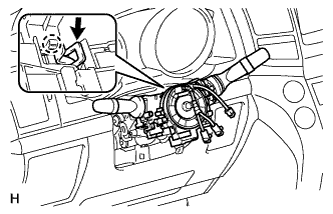
REMOVE COMBINATION SWITCH ASSEMBLY WITH SPIRAL CABLE SUB-ASSEMBLY (for Power Tilt and Power Telescopic Steering Column)
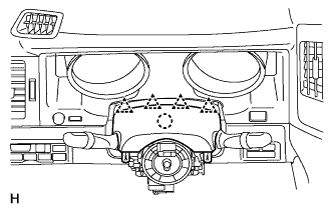
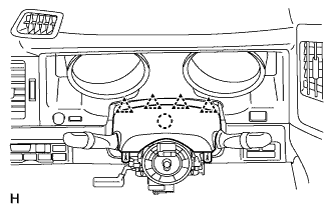
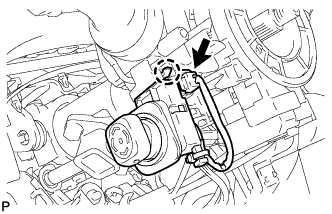
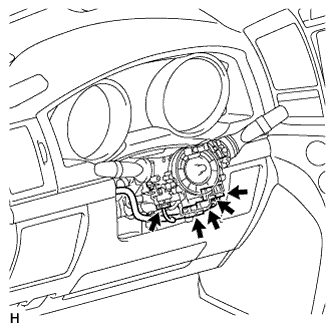
Disconnect the 5 connectors from the turn signal switch with spiral cable.
Using pliers, grip the claws of the clamp and remove the turn signal switch with spiral cable from the steering column.
15.
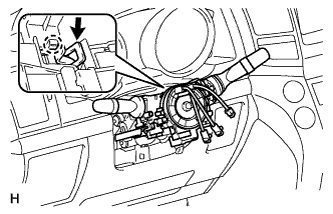
REMOVE COMBINATION SWITCH ASSEMBLY WITH SPIRAL CABLE SUB-ASSEMBLY (for Manual Tilt and Manual Telescopic Steering Column)
Disconnect the connectors from the combination switch with spiral cable.
Using pliers, grip the claws of the clamp and remove the combination switch with spiral cable from the steering column.
16.
REMOVE FRONT SEAT ASSEMBLY LH (for Power Seat)
(Click here )
17.
REMOVE FRONT SEAT ASSEMBLY LH (for Manual Seat)
(Click here )
18.
REMOVE FRONT SEAT ASSEMBLY RH (for Power Seat)
(Click here )
19.
REMOVE FRONT SEAT ASSEMBLY RH (for Manual Seat)
(Click here )
20.
REMOVE FRONT SEAT ASSEMBLY RH (for Bench Seat Type)
(Click here )
21.
REMOVE REAR CONSOLE BOX SUB-ASSEMBLY (w/o Cool Box)
(Click here )
22.
REMOVE COOLING BOX ASSEMBLY (w/ Cool Box)
(Click here )
23.
REMOVE LOWER CONSOLE BOX (w/o Console Box Lid)
(Click here )
24.
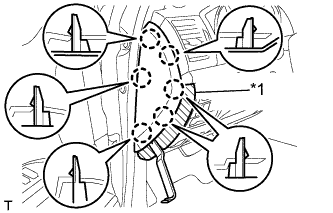
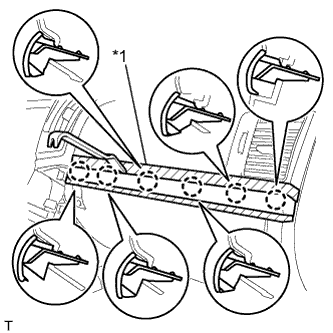
REMOVE INSTRUMENT SIDE PANEL LH
Place protective tape as shown in the illustration.
Text in Illustration
*1
Protective Tape
Using a moulding remover, detach the 6 claws and remove the instrument side panel.
25.
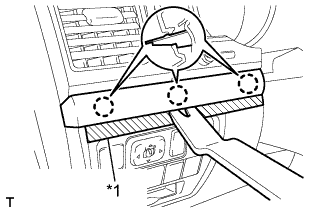
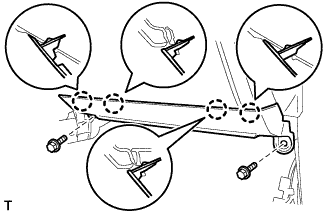
REMOVE NO. 1 INSTRUMENT CLUSTER FINISH PANEL GARNISH
Place protective tape as shown in the illustration.
Text in Illustration
*1
Protective Tape
Using a moulding remover, detach the 3 claws and remove the No. 1 instrument cluster finish panel garnish.
26.
REMOVE NO. 2 INSTRUMENT CLUSTER FINISH PANEL GARNISH
Place protective tape as shown in the illustration.
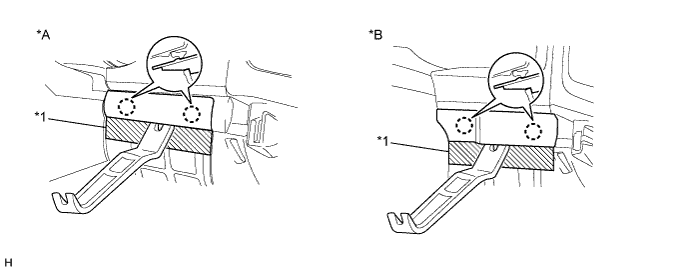
Using a moulding remover, detach the 2 claws and remove the No. 2 instrument cluster finish panel garnish.
Text in Illustration
*A
w/ Entry and Start System
*B
w/o Entry and Start System
*1
Protective Tape
-
-
27.
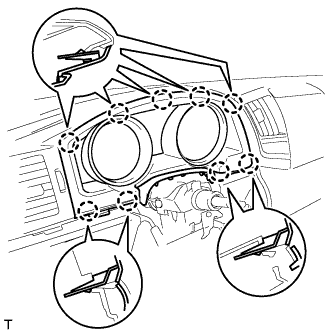
REMOVE INSTRUMENT CLUSTER FINISH PANEL SUB-ASSEMBLY (w/ Multi-information Display)
Detach the 9 claws.
Disconnect the connector and remove the instrument cluster finish panel.
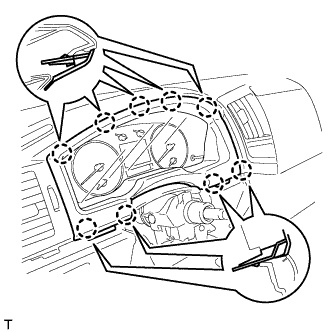
28.
REMOVE INSTRUMENT CLUSTER FINISH PANEL SUB-ASSEMBLY (w/o Multi-information Display)
Detach the 9 claws and remove the instrument cluster finish panel.
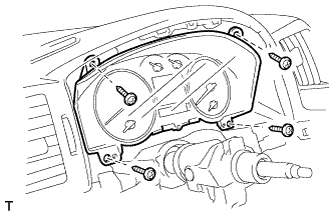
29.
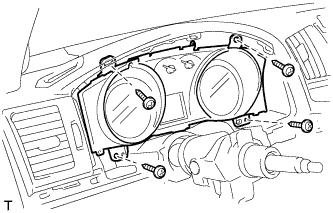
REMOVE COMBINATION METER ASSEMBLY (w/ Multi-information Display)
Remove the 4 screws.
Disconnect the connectors and remove the combination meter.
30.
REMOVE COMBINATION METER ASSEMBLY (w/o Multi-information Display)
Remove the 4 screws.
Disconnect the connectors and remove the combination meter.
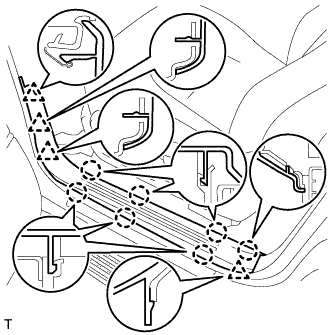
31.
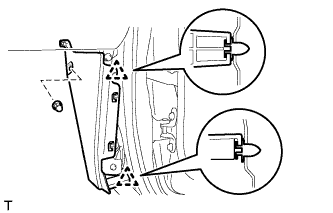
REMOVE FRONT DOOR SCUFF PLATE LH (w/o Sliding Roof)
Detach the 7 claws and 4 clips, and remove the scuff plate.
32.
REMOVE FRONT DOOR SCUFF PLATE LH (w/ Sliding Roof)
Detach the 7 claws and 4 clips, and remove the scuff plate.
33.
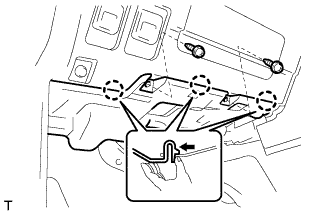
REMOVE NO. 1 INSTRUMENT PANEL UNDER COVER SUB-ASSEMBLY (w/ Floor Under Cover)
Remove the 2 screws.
Detach the 3 claws.
Disconnect the connectors and remove the No. 1 instrument panel under cover.
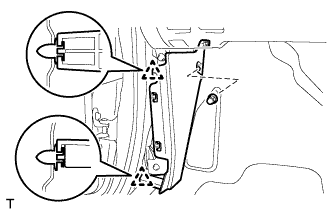
34.
REMOVE COWL SIDE TRIM BOARD LH
Remove the cap nut.
Detach the 2 clips and remove the cowl side trim board.
35.
REMOVE LOWER NO. 1 INSTRUMENT PANEL FINISH PANEL
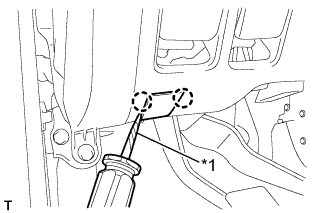
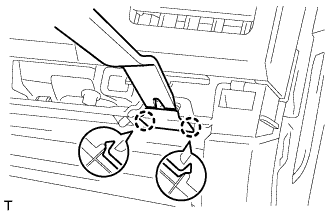
Using a screwdriver, detach the 2 claws and open the hole cover.
HINT:
Tape the screwdriver tip before use.
Text in Illustration
*1
Protective Tape
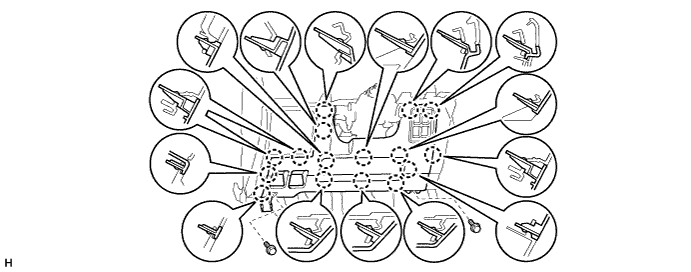
w/ Driver Side Knee Airbag:
Remove the 2 bolts.
Detach the 16 claws.
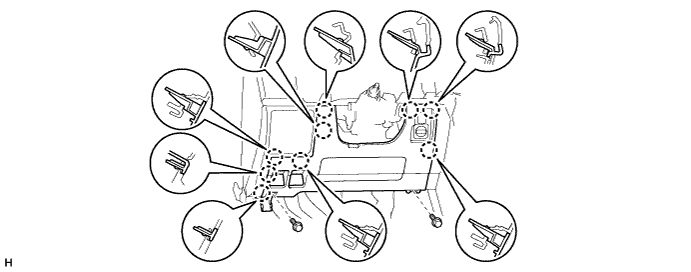
w/o Driver Side Knee Airbag:
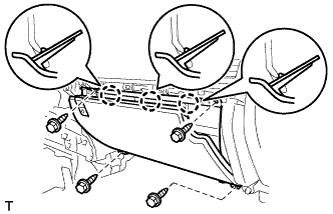
Remove the 2 bolts.
Detach the 9 claws.
for Automatic Air Conditioning System: Detach the 2 claws and remove the room temperature sensor.
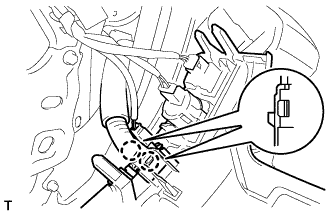
Detach the 2 claws and disconnect the 2 control cables. Disconnect the connectors and remove the lower No. 1 instrument panel finish panel.
36.
REMOVE NO. 1 SWITCH HOLE BASE
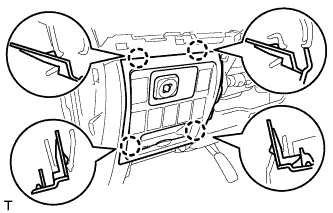
Detach the 4 claws.
Disconnect the connectors and remove the No. 1 switch hole cover.
37.
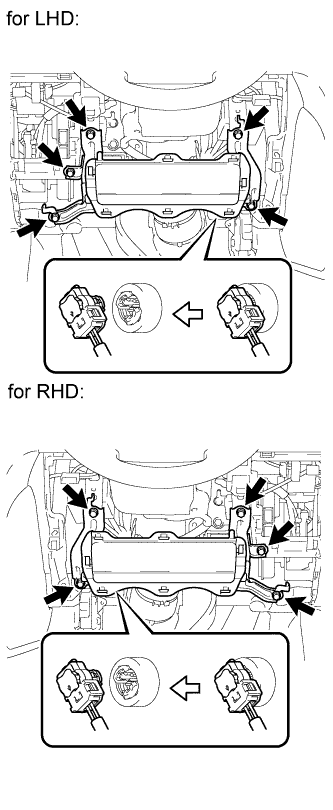
REMOVE DRIVER SIDE KNEE AIRBAG ASSEMBLY (w/ Driver Side Knee Airbag)
Remove the 5 bolts and driver side knee airbag. Disconnect the connector.
NOTICE:
When handling the airbag connector, take care not to damage the airbag wire harness.
38.
REMOVE LOWER INSTRUMENT PANEL SUB-ASSEMBLY (w/o Driver Side Knee Airbag)
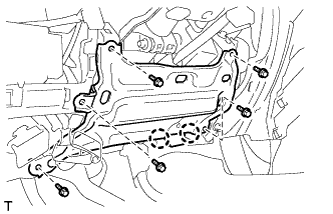
Detach the 2 claws and disconnect the DLC3.
Remove the 5 bolts and lower instrument panel.
39.
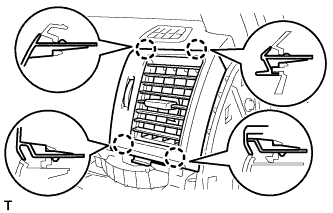
REMOVE NO. 1 INSTRUMENT PANEL REGISTER ASSEMBLY
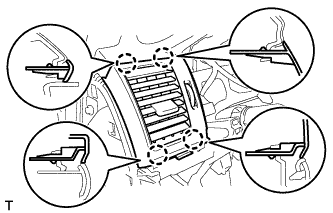
Detach the 4 claws and remove the No. 1 instrument panel register.
40.
REMOVE INSTRUMENT SIDE PANEL RH (w/o Airbag Cut Off Switch)
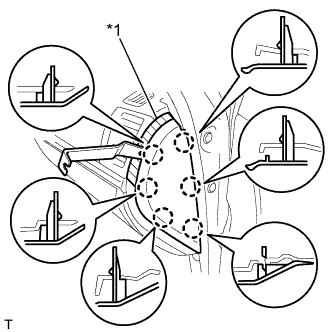
Place protective tape as shown in the illustration.
Text in Illustration
*1
Protective Tape
Using a moulding remover, detach the 6 claws and remove the instrument side panel.
41.
REMOVE INSTRUMENT SIDE PANEL RH (w/ Airbag Cut Off Switch)
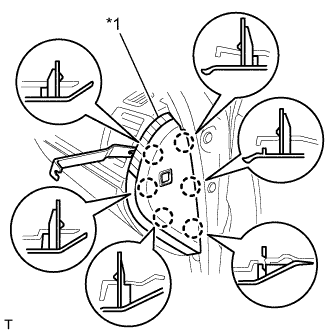
Place protective tape as shown in the illustration.
Text in Illustration
*1
Protective Tape
Using a moulding remover, detach the 6 claws.
Disconnect the connector and remove the instrument side panel.
42.
REMOVE FRONT DOOR SCUFF PLATE RH (w/o Sliding Roof)
HINT:
Use the same procedures described for the LH side.
43.
REMOVE FRONT DOOR SCUFF PLATE RH (w/ Sliding Roof)
HINT:
Use the same procedures described for the LH side.
44.
REMOVE NO. 2 INSTRUMENT PANEL UNDER COVER SUB-ASSEMBLY (w/ Floor Under Cover)
Detach the 4 claws and remove the No. 2 instrument panel under cover.
45.
REMOVE COWL SIDE TRIM BOARD RH
Remove the cap nut.
Detach the 2 clips and remove the cowl side trim board.
46.
REMOVE FRONT PASSENGER SIDE KNEE AIRBAG ASSEMBLY (w/ Passenger Side Knee Airbag)
Remove the 4 bolts. Detach the 4 claws and remove the front passenger side knee airbag.
Disconnect the connector.
NOTICE:
When handling the airbag connector, take care not to damage the airbag wire harness.
47.
REMOVE LOWER INSTRUMENT PANEL (w/o Passenger Side Knee Airbag)
Remove the 2 bolts.
Detach the 4 claws and remove the lower instrument panel.
48.
REMOVE NO. 3 INSTRUMENT CLUSTER FINISH PANEL GARNISH
Place protective tape as shown in the illustration.
Text in Illustration
*1
Protective Tape
Using a moulding remover, detach the 6 claws and remove the No. 3 instrument cluster finish panel garnish.
49.
REMOVE INSTRUMENT PANEL BOX DOOR KNOB
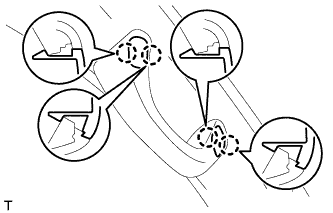
Using a moulding remover, detach the 2 claws and remove the instrument panel box door knob.
50.
REMOVE LOWER NO. 2 INSTRUMENT PANEL FINISH PANEL
Remove the 4 bolts.
Detach the 3 claws.
Disconnect the connector and remove the lower No. 2 instrument panel finish panel.
51.
REMOVE NO. 2 INSTRUMENT PANEL REGISTER ASSEMBLY
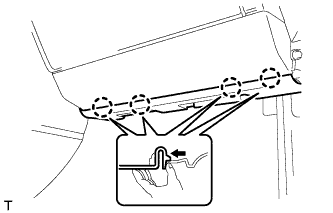
Detach the 4 claws and remove the No. 2 instrument panel register.
52.
REMOVE FRONT ASSIST GRIP SUB-ASSEMBLY (w/o Sliding Roof)
HINT:
Use the same procedure to remove the front assist grip on the other side.
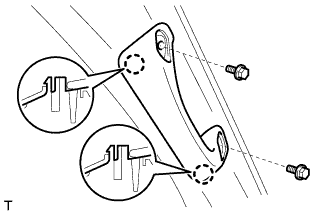
Detach the 4 claws and remove the 2 assist grip plugs.
Remove the 2 bolts. Detach the 2 claws and remove the front assist grip.
53.
REMOVE FRONT ASSIST GRIP SUB-ASSEMBLY (w/ Sliding Roof)
HINT:
Use the same procedure to remove the front assist grip on the other side.
Detach the 4 claws and remove the 2 assist grip plugs.
Remove the 2 bolts. Detach the 2 claws and remove the front assist grip.
54.
REMOVE FRONT PILLAR GARNISH LH (w/o Sliding Roof)
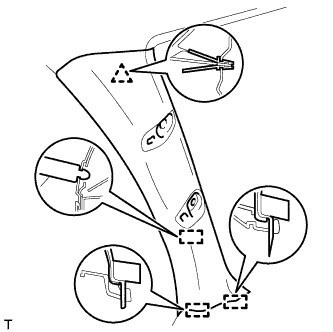
Detach the clip and 3 guides, and remove the front pillar garnish.
for 9, 14 Speakers: Disconnect the speaker connector and then remove the front pillar garnish.
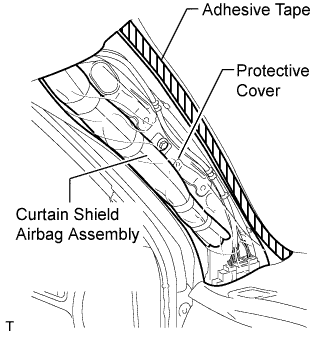
Protect the curtain shield airbag. Thoroughly cover the airbag with a cloth or nylon sheet and fix the ends of the cover with adhesive tape, as shown in the illustration.
NOTICE:
Cover the curtain shield airbag with a protective cover as soon as the front pillar garnish is removed.
55.
REMOVE FRONT PILLAR GARNISH LH (w/ Sliding Roof)
Detach the clip 3 guides, and remove the front pillar garnish.
for 9, 14 Speakers: Disconnect the speaker connector and then remove the front pillar garnish.
Protect the curtain shield airbag. Thoroughly cover the airbag with a cloth or nylon sheet and fix the ends of the cover with adhesive tape, as shown in the illustration.
NOTICE:
Cover the curtain shield airbag with a protective cover as soon as the front pillar garnish is removed.
56.
REMOVE FRONT PILLAR GARNISH RH (w/o Sliding Roof)
HINT:
Use the same procedures described for the LH side.
57.
REMOVE FRONT PILLAR GARNISH RH (w/ Sliding Roof)
HINT:
Use the same procedures described for the LH side.
58.
REMOVE NO. 1 SPEAKER OPENING COVER ASSEMBLY
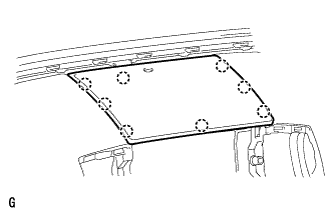
Detach the 8 claws and remove the opening cover.
59.
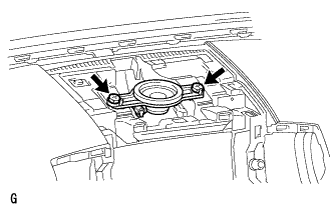
REMOVE FRONT NO. 4 SPEAKER ASSEMBLY
Remove the 2 bolts.
Remove the speaker and then disconnect the speaker connector.
NOTICE:
Do not touch the cone part of the speaker.
60.
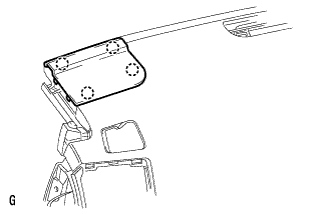
REMOVE NO. 1 INSTRUMENT PANEL SPEAKER PANEL SUB-ASSEMBLY
Detach the 4 claws and remove the speaker panel.
61.
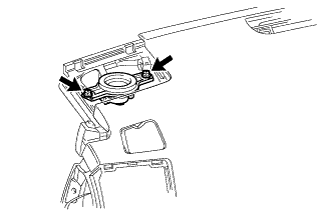
REMOVE FRONT NO. 2 SPEAKER ASSEMBLY (LH Side)
for 9 Speakers Models:
Remove the 2 bolts.
Remove the speaker and then disconnect the speaker connector.
NOTICE:
Do not touch the cone part of the speaker.
except 9 Speakers Models:
Remove the 2 bolts.
Remove the speaker and then disconnect the speaker connector.
NOTICE:
Do not touch the cone part of the speaker.
62.
REMOVE NO. 2 INSTRUMENT PANEL SPEAKER PANEL SUB-ASSEMBLY
Detach the 4 claws and remove the speaker panel.
63.
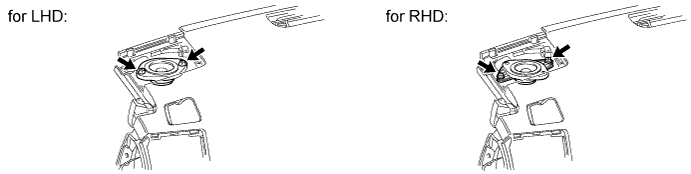
REMOVE FRONT NO. 2 SPEAKER ASSEMBLY (RH Side)
for 9 Speakers Models:
Remove the 2 bolts.
Remove the speaker and then disconnect the speaker connector.
NOTICE:
Do not touch the cone part of the speaker.
except 9 Speakers Models:
Remove the 2 bolts.
Remove the speaker and then disconnect the speaker connector.
NOTICE:
Do not touch the cone part of the speaker.
64.
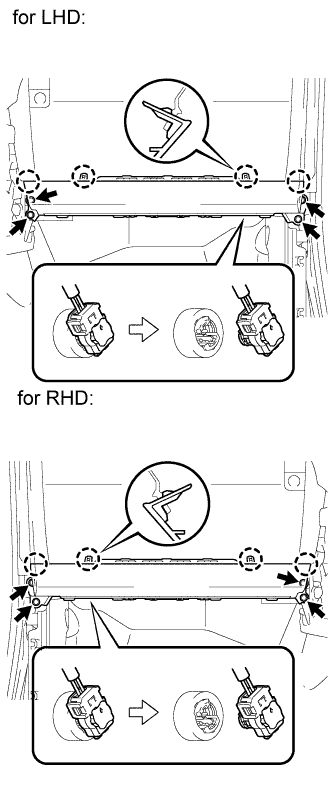
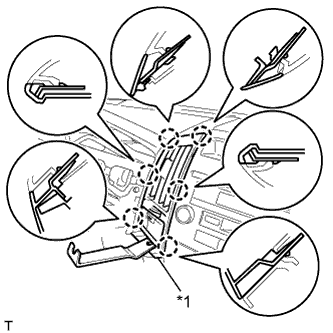
REMOVE NO. 3 INSTRUMENT PANEL REGISTER ASSEMBLY
Place protective tape as shown in the illustration.
Text in Illustration
*1
Protective Tape
Using a moulding remover, detach the 6 claws.
Disconnect the connector and remove the No. 3 instrument panel register.
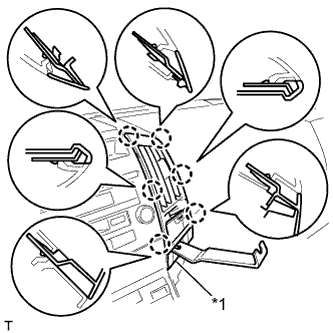
65.
REMOVE NO. 4 INSTRUMENT PANEL REGISTER ASSEMBLY
Place protective tape as shown in the illustration.
Text in Illustration
*1
Protective Tape
Using a moulding remover, detach the 6 claws.
Disconnect the connector and remove the No. 4 instrument panel register.
66.
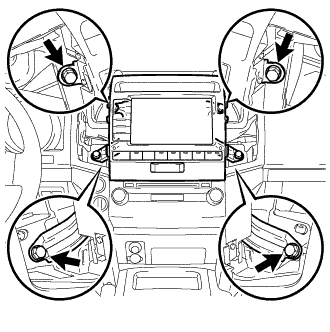
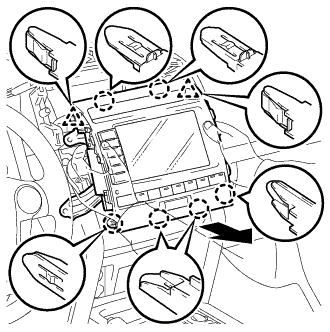
REMOVE MULTI-DISPLAY ASSEMBLY WITH BRACKET (w/ Multi-display)
Remove the 2 screws and 2 bolts.
Pull the multi-display assembly to detach the 2 clips and 6 claws on the backside of the multi-display assembly. Disconnect the connectors and remove the multi-display assembly.
67.
REMOVE RADIO RECEIVER ASSEMBLY WITH BRACKET (w/o Multi-display)
Remove the 2 screws and 2 bolts.
Pull the radio receiver to detach the 10 claws on the backside of the radio receiver. Disconnect the connectors and remove the radio receiver.
68.
REMOVE NO. 1 CENTER INSTRUMENT CLUSTER FINISH PANEL
Detach the 10 claws.
Disconnect the connector and remove the No. 1 center instrument cluster finish panel.
69.
REMOVE RADIO RECEIVER ASSEMBLY WITH BRACKET (w/ Cassette Tape Player)
Remove the 2 screws and 2 bolts. Disconnect the connectors and remove the radio receiver.
70.
REMOVE RADIO TUNER OPENING COVER WITH BRACKET (w/o Radio Receiver)
Remove the 2 bolts.
Remove the 2 screws and radio tuner opening cover with bracket.
71.
REMOVE MULTI-MEDIA MODULE RECEIVER ASSEMBLY WITH BRACKET (w/ Multi-display)
Remove the 2 screws and 2 bolts.
Pull the multi-media module receiver assembly to detach the 5 claws on the backside of the multi-media module receiver assembly. Disconnect the connectors and remove the multi-media module receiver assembly.
72.
REMOVE AIR CONDITIONING CONTROL ASSEMBLY
Pull the radio receiver to detach the 5 claws on the backside of the radio receiver. Disconnect the connectors and remove the radio receiver.
73.
REMOVE REAR NO. 2 AIR DUCT (w/ Rear Air Duct)
Fold back the front floor carpet.
Detach the clip and remove the rear No. 2 air duct.
74.
REMOVE REAR NO. 4 AIR DUCT (w/ Rear Air Duct)
Fold back the front floor carpet.
Detach the clip and remove the rear No. 4 air duct.
75.
REMOVE INSTRUMENT PANEL SAFETY PAD ASSEMBLY (for LHD)
Disconnect the connectors.
Disconnect the connectors and detach the clamps.
Remove the bolt and disconnect the wire harness.
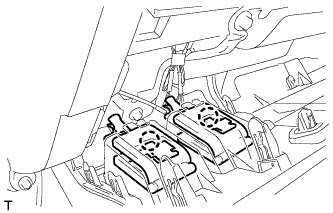
Remove the 2 passenger airbag bolts.
Disconnect the connectors.
Remove the 8 bolts.
Remove the 2 nuts and instrument panel safety pad.
76.
REMOVE INSTRUMENT PANEL SAFETY PAD ASSEMBLY (for RHD)
Disconnect the connectors.
Disconnect the connectors and detach the clamps.
Remove the bolt and disconnect the wire harness.
Remove the 2 passenger airbag bolts.
Disconnect the connectors.
Remove the 8 bolts.
Remove the 2 nuts and instrument panel safety pad.