Home › Engine / Hybrid System › 1GR-FE (ENGINE CONTROL) › SFI SYSTEM › 2014.08–2015.08
RM2660E _51 Engine / Hybrid System _052774 1GR-FE ENGINE CONTROL _0255001 SFI SYSTEM J

1GR-FE ENGINE CONTROL  SFI SYSTEM  Cranking Holding Function Circuit  


DESCRIPTION

The cranking holding control system provides current to the starter when the ECM detects the engine switch start signal (STSW). When the ECM performs a firing judgment, the system cuts current to the starter. When an ECM receives the STSW signal, it turns off the ACC relay, which prevents flickering of the combination meter, clock, audio system, etc. Also, the ECM sends a signal to the STAR terminal of the ECM. Then the STAR output signal travels through the Park/Neutral Position (PNP) switch to the ST relay, causing the starter to activate.

When the engine is cranking, the starter operation signal is sent to the STA terminal of the ECM.
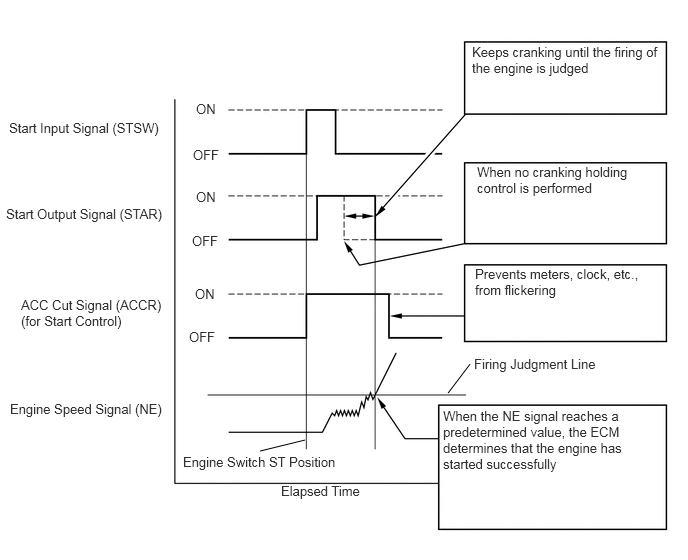
A103821E85
3.177,4.583 2.708,4.698 false 4.667,4.094 4.896,3.792 false 0.094,1.25 1.792,1.49 1.698,0.24 10 false Start Input Signal (STSW) 0.063,2.146 1.792,2.375 1.729,0.229 10 false Start Output Signal (STAR) 0.219,3.094 1.771,3.458 1.552,0.365 10 false ACC Cut Signal (ACCR) (for Start Control) 0.104,4.177 1.802,4.438 1.698,0.26 10 false Engine Speed Signal (NE) 1.906,4.729 3.604,4.99 1.698,0.26 10 false Engine Switch ST Position 2.042,1.052 2.344,1.25 0.302,0.198 10 false ON 2.01,1.531 2.417,1.75 0.406,0.219 10 false OFF 2.042,1.969 2.344,2.167 0.302,0.198 10 false ON 2,2.427 2.406,2.646 0.406,0.219 10 false OFF 2.031,2.979 2.333,3.177 0.302,0.198 10 false ON 1.969,3.427 2.375,3.646 0.406,0.219 10 false OFF 2.927,5.031 4.135,5.26 1.208,0.229 10 false Elapsed Time 4.917,0.458 6.865,0.823 1.948,0.365 10 false Keeps cranking until the firing of the engine is judged 4.969,1.708 6.927,2.073 1.958,0.365 10 false When no cranking holding control is performed 4.948,2.771 6.865,3.135 1.917,0.365 10 false Prevents meters, clock, etc., from flickering 4.938,3.708 6.5,3.927 1.563,0.219 10 false Firing Judgment Line 4.615,4.25 6.885,4.948 2.271,0.698 10 false When the NE signal reaches a predetermined value, the ECM determines that the engine has started successfully

WIRING DIAGRAM

PROCEDURE

1.CHECK CRANKING
a.

Check the cranking of the engine.

Result
Test Result Proceed to
Cranking possible and holding control operates A
Does not crank B
Cranking possible but holding control does not operate (for automatic transmission) C
Cranking possible but holding control does not operate (for manual transmission) D


A

PROCEED TO NEXT CIRCUIT INSPECTION SHOWN IN PROBLEM SYMPTOMS TABLE

B

2.READ VALUE USING GTS (STARTER SIGNAL)

C

11.CHECK HARNESS AND CONNECTOR (MAIN BODY ECU - ECM)

D

17.CHECK HARNESS AND CONNECTOR (MAIN BODY ECU - ECM)
2.READ VALUE USING GTS (STARTER SIGNAL)
a.

Connect the GTS to the DLC3.


b.

Turn the ignition switch to ON.


c.

Turn the GTS on.


d.

Enter the following menus: Powertrain / Engine and ECT / Data List / Starter Signal.


e.

Read values.


f.

Check the result when the ignition switch is turned to ON and when the engine is started.

OK:
Condition Display (Starter Signal)
Ignition switch ON OFF
Engine is started ON


Result
Result Proceed to
OK A
NG (for automatic transmission) B
NG (for manual transmission) C


A

3.INSPECT STARTER RELAY (ST)

B

7.INSPECT STARTER CUT RELAY (ST CUT)

C

13.INSPECT STARTER CUT RELAY (ST CUT)
3.INSPECT STARTER RELAY (ST)
a.


OK

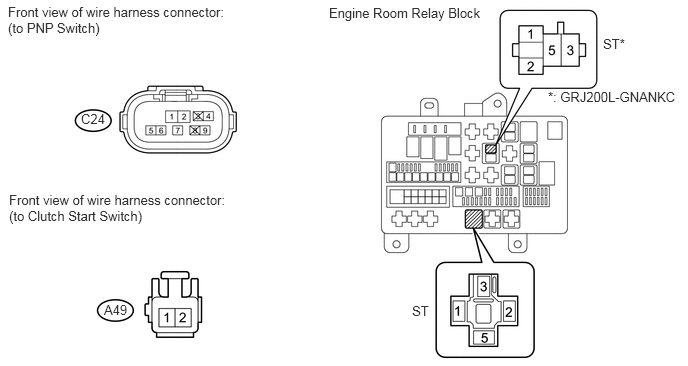
4.CHECK HARNESS AND CONNECTOR (ST RELAY - PNP SWITCH, CLUTCH START SWITCH)

NG

REPLACE STARTER RELAY (ST)

4.CHECK HARNESS AND CONNECTOR (ST RELAY - PNP SWITCH, CLUTCH START SWITCH)
U163737E03
0.094,2 2.469,2.354 2.375,0.354 10 false Front view of wire harness connector: (to Clutch Start Switch) 1.083,3.146 1.396,3.313 0.313,0.167 10 false A49 0.083,0.042 2.417,0.396 2.333,0.354 10 false Front view of wire harness connector: (to PNP Switch) 0.844,1.156 1.156,1.323 0.313,0.167 10 false C24 4.292,3.156 4.531,3.313 0.24,0.156 10 false ST 6.281,0.375 6.583,0.531 0.302,0.156 10 false ST* 5.708,0.927 7.156,1.083 1.448,0.156 10 false *: GRJ200L-GNANKC 3.427,0.052 5.135,0.25 1.708,0.198 10 false Engine Room Relay Block

a.

Disconnect the Park/Neutral Position (PNP) switch (for automatic transmission).


b.

Disconnect the clutch start switch (for manual transmission).


c.

Remove the ST relay from the engine room relay block.


d.

Measure the resistance according to the value(s) in the table below.

Standard Resistance:
for automatic transmission
Tester Connection Condition Specified Condition
ST relay (2) - C24-5 Always Below 1 Ω
ST relay (2) or C24-5 - Body ground Always 10 kΩ or higher
ST relay (1)* - C24-5 Always Below 1 Ω
ST relay (1)* or C24-5 - Body ground Always 10 kΩ or higher

for manual transmission
Tester Connection Condition Specified Condition
ST relay (2) - A49-2 Always Below 1 Ω
ST relay (2) or A49-2 - Body ground Always 10 kΩ or higher


*: GRJ200L-GNANKC


OK

5.CHECK HARNESS AND CONNECTOR (POWER SOURCE)

NG

REPAIR OR REPLACE HARNESS OR CONNECTOR

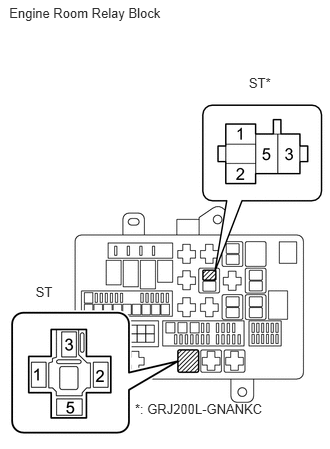
5.CHECK HARNESS AND CONNECTOR (POWER SOURCE)
A299802E01
0.096,0.054 1.792,0.223 1.696,0.169 10 Engine Room Relay Block 2.592,0.785 2.899,0.951 0.308,0.165 10 ST* 1.405,4.181 2.843,4.346 1.438,0.165 10 *: GRJ200L-GNANKC 0.371,2.959 0.616,3.124 0.245,0.165 10 ST

a.

Remove the ST relay from the engine room relay block.


b.

Measure the voltage according to the value(s) in the table below.

Standard Voltage:
Tester Connection Condition Specified Condition
ST relay (1) - ST relay (5) Always 11 to 14 V
ST relay (2)* - ST relay (5) Always 11 to 14 V


*: GRJ200L-GNANKC


OK

6.INSPECT STARTER

NG

REPAIR OR REPLACE HARNESS OR CONNECTOR (STARTER RELAY (ST) - BATTERY, BODY GROUND)

6.INSPECT STARTER

OK

REPAIR OR REPLACE HARNESS OR CONNECTOR (STARTER - STARTER RELAY (ST), BATTERY)

NG

7.INSPECT STARTER CUT RELAY (ST CUT)
a.

Inspect the starter cut relay (ST CUT) (See page Engine / Hybrid System>1GR-FE (STARTING)>RELAY>ON-VEHICLE INSPECTION).


OK

8.CHECK HARNESS AND CONNECTOR (ST CUT RELAY - PNP SWITCH, ECM)

NG

REPLACE STARTER CUT RELAY (ST CUT)

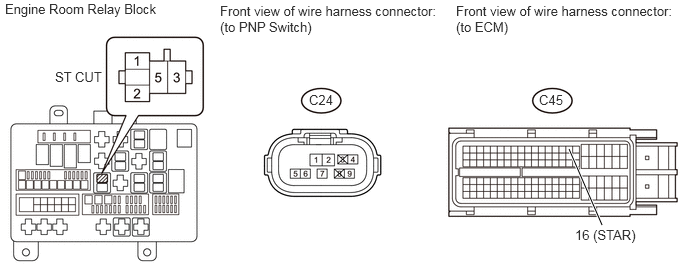
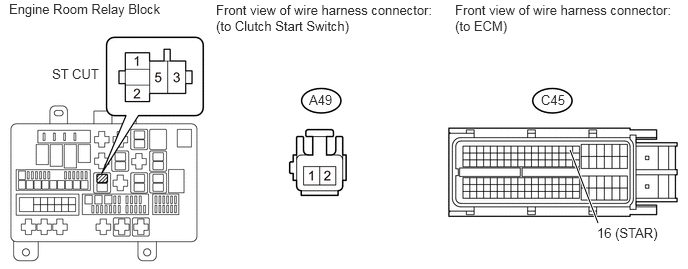
8.CHECK HARNESS AND CONNECTOR (ST CUT RELAY - PNP SWITCH, ECM)
A385640E01
5.927,1.552 6.271,2.344 true 0.052,0.01 3.573,0.208 3.521,0.198 10 false Engine Room Relay Block 0.573,0.719 1.177,0.938 0.604,0.219 10 false ST CUT 2.292,0.031 4.625,0.479 2.333,0.448 10 false Front view of wire harness connector: (to PNP Switch) 3.219,0.958 3.552,1.146 0.333,0.188 10 false C24 4.75,0.031 7.083,0.479 2.333,0.448 10 false Front view of wire harness connector: (to ECM) 5.615,0.958 5.948,1.146 0.333,0.188 10 false C45 5.99,2.365 6.74,2.583 0.75,0.219 10 false 16 (STAR)

a.

Remove the starter cut relay (ST CUT) from the engine room relay block.


b.

Disconnect the PNP switch connector.


c.

Disconnect the ECM connector.


d.

Measure the resistance according to the value(s) in the table below.

Standard Resistance:
Tester Connection Condition Specified Condition
ST CUT relay (5) - C45-16 (STAR) Always Below 1 Ω
ST CUT relay (3) - C24-4 Always Below 1 Ω
ST CUT relay (5) or C45-16 (STAR) - Body ground Always 10 kΩ or higher
ST CUT relay (3) or C24-4 - Body ground Always 10 kΩ or higher


OK

9.INSPECT PARK/NEUTRAL POSITION SWITCH

NG

REPAIR OR REPLACE HARNESS OR CONNECTOR

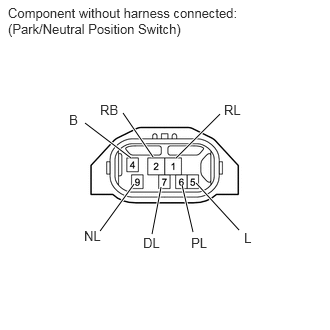
9.INSPECT PARK/NEUTRAL POSITION SWITCH
a.
C160109E37
2.49,2.396 2.042,1.906 true 1.583,2.438 1.677,1.948 true 2.01,2.417 1.896,1.927 true 1.594,1.635 1.281,1.177 true 1.042,2.406 1.396,1.917 true 1.833,1.646 2.292,1.188 true 1.365,1.646 0.885,1.281 true 0.083,0.052 2.729,0.479 2.646,0.427 10 false Component without harness connected: (Park/Neutral Position Switch) 1.042,1.063 1.25,1.24 0.208,0.177 10 false RB 0.719,1.167 0.865,1.344 0.146,0.177 10 false B 1.99,2.448 2.198,2.625 0.208,0.177 10 false PL 2.542,2.396 2.75,2.573 0.208,0.177 10 false L 1.49,2.448 1.698,2.625 0.208,0.177 10 false DL 0.875,2.375 1.083,2.552 0.208,0.177 10 false NL 2.333,1.063 2.542,1.24 0.208,0.177 10 false RL

Inspect the Park/Neutral Position (PNP) switch.

i.

Disconnect the PNP switch connector.


ii.

Measure the resistance according to the value(s) in the table below.

Standard Resistance:
Tester Connection Condition Specified Condition
4 (B) - 5 (L) Shift lever in P Below 1 Ω
Shift lever in N Below 1 Ω


OK

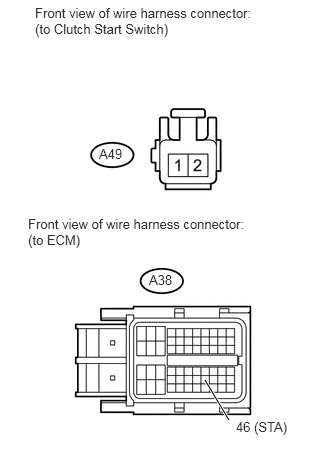
10.CHECK HARNESS AND CONNECTOR (PNP SWITCH - ECM)

NG

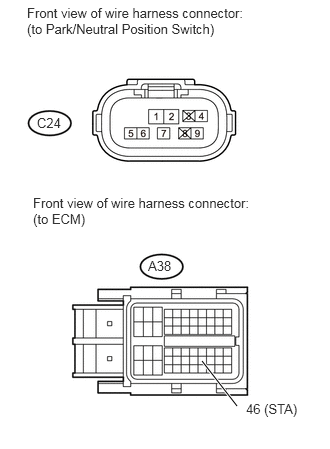
10.CHECK HARNESS AND CONNECTOR (PNP SWITCH - ECM)
A385641E01
2.104,3.76 2.469,4.229 true 0.281,0.052 2.625,0.75 2.344,0.698 10 false Front view of wire harness connector: (to Park/Neutral Position Switch) 0.385,1.198 0.729,1.396 0.344,0.198 10 false C24 0.344,2.031 2.74,2.802 2.396,0.771 10 false Front view of wire harness connector: (to ECM) 1.542,2.688 1.885,2.885 0.344,0.198 10 false A38 2.563,4.177 3.25,4.406 0.688,0.229 10 false 46 (STA)

a.

Disconnect the PNP switch connector.


b.

Disconnect the ECM connector.


c.

Measure the resistance according to the value(s) in the table below.

Standard Resistance:
Tester Connection Condition Specified Condition
C24-5 - A38-46 (STA) Always Below 1 Ω
C24-5 or A38-46 (STA) - Body ground Always 10 kΩ or higher


Result
Result Proceed to
NG A
OK B


A

REPAIR OR REPLACE HARNESS OR CONNECTOR

B

19.REPLACE ECM
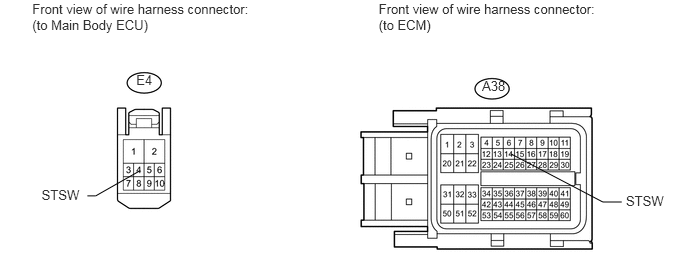
11.CHECK HARNESS AND CONNECTOR (MAIN BODY ECU - ECM)
U163024E01
1.419,0.747 1.794,0.980 0.375,0.233 10 E4 5.021,0.811 5.318,0.966 0.297,0.155 10 A38 0.336,0.01 2.745,0.377 2.409,0.367 10 Front view of wire harness connector: (to Main Body ECU) 3.944,0.01 6.352,0.377 2.408,0.367 10 Front view of wire harness connector: (to ECM) 6.52,2.014 6.986,2.216 0.466,0.202 10 STSW 0.433,1.951 0.895,2.153 0.462,0.202 10 STSW 0.91,2.04 0.997,2.04 0.997,2.04 1.452,1.781 false 6.476,2.104 6.28,2.104 6.28,2.104 5.318,1.6 false

a.

Disconnect the main body ECU connector.


b.

Disconnect the ECM connector.


c.

Measure the resistance according to the value(s) in the table below.

Standard Resistance:
Tester Connection Condition Specified Condition
E4-4 (STSW) - A38-14 (STSW) Always Below 1 Ω
E4-4 (STSW) or A38-14 (STSW) - Body ground Always 10 kΩ or higher


OK

12.CHECK HARNESS AND CONNECTOR (ST CUT RELAY - PNP SWITCH, ECM)

NG

REPAIR OR REPLACE HARNESS OR CONNECTOR

12.CHECK HARNESS AND CONNECTOR (ST CUT RELAY - PNP SWITCH, ECM)
A385640E01
5.927,1.552 6.271,2.344 true 0.052,0.01 3.573,0.208 3.521,0.198 10 false Engine Room Relay Block 0.573,0.719 1.177,0.938 0.604,0.219 10 false ST CUT 2.292,0.031 4.625,0.479 2.333,0.448 10 false Front view of wire harness connector: (to PNP Switch) 3.219,0.958 3.552,1.146 0.333,0.188 10 false C24 4.75,0.031 7.083,0.479 2.333,0.448 10 false Front view of wire harness connector: (to ECM) 5.615,0.958 5.948,1.146 0.333,0.188 10 false C45 5.99,2.365 6.74,2.583 0.75,0.219 10 false 16 (STAR)

a.

Remove the starter cut relay (ST CUT) from the engine room relay block.


b.

Disconnect the PNP switch connector.


c.

Disconnect the ECM connector.


d.

Measure the resistance according to the value(s) in the table below.

Standard Resistance:
Tester Connection Condition Specified Condition
ST CUT relay (5) - C45-16 (STAR) Always Below 1 Ω
ST CUT relay (3) - C24-4 Always Below 1 Ω
ST CUT relay (5) or C45-16 (STAR) - Body ground Always 10 kΩ or higher
ST CUT relay (3) or C24-4 - Body ground Always 10 kΩ or higher


OK

NG
REPAIR OR REPLACE HARNESS OR CONNECTOR

13.INSPECT STARTER CUT RELAY (ST CUT)
a.

Inspect the starter cut relay (ST CUT) (See page Engine / Hybrid System>1GR-FE (STARTING)>RELAY>ON-VEHICLE INSPECTION).


OK

14.CHECK HARNESS AND CONNECTOR (ST CUT RELAY - CLUTCH START SWITCH, ECM)

NG

REPLACE STARTER CUT RELAY (ST CUT)

14.CHECK HARNESS AND CONNECTOR (ST CUT RELAY - CLUTCH START SWITCH, ECM)
A385642E01
5.938,1.563 6.229,2.323 true 0.094,0.01 1.813,0.229 1.719,0.219 10 false Engine Room Relay Block 2.25,0.021 4.51,0.542 2.26,0.521 10 false Front view of wire harness connector: (to Clutch Start Switch) 0.542,0.688 1.094,0.885 0.552,0.198 10 false ST CUT 3.219,0.958 3.771,1.156 0.552,0.198 10 false A49 4.74,0.021 7,0.542 2.26,0.521 10 false Front view of wire harness connector: (to ECM) 5.635,0.958 6.188,1.156 0.552,0.198 10 false C45 6.219,2.344 6.948,2.552 0.729,0.208 10 false 16 (STAR)

a.

Remove the starter cut relay (ST CUT) from the engine room relay block.


b.

Disconnect the clutch start switch connector.


c.

Disconnect the ECM connector.


d.

Measure the resistance according to the value(s) in the table below.

Standard Resistance:
Tester Connection Condition Specified Condition
ST CUT relay (5) - C45-16 (STAR) Always Below 1 Ω
ST CUT relay (3) - A49-1 Always Below 1 Ω
ST CUT relay (5) or C45-16 (STAR) - Body ground Always 10 kΩ or higher
ST CUT relay (3) or A49-1 - Body ground Always 10 kΩ or higher


OK

15.INSPECT CLUTCH START SWITCH ASSEMBLY

NG

REPAIR OR REPLACE HARNESS OR CONNECTOR

15.INSPECT CLUTCH START SWITCH ASSEMBLY
a.

Inspect the clutch start switch (for LHD) (See page Drivetrain>CLUTCH>CLUTCH PEDAL SWITCH(for LHD)>INSPECTION).


b.

Inspect the clutch start switch (for RHD) (See page Drivetrain>CLUTCH>CLUTCH PEDAL SWITCH(for RHD)>INSPECTION).

Result
Result Proceed to
OK A
NG (for LHD) B
NG (for RHD) C


A

16.CHECK HARNESS AND CONNECTOR (CLUTCH START SWITCH - ECM)

B

REPLACE CLUTCH START SWITCH ASSEMBLY

C

REPLACE CLUTCH START SWITCH ASSEMBLY

16.CHECK HARNESS AND CONNECTOR (CLUTCH START SWITCH - ECM)
A385643E01
2.135,3.958 2.385,4.375 true 0.365,0.052 2.677,0.583 2.313,0.531 10 false Front view of wire harness connector: (to Clutch Start Switch) 1.031,1.521 1.458,1.75 0.427,0.229 10 false A49 0.292,2.25 2.656,2.854 2.365,0.604 10 false Front view of wire harness connector: (to ECM) 1.552,2.833 1.979,3.063 0.427,0.229 10 false A38 2.458,4.365 3.042,4.583 0.583,0.219 10 false 46 (STA)

a.

Disconnect the clutch start switch connector.


b.

Disconnect the ECM connector.


c.

Measure the resistance according to the value(s) in the table below.

Standard Resistance:
Tester Connection Condition Specified Condition
A49-2 - A38-46 (STA) Always Below 1 Ω
A49-2 or A38-46 (STA) - Body ground Always 10 kΩ or higher


Result
Result Proceed to
NG A
OK B


A

REPAIR OR REPLACE HARNESS OR CONNECTOR

B

19.REPLACE ECM
17.CHECK HARNESS AND CONNECTOR (MAIN BODY ECU - ECM)
U163024E01
1.419,0.747 1.794,0.980 0.375,0.233 10 E4 5.021,0.811 5.318,0.966 0.297,0.155 10 A38 0.336,0.01 2.745,0.377 2.409,0.367 10 Front view of wire harness connector: (to Main Body ECU) 3.944,0.01 6.352,0.377 2.408,0.367 10 Front view of wire harness connector: (to ECM) 6.52,2.014 6.986,2.216 0.466,0.202 10 STSW 0.433,1.951 0.895,2.153 0.462,0.202 10 STSW 0.91,2.04 0.997,2.04 0.997,2.04 1.452,1.781 false 6.476,2.104 6.28,2.104 6.28,2.104 5.318,1.6 false

a.

Disconnect the main body ECU connector.


b.

Disconnect the ECM connector.


c.

Measure the resistance according to the value(s) in the table below.

Standard Resistance:
Tester Connection Condition Specified Condition
E4-4 (STSW) - A38-14 (STSW) Always Below 1 Ω
E4-4 (STSW) or A38-14 (STSW) - Body ground Always 10 kΩ or higher


OK

18.CHECK HARNESS AND CONNECTOR (ST CUT RELAY - CLUTCH START SWITCH SWITCH, ECM)

NG

REPAIR OR REPLACE HARNESS OR CONNECTOR

18.CHECK HARNESS AND CONNECTOR (ST CUT RELAY - CLUTCH START SWITCH SWITCH, ECM)
A385642E01
5.938,1.563 6.229,2.323 true 0.094,0.01 1.813,0.229 1.719,0.219 10 false Engine Room Relay Block 2.25,0.021 4.51,0.542 2.26,0.521 10 false Front view of wire harness connector: (to Clutch Start Switch) 0.542,0.688 1.094,0.885 0.552,0.198 10 false ST CUT 3.219,0.958 3.771,1.156 0.552,0.198 10 false A49 4.74,0.021 7,0.542 2.26,0.521 10 false Front view of wire harness connector: (to ECM) 5.635,0.958 6.188,1.156 0.552,0.198 10 false C45 6.219,2.344 6.948,2.552 0.729,0.208 10 false 16 (STAR)

a.

Remove the starter cut relay (ST CUT) from the engine room relay block.


b.

Disconnect the clutch start switch connector.


c.

Disconnect the ECM connector.


d.

Measure the resistance according to the value(s) in the table below.

Standard Resistance:
Tester Connection Condition Specified Condition
ST CUT relay (5) - C45-16 (STAR) Always Below 1 Ω
ST CUT relay (3) - A49-1 Always Below 1 Ω
ST CUT relay (5) or C45-16 (STAR) - Body ground Always 10 kΩ or higher
ST CUT relay (3) or A49-1 - Body ground Always 10 kΩ or higher


OK

NG

REPAIR OR REPLACE HARNESS OR CONNECTOR

19.REPLACE ECM

NEXT

20.CONFIRM WHETHER MALFUNCTION HAS BEEN SUCCESSFULLY REPAIRED
a.

Check the starter operation.

OK:

Malfunction has been repaired successfully.


OK

END

NG