F33A-FTV ENGINE CONTROL ECD SYSTEM(w/o DPF) VC Output Circuit
DESCRIPTION
The ECM constantly generates a 5 V power source voltage from the battery voltage supplied to the +B (BATT) terminal to operate the microprocessor. The ECM also provides this power source voltage to the sensors through the VC output circuit.
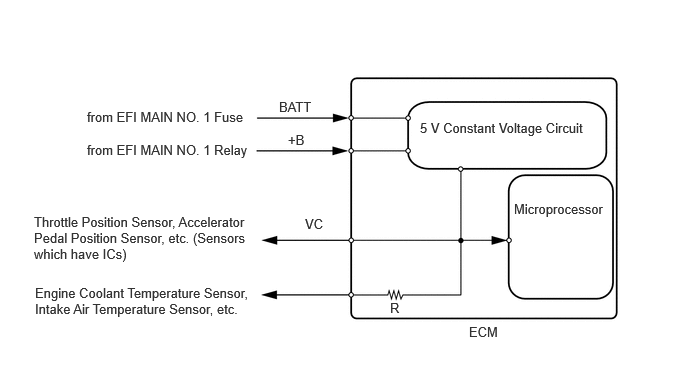
When the VC circuit has a short circuit, the CPU in the ECM and sensors that are supplied power through the VC circuit are deactivated because power is not supplied from the VC circuit. When the system is in this condition, it will not start.
WIRING DIAGRAM
For the circuit diagram of the ECM power source circuit.
Click hereEngine / Hybrid System>F33A-FTV (ENGINE CONTROL)>ECD SYSTEM (w/o DPF)>ECM Power Source Circuit
VC Power Source Circuit
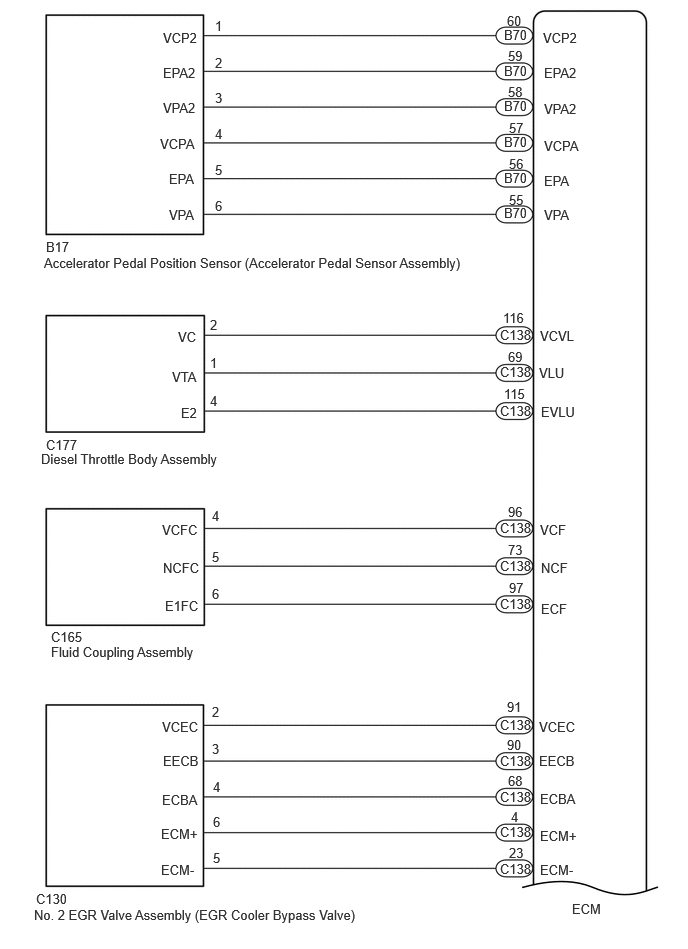
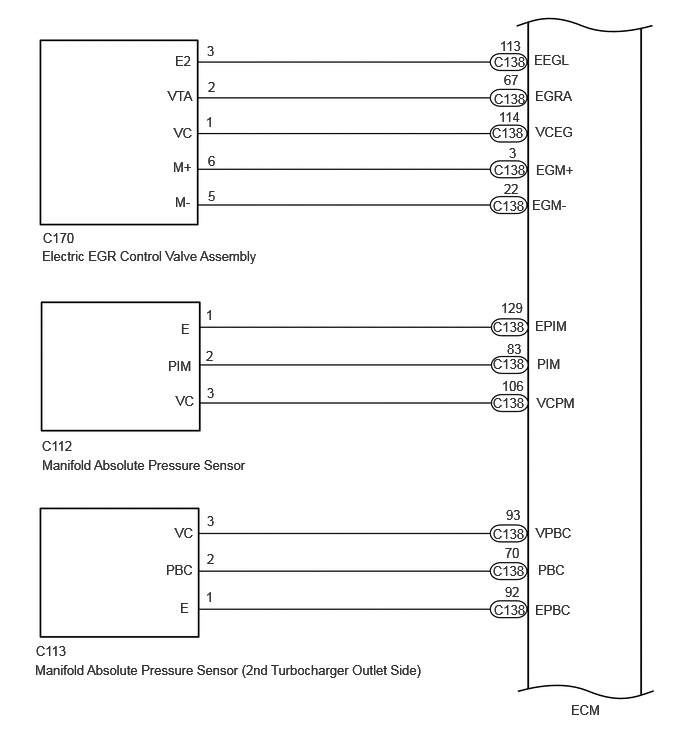
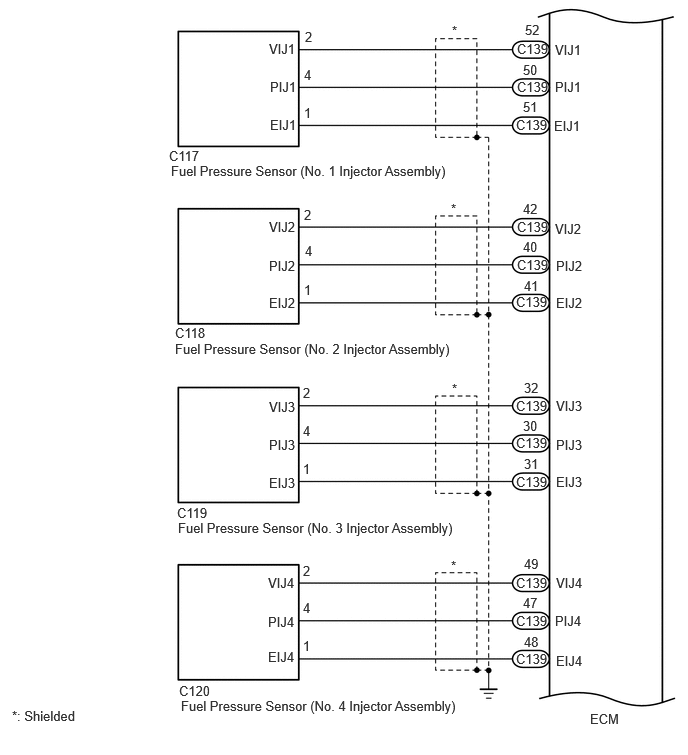
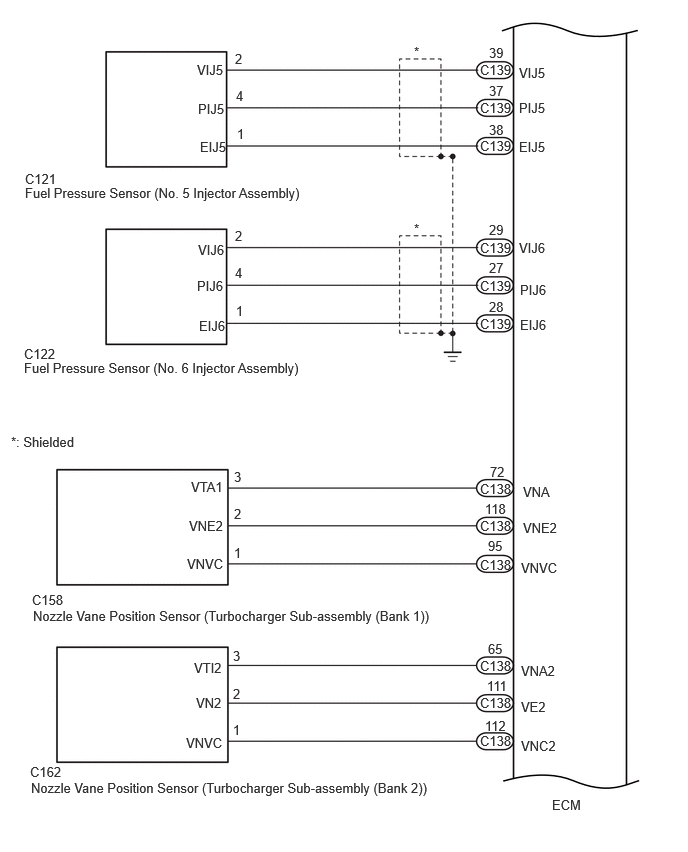
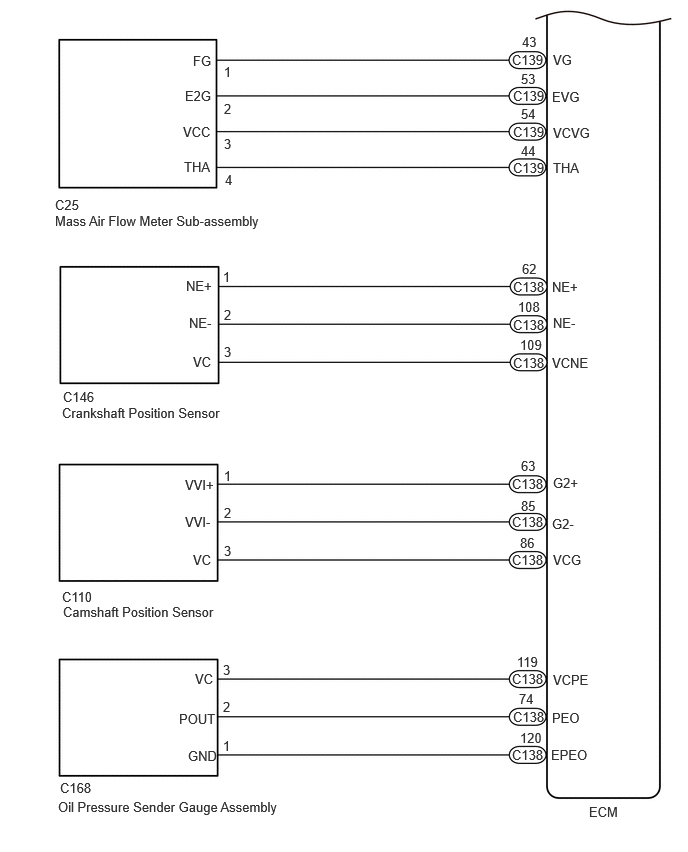
CAUTION / NOTICE / HINT
- NOTICE:
-
·
Check the fuses for circuits related to this system before performing the following inspection procedure.
·After replacing the ECM, the new ECM needs registration (Click here Engine / Hybrid System>F33A-FTV (ENGINE CONTROL)>ECD SYSTEM (w/o DPF)>REGISTRATION) and initialization (Click here Engine / Hybrid System>F33A-FTV (ENGINE CONTROL)>ECD SYSTEM (w/o DPF)>INITIALIZATION).
PROCEDURE
Connect the GTS to the DLC3.
Turn the ignition switch to ON and turn the GTS on.
Check the communication between the GTS and ECM.
- HINT:
-
It can be checked using the "Engine" item of the Data List.
- Result:
-
Result Proceed to Communication is not possible A Communication is possible B
A
B
Click hereEngine / Hybrid System>F33A-FTV (ENGINE CONTROL)>ECD SYSTEM (w/o DPF)>PROBLEM SYMPTOMS TABLE
Turn the ignition switch to ON.
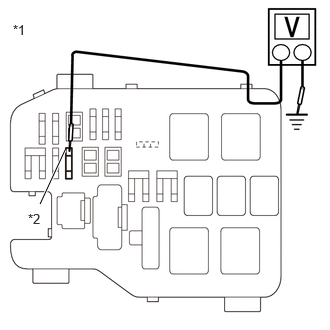
| *1 | No. 3 Engine Room Relay Block and Junction Block Assembly |
| *2 | EFI-B NO. 1 Fuse |
Measure the voltage according to the value(s) in the table below.
- Standard Voltage:
-
Tester Connection Condition Specified Condition 1 (EFI-B NO. 1 fuse) - Body ground Ignition switch ON 11 to 14 V
- HINT:
-
·
Check the fuse with it installed to the No. 3 engine room relay block and junction block assembly.
·If the result is not as specified, since current is not flowing to the +B terminals of the ECM, the system may not be started.
- Result:
-
Proceed to OK NG
OK
NG
Click hereEngine / Hybrid System>F33A-FTV (ENGINE CONTROL)>ECD SYSTEM (w/o DPF)>ECM Power Source Circuit
Disconnect the diesel throttle body assembly connector.
Turn the ignition switch to ON and turn the GTS on.
Check the communication between the GTS and ECM.
- HINT:
-
It can be checked using the "Engine" item of the Data List.
- Result:
-
Result Proceed to Communication is possible A Communication is not possible B
Reconnect the diesel throttle body assembly connector.
A
B
Disconnect the accelerator pedal position sensor connector.
Turn the ignition switch to ON and turn the GTS on.
Check the communication between the GTS and ECM.
- HINT:
-
It can be checked using the "Engine" item of the Data List.
- Result:
-
Result Proceed to Communication is possible A Communication is not possible B
Reconnect the accelerator pedal position sensor connector.
A
B
Disconnect the No. 1 injector assembly connector.
Turn the ignition switch to ON and turn the GTS on.
Check the communication between the GTS and ECM.
- HINT:
-
It can be checked using the "Engine" item of the Data List.
- Result:
-
Result Proceed to Communication is possible A Communication is not possible B
Reconnect the No. 1 injector assembly connector.
A
B
Disconnect the No. 2 injector assembly connector.
Turn the ignition switch to ON and turn the GTS on.
Check the communication between the GTS and ECM.
- HINT:
-
It can be checked using the "Engine" item of the Data List.
- Result:
-
Result Proceed to Communication is possible A Communication is not possible B
Reconnect the No. 2 injector assembly connector.
A
B
Disconnect the No. 3 injector assembly connector.
Turn the ignition switch to ON and turn the GTS on.
Check the communication between the GTS and ECM.
- HINT:
-
It can be checked using the "Engine" item of the Data List.
- Result:
-
Result Proceed to Communication is possible A Communication is not possible B
Reconnect the No. 3 injector assembly connector.
A
B
Disconnect the No. 4 injector assembly connector.
Turn the ignition switch to ON and turn the GTS on.
Check the communication between the GTS and ECM.
- HINT:
-
It can be checked using the "Engine" item of the Data List.
- Result:
-
Result Proceed to Communication is possible A Communication is not possible B
Reconnect the No. 4 injector assembly connector.
A
B
Disconnect the No. 5 injector assembly connector.
Turn the ignition switch to ON and turn the GTS on.
Check the communication between the GTS and ECM.
- HINT:
-
It can be checked using the "Engine" item of the Data List.
- Result:
-
Result Proceed to Communication is possible A Communication is not possible B
Reconnect the No. 5 injector assembly connector.
A
B
Disconnect the No. 6 injector assembly connector.
Turn the ignition switch to ON and turn the GTS on.
Check the communication between the GTS and ECM.
- HINT:
-
It can be checked using the "Engine" item of the Data List.
- Result:
-
Result Proceed to Communication is possible A Communication is not possible B
Reconnect the No. 6 injector assembly connector.
A
B
Disconnect the manifold absolute pressure sensor connector.
Turn the ignition switch to ON and turn the GTS on.
Check the communication between the GTS and ECM.
- HINT:
-
It can be checked using the "Engine" item of the Data List.
- Result:
-
Result Proceed to Communication is possible A Communication is not possible B
Reconnect the manifold absolute pressure sensor connector.
A
Click hereEngine / Hybrid System>F33A-FTV (ENGINE CONTROL)>MANIFOLD ABSOLUTE PRESSURE SENSOR>REMOVAL
B
Disconnect the manifold absolute pressure sensor (2nd turbocharger outlet side) connector.
Turn the ignition switch to ON and turn the GTS on.
Check the communication between the GTS and ECM.
- HINT:
-
It can be checked using the "Engine" item of the Data List.
- Result:
-
Result Proceed to Communication is possible A Communication is not possible B
Reconnect the manifold absolute pressure sensor (2nd turbocharger outlet side) connector.
A
Click hereEngine / Hybrid System>F33A-FTV (ENGINE CONTROL)>MANIFOLD ABSOLUTE PRESSURE SENSOR>REMOVAL
B
Disconnect the electric EGR control valve assembly connector.
Turn the ignition switch to ON and turn the GTS on.
Check the communication between the GTS and ECM.
- HINT:
-
It can be checked using the "Engine" item of the Data List.
- Result:
-
Result Proceed to Communication is possible A Communication is not possible B
Reconnect the electric EGR control valve assembly connector.
A
B
Disconnect the No. 2 EGR valve assembly (EGR cooler bypass valve) connector.
Turn the ignition switch to ON and turn the GTS on.
Check the communication between the GTS and ECM.
- HINT:
-
It can be checked using the "Engine" item of the Data List.
- Result:
-
Result Proceed to Communication is possible A Communication is not possible B
Reconnect the No. 2 EGR valve assembly (EGR cooler bypass valve) connector.
A
B
Disconnect the nozzle vane position sensor (turbocharger sub-assembly (bank 1)) connector.
Turn the ignition switch to ON and turn the GTS on.
Check the communication between the GTS and ECM.
- HINT:
-
It can be checked using the "Engine" item of the Data List.
- Result:
-
Result Proceed to Communication is possible A Communication is not possible B
Reconnect the nozzle vane position sensor (turbocharger sub-assembly (bank 1)) connector.
A
B
Disconnect the nozzle vane position sensor (turbocharger sub-assembly (bank 2)) connector.
Turn the ignition switch to ON and turn the GTS on.
Check the communication between the GTS and ECM.
- HINT:
-
It can be checked using the "Engine" item of the Data List.
- Result:
-
Result Proceed to Communication is possible A Communication is not possible B
Reconnect the nozzle vane position sensor (turbocharger sub-assembly (bank 2)) connector.
A
B
Disconnect the fluid coupling assembly connector.
Turn the ignition switch to ON and turn the GTS on.
Check the communication between the GTS and ECM.
- HINT:
-
It can be checked using the "Engine" item of the Data List.
- Result:
-
Result Proceed to Communication is possible A Communication is not possible B
Reconnect the fluid coupling assembly connector.
A
B
Disconnect the mass air flow meter sub-assembly connector.
Turn the ignition switch to ON and turn the GTS on.
Check the communication between the GTS and ECM.
- HINT:
-
It can be checked using the "Engine" item of the Data List.
- Result:
-
Result Proceed to Communication is possible A Communication is not possible B
Reconnect the mass air flow meter sub-assembly connector.
A
B
Disconnect the camshaft position sensor connector.
Turn the ignition switch to ON and turn the GTS on.
Check the communication between the GTS and ECM.
- HINT:
-
It can be checked using the "Engine" item of the Data List.
- Result:
-
Result Proceed to Communication is possible A Communication is not possible B
Reconnect the camshaft position sensor connector.
A
B
Disconnect the crankshaft position sensor connector.
Turn the ignition switch to ON and turn the GTS on.
Check the communication between the GTS and ECM.
- HINT:
-
It can be checked using the "Engine" item of the Data List.
- Result:
-
Result Proceed to Communication is possible A Communication is not possible B
Reconnect the crankshaft position sensor connector.
A
B
Disconnect the oil pressure sender gauge assembly connector.
Turn the ignition switch to ON and turn the GTS on.
Check the communication between the GTS and ECM.
- HINT:
-
It can be checked using the "Engine" item of the Data List.
- Result:
-
Result Proceed to Communication is possible A Communication is not possible B
Reconnect the nozzle vane position sensor connector.
A
B
Disconnect the diesel throttle body assembly connector.
Disconnect the No. 1 injector assembly connector.
Disconnect the No. 2 injector assembly connector.
Disconnect the No. 3 injector assembly connector.
Disconnect the No. 4 injector assembly connector.
Disconnect the No. 5 injector assembly connector.
Disconnect the No. 6 injector assembly connector.
Disconnect the manifold absolute pressure sensor connector.
Disconnect the manifold absolute pressure sensor (2nd turbocharger outlet side) connector.
Disconnect the electric EGR control valve assembly connector.
Disconnect the No. 2 EGR valve assembly (EGR cooler bypass valve) connector.
Disconnect the fluid coupling assembly connector.
Disconnect the nozzle vane position sensor (turbocharger sub-assembly (bank 1)) connector.
Disconnect the nozzle vane position sensor (turbocharger sub-assembly (bank 2)) connector.
Disconnect the mass air flow meter sub-assembly connector.
Disconnect the camshaft position sensor connector.
Disconnect the crankshaft position sensor connector.
Disconnect the oil pressure sender gauge assembly connector.
Disconnect the accelerator pedal sensor assembly connector.
Remove the EFI MAIN NO. 1 relay from the No. 3 engine room relay block and junction block assembly.
Disconnect the ECM connectors.
Measure the resistance according to the value(s) in the table below.
- Standard Resistance:
-
Tester Connection Condition Specified Condition Click Location & Routing(B70,C138,C139)Location & Routingewd_type=routing;type=c,c,c;code=B70,C138,C139
B70-60 (VCP2) - Body ground and other terminals Always 10 kΩ or higher B70-57 (VCPA) - Body ground and other terminals Always 10 kΩ or higher C138-116 (VCVL) - Body ground and other terminals Always 10 kΩ or higher C138-96 (VCF) - Body ground and other terminals Always 10 kΩ or higher C138-91 (VCEC) - Body ground and other terminals Always 10 kΩ or higher C138-114 (VCEG) - Body ground and other terminals Always 10 kΩ or higher C138-106 (VCPM) - Body ground and other terminals Always 10 kΩ or higher C138-93 (VPBC) - Body ground and other terminals Always 10 kΩ or higher C139-52 (VIJ1) - Body ground and other terminals Always 10 kΩ or higher C139-42 (VIJ2) - Body ground and other terminals Always 10 kΩ or higher C139-32 (VIJ3) - Body ground and other terminals Always 10 kΩ or higher C139-49 (VIJ4) - Body ground and other terminals Always 10 kΩ or higher C139-39 (VIJ5) - Body ground and other terminals Always 10 kΩ or higher C139-29 (VIJ6) - Body ground and other terminals Always 10 kΩ or higher C138-95 (VNVC) - Body ground and other terminals Always 10 kΩ or higher C138-112 (VNC2) - Body ground and other terminals Always 10 kΩ or higher C139-54 (VCVG) - Body ground and other terminals Always 10 kΩ or higher C138-109 (VCNE) - Body ground and other terminals Always 10 kΩ or higher C138-86 (VCG) - Body ground and other terminals Always 10 kΩ or higher C138-119 (VCPE) - Body ground and other terminals Always 10 kΩ or higher EFI MAIN NO. 1 relay terminal 5 - B70-9 (+B) Always 10 kΩ or higher EFI MAIN NO. 1 relay terminal 5 - B70-35 (+B2) Always 10 kΩ or higher
- Result:
-
Proceed to OK NG
OK
NG