1VD-FTV INTAKE / EXHAUST INTAKE MANIFOLD(w/ DPF) INSTALLATION
PROCEDURE

 17112 1.INSTALL NO. 2 INTAKE MANIFOLD
Install a new gasket and the No. 2 intake manifold with the 9 bolts.
- Torque:
- 21 N*m (214 kgf*cm, 15 ft.*lbf)
17111 2.INSTALL NO. 1 INTAKE MANIFOLD
Install a new gasket and the No. 1 intake manifold with the 7 bolts.
- Torque:
- 21 N*m (214 kgf*cm, 15 ft.*lbf)
3.INSTALL STARTER HOSE BRACKET SUB-ASSEMBLY
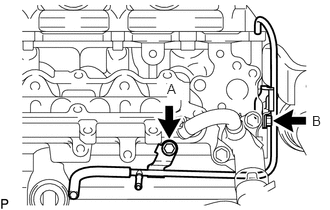
Install the starter hose bracket sub-assembly with the 2 bolts.
- Torque:
- for bolt A : 21 N*m (214 kgf*cm, 15 ft.*lbf)
- for bolt B : 10 N*m (102 kgf*cm, 7 ft.*lbf)
Connect the 2 starter hoses to the starter assembly and starter hose bracket sub-assembly.
23841C 4.INSTALL NO. 1 FUEL PIPE CLAMP
Install the 2 No. 1 fuel pipe clamps with the 2 bolts.
- Torque:
- 10 N*m (102 kgf*cm, 7 ft.*lbf)
16268 5.INSTALL NO. 1 WATER BY-PASS PIPE
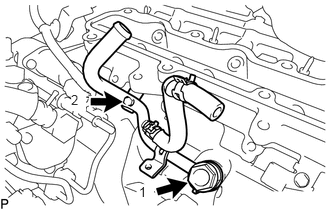
Temporarily install a new gasket and the No. 1 water by-pass pipe with the union bolt and bolt.
Tighten the union bolt and bolt in the order shown in the illustration.
- Torque:
- for union bolt : 58.8 N*m (600 kgf*cm, 43 ft.*lbf)
- for bolt : 10 N*m (102 kgf*cm, 7 ft.*lbf)
23901H 6.INSTALL FUEL TUBE SUB-ASSEMBLY
Attach the 3 clamps to install the fuel tube.
Connect the 2 fuel tube connectors.
Click hereEngine / Hybrid System>1VD-FTV (FUEL)>FUEL SYSTEM(w/ DPF)>PRECAUTION
7.INSTALL EGR COOLER
17114D 8.INSTALL NO. 3 INTAKE MANIFOLD
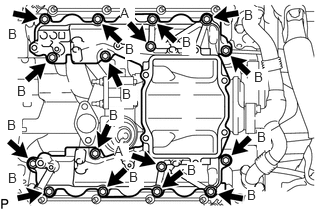
Install a new gasket to the No. 1 intake manifold and a new gasket to the No. 2 intake manifold.
Install the No. 3 intake manifold with the 16 bolts.
- Torque:
- 21 N*m (214 kgf*cm, 15 ft.*lbf)
- Bolt length:
-
Item Length Bolt A 70 mm (2.76 in.) Bolt B 25 mm (0.984 in.)
23810A 9.INSTALL COMMON RAIL LH
23820A 10.INSTALL COMMON RAIL RH
23705 11.INSTALL NO. 5 INJECTION PIPE SUB-ASSEMBLY
Temporarily install a new No. 5 injection pipe by hand.
- NOTICE:
-
Make sure there is no damage or foreign matter on the seal surfaces.
Install the No. 2 injection pipe clamp with the bolt.
- Torque:
- 5.0 N*m (51 kgf*cm, 44 in.*lbf)
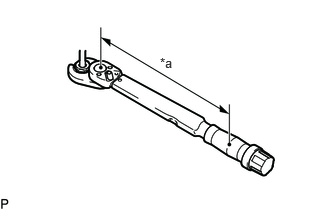
| *a | Fulcrum length |
Using a 17 mm union nut wrench, install the No. 5 injection pipe sub-assembly.
- Torque:
- Specified tightening torque:
-
34 N*m (347 kgf*cm, 25 ft.*lbf)
- HINT:
-
·
Calculate the torque wrench reading when changing the fulcrum length of the torque wrench.
Click hereGeneral>INTRODUCTION>REPAIR INSTRUCTION>PRECAUTION
·When using a union nut wrench (fulcrum length of 30 mm (1.1811 in.)) + torque wrench (fulcrum length of 180 mm (7.0866 in.)): 29.1 N*m (297 kgf*cm, 21 ft.*lbf)
23801L 12.INSTALL FUEL FILTER TO INJECTION PUMP FUEL PIPE SUB-ASSEMBLY
- NOTICE:
-
Check for damage and foreign matter on the fuel pipe installation surface of the fuel supply pump.
-
If there is foreign matter, remove it from the installation surface.
-
If the installation surface is damaged, replace the fuel supply pump.
Temporarily install a new gasket and fuel filter to injection pump fuel pipe with the nut, bolt and union bolt.
Tighten the union bolt, bolt and nut.
- Torque:
- for union bolt : 12.3 N*m (125 kgf*cm, 9 ft.*lbf)
- for bolt and nut : 10 N*m (102 kgf*cm, 7 ft.*lbf)
Connect the fuel hose.
23765 13.INSTALL NO. 5 NOZZLE LEAKAGE PIPE
23812D 14.INSTALL NO. 2 FUEL PIPE SUB-ASSEMBLY
Install the No. 2 fuel pipe sub-assembly with the union bolt and bolt.
- Torque:
- for union bolt : 29 N*m (296 kgf*cm, 21 ft.*lbf)
- for bolt : 10 N*m (102 kgf*cm, 7 ft.*lbf)
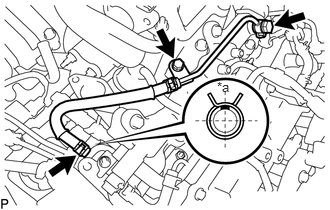
| *a | Upper |
Install the No. 4 fuel hose.
- HINT:
-
Install the clamp so that its direction and position are as shown in the illustration.
17113 15.INSTALL INTAKE PIPE
23763 16.INSTALL NO. 3 NOZZLE LEAKAGE PIPE
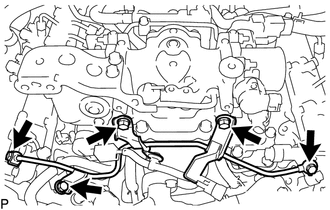
Temporarily install 2 new gaskets and the No. 3 nozzle leakage pipe with the 2 injector hollow screws and 3 bolts.
Tighten the 2 injector hollow screws and bolt.
- Torque:
- for injector hollow screw : 21 N*m (214 kgf*cm, 15 ft.*lbf)
- for bolt : 21 N*m (214 kgf*cm, 15 ft.*lbf)
- HINT:
-
Tighten the injector hollow screws first, and then tighten the bolt.
17.INSTALL INJECTION PIPE LH
| *a | Fulcrum length |
Using 17 mm union nut wrench, install 4 new injection pipes to the common rail and fuel injectors with the union nuts.
- Torque:
- Specified tightening torque:
-
34 N*m (347 kgf*cm, 25 ft.*lbf)
- NOTICE:
-
Make sure there is no damage or foreign matter on the seal surfaces.
- HINT:
-
·
Calculate the torque wrench reading when changing the fulcrum length of the torque wrench.
Click hereGeneral>INTRODUCTION>REPAIR INSTRUCTION>PRECAUTION
·When using a union nut wrench (fulcrum length of 30 mm (1.1811 in.)) + torque wrench (fulcrum length of 180 mm (7.0866 in.)): 29.1 N*m (297 kgf*cm, 21 ft.*lbf)
18.INSTALL INJECTION PIPE RH
| *a | Fulcrum length |
Using a 17 mm union nut wrench, install 4 new injection pipes to the common rail and fuel injectors with the union nuts.
- Torque:
- Specified tightening torque:
-
34 N*m (347 kgf*cm, 25 ft.*lbf)
- NOTICE:
-
Make sure there is no damage or foreign matter on the seal surfaces.
- HINT:
-
·
Calculate the torque wrench reading when changing the fulcrum length of the torque wrench.
Click hereGeneral>INTRODUCTION>REPAIR INSTRUCTION>PRECAUTION
·When using a union nut wrench (fulcrum length of 30 mm (1.1811 in.)) + torque wrench (fulcrum length of 180 mm (7.0866 in.)): 29.1 N*m (297 kgf*cm, 21 ft.*lbf)
23706 19.INSTALL NO. 6 INJECTION PIPE SUB-ASSEMBLY
| *a | Fulcrum length |
Using a 17 mm union nut wrench, install a new No. 6 injection pipe to the common rail with the union nuts.
- Torque:
- Specified tightening torque:
-
34 N*m (347 kgf*cm, 25 ft.*lbf)
- NOTICE:
-
Make sure there is no damage or foreign matter on the seal surfaces.
- HINT:
-
·
Calculate the torque wrench reading when changing the fulcrum length of the torque wrench.
Click hereGeneral>INTRODUCTION>REPAIR INSTRUCTION>PRECAUTION
·When using a union nut wrench (fulcrum length of 30 mm (1.1811 in.)) + torque wrench (fulcrum length of 180 mm (7.0866 in.)): 29.1 N*m (297 kgf*cm, 21 ft.*lbf)
Install the 2 No. 2 injection pipe clamps with the 2 nuts.
- Torque:
- 5.0 N*m (51 kgf*cm, 44 in.*lbf)
17947B 20.INSTALL NO. 3 INTERCOOLER SUPPORT BRACKET
Install the No. 3 intercooler support bracket with the 2 bolts.
- Torque:
- 21 N*m (214 kgf*cm, 15 ft.*lbf)
23265 21.INSTALL NO. 1 GAS FILTER
Install the No. 1 gas filter.
Connect the hose to the intake pipe.
82121 22.CONNECT ENGINE WIRE
RH Side:
Connect the engine wire with the 4 bolts and nut.
- Torque:
- 10 N*m (102 kgf*cm, 7 ft.*lbf)
Attach the 2 clamps.
Connect the 4 fuel injector connectors.
Connect the 6 connectors.
LH Side:
Connect the engine wire with the 7 bolts.
- Torque:
- 10 N*m (102 kgf*cm, 7 ft.*lbf)
Connect the 4 fuel injector connectors.
Connect the 2 connectors.
Rear Side:
Connect the 2 wire harness brackets with the 2 bolts.
- Torque:
- 10 N*m (102 kgf*cm, 7 ft.*lbf)
Connect the 2 ground wires with the 2 bolts.
- Torque:
- 10 N*m (102 kgf*cm, 7 ft.*lbf)
Attach the clamp to the No. 3 intercooler support bracket.
23243C 23.INSTALL FUEL PUMP MOTOR WIRE
Connect the fuel pump motor connector.
Install the bracket with the bolt.
- Torque:
- 10 N*m (102 kgf*cm, 7 ft.*lbf)
25800 24.INSTALL ELECTRIC EGR CONTROL VALVE ASSEMBLY
16288 25.INSTALL NO. 4 WATER BY-PASS PIPE
Connect the No. 2 water by-pass pipe and slide the clamp to secure the hose.
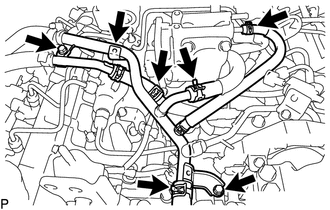
Connect the inlet water hose, No. 4 water by-pass hose and No. 12 water by-pass hoses to the No. 4 water by-pass pipe, and slide the clamp to secure the hoses.
- HINT:
-
·
Align the markings and connect the hose.
·Align the pinching portion of the clamp with the hose marking and connect the hose.
Install the No. 4 water by-pass pipe with the 2 bolts and nut.
- Torque:
- 10 N*m (102 kgf*cm, 7 ft.*lbf)
- HINT:
-
Tighten the 2 bolts first.
25850 26.INSTALL ELECTRIC VACUUM REGULATING VALVE ASSEMBLY
44761 27.INSTALL VACUUM PUMP TO CONNECTOR TUBE
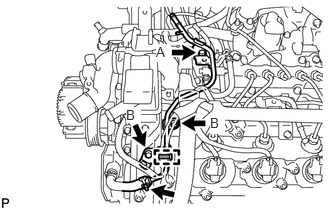
Install the vacuum pump to connector tube with the 3 bolts.
- Torque:
- for bolt A : 21 N*m (214 kgf*cm, 15 ft.*lbf)
- for bolt B : 10 N*m (102 kgf*cm, 7 ft.*lbf)
Connect the union to connector tube hose to the vacuum pump to connector tube, and slide the clamp to secure the hose.
Connect the engine wire clamp to the vacuum pump to connector tube.
82122 28.CONNECT NO. 2 ENGINE WIRE
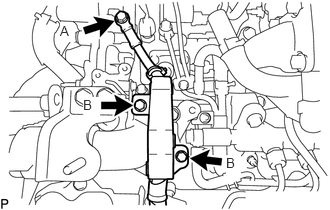
Connect the No. 2 engine wire with the 3 bolts.
- Torque:
- for bolt A : 32 N*m (326 kgf*cm, 24 ft.*lbf)
- for bolt B : 13 N*m (133 kgf*cm, 10 ft.*lbf)
44769 29.INSTALL VACUUM RESERVOIR CONNECT TUBE
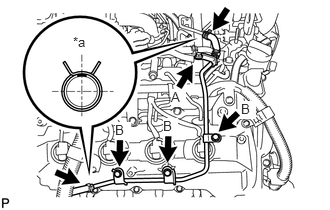
| *a | Upper |
Install the vacuum reservoir connect tube with the 4 bolts.
- Torque:
- for bolt A : 21 N*m (214 kgf*cm, 15 ft.*lbf)
- for bolt B : 10 N*m (102 kgf*cm, 7 ft.*lbf)
Connect the 2 vacuum hoses, and slide the clamp to secure the hose.
- HINT:
-
·
Align the hose markings as shown in the illustration.
·Align the pinching portion of the clamp with the hose marking and connect the hose.
23271H 30.CONNECT NO. 1 AND NO. 2 FUEL HOSES
12142 31.INSTALL NO. 2 ENGINE OIL LEVEL DIPSTICK GUIDE
Apply a light coat of engine oil to a new O-ring.
Install the O-ring to the No. 2 engine oil level dipstick guide.
Install the No. 2 engine oil level dipstick guide with the bolt.
- Torque:
- 10 N*m (102 kgf*cm, 7 ft.*lbf)
15301 32.INSTALL ENGINE OIL LEVEL DIPSTICK
26100G 33.INSTALL DIESEL THROTTLE BODY ASSEMBLY (for Bank 2)
26100G 34.INSTALL DIESEL THROTTLE BODY ASSEMBLY (for Bank 1)
17972 35.INSTALL NO. 2 COOL AIR INLET
17971 36.INSTALL NO. 1 COOL AIR INLET
17940D 37.INSTALL INTERCOOLER ASSEMBLY
87246A 38.CONNECT HEATER WATER HOSE
39.BLEED AIR FROM FUEL SYSTEM
40.ADD ENGINE COOLANT
41.CONNECT CABLE TO NEGATIVE BATTERY TERMINAL
42. INITIALIZATION AFTER RECONNECTING BATTERY TERMINAL
- HINT:
-
When disconnecting and reconnecting the battery, there is an automatic learning function that completes learning when the respective system is used.
-
Click hereGeneral>SETUP>WHEN DISCONNECTING OR RECONNECTING BATTERY TERMINAL>AUTOMATIC LEARNING CHART
43.INSPECT FOR FUEL LEAK
44.INSPECT FOR OIL LEAK
45.INSPECT FOR COOLANT LEAK
51442 46.INSTALL NO. 2 ENGINE UNDER COVER