WINDOW / GLASS WINDOW DEFOGGER SYSTEM Rear Window Defogger System does not Operate
DESCRIPTION
An operation request signal is sent to the air conditioning amplifier assembly via LIN communication when the air conditioning control assembly (window defogger switch) is operated.
When the air conditioning amplifier assembly receives the signal, it sends an operation request signal via CAN communication to the main body ECU (multiplex network body ECU).
When the main body ECU (multiplex network body ECU) receives the signal, it sends an operation request signal via CPXI communication to the No. 2 semiconductor power integration ECU.
After the operation request signal is received by the No. 2 semiconductor power integration ECU it outputs an operation signal and operates the window defogger.
WIRING DIAGRAM
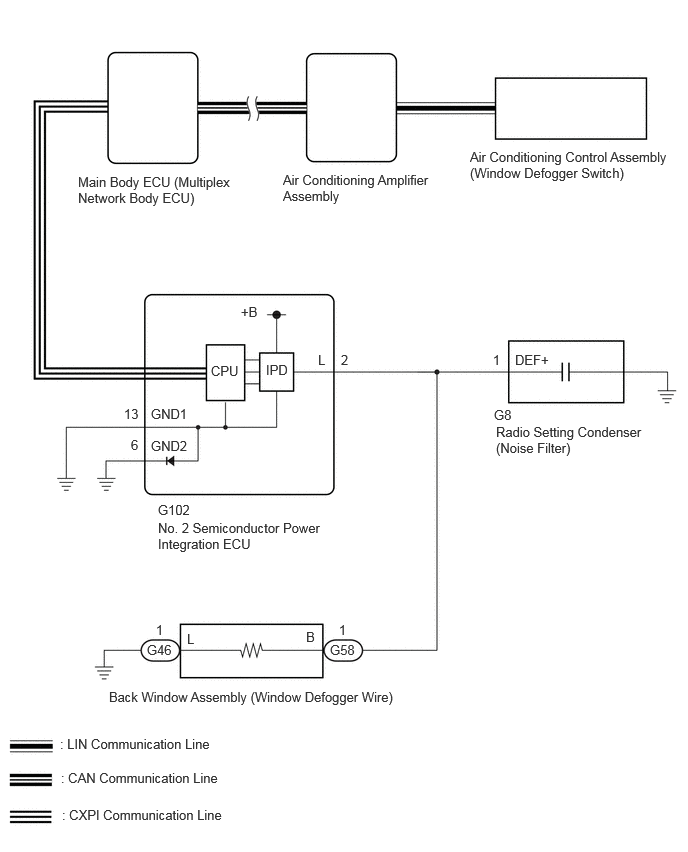
CAUTION / NOTICE / HINT
- NOTICE:
- ·
The window defogger system uses the CAN communication system. Inspect the communication function by following How to Proceed with Troubleshooting. Troubleshoot the window defogger system after confirming that the communication system is functioning properly.
Click herePower Source / Network>NETWORKING>CAN COMMUNICATION SYSTEM>HOW TO PROCEED WITH TROUBLESHOOTING
·The window defogger system uses the CXPI communication system. Inspect the communication function by following How to Proceed with Troubleshooting. Troubleshoot the window defogger system after confirming that the communication system is functioning properly.
Click herePower Source / Network>NETWORKING>CXPI COMMUNICATION SYSTEM>HOW TO PROCEED WITH TROUBLESHOOTING
·The window defogger system is controlled by the power integration system. Troubleshoot by checking if there are any malfunctions in the power integration system by following the steps in "How to Proceed with Troubleshooting".
·If the window defogger system is operated when the auxiliary battery voltage is low, due to the electrical load limit control that gives voltage supply priority to the power steering system, the window defogger system may not operate. In this case, check the vehicle control history of the power steering system and check that "Battery Voltage Drop: X208F" is not stored before proceeding with troubleshooting.
Click hereSteering>POWER ASSIST SYSTEMS>POWER STEERING SYSTEM>VEHICLE CONTROL HISTORY
·With the negative (-) auxiliary battery terminal connected, disconnect/do not connect the connector of the No. 2 semiconductor power integration ECU.
·When replacing the No. 2 semiconductor power integration ECU, the system may not operate normally if the same part number is not used.
·After turning the ignition switch off, waiting time may be required before disconnecting the cable from the negative (-) auxiliary battery terminal.
Click hereGeneral>INTRODUCTION>REPAIR INSTRUCTION>PRECAUTION
·When disconnecting and reconnecting the auxiliary battery.
Click hereGeneral>SETUP>WHEN DISCONNECTING OR RECONNECTING BATTERY TERMINAL>WORK PROCEDURE
- HINT:
-
When disconnecting and reconnecting the auxiliary battery, there is an automatic learning function that completes learning when the respective system is used.
-
Click hereGeneral>SETUP>WHEN DISCONNECTING OR RECONNECTING BATTERY TERMINAL>AUTOMATIC LEARNING CHART
·Some parts must be initialized and set when replacing or removing and installing parts.
Click hereGeneral>SETUP>WHEN REPLACING OR REMOVING/INSTALLING PARTS>WORK PROCEDURE
PROCEDURE
Check the air conditioning system.
- HINT:
-
Both the window defogger system operation signal and air conditioning system operation signal are transmitted to the air conditioning amplifier assembly via the same communication line.
- OK:
The air conditioning system operates normally.
- Result:
Proceed to OK NG
OK
NG
Check that the defogger indicator illuminates when the window defogger switch is on.
- OK:
Defogger indicator illuminates.
- Result:
Proceed to OK NG
OK
NG
for LHD:
Click hereVehicle Interior>HEATING / AIR CONDITIONING>AIR CONDITIONING PANEL (for LHD Front)>REMOVAL
for RHD:
Click hereVehicle Interior>HEATING / AIR CONDITIONING>AIR CONDITIONING PANEL (for RHD Front)>REMOVAL
Using the GTS, perform the Active Test.
- Body Electrical > Air Conditioner > Active Test
-
Tester Display Measurement Item Control Range Diagnostic Note Defogger Relay (Rear) Back window assembly (window defogger wire) OFF or ON -
- Body Electrical > Air Conditioner > Active Test
-
Tester Display Defogger Relay (Rear) - 50004 121 22
- OK:
Back window assembly (window defogger wire) warms up.
- Result:
Proceed to OK NG
OK
NG
Temporarily replace the air conditioning amplifier assembly with a new or normally functioning one.
Click hereVehicle Interior>HEATING / AIR CONDITIONING>AIR CONDITIONING AMPLIFIER>REMOVAL
Check that the window defogger system operates normally.
Click hereVehicle Exterior>WINDOW / GLASS>WINDOW DEFOGGER SYSTEM>OPERATION CHECK
- OK:
The window defogger system operates normally.
- Result:
Proceed to OK NG
OK
NG
for LHD:
Click hereVehicle Interior>HEATING / AIR CONDITIONING>AIR CONDITIONING PANEL (for LHD Front)>REMOVAL
for RHD:
Click hereVehicle Interior>HEATING / AIR CONDITIONING>AIR CONDITIONING PANEL (for RHD Front)>REMOVAL
Using the GTS, read the Data List.
- Body Electrical > Power Integration No.3 > Data List
-
Tester Display Measurement Item Range Normal Condition Diagnostic Note Status of Rear Defogger Fuse Window defogger fuse condition Disconnect or Connect Disconnect: Fuse shut off
Connect: Fuse not shut off-
- Body Electrical > Power Integration No.3 > Data List
-
Tester Display Status of Rear Defogger Fuse - 50003 412 92
- OK:
The Data List value displays "Connect".
- Result:
Proceed to OK NG
OK
NG
Using the GTS, read the Data List.
- Body Electrical > Power Integration No.3 > Data List
-
Tester Display Measurement Item Range Normal Condition Diagnostic Note Rear Defogger Input Signal Window defogger switch signal input condition ON or OFF ON: Window defogger switch is on
OFF: Window defogger switch is off-
- Body Electrical > Power Integration No.3 > Data List
-
Tester Display Rear Defogger Input Signal - 50003 412 72
- OK:
The Data List value displays "ON" with the air conditioning control assembly (window defogger switch) set to ON.
- Result:
Proceed to OK NG
OK
NG
Using the GTS, read the Data List.
- Body Electrical > Power Integration No.3 > Data List
-
Tester Display Measurement Item Range Normal Condition Diagnostic Note Rear Defogger Output Signal Window defogger output condition ON or OFF ON: Window defogger operates
OFF: Window defogger does not operate-
- Body Electrical > Power Integration No.3 > Data List
-
Tester Display Rear Fog Light Output Signal - 50003 412 77
- OK:
The Data List value displays "ON" with the air conditioning control assembly (window defogger switch) set to ON.
- Result:
Proceed to OK NG
OK
NG
Disconnect the G58 back window assembly (window defogger wire) connector.
Measure the voltage according to the value(s) in the table below.
- Standard Voltage:
Tester Connection Switch Condition Specified Condition Click Location & Routing(G58)Location & Routingewd_type=routing;type=c;code=G58
Click Connector(G58)Body>Floor Wire / No. 3 Floor Wire>Rear Window Defogger (Back Window Assembly)ewd_type=component;type=c;code=G58;pinno=1
G58-1 (B) - Body ground Ignition switch ON, window defogger switch on 8 V or higher Ignition switch ON, window defogger switch off Below 3 V
- Result:
Proceed to OK NG
OK
NG
Disconnect the G46 back window assembly (window defogger wire) connector.
Measure the resistance according to the value(s) in the table below.
- Standard Resistance:
Tester Connection Condition Specified Condition Click Location & Routing(G46)Location & Routingewd_type=routing;type=c;code=G46
Click Connector(G46)Body>Floor Wire / No. 3 Floor Wire>Rear Window Defogger (Back Window Assembly)ewd_type=component;type=c;code=G46;pinno=1
G46-1 (L) - Body ground Always Below 1 Ω
- Result:
Proceed to OK NG
OK
NG
Turn the ignition switch off.
Disconnect the cable from the negative (-) auxiliary battery terminal.
Disconnect the G102 No. 2 semiconductor power integration ECU connector.
Disconnect the G58 back window assembly (window defogger wire) connector.
Measure the resistance according to the value(s) in the table below.
- Standard Resistance:
Tester Connection Condition Specified Condition Click Location & Routing(G102,G58)Location & Routingewd_type=routing;type=c,c;code=G102,G58
Click Connector(G102)Body>Floor Wire / No. 3 Floor Wire>No. 2 Semiconductor Power Integration ECUewd_type=component;type=c;code=G102;pinno=2
Click Connector(G58)Body>Floor Wire / No. 3 Floor Wire>Rear Window Defogger (Back Window Assembly)ewd_type=component;type=c;code=G58;pinno=1
G102-2 (L) - G58-1 (B) Always Below 1 Ω
- Result:
Proceed to OK NG
OK
NG
Disconnect the G58 back window glass (window defogger wire) connector.
Turn the window defogger switch "OFF" on the air conditioning control assembly.
Turn the window defogger switch "ON" on the air conditioning control assembly.
Using the GTS, read the Data List.
- Body Electrical > Power Integration No.3 > Data List
-
Tester Display Measurement Item Range Normal Condition Diagnostic Note Status of Rear Defogger Fuse Window defogger fuse condition Disconnect or Connect Disconnect: Fuse shut off
Connect: Fuse not shut off-
- Body Electrical > Power Integration No.3 > Data List
-
Tester Display Status of Rear Defogger Fuse - 50003 412 92
- OK:
The Data List value displays "Connect".
- Result:
Proceed to OK NG
OK
NG
Disconnect the G8 radio setting condenser (noise filter) connector.
Turn the window defogger switch "OFF" on the air conditioning control assembly.
Turn the window defogger switch "ON" on the air conditioning control assembly.
Using the GTS, read the Data List.
- Body Electrical > Power Integration No.3 > Data List
-
Tester Display Measurement Item Range Normal Condition Diagnostic Note Status of Rear Defogger Fuse Window defogger fuse condition Disconnect or Connect Disconnect: Fuse shut off
Connect: Fuse not shut off-
- Body Electrical > Power Integration No.3 > Data List
-
Tester Display Status of Rear Defogger Fuse - 50003 412 92
- OK:
The Data List value displays "Connect".
- Result:
Proceed to OK NG
OK
NG
Turn the ignition switch off.
Disconnect the cable from the negative (-) auxiliary battery terminal.
Disconnect the G102 No. 2 semiconductor power integration ECU connector.
Disconnect the G58 back window assembly (window defogger wire) connector.
Disconnect the G8 radio setting condenser (noise filter) connector.
Measure the resistance according to the value(s) in the table below.
- Standard Resistance:
Tester Connection Condition Specified Condition Click Location & Routing(G102,G58)Location & Routingewd_type=routing;type=c,c;code=G102,G58
Click Connector(G102)Body>Floor Wire / No. 3 Floor Wire>No. 2 Semiconductor Power Integration ECUewd_type=component;type=c;code=G102;pinno=2
Click Connector(G58)Body>Floor Wire / No. 3 Floor Wire>Rear Window Defogger (Back Window Assembly)ewd_type=component;type=c;code=G58;pinno=1
G102-2 (L) or G58-1 (B) - Body ground Always 10 kΩ or higher
- Result:
Proceed to OK NG
OK
NG