COOLING WATER PUMP INSTALLATION
CAUTION / NOTICE / HINT
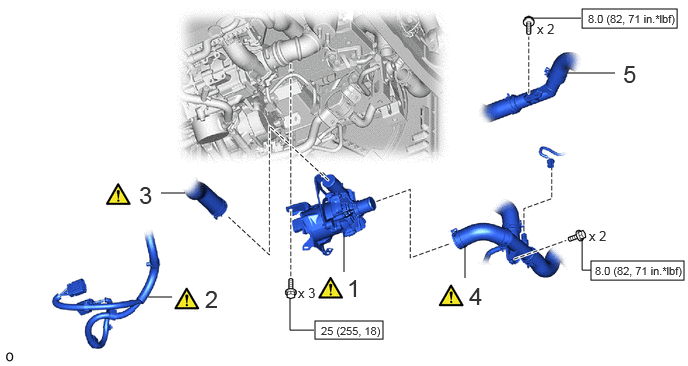
| Procedure | Part Name Code | 
|

|

|
|
|---|---|---|---|---|---|
| 1 | FC COOLING WATER PUMP ASSEMBLY | 16A10 | ( ) |
- | - |
| 2 | FC COOLING WATER PUMP CABLE | 16A18 | ()
|
- | - |
| 3 | NO. 2 FC RADIATOR HOSE | 16572F | ()
|
- | - |
| 4 | NO. 11 FC RADIATOR HOSE | 1657B | ()
|
- | - |
| 5 | NO. 6 FC RADIATOR PIPE | 165H6 | - | - | - |
| *1 | INVERTER TERMINAL COVER | *2 | FC AIR COMPRESSOR BRACKET |

|
Tightening torque for "Major areas involving basic vehicle performance such as moving/turning/stopping": N*m (kgf*cm, ft.*lbf) | 
|
N*m (kgf*cm, ft.*lbf): Specified torque |
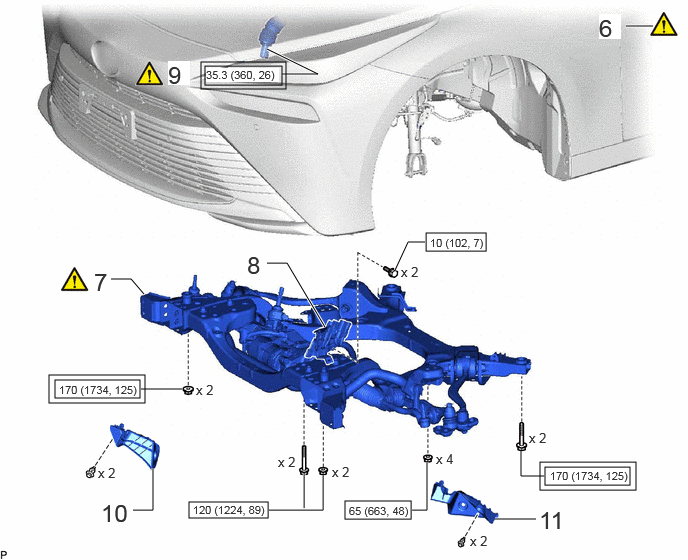
| Procedure | Part Name Code |
|
|
|
|
|---|---|---|---|---|---|
| 6 | HOLDING BAR | - | ()
|
- | - |
| 7 | FRONT FRAME ASSEMBLY | 51100G | ()
|
- | - |
| 8 | WIRE HARNESS CLAMP BRACKET | - | - | - | - |
| 9 | NO. 2 STEERING INTERMEDIATE SHAFT ASSEMBLY | 45260 | ()
|
- | - |
| 10 | FRONT COMPARTMENT SIDE COVER RH | 51473D | - | - | - |
| 11 | FRONT COMPARTMENT SIDE COVER LH | 51474C | - | - | - |
|
|
Tightening torque for "Major areas involving basic vehicle performance such as moving/turning/stopping": N*m (kgf*cm, ft.*lbf) |
|
N*m (kgf*cm, ft.*lbf): Specified torque |
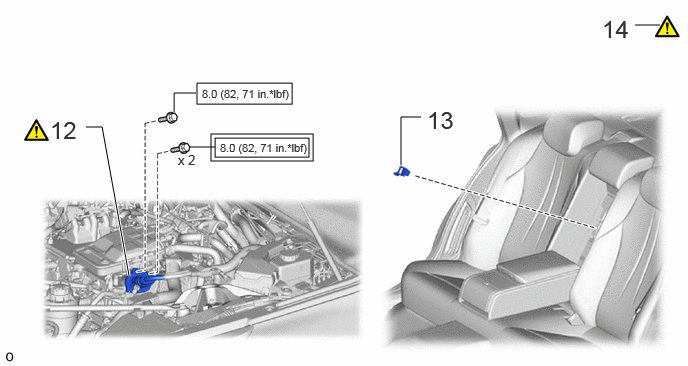
| Procedure | Part Name Code |
|
|
|
|
|---|---|---|---|---|---|
| 12 | FC CONVERTER POWER OUTLET CABLE (INVERTER WITH CONVERTER ASSEMBLY) | G9200A | ()
|
- | - |
| 13 | SERVICE PLUG GRIP | G3834 | - | - | - |
| 14 | ENGINE SUPPORT BRIDGE | - | ()
|
- | - |
|
|
Tightening torque for "Major areas involving basic vehicle performance such as moving/turning/stopping": N*m (kgf*cm, ft.*lbf) |
|
N*m (kgf*cm, ft.*lbf): Specified torque |
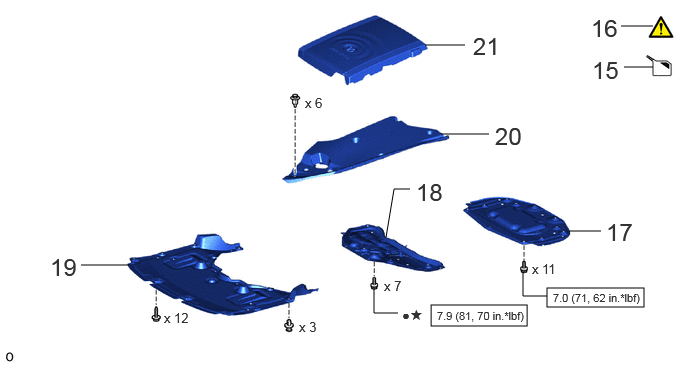
| Procedure | Part Name Code |
|
|
|
|
|---|---|---|---|---|---|
| 15 | ADD COOLANT (TOYOTA GENUINE FC STACK COOLANT (Pre-mixed)) | - | - | ()
|
- |
| 16 | INSPECT FOR COOLANT (TOYOTA GENUINE FC STACK COOLANT (Pre-mixed)) LEAK | - | ()
|
- | - |
| 17 | FRONT COMPARTMEMT UNDER COVER ASSEMBLY | 51420A | - | - | - |
| 18 | FRONT LOWER SUSPENSION MEMBER PROTECTOR | 51219 | - | - | - |
| 19 | FRONT COMPARTMENT UNDER COVER | 51441N | - | - | - |
| 20 | UPPER RADIATOR SUPPORT SEAL | 53292A | - | - | - |
| 21 | FC STACK COVER SUB-ASSEMBLY | 1A906 | - | - | - |
|
|
N*m (kgf*cm, ft.*lbf): Specified torque | ● | Non-reusable part |
| ★ | Precoated part | - | - |
PROCEDURE

 16A10
1.INSTALL FC COOLING WATER PUMP ASSEMBLY
|
|
|
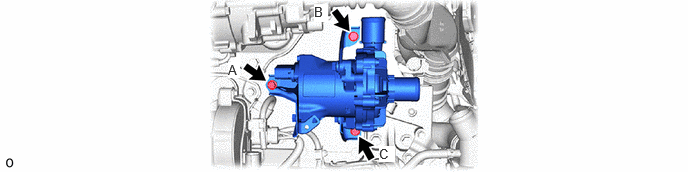
Install the FC cooling water pump assembly to the FC stack assembly with the 3 bolts.
- Torque:
- 25 N*m (255 kgf*cm, 18 ft.*lbf)
- NOTICE:
-
Tightening order: Temporarily install bolt A → Tighten bolt C → Tighten bolt B → Tighten bolt A
16A18
2.CONNECT FC COOLING WATER PUMP CABLE
|
|
|
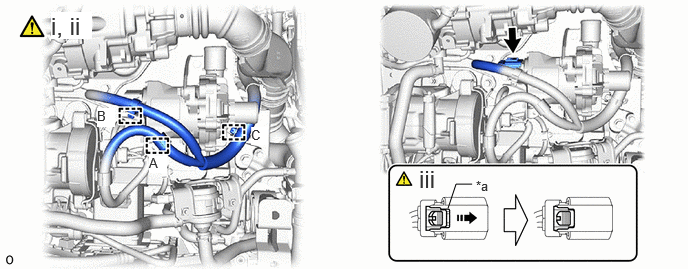
| *a | Green-colored Lock | 
|
Slide |
Attach the clamp A.
Attach the clamp B and C to connect the FC cooling water pump cable.
As shown in the illustration, connect the FC cooling water pump cable connector and press in the green-colored lock to securely fix the connector in place.
16572F
3.CONNECT NO. 2 FC RADIATOR HOSE
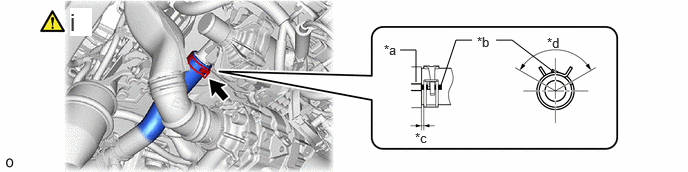
| *a | FC Cooling Water Pump Assembly Rib | *b | Hose Paint Mark |
| *c | 2 to 7 mm (0.0787 to 0.276 in.) | *d | 120° |
Connect the No. 2 FC radiator hose to the FC cooling water pump assembly and slide the hose clip to secure it.
- NOTICE:
- ·
Align the hose and the hose clip at the locations shown in the illustration and install them.
·Make sure the No. 2 FC radiator hose is securely inserted to the stopper.
When connecting, if the hose is difficult to insert, apply new coolant (Toyota genuine FC stack coolant (Pre-mixed)) to it.
1657B
4.CONNECT NO. 11 FC RADIATOR HOSE
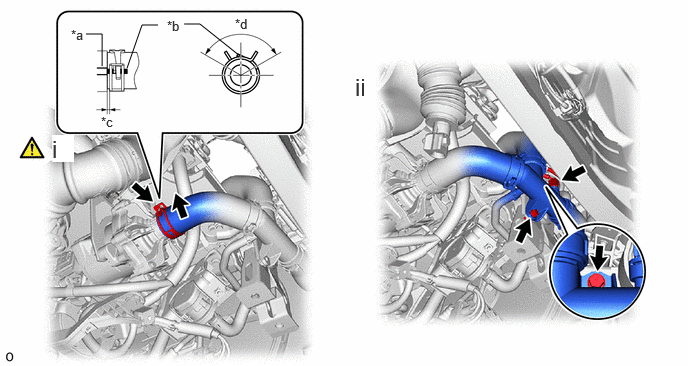
| *a | FC Cooling Water Pump Assembly Rib | *b | Hose Paint Mark |
| *c | 2 to 7 mm (0.0787 to 0.276 in.) | *d | 120° |
Connect the No. 11 FC radiator hose to the FC cooling water pump assembly and slide the hose clip to secure it.
- NOTICE:
- ·
Align the hose and the hose clip at the locations shown in the illustration and install them.
·Make sure the No. 11 FC radiator hose is securely inserted to the stopper.
When connecting, if the hose is difficult to insert, apply new coolant (Toyota genuine FC stack coolant (Pre-mixed)) to it.
Connect the connector with the 2 bolts.
- Torque:
- 8.0 N*m (82 kgf*cm, 71 in.*lbf)
165H6
5.CONNECT NO. 6 FC RADIATOR PIPE
- Torque:
- 8.0 N*m (82 kgf*cm, 71 in.*lbf)
6.REMOVE HOLDING BAR
51100G
7.INSTALL FRONT FRAME ASSEMBLY
|
|
Click here()
|
8.CONNECT WIRE HARNESS CLAMP BRACKET
45260
9.CONNECT NO. 2 STEERING INTERMEDIATE SHAFT ASSEMBLY
|
|
Click here()
|
51473D
10.INSTALL FRONT COMPARTMENT SIDE COVER RH
Use the same procedure as for the LH side.
51474C
11.INSTALL FRONT COMPARTMENT SIDE COVER LH
G9200A
12.CONNECT FC CONVERTER POWER OUTLET CABLE (INVERTER WITH CONVERTER ASSEMBLY)
|
|
Click here()
|
G3834
13.INSTALL SERVICE PLUG GRIP
14.REMOVE ENGINE SUPPORT BRIDGE
15.ADD COOLANT (TOYOTA GENUINE FC STACK COOLANT (Pre-mixed))
16.INSPECT FOR COOLANT (TOYOTA GENUINE FC STACK COOLANT (Pre-mixed)) LEAK
51420A
17.INSTALL FRONT COMPARTMEMT UNDER COVER ASSEMBLY
51219
18.INSTALL FRONT LOWER SUSPENSION MEMBER PROTECTOR
51441N
19.INSTALL FRONT COMPARTMENT UNDER COVER
53292A
20.INSTALL UPPER RADIATOR SUPPORT SEAL
1A906
21.INSTALL FC STACK COVER SUB-ASSEMBLY