FC CONTROL FC CONTROL SYSTEM P1E4000 Extreme Hydrogen Leak (Motor Room) P1E407A Hydrogen Leak (Motor Room) Fluid Leak or Seal Failure P1E4100 Extreme Hydrogen Leak (Tank Area 1) P1E417A Hydrogen Leak (Tank Area 1) Fluid Leak or Seal Failure P1EF600 Extreme Hydrogen Leak (Tank Area 2) P1EF67A Hydrogen Leak (Tank Area 2) Fluid Leak or Seal Failure
DESCRIPTION
The hydrogen detector is provided in an area where hydrogen may accumulate, so that it can detect hydrogen in case of leaks. The hydrogen detector monitors for leaks independently from the FC system control.
If hydrogen concentrations more than a specified amount is detected by the hydrogen detector, this DTC will be stored.
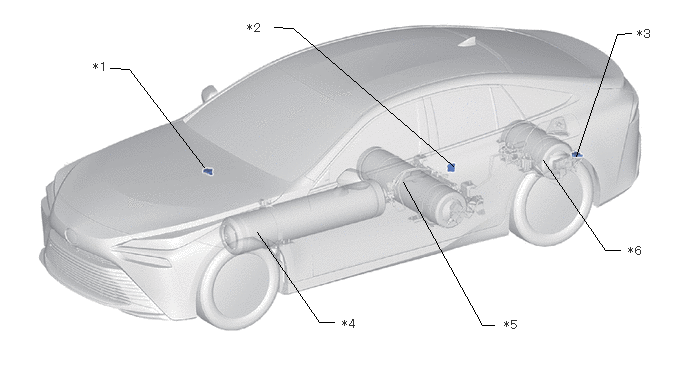
| *1 | Hydrogen Detector (for Front Compartment Side) | *2 | Hydrogen Detector (for Hydrogen Tank 1, 2 Side) |
| *3 | Hydrogen Detector (for Hydrogen Tank 3 Side) | *4 | No. 1 Hydrogen Tank Assembly |
| *5 | No. 2 Hydrogen Tank Assembly | *6 | No. 3 Hydrogen Tank Assembly |
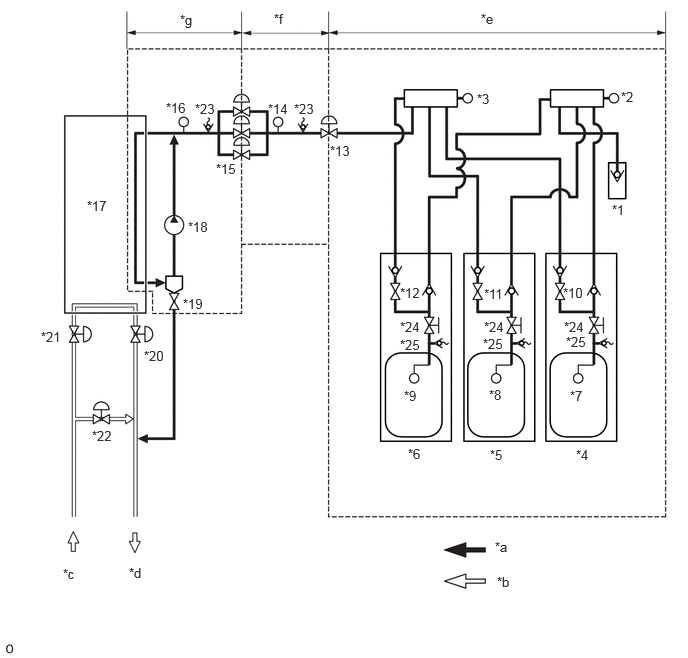
| *1 | Hydrogen Inlet Receptacle Assembly | *2 | Hydrogen Tank Pressure Sensor (for Inlet Side) |
| *3 | Hydrogen Tank Pressure Sensor (for Outlet Side) | *4 | No. 1 Hydrogen Tank Assembly |
| *5 | No. 2 Hydrogen Tank Assembly | *6 | No. 3 Hydrogen Tank Assembly |
| *7 | Hydrogen Tank Temperature Sensor 1 | *8 | Hydrogen Tank Temperature Sensor 2 |
| *9 | Hydrogen Tank Temperature Sensor 3 | *10 | Tank Shut Valve 1 |
| *11 | Tank Shut Valve 2 | *12 | Tank Shut Valve 3 |
| *13 | Hydrogen Supply Regulator Assembly | *14 | Hydrogen Primary Pressure Sensor |
| *15 | Fuel Injector Assembly | *16 | Hydrogen Secondary Pressure Sensor |
| *17 | FC Stack | *18 | Hydrogen Recirculation Pump Assembly |
| *19 | Exhaust Drainage Valve (Hydrogen Recirculation Separator Assembly) | *20 | FC Air Pressure Regulator Assembly (Air Pressure Regulating Valve) |
| *21 | FC Air Pressure Regulator Assembly (Air Sealing Valve) | *22 | FC Air By-pass Valve Assembly (Air Shunt Valve) |
| *23 | Pressure Relief Valve | *24 | Manual Valve |
| *25 | Pressure Relief Device | - | - |
| *a | Hydrogen System | *b | Air System |
| *c | From the FC Air Compressor with Motor Assembly | *d | To the Exhaust Drainage Pipe |
| *e | High-range Pressure Area | *f | Medium-range Pressure Area |
| *g | Low-range Pressure Area | - | - |
| DTC No. | Detection Item | DTC Detection Condition | Trouble Area | Warning Indicate | DTC Output from | Priority |
|---|---|---|---|---|---|---|
| P1E4000 | Extreme Hydrogen Leak (Motor Room) | Detected when the hydrogen detectors have completed warmup (within 10 seconds of turning the ignition switch to ON), the ignition switch is turned to ON (READY), FC Work Mode is not FC Shutdown, and any of the following conditions is met.
The hydrogen detector provided in the front compartment detects a concentration of more than 3% (Hydrogen leak warning light comes on and FC system shuts off) (1 trip detection logic) |
·
High-range hydrogen pressure pipe ·
Medium-range hydrogen pressure pipe ·
No. 1 hydrogen tank assembly ·
No. 2 hydrogen tank assembly ·
No. 3 hydrogen tank assembly ·
Hydrogen detector (for front compartment side) ·
FC stack assembly |
·
Master Warning: Comes on ·
Hydrogen Leak Warning: Comes on |
EV | B |
| P1E407A | Hydrogen Leak (Motor Room) Fluid Leak or Seal Failure | Detected when the hydrogen detectors have completed warmup (within 10 seconds of turning the ignition switch to ON), the ignition switch is turned to ON (READY), FC Work Mode is not FC Shutdown, and any of the following conditions is met.
The hydrogen detector provided in the front compartment detects a concentration of more than 2% (Hydrogen leak warning light comes on) (1 trip detection logic) |
·
High-range hydrogen pressure pipe ·
Medium-range hydrogen pressure pipe ·
No. 1 hydrogen tank assembly ·
No. 2 hydrogen tank assembly ·
No. 3 hydrogen tank assembly ·
Hydrogen detector (for front compartment side) ·
FC stack assembly |
Hydrogen Leak Warning: Comes on | EV | B |
| P1E4100 | Extreme Hydrogen Leak (Tank Area 1) | Detected when the hydrogen detectors have completed warmup (within 10 seconds of turning the ignition switch to ON), the ignition switch is turned to ON (READY), FC Work Mode is not FC Shutdown, and any of the following conditions is met.
Hydrogen detector (for front hydrogen area) detects a concentration of 3% or higher (Hydrogen leak warning light comes on and FC system shuts off) (1 trip detection logic) |
·
High-range hydrogen pressure pipe ·
Medium-range hydrogen pressure pipe ·
No. 1 hydrogen tank assembly ·
No. 2 hydrogen tank assembly ·
No. 3 hydrogen tank assembly ·
Hydrogen detector (for hydrogen tank 1, 2 side) ·
FC stack assembly |
·
Master Warning: Comes on ·
Hydrogen Leak Warning: Comes on |
EV | B |
| P1E417A | Hydrogen Leak (Tank Area 1) Fluid Leak or Seal Failure | Detected when the hydrogen detectors have completed warmup (within 10 seconds of turning the ignition switch to ON), the ignition switch is turned to ON (READY), FC Work Mode is not FC Shutdown, and any of the following conditions is met.
Hydrogen detector (for front hydrogen area) detects a concentration of 2% or higher (Hydrogen leak warning light comes on) (1 trip detection logic) |
·
High-range hydrogen pressure pipe ·
Medium-range hydrogen pressure pipe ·
No. 1 hydrogen tank assembly ·
No. 2 hydrogen tank assembly ·
No. 3 hydrogen tank assembly ·
Hydrogen detector (for hydrogen tank 1, 2 side) ·
FC stack assembly |
Hydrogen Leak Warning: Comes on | EV | B |
| P1EF600 | Extreme Hydrogen Leak (Tank Area 2) | Detected when the hydrogen detectors have completed warmup (within 10 seconds of turning the ignition switch to ON), the ignition switch is turned to ON (READY), FC Work Mode is not FC Shutdown, and any of the following conditions is met.
Hydrogen detector (for rear hydrogen area) detects a concentration of 3% or higher (Hydrogen leak warning light comes on and FC system shuts off) (1 trip detection logic) |
·
High-range hydrogen pressure pipe ·
Medium-range hydrogen pressure pipe ·
No. 1 hydrogen tank assembly ·
No. 2 hydrogen tank assembly ·
No. 3 hydrogen tank assembly ·
Hydrogen detector (for hydrogen tank 3 side) ·
FC stack assembly |
·
Master Warning: Comes on ·
Hydrogen Leak Warning: Comes on |
EV | B |
| P1EF67A | Hydrogen Leak (Tank Area 2) Fluid Leak or Seal Failure | Detected when the hydrogen detectors have completed warmup (within 10 seconds of turning the ignition switch to ON), the ignition switch is turned to ON (READY), FC Work Mode is not FC Shutdown, and any of the following conditions is met.
Hydrogen detector (for rear hydrogen area) detects a concentration of 2% or higher (Hydrogen leak warning light comes on) (1 trip detection logic) |
·
High-range hydrogen pressure pipe ·
Medium-range hydrogen pressure pipe ·
No. 1 hydrogen tank assembly ·
No. 2 hydrogen tank assembly ·
No. 3 hydrogen tank assembly ·
Hydrogen detector (for hydrogen tank 3 side) ·
FC stack assembly |
Hydrogen Leak Warning: Comes on | EV | B |
- HINT:
- ·
DTC P1E4000, P1E407A indicates hydrogen leaks somewhere in the front compartment, and P1E4100, P1E417A, P1EF600, P1EF67A indicates hydrogen leaks somewhere near the hydrogen tank.
·Troubleshoot hydrogen leaks from the high-range pressure area first.
| Vehicle Condition | FC shutdown
(ignition switch ON) |
FC startup process | FC intermittent operation | FC is generating power
(vehicle is in stationary) |
FC is generating power
(vehicle is traveling) |
FC shutdown process |
|---|---|---|---|---|---|---|
| Data List
"FC Work Mode" |
Stop | Startup | Working | Finishing | ||
| Data List
"FC Intermittent Operation" |
OFF | ON | OFF | OFF | ||
| DTC Detection | - | ○ | ○ | ○ | ○ | ○ |
| DTC No. | Data List |
|---|---|
| P1E4000
P1E407A P1E4100 P1E417A P1EF600 P1EF67A |
·
Motor Room Hydrogen Density ·
Tank Area 1 Hydrogen Density ·
Tank Area 2 Hydrogen Density ·
High-Range Hydrogen Pressure (Filtered Value) ·
Medium-Range Hydrogen Pressure (Filtered Value) ·
Low-Range Hydrogen Pressure (Filtered Value) ·
Target Low-range Hydrogen Pressure |
Refer to the following items stored in the freeze frame data.
"Motor Room Hydrogen Density", "Tank Area 1 Hydrogen Density", "Tank Area 2 Hydrogen Density":
Amount of detected leakage is displayed in percentage.
"High-Range Hydrogen Pressure (Filtered Value)":
The value is normally in a range of 1000 to 87500 kPa(abs) with the ignition switch ON (READY). If it is below 1000 kPa(abs), a situation is identified as lack of hydrogen, and the FC system will be brought to a halt.
"Medium-Range Hydrogen Pressure (Filtered Value)":
The value is normally in a range of 1000 to 1600 kPa(abs) with the ignition switch ON (READY).
"Low-Range Hydrogen Pressure (Filtered Value)":
The value is normally "an atmospheric pressure plus 10 kPa" to "280 kPa(abs)" with the ignition switch to ON (READY), and is regulated to stay at the "Target Low-range Hydrogen Pressure" value.
CAUTION / NOTICE / HINT
- CAUTION:
- ·
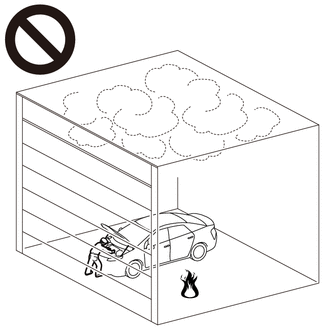
Work procedures must be performed in an area with good ventilation (airflow) where hydrogen gas will not accumulate, and flames or other things that could act as ignition sources must not be present.
·Accumulated hydrogen gas could ignite, resulting in a serious accident.
Click hereEngine / Hybrid System>FUEL>FUEL SYSTEM>PRECAUTION
- NOTICE:
- ·
After completion of repair, using a hydrogen gas detector and soapy water, check that no hydrogen leaks from the hydrogen pipes.
·This vehicle performs FC system shutdown process after turning the ignition switch off from ON (READY). Therefore, after the ignition switch is turned off from ON (READY), do not perform any work on the electrical system for at least 10 minutes including removing connectors or disconnecting the negative (-) auxiliary battery terminal.
·When the EV control ECU determines that the temperature of FC system components is below 0°C (32°F) when the vehicle is parked with the ignition switch off, it operates the FC air compressor, hydrogen pump and FC cooling water pump for a maximum of 180 seconds to drain the FC stack assembly. When performing inspection or repairs with the ignition switch off (not ON or ON (READY)), disconnect the cable from the negative (-) auxiliary battery terminal before performing work. (If the auxiliary battery voltage is needed to conduct inspection, perform the inspection in an environment with an ambient temperature of 10°C (50°F) or higher.)
- HINT:
- ·
Forcing the SOC of the EV supply battery assembly to decrease by applying electrical loads such as turning on the air conditioning (HOT MAX, maximum airflow), or depressing the accelerator pedal with the shift state in park (P), the "FC Intermittent Operation" of the Data List is easily to enter OFF (power generation mode).
-
After the repair, clear the DTCs and perform the following procedure to check that DTCs are not output.
- 1.
Activate the FC system (If it cannot be activated, check the DTCs that are present at the time).
- ·
If the "Motor Room Hydrogen Density", "Tank Area 1 Hydrogen Density" or "Tank Area 2 Hydrogen Density" value in the Data List is more than 2%, a DTC will be output. Also, if pressure leaks have occurred in the hydrogen system, the following DTCs listed below will be output. If no pressure leaks have occurred, the "Smoothed Value of High-range Hydrogen Pressure" and "Smoothed Value of Medium-range Hydrogen Pressure" in the Data List are stable at values other than 0 (zero) with the ignition switch ON (READY).
-P1E427A (Hydrogen Leak (Excessive Hydrogen Flow) Fluid Leak or Seal Failure)
-P1E437A (Hydrogen Leak (High/Medium Pressure Area) Fluid Leak or Seal Failure)
-P1E447A (Hydrogen Leak (Low Pressure Area) Fluid Leak or Seal Failure)
PROCEDURE
- NOTICE:
-
The freeze frame data is cleared when DTCs are cleared. Be sure to make a note of necessary data in advance.
Pre-procedure1
None
Procedure1
According to the display on the GTS, check for DTCs in the Health Check.
- Result:
Result Proceed to Only P1E4000, P1E407A, P1E4100, P1E417A, P1EF600 or P1EF67A is output A P1E4000, P1E407A, P1E4100, P1E417A, P1EF600 or P1EF67A is output and DTCs other than the DTCs in the table below are output B P1E4000, P1E407A, P1E4100, P1E417A, P1EF600 or P1EF67A is output and any DTCs in the table below are output C
Malfunction Content Relevant DTC System malfunction P1E427A (EV) Hydrogen Leak (Excessive Hydrogen Flow) Fluid Leak or Seal Failure P1E437A (EV) Hydrogen Leak (High/Medium Pressure Area) Fluid Leak or Seal Failure P1E447A (EV) Hydrogen Leak (Low Pressure Area) Fluid Leak or Seal Failure P1DC100 (EV) Low-Range Hydrogen Pressure Too High P1DC300 (EV) Medium-Range Hydrogen Pressure Too High
- HINT:
- ·
DTC P1E4000, P1E407A, P1E4100, P1E417A, P1EF600 or P1EF67A may be store due to problems that cause the DTCs shown above to be output. If such happens, troubleshoot the suspected area(s) corresponding to the output DTC(s) in order starting with the listed DTCs shown in the table above.
·If no pressure leaks have occurred in the high-range or medium-range hydrogen pressure system, the "High-Range Hydrogen Pressure (Filtered Value)" and "Medium-Range Hydrogen Pressure (Filtered Value)" in the Data List are stable at values other than 0 (zero) with the ignition switch ON (READY OFF).
Post-procedure1
Turn the ignition switch off.
A
B
C
Pre-procedure1
None
Procedure1
Clear the DTCs.
- Powertrain > EV > Clear DTCs
- 50002 397
- Result:
Proceed to NEXT
Post-procedure1
Turn the ignition switch off and wait for 10 minutes or more.
NEXT
- CAUTION:
- ·
Work procedures must be performed in an area with good ventilation (airflow) where hydrogen gas will not accumulate, and flames or other things that could act as ignition sources must not be present.
·Accumulated hydrogen gas could ignite, resulting in a serious accident.
·Open the hood with the ignition switch off, check for hydrogen leaks around the underbody and in the front compartment with a hydrogen gas detector. If leakage is found, pay extra attention to fire safety in the following operations.
- HINT:
-
For procedures to check for leaks from hydrogen pipes and components (high-range pressure and medium-range pressure), refer toEngine / Hybrid System>FUEL>FUEL SYSTEM>ON-VEHICLE INSPECTION.
Pre-procedure1
Turn the ignition switch off.
Remove the under cover.
Procedure1
Check that the hydrogen tank and hydrogen pipes are not damaged.
Check for a gas leaking sound, and then check if there are hydrogen leaks in the hydrogen pipes and components with a hydrogen gas detector.
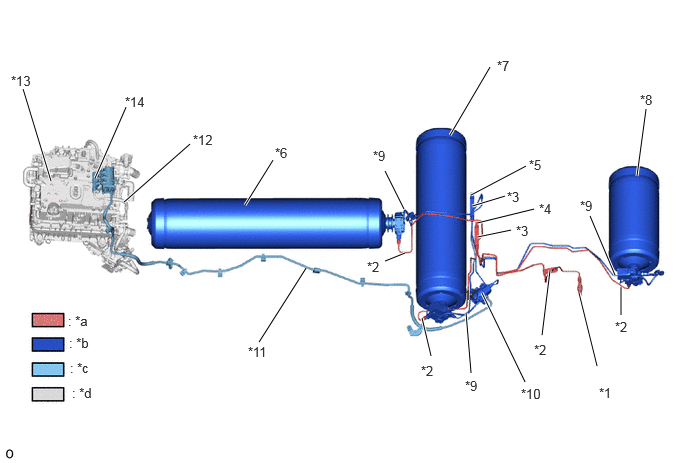
| *1 | Hydrogen Inlet Receptacle Assembly | *2 | High-range Hydrogen Pressure Pipe (for filling) |
| *3 | Hydrogen Tank Tube Joint | *4 | Hydrogen Tank Pressure Sensor (for Inlet Side) |
| *5 | Hydrogen Tank Pressure Sensor (for Outlet Side) | *6 | No. 1 Hydrogen Tank Assembly |
| *7 | No. 2 Hydrogen Tank Assembly | *8 | No. 3 Hydrogen Tank Assembly |
| *9 | High-range Hydrogen Pressure Pipe (for feeding) | *10 | Hydrogen Supply Regulator Assembly |
| *11 | Medium-range Hydrogen Pressure Pipe | *12 | Low-range Hydrogen Pressure Pipe |
| *13 | FC Stack Assembly | *14 | Hydrogen Injector |
| *a | High-range Pressure Area (when filling)
(Hydrogen Inlet Receptacle Assembly → Hydrogen Tank Assembly ) |
*b | High-range Pressure Area
(Hydrogen Tank Assembly → Hydrogen Supply Regulator Assembly) |
| *c | Medium-range Pressure Area
(Hydrogen Supply Regulator Assembly → Hydrogen Injector) |
*d | Low-range Pressure Area
(Hydrogen Injector → FC Stack) |
- Standard value:
300 ppm or less. (Hydrogen gas detector)
- Result:
Proceed to OK NG
Post-procedure1
Install the under cover.
OK
NG
- CAUTION:
- ·
Work procedures must be performed in an area with good ventilation (airflow) where hydrogen gas will not accumulate, and flames or other things that could act as ignition sources must not be present.
·Accumulated hydrogen gas could ignite, resulting in a serious accident.
·Open the hood with the ignition switch off, check for hydrogen leaks around the underbody and in the front compartment with a hydrogen gas detector. If leakage is found, pay extra attention to fire safety in the following operations.
- NOTICE:
-
Turn the ignition switch to ON (READY) causes the tank shut valve to open, and this pressurizes hydrogen in the hydrogen pipes. At this time, locate leaking areas of the hydrogen pipe. If there are leaks, the hydrogen pressure in the pipe decreases gradually, so perform checks quickly.
- HINT:
-
For procedures to check for leaks from hydrogen pipes and components (high-range pressure and medium-range pressure), refer toEngine / Hybrid System>FUEL>FUEL SYSTEM>ON-VEHICLE INSPECTION.
Pre-procedure1
Remove the under cover.
Turn the ignition switch to ON (READY) with the shift state in park (P), and check that the Data List "FC Work Mode" is Working and "FC Intermittent Operation" is OFF.
- Powertrain > EV > Data List
-
Tester Display FC Work Mode FC Intermittent Operation - 50003 397 962,872
- HINT:
-
If there are no leaks, the high-range and medium-range hydrogen systems will be pressurized full in virtually a few seconds after the ignition switch is turned to ON (READY) (the tank shut valves open). For the low-range hydrogen system, after the ignition switch is turned to ON (READY), when the "FC Work Mode" in the Data List enters Working and Intermittent Operation turns OFF, the hydrogen injector is caused to open so that hydrogen can be supplied.
Turn the ignition switch off.
Procedure1
Check for a gas leaking sound, and then check if there are hydrogen leaks in the hydrogen pipes and components with a hydrogen gas detector.
| *1 | Hydrogen Inlet Receptacle Assembly | *2 | High-range Hydrogen Pressure Pipe (for filling) |
| *3 | Hydrogen Tank Tube Joint | *4 | Hydrogen Tank Pressure Sensor (for Inlet Side) |
| *5 | Hydrogen Tank Pressure Sensor (for Outlet Side) | *6 | No. 1 Hydrogen Tank Assembly |
| *7 | No. 2 Hydrogen Tank Assembly | *8 | No. 3 Hydrogen Tank Assembly |
| *9 | High-range Hydrogen Pressure Pipe (for feeding) | *10 | Hydrogen Supply Regulator Assembly |
| *11 | Medium-range Hydrogen Pressure Pipe | *12 | Low-range Hydrogen Pressure Pipe |
| *13 | FC Stack Assembly | *14 | Hydrogen Injector |
| *a | High-range Pressure Area (when filling)
(Hydrogen Inlet Receptacle Assembly → Hydrogen Tank Assembly ) |
*b | High-range Pressure Area
(Hydrogen Tank Assembly → Hydrogen Supply Regulator Assembly) |
| *c | Medium-range Pressure Area
(Hydrogen Supply Regulator Assembly → Hydrogen Injector) |
*d | Low-range Pressure Area
(Hydrogen Injector → FC Stack) |
- Standard value:
300 ppm or less. (Hydrogen gas detector)
- Result:
Proceed to OK NG
Post-procedure1
Install the under cover.
OK
NG
- HINT:
- ·
This procedure is aimed to check whether the tank pressure is lower than that of the No. 2 hydrogen tank assembly and No. 3 hydrogen tank assembly, or whether it is not empty, due to hydrogen leak from the No. 1 hydrogen tank assembly.
·Close the manual valves on the No. 2 hydrogen tank assembly and No. 3 hydrogen tank assembly to check the pressure of the No. 1 hydrogen tank assembly.
Pre-procedure1
Clear the DTCs.
- Powertrain > EV > Clear DTCs
- 50002 397
Procedure1
Turn the ignition switch to ON (READY) with the shift state in park (P), and check that the Data List "FC Work Mode" is Working.
- Powertrain > EV > Data List
-
Tester Display FC Work Mode High-Range Hydrogen Pressure (Filtered Value) - 50003 397 962,1030
Record the "High-Range Hydrogen Pressure (Filtered Value)" of the Data List. (1)
Post-procedure1
Turn the ignition switch off and wait for 10 minutes or more.
- HINT:
-
After the ignition switch is turned off, the "High-Range Hydrogen Pressure (Filtered Value)" is reduced to depressurized by 5000 to 10000 kPa due to system shutdown control.
Pre-procedure2
Remove the under cover.
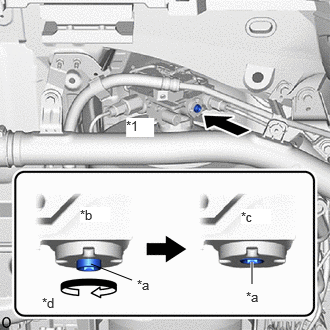
| *1 | No. 2 Hydrogen Tank Assembly |
| *a | Adjustment Bolt |
| *b | Manual Valve Open |
| *c | Manual Valve Closed |
| *d | Clockwise |
Using an 8 mm hexagon socket wrench, rotate the adjustment bolt clockwise to close the manual valve of the No. 2 hydrogen tank assembly.
- Torque:
20 N*m (204 kgf*cm, 15 ft.*lbf)
- NOTICE:
- ·
The manual valve is the component that shuts off the pressure from the hydrogen tank assembly, so be careful not to damage the hexagonal portion.
·If the hexagonal portion has been damaged, the No. 2 hydrogen tank assembly must be replaced.
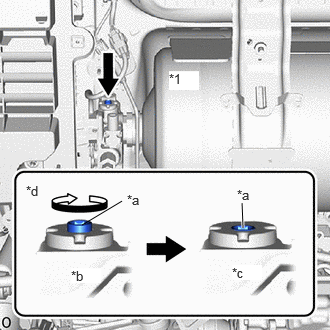
| *1 | No. 3 Hydrogen Tank Assembly |
| *a | Adjustment Bolt |
| *b | Manual Valve Open |
| *c | Manual Valve Closed |
| *d | Clockwise |
Using an 8 mm hexagon socket wrench, rotate the adjustment bolt clockwise to close the manual valve of the No. 3 hydrogen tank assembly.
- Torque:
20 N*m (204 kgf*cm, 15 ft.*lbf)
- NOTICE:
- ·
The manual valve is the component that shuts off the pressure from the hydrogen tank assembly, so be careful not to damage the hexagonal portion.
·If the hexagonal portion has been damaged, the No. 3 hydrogen tank assembly must be replaced.
Procedure2
Turn the ignition switch to ON.
Enter the following menus: Powertrain / EV / Data List / FC Work Mode, High-Range Hydrogen Pressure (Filtered Value)
- Powertrain > EV > Data List
-
Tester Display FC Work Mode High-Range Hydrogen Pressure (Filtered Value) - 50003 397 962,1030
Turn the ignition switch to ON (READY).
- NOTICE:
- ·
Perform operations (2) and (3) instructed below within 5 seconds of turning the ignition switch ON (READY).
·If the tank is empty due to a hydrogen leak from the No. 1 hydrogen tank assembly, when the manual valves of the No. 2 hydrogen tank assembly and No. 3 hydrogen tank assembly are closed, hydrogen cannot be supplied to the hydrogen supply pipe when the ignition switch is turned to ON (READY).
At this time, "Hydrogen Empty Low Level" may be stored under the vehicle control history. Therefore, be sure to check the vehicle control history after completing the repair, and clear "Hydrogen Empty Low Level" if it has been stored before returning the vehicle.
- HINT:
-
If the tank is empty due to a hydrogen leak from the No. 1 hydrogen tank assembly, because the manual valves of the No. 2 hydrogen tank assembly and No. 3 hydrogen tank assembly are closed, hydrogen cannot be supplied to the FC stack and the FC system cannot start (Data List "FC Work Mode" cannot enter Working).
Read the "High-Range Hydrogen Pressure (Filtered Value)" of the Data List. (2)
Turn the ignition switch off. (3)
- Result:
Result Proceed to "High-Range Hydrogen Pressure (Filtered Value)" has increased up to the value recorded in operation (1). A Other than above B
Post-procedure2
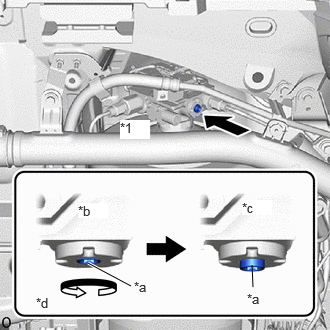
| *1 | No. 2 Hydrogen Tank Assembly |
| *a | Adjustment Bolt |
| *b | Manual Valve Closed |
| *c | Manual Valve Open |
| *d | Counterclockwise |
Using an 8 mm socket hexagon wrench, rotate the adjustment bolt counterclockwise until it contacts the plug, and open the No. 2 hydrogen tank assembly manual valve.
- NOTICE:
- ·
The manual valve is the component that shuts off the pressure from the hydrogen tank assembly, so be careful not to damage the hexagonal portion.
·If the hexagonal portion has been damaged, the No. 2 hydrogen tank assembly must be replaced.
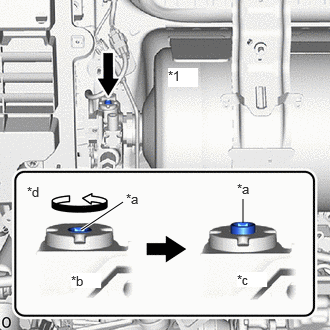
| *1 | No. 3 Hydrogen Tank Assembly |
| *a | Adjustment Bolt |
| *b | Manual Valve Closed |
| *c | Manual Valve Open |
| *d | Counterclockwise |
Using an 8 mm socket hexagon wrench, rotate the adjustment bolt counterclockwise until it contacts the plug, and open the No. 3 hydrogen tank assembly manual valve.
- NOTICE:
- ·
The manual valve is the component that shuts off the pressure from the hydrogen tank assembly, so be careful not to damage the hexagonal portion.
·If the hexagonal portion has been damaged, the No. 3 hydrogen tank assembly must be replaced.
Install the under cover.
A
B
- HINT:
- ·
This procedure is aimed to check whether the tank pressure is lower than that of the No. 1 hydrogen tank assembly and No. 3 hydrogen tank assembly, or whether it is not empty, due to hydrogen leak from the No. 2 hydrogen tank assembly.
·Close the manual valves on the No. 1 hydrogen tank assembly and No. 3 hydrogen tank assembly to check the pressure of the No. 2 hydrogen tank assembly.
Pre-procedure1
Clear the DTCs.
- Powertrain > EV > Clear DTCs
- 50002 397
Procedure1
Turn the ignition switch to ON (READY) with the shift state in park (P), and check that the Data List "FC Work Mode" is Working.
- Powertrain > EV > Data List
-
Tester Display FC Work Mode High-Range Hydrogen Pressure (Filtered Value) - 50003 397 962,1030
Record the "High-Range Hydrogen Pressure (Filtered Value)" of the Data List. (1)
Post-procedure1
Turn the ignition switch off and wait for 10 minutes or more.
- HINT:
-
After the ignition switch is turned off, the "High-Range Hydrogen Pressure (Filtered Value)" is reduced to depressurized by 5000 to 10000 kPa due to system shutdown control.
Pre-procedure2
Remove the under cover.
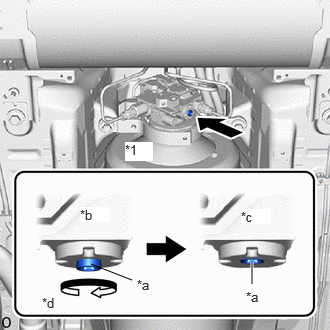
| *1 | No. 1 Hydrogen Tank Assembly |
| *a | Adjustment Bolt |
| *b | Manual Valve Open |
| *c | Manual Valve Closed |
| *d | Clockwise |
Using an 8 mm hexagon socket wrench, rotate the adjustment bolt clockwise to close the manual valve of the No. 1 hydrogen tank assembly.
- Torque:
20 N*m (204 kgf*cm, 15 ft.*lbf)
- NOTICE:
- ·
The manual valve is the component that shuts off the pressure from the hydrogen tank assembly, so be careful not to damage the hexagonal portion.
·If the hexagonal portion has been damaged, the No. 1 hydrogen tank assembly must be replaced.
| *1 | No. 3 Hydrogen Tank Assembly |
| *a | Adjustment Bolt |
| *b | Manual Valve Open |
| *c | Manual Valve Closed |
| *d | Clockwise |
Using an 8 mm hexagon socket wrench, rotate the adjustment bolt clockwise to close the manual valve of the No. 3 hydrogen tank assembly.
- Torque:
20 N*m (204 kgf*cm, 15 ft.*lbf)
- NOTICE:
- ·
The manual valve is the component that shuts off the pressure from the hydrogen tank assembly, so be careful not to damage the hexagonal portion.
·If the hexagonal portion has been damaged, the No. 3 hydrogen tank assembly must be replaced.
Procedure2
Turn the ignition switch to ON.
Enter the following menus: Powertrain / EV / Data List / FC Work Mode, High-Range Hydrogen Pressure (Filtered Value)
- Powertrain > EV > Data List
-
Tester Display FC Work Mode High-Range Hydrogen Pressure (Filtered Value) - 50003 397 962,1030
Turn the ignition switch to ON (READY).
- NOTICE:
- ·
Perform operations (2) and (3) instructed below within 5 seconds of turning the ignition switch ON (READY).
·If the tank is empty due to a hydrogen leak from the No. 2 hydrogen tank assembly, when the manual valves of the No. 1 hydrogen tank assembly and No. 3 hydrogen tank assembly are closed, hydrogen cannot be supplied to the hydrogen supply pipe when the ignition switch is turned to ON (READY).
At this time, "Hydrogen Empty Low Level" may be stored under the vehicle control history. Therefore, be sure to check the vehicle control history after completing the repair, and clear "Hydrogen Empty Low Level" if it has been stored before returning the vehicle.
- HINT:
-
If the tank is empty due to a hydrogen leak from the No. 2 hydrogen tank assembly, because the manual valves of the No. 1 hydrogen tank assembly and No. 3 hydrogen tank assembly are closed, hydrogen cannot be supplied to the FC stack and the FC system cannot start (Data List "FC Work Mode" cannot enter Working).
Read the "High-Range Hydrogen Pressure (Filtered Value)" of the Data List. (2)
Turn the ignition switch off. (3)
- Result:
Result Proceed to "High-Range Hydrogen Pressure (Filtered Value)" has increased up to the value recorded in operation (1). A Other than above B
Post-procedure2
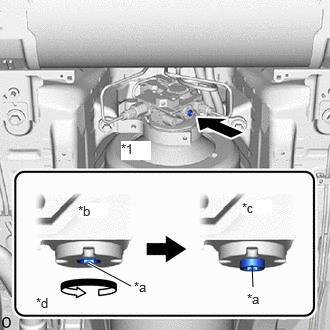
| *1 | No. 1 Hydrogen Tank Assembly |
| *a | Adjustment Bolt |
| *b | Manual Valve Closed |
| *c | Manual Valve Open |
| *d | Counterclockwise |
Using an 8 mm socket hexagon wrench, rotate the adjustment bolt counterclockwise until it contacts the plug, and open the No. 1 hydrogen tank assembly manual valve.
- NOTICE:
- ·
The manual valve is the component that shuts off the pressure from the hydrogen tank assembly, so be careful not to damage the hexagonal portion.
·If the hexagonal portion has been damaged, the No. 1 hydrogen tank assembly must be replaced.
| *1 | No. 3 Hydrogen Tank Assembly |
| *a | Adjustment Bolt |
| *b | Manual Valve Closed |
| *c | Manual Valve Open |
| *d | Counterclockwise |
Using an 8 mm socket hexagon wrench, rotate the adjustment bolt counterclockwise until it contacts the plug, and open the No. 3 hydrogen tank assembly manual valve.
- NOTICE:
- ·
The manual valve is the component that shuts off the pressure from the hydrogen tank assembly, so be careful not to damage the hexagonal portion.
·If the hexagonal portion has been damaged, the No. 3 hydrogen tank assembly must be replaced.
Install the under cover.
A
B
- HINT:
- ·
This procedure is aimed to check whether the tank pressure is lower than that of the No. 1 hydrogen tank assembly and No. 2 hydrogen tank assembly, or whether it is not empty, due to hydrogen leak from the No. 3 hydrogen tank assembly.
·Close the manual valves on the No. 1 hydrogen tank assembly and No. 2 hydrogen tank assembly to check the pressure of the No. 3 hydrogen tank assembly.
Pre-procedure1
Clear the DTCs.
- Powertrain > EV > Clear DTCs
- 50002 397
Procedure1
Turn the ignition switch to ON (READY) with the shift state in park (P), and check that the Data List "FC Work Mode" is Working.
- Powertrain > EV > Data List
-
Tester Display FC Work Mode High-Range Hydrogen Pressure (Filtered Value) - 50003 397 962,1030
Record the "High-Range Hydrogen Pressure (Filtered Value)" of the Data List. (1)
Post-procedure1
Turn the ignition switch off and wait for 10 minutes or more.
- HINT:
-
After the ignition switch is turned off, the "High-Range Hydrogen Pressure (Filtered Value)" is reduced to depressurized by 5000 to 10000 kPa due to system shutdown control.
Remove the under cover.
| *1 | No. 1 Hydrogen Tank Assembly |
| *a | Adjustment Bolt |
| *b | Manual Valve Open |
| *c | Manual Valve Closed |
| *d | Clockwise |
Using an 8 mm hexagon socket wrench, rotate the adjustment bolt clockwise to close the manual valve of the No. 1 hydrogen tank assembly.
- Torque:
20 N*m (204 kgf*cm, 15 ft.*lbf)
- NOTICE:
- ·
The manual valve is the component that shuts off the pressure from the hydrogen tank assembly, so be careful not to damage the hexagonal portion.
·If the hexagonal portion has been damaged, the No. 1 hydrogen tank assembly must be replaced.
| *1 | No. 2 Hydrogen Tank Assembly |
| *a | Adjustment Bolt |
| *b | Manual Valve Open |
| *c | Manual Valve Closed |
| *d | Clockwise |
Using an 8 mm hexagon socket wrench, rotate the adjustment bolt clockwise to close the manual valve of the No. 2 hydrogen tank assembly.
- Torque:
20 N*m (204 kgf*cm, 15 ft.*lbf)
- NOTICE:
- ·
The manual valve is the component that shuts off the pressure from the hydrogen tank assembly, so be careful not to damage the hexagonal portion.
·If the hexagonal portion has been damaged, the No. 2 hydrogen tank assembly must be replaced.
Procedure2
Turn the ignition switch to ON.
Enter the following menus: Powertrain / EV / Data List / FC Work Mode, High-Range Hydrogen Pressure (Filtered Value)
- Powertrain > EV > Data List
-
Tester Display FC Work Mode High-Range Hydrogen Pressure (Filtered Value) - 50003 397 962,1030
Turn the ignition switch to ON (READY).
- NOTICE:
- ·
Perform operations (2) and (3) instructed below within 5 seconds of turning the ignition switch ON (READY).
·If the tank is empty due to a hydrogen leak from the No. 3 hydrogen tank assembly, when the manual valves of the No. 1 hydrogen tank assembly and No. 2 hydrogen tank assembly are closed, hydrogen cannot be supplied to the hydrogen supply pipe when the ignition switch is turned to ON (READY).
At this time, "Hydrogen Empty Low Level" may be stored under the vehicle control history. Therefore, be sure to check the vehicle control history after completing the repair, and clear "Hydrogen Empty Low Level" if it has been stored before returning the vehicle.
- HINT:
-
If the tank is empty due to a hydrogen leak from the No. 3 hydrogen tank assembly, because the manual valves of the No. 1 hydrogen tank assembly and No. 2 hydrogen tank assembly are closed, hydrogen cannot be supplied to the FC stack and the FC system cannot start (Data List "FC Work Mode" cannot enter Working).
Read the "High-Range Hydrogen Pressure (Filtered Value)" of the Data List. (2)
Turn the ignition switch off. (3)
- Result:
Result Proceed to "High-Range Hydrogen Pressure (Filtered Value)" has increased up to the value recorded in operation (1). A Other than above B
Post-procedure2
| *1 | No. 1 Hydrogen Tank Assembly |
| *a | Adjustment Bolt |
| *b | Manual Valve Closed |
| *c | Manual Valve Open |
| *d | Counterclockwise |
Using an 8 mm socket hexagon wrench, rotate the adjustment bolt counterclockwise until it contacts the plug, and open the No. 1 hydrogen tank assembly manual valve.
- NOTICE:
- ·
The manual valve is the component that shuts off the pressure from the hydrogen tank assembly, so be careful not to damage the hexagonal portion.
·If the hexagonal portion has been damaged, the No. 1 hydrogen tank assembly must be replaced.
| *1 | No. 2 Hydrogen Tank Assembly |
| *a | Adjustment Bolt |
| *b | Manual Valve Closed |
| *c | Manual Valve Open |
| *d | Counterclockwise |
Using an 8 mm socket hexagon wrench, rotate the adjustment bolt counterclockwise until it contacts the plug, and open the No. 2 hydrogen tank assembly manual valve.
- NOTICE:
- ·
The manual valve is the component that shuts off the pressure from the hydrogen tank assembly, so be careful not to damage the hexagonal portion.
·If the hexagonal portion has been damaged, the No. 2 hydrogen tank assembly must be replaced.
Install the under cover.
A
B
- CAUTION:
- ·
Work procedures must be performed in an area with good ventilation (airflow) where hydrogen gas will not accumulate, and flames or other things that could act as ignition sources must not be present.
·Accumulated hydrogen gas could ignite, resulting in a serious accident.
Pre-procedure1
Ensure the safety of the areas in front and at the back of the vehicle.
Put wheel chocks and securely apply the parking brake.
Procedure1
Turn the ignition switch to ON (READY) with the shift state in park (P), and check that the Data List "FC Work Mode" is Working, "FC Intermittent Operation" is OFF, and "Exhaust Drainage Valve" is Close.
- Powertrain > EV > Active Test
-
Active Test Display Activate the Exhaust Drainage Valve -
Data List Display FC Work Mode FC Intermittent Operation Exhaust Drainage Valve - 50004 397 42006 962,872,818
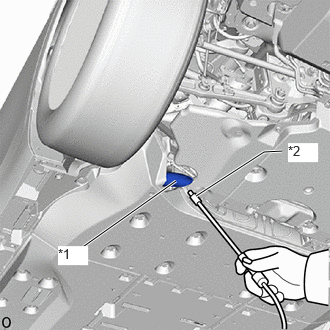
| *1 | Tailpipe |
| *2 | Hydrogen Gas Detector Probe |
Use the hydrogen gas detector to measure and record the hydrogen concentration in gas released from the tailpipe when the exhaust drainage valve is closed.
- NOTICE:
- ·
Perform this measurement in an environment where there is no wind.
·Position the hydrogen gas detector probe in an area 100 mm (3.94 in.) away from the tailpipe opening. (Avoid locations underneath the tailpipe opening)
·Position the hydrogen gas detector probe so that it is free from dropping water that comes from the tailpipe opening.
Perform the "Activate the Exhaust Drainage Valve" Active Test several times over 1 minute, and then, starting from the third test, use the hydrogen gas detector to measure the hydrogen concentration in gas released from the tailpipe when the exhaust drainage valve is open.
- HINT:
- ·
The exhaust drainage valve will open for 1 second each time the Active Test is performed, so measure the hydrogen concentration for several seconds.
·Hydrogen concentration may not increase while coolant escapes when the valve is first opened. Therefore, start measuring from the third test.
·There is a delayed response when performing detection using the hydrogen gas detector, so measure for several seconds.
·"FC Intermittent Operation" in the Data List will be more likely to turn OFF if the accelerator pedal is depressed with the shift state in park (P).
- Result:
Result Proceed to The hydrogen concentration of the hydrogen gas detector will increase when "Exhaust Drainage Valve" in the Data List is Open rather than when "Exhaust Drainage Valve" is Close. A Other than above* B
*: The exhaust drainage valve is malfunctioning
Exhaust drainage valve is stuck closed:
Regardless of the "Exhaust Drainage Valve Driving Request" being ON or OFF, the concentration shown on the hydrogen gas detector has remained low.
Exhaust drainage valve is stuck open:
Regardless of the "Exhaust Drainage Valve Driving Request" being ON or OFF, the concentration shown on the hydrogen gas detector has remained high when the ignition switch is on (READY).
Post-procedure1
Turn the ignition switch off.
A
B
Perform on-vehicle inspection for the hydrogen detector.
If DTC P1E400, P1E407A is stored: Click hereEngine / Hybrid System>FC CONTROL>HYDROGEN DETECTOR (for Motor Room Side)>ON-VEHICLE INSPECTION
If DTC P1E4100, P1E417A, P1EF600, P1EF67A is stored: Click hereEngine / Hybrid System>FC CONTROL>HYDROGEN DETECTOR (for Hydrogen Tank Side)>ON-VEHICLE INSPECTION
- Result:
Proceed to OK NG
OK
Click hereGeneral>INTRODUCTION>HOW TO TROUBLESHOOT ECU CONTROLLED SYSTEMS>HOW TO PROCEED WITH TROUBLESHOOTING
NG
Hydrogen detector (for motor room side)
Click hereEngine / Hybrid System>FC CONTROL>HYDROGEN DETECTOR (for Motor Room Side)>REMOVAL
Hydrogen detector (for hydrogen tank side)
Click hereEngine / Hybrid System>FC CONTROL>HYDROGEN DETECTOR (for Hydrogen Tank Side)>REMOVAL
- CAUTION:
- ·
Work procedures must be performed in an area with good ventilation (airflow) where hydrogen gas will not accumulate, and flames or other things that could act as ignition sources must not be present.
·Accumulated hydrogen gas could ignite, resulting in a serious accident.
Pre-procedure1
Enter the following menus: Powertrain / EV / Data List / FC Mode, FC Intermittent Operation
- Powertrain > EV > Data List
-
Tester Display FC Work Mode FC Intermittent Operation - 50003 397 962,872
Turn the ignition switch to ON (READY) with the shift state in park (P), and check that the Data List "FC Work Mode" is Working and "FC Intermittent Operation" is OFF.
- HINT:
-
If there are no leaks, the high-range and medium-range hydrogen systems will be pressurized full in virtually a few seconds after the ignition switch is turned to ON (READY) (the tank shut valves open). For the low-range hydrogen system, after the ignition switch is turned to ON (READY), when the "FC Work Mode" in the Data List enters Working and Intermittent Operation turns OFF, the hydrogen injector is caused to open so that hydrogen can be supplied.
Turn the ignition switch off.
Procedure1
Apply soapy water to locate hydrogen leaking areas.
- NOTICE:
-
Do not apply soapy water to the FC stack assembly. If a hydrogen gas detector identifies gas leaks from the FC stack assembly, replace the FC stack assembly with new one.
- Result:
Proceed to NEXT
Post-procedure1
None
NEXT
- CAUTION:
- ·
Work procedures must be performed in an area with good ventilation (airflow) where hydrogen gas will not accumulate, and flames or other things that could act as ignition sources must not be present.
·Accumulated hydrogen gas could ignite, resulting in a serious accident.
Apply soapy water to locate hydrogen leaking areas.
- NOTICE:
-
Do not apply soapy water to the FC stack assembly. If a hydrogen gas detector identifies gas leaks from the FC stack assembly, replace the FC stack assembly with new one.
- Result:
Proceed to NEXT
NEXT