STEERING COLUMN STEERING COLUMN ASSEMBLY INSTALLATION
PROCEDURE

 1.INSPECT STEERING COLUMN ASSEMBLY
2.INSTALL STEERING COLUMN ASSEMBLY
Install the steering column assembly with the bolt and 2 nuts.
- Torque:
- Bolt : 36 N*m (367 kgf*cm, 27 ft.*lbf)
- Nut : 25 N*m (255 kgf*cm, 18 ft.*lbf)
- NOTICE:
- ·
Be sure there is no interference around the wire harness.
·There are two different bolt sizes (12 mm (0.472 in.) or 14 mm (0.551 in.)) available.
Engage the wire harness clamp.
Connect the 2 connectors to the power steering ECU assembly.
Connect the connectors and engage the wire harness clamps to the steering column assembly.
3.INSTALL UPPER INSTRUMENT PANEL ASSEMBLY
55106
4.INSTALL BRAKE PEDAL SUPPORT ASSEMBLY
for LHD: (See page Brake>BRAKE SYSTEM (OTHER)>BRAKE PEDAL(for LHD)>INSTALLATION)
for RHD: (See page Brake>BRAKE SYSTEM (OTHER)>BRAKE PEDAL(for RHD)>INSTALLATION)
45260
5.CONNECT NO. 2 STEERING INTERMEDIATE SHAFT ASSEMBLY
When reusing the electric power steering column sub-assembly and No. 2 steering intermediate shaft assembly:
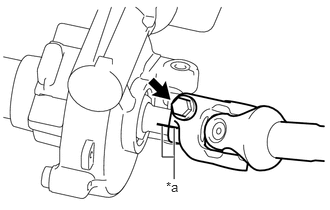
Align the matchmarks on the No. 2 steering intermediate shaft assembly and the steering column assembly, and install them.
| *a | Matchmark |
When replacing the electric power steering column sub-assembly or No. 2 steering intermediate shaft assembly:
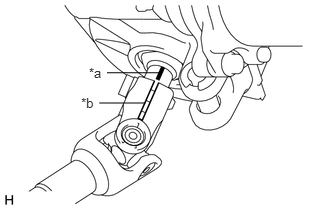
Align the marking (pink) on the steering column assembly shaft with the slit of the No. 2 steering intermediate shaft assembly, and install them.
| *a | Marking (Pink) |
| *b | Slit |
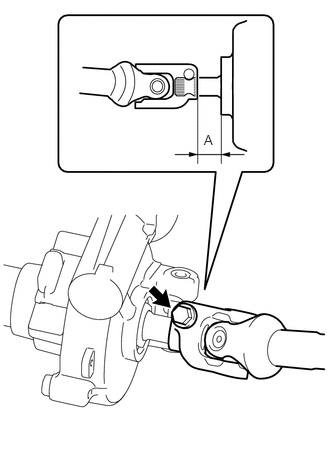
Install the bolt while aligning the No. 2 steering intermediate shaft assembly with the position A as shown in the illustration.
- Standard A:
17.5 to 18.7 mm (0.689 to 0.736 in.)
- Torque:
- 35 N*m (360 kgf*cm, 26 ft.*lbf)
45209
6.INSTALL STEERING SLIDING YOKE SUB-ASSEMBLY
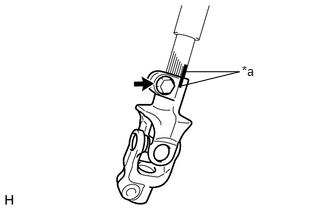
Install the steering sliding yoke sub-assembly to the No. 2 steering intermediate shaft assembly.
| *a | Matchmark |
- NOTICE:
-
Align the matchmarks on the steering sliding yoke sub-assembly and the No. 2 steering intermediate shaft assembly.
Temporarily install the bolt.
- HINT:
-
Fully tighten the bolt after installing the steering sliding yoke sub-assembly to the steering gear assembly.
45209
7.CONNECT STEERING SLIDING YOKE SUB-ASSEMBLY
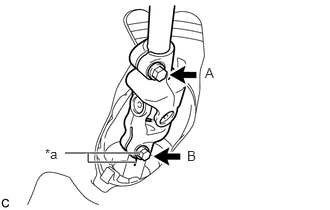
Install the steering sliding yoke sub-assembly to the steering gear assembly.
| *a | Matchmark |
- NOTICE:
- ·
Align the matchmarks on the steering sliding yoke sub-assembly and the steering gear assembly.
·When the steering sliding yoke sub-assembly is replaced with a new one, it has no matchmarks, so install it while the head of the bolt B faces the back of the vehicle.
Install bolt B.
- Torque:
- 35 N*m (360 kgf*cm, 26 ft.*lbf)
Tighten bolt A.
- Torque:
- 35 N*m (360 kgf*cm, 26 ft.*lbf)
45259A
8.INSTALL COLUMN HOLE COVER SILENCER SHEET
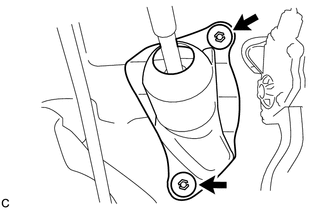
Install the column hole cover silencer sheet with the 2 clips.
Install the floor carpet.
73900
9.INSTALL LOWER NO. 1 INSTRUMENT PANEL AIR BAG ASSEMBLY
10.INSTALL TURN SIGNAL SWITCH ASSEMBLY WITH SPIRAL CABLE SUB-ASSEMBLY
- NOTICE:
- ·
Do not replace the spiral cable with sensor sub-assembly with the negative (-) auxiliary battery cable connected and the power switch on (IG).
·Do not rotate the spiral cable with sensor sub-assembly without the steering wheel with the negative (-) auxiliary battery cable connected and the power switch on (IG).
·Ensure that the steering wheel is installed and aligned straight when inspecting the steering sensor.
·Do not remove the spiral cable from the steering sensor.
Using pliers, expand the clamp.
While holding the clamp expanded, install the turn signal switch assembly with spiral cable sub-assembly to the steering post assembly and engage the claw.
Return the clamp to its original position.
Connect the connectors to the turn signal switch assembly with spiral cable sub-assembly.
45286B
11.INSTALL UPPER STEERING COLUMN COVER
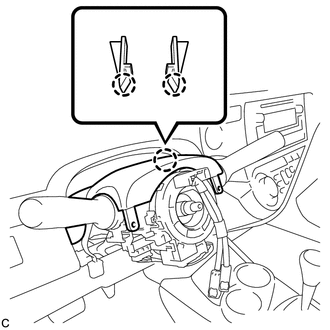
Engage the 2 claws to install the upper steering column cover.
45287
12.INSTALL LOWER STEERING COLUMN COVER
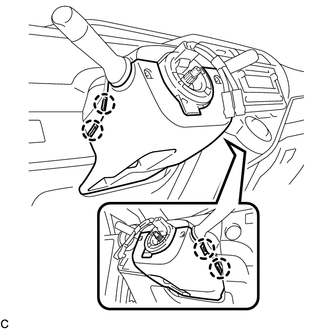
Engage the 4 claws to install the lower steering column cover.
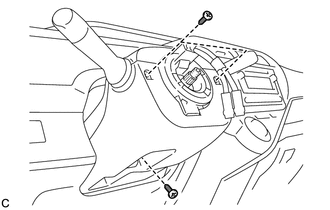
Install the 3 screws.
13.ALIGN FRONT WHEELS FACING STRAIGHT AHEAD
14.ADJUST SPIRAL CABLE WITH SENSOR SUB-ASSEMBLY
45100
15.INSTALL STEERING WHEEL ASSEMBLY
45130
16.INSTALL HORN BUTTON ASSEMBLY
17. PERFORM CALIBRATION OF TORQUE SENSOR ZERO POINT