1NZ-FXE ENGINE CONTROL SFI SYSTEM(w/ Canister Pump Module) EVAP System
RELATED DTCS
| DTC No. | Monitoring Item | See page |
|---|---|---|
| P043E | Reference orifice clogged (built into canister pump module) | ( ) |
| P043F | Reference orifice high-flow (built into canister pump module) | |
| P0441 | ·
Purge VSV (Vacuum Switching Valve) stuck closed ·
Purge VSV stuck open ·
Purge flow |
()
|
| P0451 | Canister pressure sensor (built into canister pump module) signal noise | ()
|
| P0452 | Canister pressure sensor (built into canister pump module) voltage low | |
| P0453 | Canister pressure sensor (built into canister pump module) voltage high | |
| P0455 | EVAP gross leak | ()
|
| P0456 | EVAP small leak | |
| P2401 | Leak detection pump stuck off (built into canister pump module) | ()
|
| P2402 | Leak detection pump stuck on (built into canister pump module) | |
| P2419 | Vent valve stuck closed (built into canister pump module) | |
| P2420 | Vent valve stuck open (vent) (built into canister pump module) | ()
|
| P2610 | Soak timer (built into ECM) | ()
|
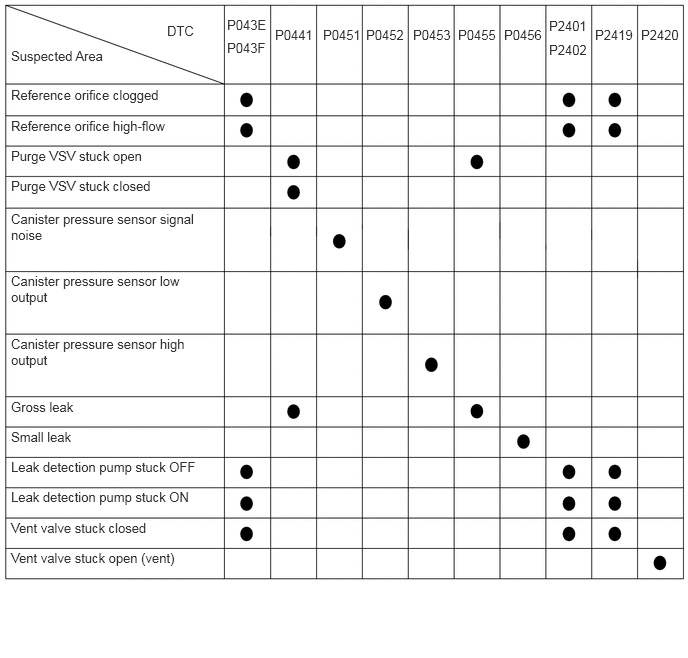
If any EVAP system DTCs are output, the malfunctioning area can be determined using the table below.
- NOTICE:
-
If the reference pressure difference between the first and second checks is more than the specification, all the DTCs relating to the reference pressure (P043E, P043F, P2401, P2402 and P2419) will all be stored.
DESCRIPTION
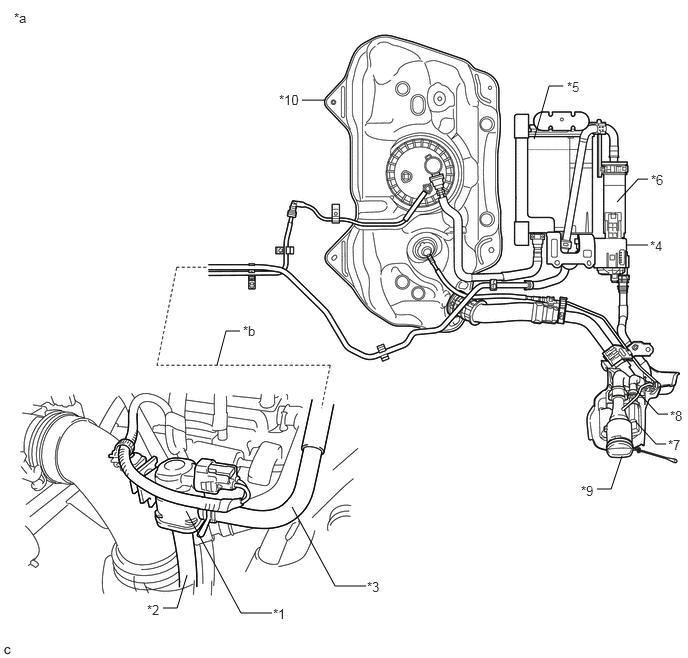
| *1 | Purge VSV | *2 | Fuel Vapor Feed Hose (EVAP Hose) (to Intake Manifold) |
| *3 | Fuel Vapor Feed Hose (EVAP Hose) (from Canister) | *4 | Canister Pump Module
- Canister Pressure Sensor - Leak Detection Pump - Vent Valve |
| *5 | Canister | *6 | No. 1 Canister |
| *7 | Canister Filter | *8 | Air Inlet Port |
| *9 | Fuel Cap | *10 | Fuel Tank |
| *a | Location of EVAP (Evaporative Emission) System | *b | Purge Line |
- HINT:
-
The canister pressure sensor, the leak detection pump and the vent valve are built into the canister pump module.
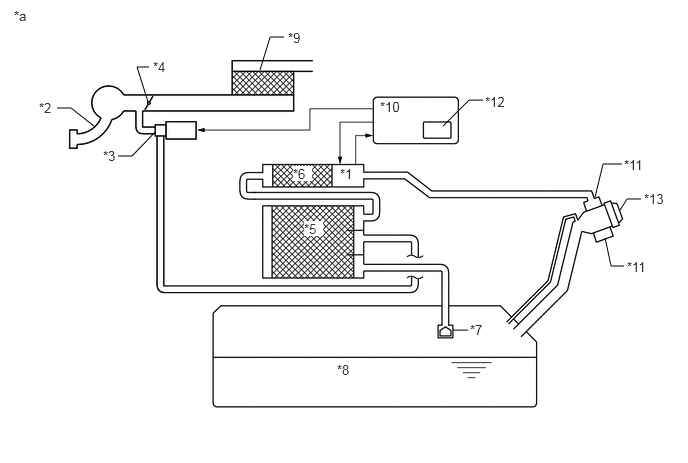
| *1 | Canister Pump Module | *2 | Intake Manifold |
| *3 | Purge VSV | *4 | Throttle Valve |
| *5 | Canister | *6 | No. 1 Canister |
| *7 | Cut-off Valve | *8 | Fuel Tank |
| *9 | Air Cleaner | *10 | ECM |
| *11 | Canister Filter | *12 | Soak Timer |
| *13 | Fuel Cap | - | - |
| *a | EVAP System Circuit | - | - |
- NOTICE:
-
In the EVAP system of this vehicle, turning on the vent valve does not seal off the EVAP system. To check for leaks in the EVAP system, disconnect the air inlet vent hose and apply pressure from the atmospheric side of the canister.
While the engine is running, if a predetermined condition (closed-loop, etc.) is met, the purge VSV is opened by the ECM and fuel vapors stored in the canister are purged to the intake manifold. The ECM changes the duty cycle ratio of the purge VSV to control purge flow volume.
The purge flow volume is also determined by the intake manifold pressure. Atmospheric pressure is allowed into the canister through the vent valve to ensure that the purge flow is maintained when negative pressure (vacuum) is applied to the canister.
The following two monitors run to confirm appropriate EVAP system operation.
Key-off monitor
This monitor checks for EVAP (evaporative emission) system leaks and canister pump module malfunctions. The monitor starts 5 hours* after the power switch is turned off. At least 5 hours are required for the fuel to cool down to stabilize the EVAP pressure, thus making the EVAP system monitor more accurate.
The leak detection pump creates negative pressure (vacuum) in the EVAP system and the pressure is measured. Finally, the ECM monitors for leaks from the EVAP system, and malfunctions in both the canister pump module and purge VSV based on the EVAP pressure.
- HINT:
-
*: If the engine coolant temperature is not less than 35°C (95°F) 5 hours after the power switch is turned off, the monitor check starts 2 hours later. If it is still not less than 35°C (95°F) 7 hours after the power switch is turned off, the monitor check starts 2.5 hours later.
Purge flow monitor
The purge flow monitor consists of the 2 monitors. The 1st monitor is conducted every time and the 2nd monitor is activated if necessary.
The 1st monitor
While the engine is running and the purge VSV (Vacuum Switching Valve) is on (open), the ECM monitors the purge flow by measuring the EVAP pressure change. If negative pressure is not created, the ECM begins the 2nd monitor.
The 2nd monitor
The vent valve is turned on (closed) and the EVAP pressure is then measured. If the variation in the pressure is less than 0.5 kPa(gauge) [3.751 mmHg(gauge)], the ECM interprets this as the purge VSV being stuck closed, illuminates the MIL and stores DTC P0441 (2 trip detection logic).
Atmospheric pressure check:
In order to ensure reliable malfunction detection, the variation between the atmospheric pressures, before and after of the purge flow monitor, is measured by the ECM.
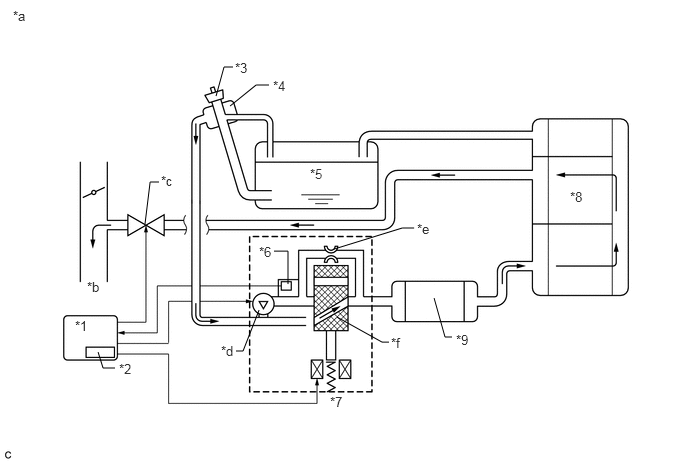
| *1 | ECM | *2 | Soak Timer |
| *3 | Fuel Cap | *4 | Canister Filter |
| *5 | Fuel Tank | *6 | Canister Pressure Sensor |
| *7 | Canister Pump Module | *8 | Canister |
| *9 | No. 1 Canister | - | - |
| *a | EVAP Purge Flow | *b | to Intake Manifold |
| *c | Purge VSV: on | *d | Leak Detection Pump: off |
| *e | Reference Orifice (0.02 inch) | *f | Vent Valve: off |
| Component | Operation |
|---|---|
| Canister, No. 1 canister | Contains activated charcoal to absorb EVAP (Evaporative Emissions) generated in fuel tank. |
| Cut-off valve | Located in fuel tank. Valve floats and closes when fuel tank is 100% full. |
| Purge VSV (Vacuum Switching Valve) | Opens or closes line between canister and intake manifold. ECM uses purge VSV to control EVAP purge flow. In order to discharge EVAP absorbed by canister to intake manifold, ECM opens purge VSV. EVAP discharge volume to intake manifold controlled by purge VSV duty cycle (current-carrying time). (Open: on, Close: off) |
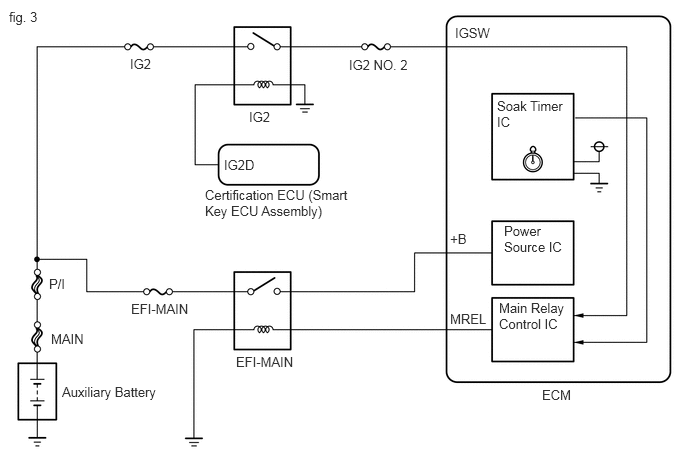
| Soak timer | Built into ECM. To ensure accurate EVAP monitor, measures 5 hours (+/-15 min) after power switch is turned off. This allows fuel to cool down, stabilizing EVAP pressure. When approximately 5 hours elapsed, ECM activates (refer to fig. 3). |
| Canister pump module | Consists of (a) to (d) below. Canister pump module cannot be disassembled. |
| (a) Vent valve | Vents and closes EVAP system. When ECM turns valve on, EVAP system is closed. When ECM turns valve off, EVAP system is vented. Negative pressure (vacuum) is created in EVAP system to check for EVAP leaks by closing purge VSV, turning on vent valve (closing it) and operating leak detection pump (refer to fig. 1). |
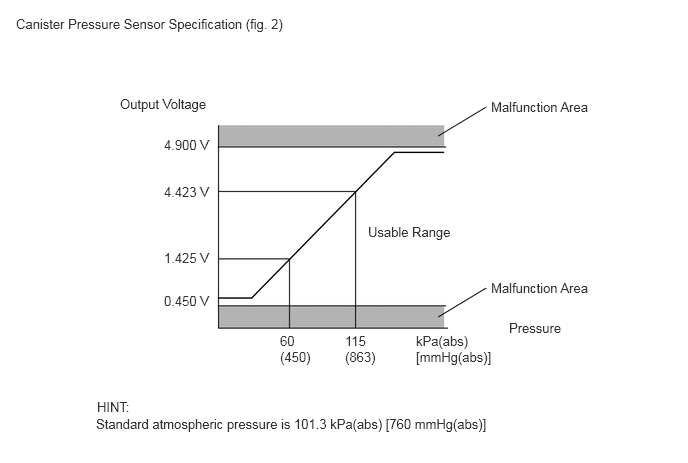
| (b) Canister pressure sensor | Indicates pressure as voltages. ECM supplies regulated 5 V to pressure sensor, and uses feedback from sensor to monitor EVAP system pressure (refer to fig. 2). |
| (c) Leak detection pump | Creates negative pressure (vacuum) in EVAP system for leak check. |
| (d) Reference orifice | Has opening with 0.02 inch diameter. Vacuum is produced through orifice by closing purge VSV, turning off vent valve and operating leak detection pump, to monitor reference pressure. Reference pressure is used when checking for small EVAP leaks. |
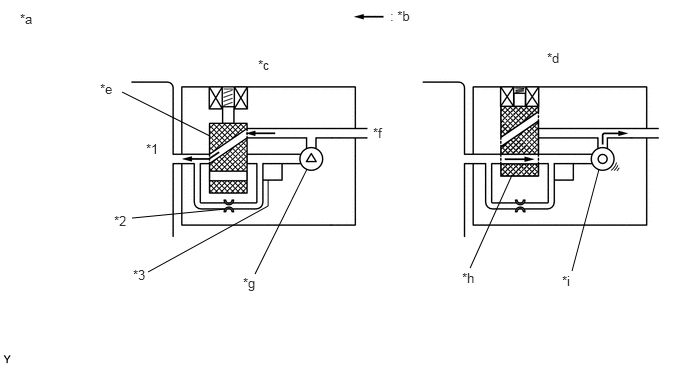
| *1 | Canister | *2 | Reference Orifice (0.02 Inch) |
| *3 | Canister Pressure Sensor | - | - |
| *a | Canister Pump Module (fig. 1) | *b | Airflow |
| *c | Condition: Purge Flow | *d | Condition: Leak Check |
| *e | Vent Valve: Off (vent) | *f | to Canister Filter (Atmosphere) |
| *g | Leak Detection Pump: Off | *h | Vent Valve: On (closed) |
| *i | Leak Detection Pump: On | - | - |
WIRING DIAGRAM
Refer to DTC P0451.
Click hereEngine / Hybrid System>1NZ-FXE (ENGINE CONTROL)>SFI SYSTEM(w/ Canister Pump Module)>P0451
CONFIRMATION DRIVING PATTERN
- HINT:
-
After a repair, check Monitor Status by performing the Key-Off Monitor Confirmation and Purge Flow Monitor Confirmation described below.
1. KEY-OFF MONITOR CONFIRMATION
- NOTICE:
- ·
The Evaporative System Check (Automatic Mode) consists of 6 steps performed automatically by the GTS. It takes a maximum of approximately 24 minutes.
·Do not perform the Evaporative System Check when the fuel tank is more than 90% full because the cut-off valve may be closed, making the fuel tank leak check unavailable.
·Do not start the engine during this operation.
·When the temperature of the fuel is 35°C (95°F) or higher, a large amount of vapor forms and any check results become inaccurate. When performing the Evaporative System Check, keep the fuel temperature less than 35°C (95°F).
Connect the GTS to the DLC3.
Turn the power switch on (IG).
Turn the GTS on.
Clear the DTCs (even if no DTCs are stored, perform the clear DTC procedure).
Turn the power switch off and wait for at least 30 seconds.
Turn the power switch on (IG).
Turn the GTS on.
Enter the following menus: Powertrain / Engine / Utility / Evaporative System Check / Automatic Mode.
After the "Evaporative System Check" is completed, check for All Readiness by entering the following menus: Powertrain / Engine / Utility / All Readiness.
Input the DTC: P043E, P043F, P0451, P0452, P0453, P0455, P0456, P2401, P2402, P2419 or P2420.
Check the DTC judgment result.
| GTS Display | Description |
|---|---|
| NORMAL | ·
DTC judgment completed ·
System normal |
| ABNORMAL | ·
DTC judgment completed ·
System abnormal |
| INCOMPLETE | ·
DTC judgment not completed ·
Perform driving pattern after confirming DTC enabling conditions |
| N/A | ·
Unable to perform DTC judgment ·
Number of DTCs which do not fulfill DTC preconditions has reached ECU memory limit |
- HINT:
- ·
If the judgment result shows NORMAL, the system is normal.
·If the judgment result shows ABNORMAL, the system has a malfunction.
2. PURGE FLOW MONITOR CONFIRMATION (P0441)
Connect the GTS to the DLC3.
Turn the power switch on (IG) and turn the GTS on.
Clear the DTCs (even if no DTCs are stored, perform the clear DTC procedure).
Turn the power switch off and wait for at least 30 seconds.
Turn the power switch on (IG) and turn the GTS on.
Put the engine in inspection mode (maintenance mode).
Click hereGeneral>INTRODUCTION>REPAIR INSTRUCTION>INSPECTION MODE PROCEDURE
Start the engine and wait 15 minutes or more.
Enter the following menus: Powertrain / Engine and ECT / Trouble Codes.
Read the pending DTCs.
- HINT:
- ·
If a pending DTC is output, the system is malfunctioning.
·If a pending DTC is not output, perform the following procedure.
Enter the following menus: Powertrain / Engine and ECT / Utility / All Readiness.
Input the DTC: P0441.
Check the DTC judgment result.
| GTS Display | Description |
|---|---|
| NORMAL | ·
DTC judgment completed ·
System normal |
| ABNORMAL | ·
DTC judgment completed ·
System abnormal |
| INCOMPLETE | ·
DTC judgment not completed ·
You should perform driving pattern after confirming DTC enabling conditions |
| N/A | ·
Unable to perform DTC judgment ·
Number of DTCs which do not fulfill DTC preconditions has reached ECU memory limit |
- HINT:
- ·
If the judgment result shows NORMAL, the system is normal.
·If the judgment result shows ABNORMAL, the system has a malfunction.
·If the judgment result shows INCOMPLETE or N/A, perform the following procedure.
- NOTICE:
- ·
The Evaporative System Check (Automatic Mode) consists of 6 steps performed automatically by the GTS. It takes a maximum of approximately 24 minutes.
·Do not perform the Evaporative System Check when the fuel tank is higher than 90% full because the cut-off valve may be closed, making the fuel tank leak check unavailable.
·Do not run the engine during this operation.
·When the temperature of the fuel is 35°C (95°F) or higher, a large amount of vapor forms and any check results become inaccurate. When performing the Evaporative System Check, keep the fuel temperature less than 35°C (95°F).
Clear the DTCs (even if no DTCs are stored, perform the clear DTC procedure).
Turn the power switch off and wait for at least 30 seconds.
Turn the power switch on (IG) and turn the GTS on.
Enter the following menus: Powertrain / Engine and ECT / Utility / Evaporative System Check / Automatic Mode.
After the Evaporative System Check is completed, check for All Readiness by entering the following menus: Powertrain / Engine and ECT / Utility / All Readiness.
Input the DTC: P0441.
Check the DTC judgment result.
| GTS Display | Description |
|---|---|
| NORMAL | ·
DTC judgment completed ·
System normal |
| ABNORMAL | ·
DTC judgment completed ·
System abnormal |
| INCOMPLETE | ·
DTC judgment not completed ·
Perform driving pattern after confirming DTC enabling conditions |
| N/A | ·
Unable to perform DTC judgment ·
Number of DTCs which do not fulfill DTC preconditions has reached ECU memory limit |
- HINT:
- ·
If the judgment result shows NORMAL, the system is normal.
·If the judgment result shows ABNORMAL, the system has a malfunction.
CAUTION / NOTICE / HINT
- NOTICE:
- ·
Inspect the fuses for circuits related to this system before performing the following inspection procedure.
·The GTS is required to conduct the following diagnostic troubleshooting procedure.
- HINT:
- ·
Using the GTS monitor results enables the EVAP (Evaporative Emission) system to be confirmed.
·Read freeze frame data using the GTS. The ECM records vehicle and driving condition information as freeze frame data the moment a DTC is stored. When troubleshooting, freeze frame data can help determine if the vehicle was moving or stationary, if the engine was warmed up or not, if the air fuel ratio was lean or rich, and other data from the time the malfunction occurred.
PROCEDURE
Turn the power switch off and wait for 10 seconds.
Turn the power switch on (IG).
Turn the power switch off and wait for 10 seconds.
Connect the GTS to the DLC3.
Turn the power switch on (IG) and turn the GTS on.
Enter the following menus: Powertrain / Engine and ECT / Trouble Codes.
Confirm DTCs and freeze frame data.
If any EVAP system DTCs are set, the malfunctioning area can be determined using the table below.
- NOTICE:
-
If the reference pressure difference between the first and second checks is greater than the specification, all the DTCs relating to the reference pressure (P043E, P043F, P2401, P2402 and P2419) are stored.
NEXT
- NOTICE:
- ·
The Evaporative System Check (Automatic Mode) consists of 6 steps performed automatically by the GTS. It takes a maximum of approximately 24 minutes.
·Do not perform the Evaporative System Check when the fuel tank is higher than 90% full because the cut-off valve may be closed, making the fuel tank leak check unavailable.
·Do not run the engine during this operation.
·When the temperature of the fuel is 35°C (95°F) or higher, a large amount of vapor forms and any check results become inaccurate. When performing the Evaporative System Check, keep the temperature less than 35°C (95°F).
Connect the GTS to the DLC3.
Turn the power switch on (IG).
Turn the GTS on.
Clear the DTCs.
Enter the following menus: Powertrain / Engine and ECT / Utility / Evaporative System Check / Automatic Mode.
After the Evaporative System Check is completed, check for pending DTCs by entering the following menus: Powertrain / Engine and ECT / Trouble Codes.
- HINT:
-
If no pending DTCs are displayed, perform the Confirmation Driving Pattern. After this confirmation, check for pending DTCs. If no DTCs are displayed, the EVAP system is normal.
NEXT
- NOTICE:
- ·
In the Evaporative System Check (Manual Mode), the series of 6 Evaporative System Check steps are performed manually using the GTS.
·Do not perform the Evaporative System Check when the fuel tank is higher than 90% full because the cut-off valve may be closed, making the fuel tank leak check unavailable.
·Do not run the engine during this operation.
·When the temperature of the fuel is 35°C (95°F) or higher, a large amount of vapor forms and any check results become inaccurate. When performing the Evaporative System Check, keep the temperature less than 35°C (95°F).
Connect the GTS to the DLC3.
Turn the power switch on (IG).
Turn the GTS on.
Clear the DTCs.
Enter the following menus: Powertrain / Engine and ECT / Utility / Evaporative System Check / Manual Mode.
NEXT
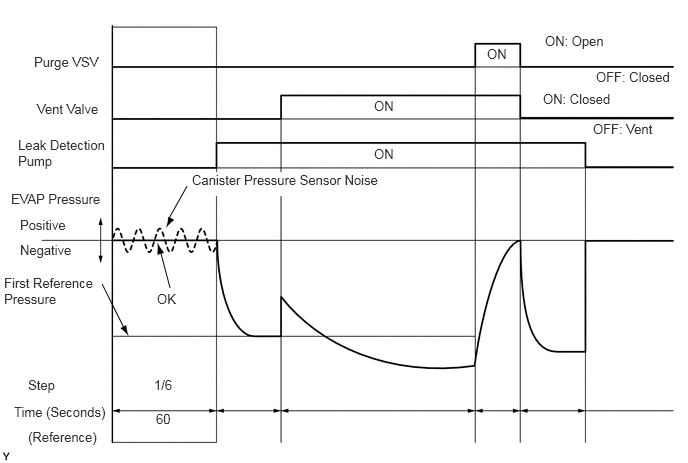
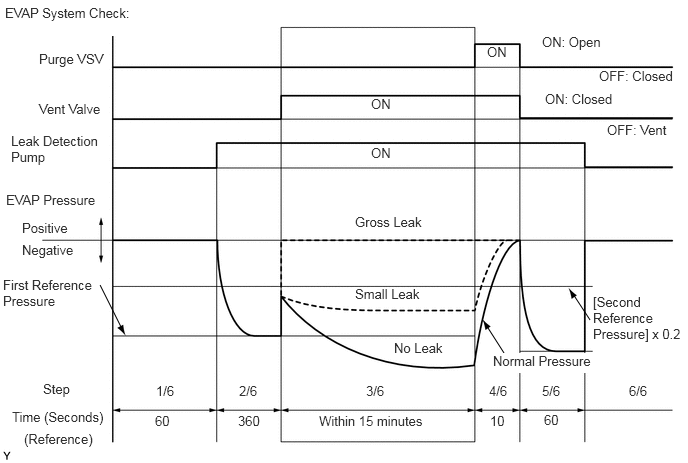
Check the EVAP pressure in step 1/6.
| DTC
*1 |
Result | Suspected Trouble Area | Proceed to |
|---|---|---|---|
| - | Virtually no variation in EVAP pressure | Not yet determined | A |
| P0451 | EVAP pressure fluctuates by +/-0.3 kPa(gauge) [2.25 mmHg(gauge)] or higher | Canister pressure sensor signal noise | B |
| (P0452 or P0453)
*2 |
·
EVAP pressure is below 42.11009 kPa(abs) [315.82568 mmHg(abs)], or higher than 123.76147 kPa(abs) [928.21103 mmHg(abs)] ·
EVAP pressure deviates +/-10 kPa(gauge) [+/-75 mmHg(gauge)] from actual atmosphere pressure *3 |
Canister pressure sensor or its circuit has malfunction | C |
*1: These DTCs are already present in the ECM when the vehicle arrives and are confirmed in the "Confirm DTC" procedure above.
*2: If the canister pressure sensor circuit has an open or short, DTC P0452 or P0453 is stored 0.5 seconds after the power switch is turned to on (IG).
- HINT:
-
*3: Canister pressure sensor standard output range is 70 to 110 kPa(abs) [525 to 825 mmHg(abs)]. This varies by weather.
A
B
C
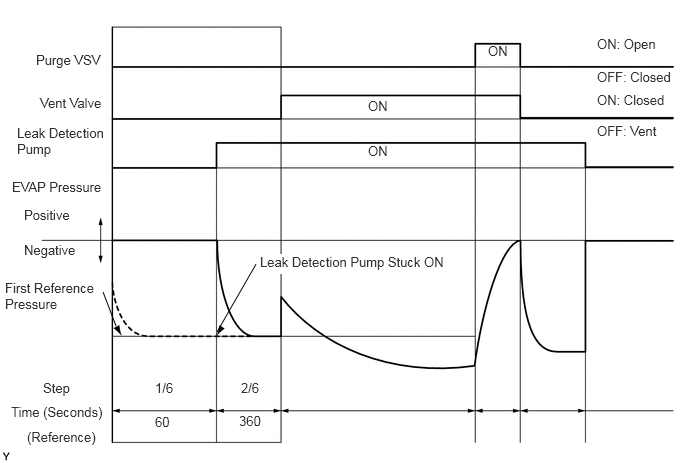
Check the EVAP pressure in steps 1/6 and 2/6.
| DTC* | Result | Suspected Trouble Area | Proceed to |
|---|---|---|---|
| - | Virtually no variation in EVAP pressure during step 1/6. Then decreases to reference pressure | Not yet determined | A |
| P2402 | Small difference between EVAP pressures during steps 1/6 and 2/6 | Leak detection pump stuck ON | B |
*: These DTCs are already present in the ECM when the vehicle arrives and are confirmed in the "Confirm DTC" procedure above.
- HINT:
-
The first reference pressure is the value determined in step 2/6.
A
B
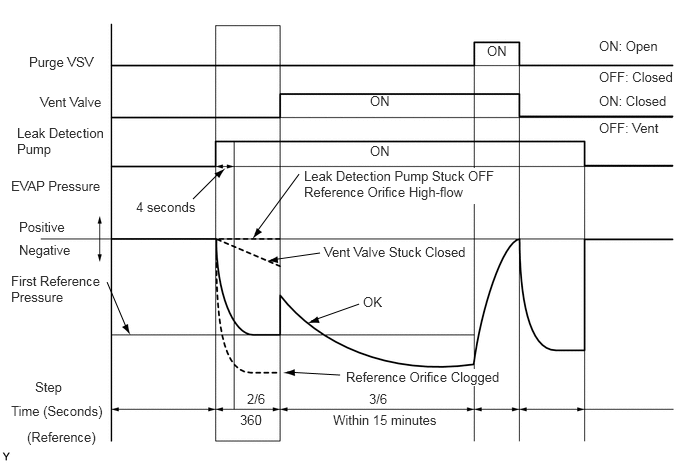
- HINT:
-
Make a note of the pressures checked in inspection items (A) and (B) below.
Check the EVAP pressure 4 seconds after the leak detection pump is activated*1 (A).
*1: The leak detection pump begins to operate as step 1/6 finishes and step 2/6 starts.
Check the EVAP pressure again when it has stabilized. This pressure is the reference pressure (B).
| DTC*2 | Result | Suspected Trouble Area | Proceed to |
|---|---|---|---|
| - | EVAP pressure in inspection item (B) is between -4.85 kPa(gauge) and -1.057 kPa(gauge) [-36.38 mmHg(gauge) and -7.929 mmHg(gauge)] | Not yet determined | A |
| P043F and P2401 | EVAP pressure in inspection item (B) is -1.057 kPa(gauge) [-7.929 mmHg(gauge)] or higher | ·
Reference orifice high-flow ·
Leak detection pump stuck OFF |
B |
| P043E | EVAP pressure in inspection item (B) is less than -4.85 kPa(gauge) [-36.38 mmHg(gauge)] | Reference orifice clogged | C |
| P2419 | EVAP pressure in inspection item (A) is higher than -0.25 kPa(gauge) [-1.875 mmHg(gauge)] | ·
Vent valve stuck closed ·
Leak detection pump performance deteriorates ·
Leak detection pump circuit malfunctioning (large resistance exists in the circuit) |
D |
*2: These DTCs are already present in the ECM when the vehicle arrives and are confirmed in the "Confirm DTC" procedure above.
A
B
C
D
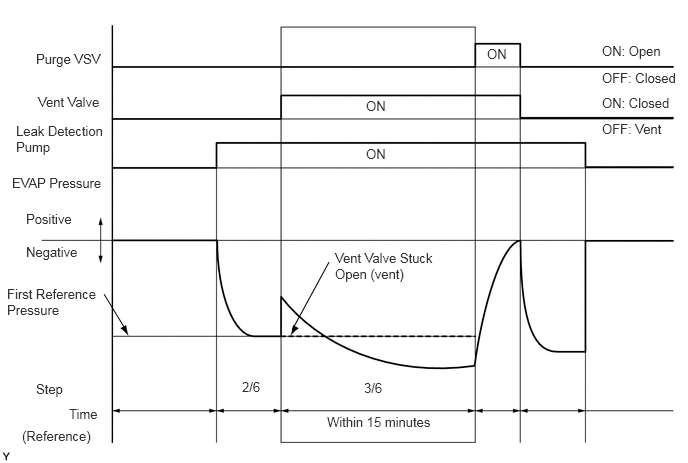
Check the EVAP pressure in step 3/6.
| DTC* | Result | Suspected Trouble Area | Proceed to |
|---|---|---|---|
| - | EVAP pressure increases by 0.3 kPa(gauge) [2.25 mmHg(gauge)] or higher within 10 seconds of proceeding from step 2/6 to step 3/6 | Not yet determined | A |
| P2420 | No variation in EVAP pressure even after proceeding from step 2/6 to step 3/6 | ·
Vent valve stuck open (vent) ·
Canister (charcoal filter inside canister) clogged ·
No. 1 canister (charcoal filter inside canister) clogged |
B |
*: These DTCs are already present in the ECM when the vehicle arrives and are confirmed in the "Confirm DTC" procedure above.
A
B
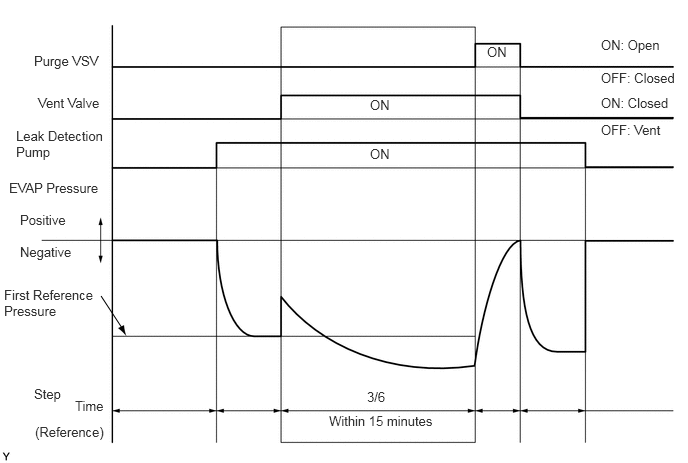
Wait until the EVAP pressure change is less than 0.12 kPa(gauge) [0.9 mmHg(gauge)] for 40 seconds.
Measure the EVAP pressure and record it.
- HINT:
-
A few minutes are required for the EVAP pressure to become saturated. When there is little fuel in the fuel tank, it takes up to 15 minutes.
NEXT
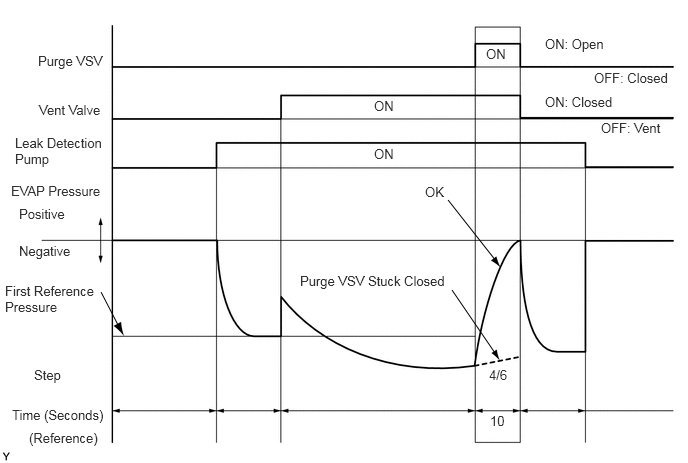
Check the EVAP pressure in step 4/6.
| DTC*1 | Result | Suspected Trouble Area | Proceed to |
|---|---|---|---|
| - | EVAP pressure increases by 0.3 kPa(gauge) [2.25 mmHg(gauge)] or higher within 10 seconds of proceeding from step 3/6 to step 4/6 | Not yet determined | A |
| P0441
*2 |
EVAP pressure increases by 0.3 kPa(gauge) [2.25 mmHg(gauge)] or higher more within 10 seconds of proceeding from step 3/6 to step 4/6 | ·
Purge VSV ·
Purge VSV circuit ·
Problems in EVAP hose between purge VSV and intake manifold ·
Problems in EVAP hose between canister and purge VSV ·
ECM |
B |
| P0441 | Variation in EVAP pressure is less than 0.3 kPa(gauge) [2.25 mmHg(gauge)] for 10 seconds, after proceeding from step 3/6 to step 4/6 | ·
Purge VSV stuck closed ·
Purge VSV circuit ·
Canister (charcoal filter inside canister) clogged ·
No. 1 canister (charcoal filter inside canister) clogged ·
Problems in EVAP hose between purge VSV and intake manifold ·
Problems in EVAP hose between canister and purge VSV ·
ECM |
C |
*1: These DTCs are already present in the ECM when the vehicle arrives and are confirmed in the "Confirm DTC" procedure above.
*2: This result suggests that due to purge line blockage or purge VSV malfunction, the DTC was stored by the purge flow monitor while the engine was running, or that key-off monitor test result were nearly borderline values.
A
B
C
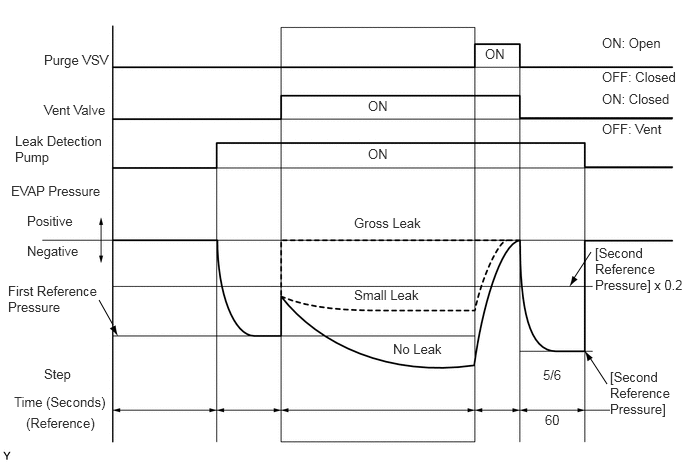
Check the EVAP pressure in step 5/6.
Compare the EVAP pressure in step 3/6 and the second reference pressure (step 5/6).
| DTC* | Result | Suspected Trouble Area | Proceed to |
|---|---|---|---|
| - | EVAP pressure from step 3/6 lower than second reference pressure (step 5/6) | Not yet determined (no leakage from EVAP system) | A |
| P0441 and P0455 | EVAP pressure from step 3/6 higher than [second reference pressure (step 5/6) x 0.2] | ·
Purge VSV stuck open ·
EVAP gross leak |
B |
| P0456 | EVAP pressure from step 3/6 higher than second reference pressure (step 5/6) | EVAP small leak | B |
*: These DTCs are already present in the ECM when the vehicle arrives and are confirmed in the "Confirm DTC" procedure above.
A
B
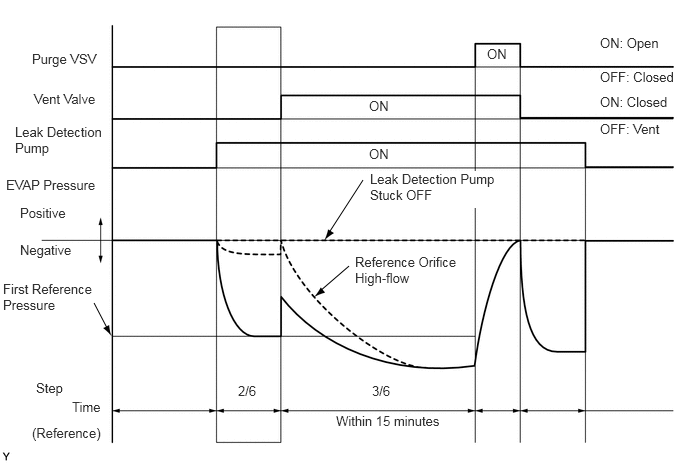
Check the EVAP pressure in step 3/6.
| DTC* | Result | Suspected Trouble Area | Proceed to |
|---|---|---|---|
| P043F | EVAP pressure less than [reference pressure] measured in step 2/6 | Reference orifice high-flow | A |
| P2401 | EVAP pressure almost same as [reference pressure] measured in step 2/6 | Leak detection pump stuck off | B |
*: These DTCs are already present in the ECM when the vehicle arrives and are confirmed in the "Confirm DTC" procedure above.
- HINT:
-
The first reference pressure is the value determined in step 2/6.
A
B
Check the canister pressure sensor circuit, referring to DTC P0451 canister pressure sensor circuit inspection procedure.
Click hereEngine / Hybrid System>1NZ-FXE (ENGINE CONTROL)>SFI SYSTEM(w/ Canister Pump Module)>P0451
NEXT
Turn the power switch off.
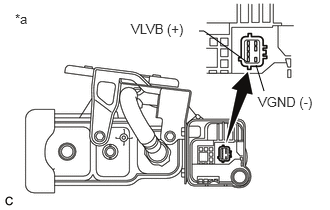
Disconnect the canister pump module connector.
| *a | Component without harness connected
(Canister Pump Module) |
Apply the auxiliary battery voltage to terminals VLVB and VGND of the canister pump module.
Touch the canister pump module to confirm the vent valve operation.
| Condition | Tester Result | Suspected Trouble Area | Proceed to |
|---|---|---|---|
| Apply auxiliary battery voltage to terminals VLVB and VGND | Operating | ·
Wire harness or connector between vent valve and ECM ·
Leak detection pump performance deteriorates ·
Leak detection pump circuit malfunctioning (large resistance exists in the circuit) ·
ECM |
A |
| Not operating | Vent valve | B |
A
B
Turn the power switch off.
Disconnect the ECM connector.
Disconnect the canister pump module connector.
Measure the resistance according to the value(s) in the table below.
- Standard Resistance:
Tester Connection Condition Specified Condition M52-1 (VGND) - A40-5 (VPMP) Always Below 1 Ω M52-1 (VGND) or A40-5 (VPMP) - Body ground Always 10 kΩ or higher
| Result | Suspected Trouble Area | Proceed to |
|---|---|---|
| OK | ·
Leak detection pump performance deteriorates ·
Leak detection pump circuit malfunctioning (large resistance exists in the circuit) ·
ECM |
A |
| NG | Wire harness or connector between ECM and canister pump module | B |
A
B
Disconnect the canister pump module connector.
Measure the resistance according to the value(s) in the table below.
| Tester Connection | Condition | Specified Condition | Suspected Trouble Area | Proceed to |
|---|---|---|---|---|
| M52-4 (MGND) - Body ground | Always | Below 1 Ω | ·
Canister pump module ·
Wire harness or connector between canister pump module and ECM ·
ECM |
A |
| 10 kΩ or higher | Wire harness or connector between canister pump module and body ground | B |
A
B
Disconnect the canister pump module connector.
Disconnect the ECM connector.
Measure the resistance according to the value(s) in the table below.
| Tester Connection | Condition | Specified Condition | Suspected Trouble Area | Proceed to |
|---|---|---|---|---|
| A40-18 (MPMP) - M52-3 (MTRB) | Always | Below 1 Ω | ·
Canister pump module ·
ECM |
A |
| 10 kΩ or higher | Wire harness or connector between ECM and canister pump module | B |
A
B
Enter the following menus: Powertrain / Engine and ECT / Active Test / Activate the VSV for EVAP Control.
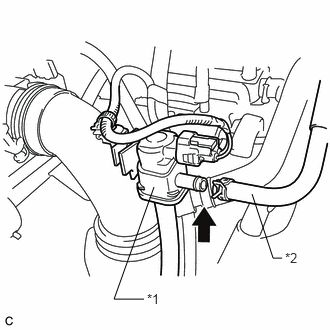
Disconnect the fuel vapor feed hose (connected to the canister) from the purge VSV.
| *1 | Purge VSV |
| *2 | Fuel Vapor Feed Hose (to Canister) |
Put the engine in inspection mode (maintenance mode).
Click hereGeneral>INTRODUCTION>REPAIR INSTRUCTION>INSPECTION MODE PROCEDURE
Start the engine.
Using the GTS, turn off the purge VSV (Activate the VSV for Evap Control: OFF).
Use your finger to confirm that the purge VSV has no suction.
Using the GTS, turn on the purge VSV (Activate the VSV for Evap Control: ON).
Use your finger to confirm that the purge VSV has suction.
| Test Result | Suspected Trouble Area | Proceed to |
|---|---|---|
| No suction when purge VSV turned off, and suction applied when turned on | Blockage in the purge line is considered (based on result of step 9):
·
Problems with EVAP hose between canister and purge VSV ·
Canister (charcoal filter inside canister) clogged ·
No. 1 canister (charcoal filter inside canister) clogged ·
ECM |
A |
| Leakage is considered (based on result of step 10):
·
Fuel cap ·
Leakage from EVAP line, fuel tank, canister, or No. 1 canister |
B | |
| Suction applied when purge VSV turned off | ·
Purge VSV stuck open |
C |
| No suction when purge VSV turned on | ·
Purge VSV stuck closed ·
Problems with EVAP hose between purge VSV and intake manifold |
D |
A
B
C
D
Check for blockages in the EVAP purge line between the purge VSV and canister.
- OK:
No blockages in the EVAP purge line between the purge VSV and canister.
OK
NG
Check for filter blockage in the canister.
Click hereEngine / Hybrid System>1NZ-FXE EMISSION CONTROL>CANISTER(w/ Canister Pump Module)>INSPECTION
- OK:
No blockages in the canister.
OK
NG
Check for filter blockage in the No. 1 canister.
Click hereEngine / Hybrid System>1NZ-FXE EMISSION CONTROL>CANISTER(w/ Canister Pump Module)>INSPECTION
- OK:
No blockages in the No. 1 canister.
OK
NG
Check that the fuel cap is correctly installed and confirm that the fuel cap meets OEM specifications.
Tighten the fuel cap firmly (only one click sound could be heard).
- HINT:
-
If an EVAP tester is available, check the fuel cap using the tester.
Remove the fuel cap and install it onto a fuel cap adapter.
Connect an EVAP tester pump hose to the adapter, and pressurize the cap to 3.2 to 3.7 kPa(gauge) [24 to 27.75 mmHg(gauge)] using an EVAP tester pump.
Seal the adapter and wait for 2 minutes.
Check the pressure. If the pressure is 2 kPa(gauge) [15 mmHg(gauge)] or higher, the fuel cap is normal.
| Test Result | Suspected Trouble Area | Proceed to |
|---|---|---|
| Fuel cap correctly installed | - | A |
| Fuel cap loose | ·
Fuel cap improperly installed ·
Defective fuel cap ·
Fuel cap does not meet OEM specifications |
B |
| Defective fuel cap | - | B |
| No fuel cap | - | C |
A
B
C
Turn the power switch off.
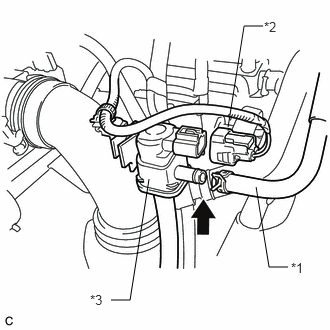
Disconnect the purge VSV connector.
| *1 | Fuel Vapor Feed Hose (to Canister) |
| *2 | Connector |
| *3 | Purge VSV |
Disconnect the fuel vapor feed hose (connected to the canister) from the purge VSV.
Put the engine in inspection mode (maintenance mode).
Click hereGeneral>INTRODUCTION>REPAIR INSTRUCTION>INSPECTION MODE PROCEDURE
Start the engine.
Use your finger to confirm that the purge VSV has no suction.
| Test Result | Suspected Trouble Area | Proceed to |
|---|---|---|
| No suction | ·
Wire harness or connector between purge VSV and ECM ·
ECM |
A |
| Suction applied | Purge VSV | B |
A
B
Check for blockages in the EVAP purge line between the purge VSV and canister.
- OK:
No blockages in the EVAP purge line between the purge VSV and canister.
OK
NG
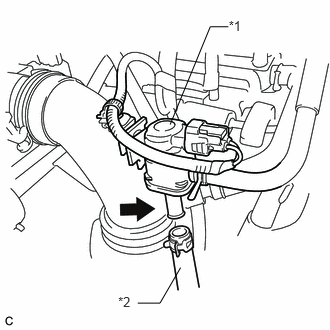
Disconnect the fuel vapor feed hose (connected to the intake manifold) from the purge VSV.
| *1 | Purge VSV |
| *2 | Fuel Vapor Feed Hose (to intake manifold) |
Put the engine in inspection mode (maintenance mode).
Click hereGeneral>INTRODUCTION>REPAIR INSTRUCTION>INSPECTION MODE PROCEDURE
Start the engine.
Use your finger to confirm that the fuel vapor feed hose has suction.
| Test Result | Suspected Trouble Area | Proceed to |
|---|---|---|
| Suction applied | EVAP hose between purge VSV and intake manifold normal
·
Purge VSV ·
Purge VSV power source ·
Wire harness or connector between purge VSV and ECM |
A |
| No suction | ·
Intake manifold port ·
EVAP hose between purge VSV and intake manifold |
B |
A
B
Remove the purge VSV.
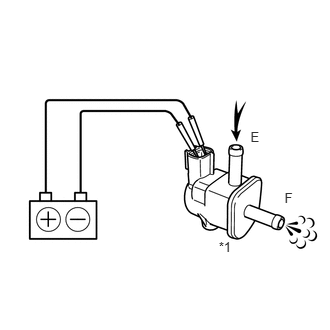
Apply auxiliary battery voltage to the terminals of the purge VSV.
| *1 | Purge VSV |
Confirm that air flows from port E to port F.
| Test Result | Condition | Suspected Trouble Area | Proceed to |
|---|---|---|---|
| Air flows | Auxiliary battery voltage is applied to purge VSV terminals | Purge VSV normal
·
Purge VSV power source ·
Wire harness or connector between purge VSV and ECM |
A |
| No air flow | Auxiliary battery voltage is applied to purge VSV terminals | Purge VSV | B |
A
B
Disconnect the purge VSV connector.
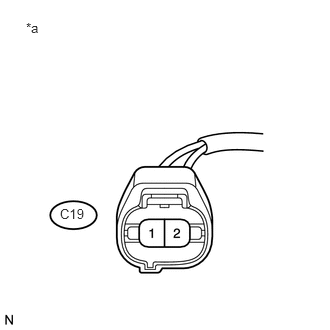
Turn the power switch on (IG).
| *a | Front view of wire harness connector
(to Purge VSV) |
Measure the voltage according to the value(s) in the table below.
| Tester Connection | Condition | Specified Condition | Suspected Trouble Area | Proceed to |
|---|---|---|---|---|
| C19-1 - Body ground | Power switch on (IG) | 11 to 14 V | Purge VSV power source normal
·
Wire harness or connector between purge VSV and ECM |
A |
| Other than result above | Wire harness or connectors between purge VSV and auxiliary battery | B |
A
B
Disconnect the ECM connector.
Disconnect the purge VSV connector.
Measure the resistance according to the value(s) in the table below.
- Standard Resistance:
Tester Connection Condition Specified Condition C19-2 - C10-76 (PRG) Always Below 1 Ω C19-2 or C10-76 (PRG) - Body ground Always 10 kΩ or higher
OK
NG
Turn the power switch off.
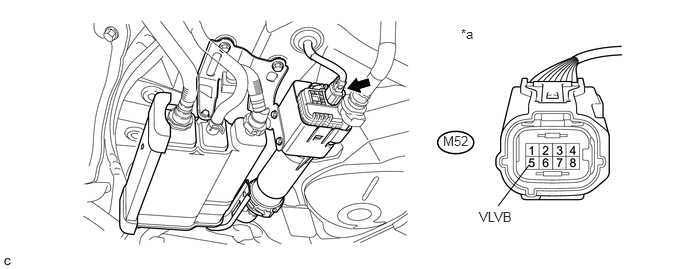
| *a | Front view of wire harness connector
(to Canister Pump Module) |
- | - |
Disconnect the canister pump module connector.
Turn the power switch on (IG).
Measure the voltage according to the value(s) in the table below.
| Tester Connection | Condition | Specified Condition | Suspected Trouble Area | Proceed to |
|---|---|---|---|---|
| M52-5 (VLVB) - Body ground | Power switch on (IG) | 11 to 14 V | ·
Wire harness or connector between vent valve and ECM ·
Vent valve ·
Canister (charcoal filter inside canister) clogged ·
No. 1 canister (charcoal filter inside canister) clogged ·
ECM |
A |
| Below 3 V | ·
Power source wire harness of vent valve |
B |
A
B
Turn the power switch off.
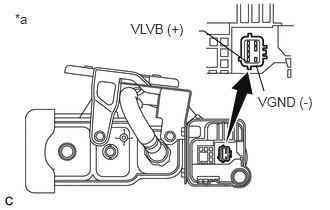
Disconnect the canister pump module connector.
| *a | Component without harness connected
(Canister Pump Module) |
Apply the auxiliary battery voltage to terminals VLVB and VGND of the canister pump module.
Touch the canister pump module to confirm the vent valve operation.
| Condition | Tester Result | Suspected Trouble Area | Proceed to |
|---|---|---|---|
| Apply auxiliary battery voltage to terminals VLVB and VGND | Operating | ·
Wire harness or connector between vent valve and ECM ·
Canister (charcoal filter inside canister) clogged ·
No. 1 canister (charcoal filter inside canister) clogged ·
ECM |
A |
| Not operating | ·
Vent valve |
B |
A
B
Turn the power switch off.
Disconnect the ECM connector.
Disconnect the canister pump module connector.
Measure the resistance according to the value(s) in the table below.
| Tester Connection | Condition | Test Result | Suspected Trouble Area | Proceed to |
|---|---|---|---|---|
| M52-1 (VGND) - A40-5 (VPMP) | Always | Below 1 Ω | ·
Canister (charcoal filter inside canister) clogged ·
ECM |
A |
| 10 kΩ or higher | Wire harness or connector between ECM and canister pump module | B |
A
B
Check for filter blockage in the canister.
Click hereEngine / Hybrid System>1NZ-FXE EMISSION CONTROL>CANISTER(w/ Canister Pump Module)>INSPECTION
- OK:
No blockages in the canister.
OK
NG
Check for filter blockage in the No. 1 canister.
Click hereEngine / Hybrid System>1NZ-FXE EMISSION CONTROL>CANISTER(w/ Canister Pump Module)>INSPECTION
- OK:
No blockages in the No. 1 canister.
OK
NG
Turn the power switch off.
Disconnect the canister pump module connector.
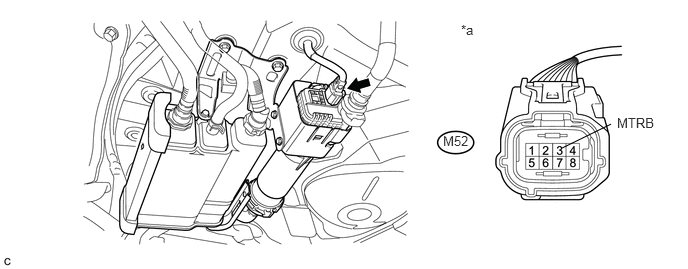
| *a | Front view of wire harness connector
(to Canister Pump Module) |
- | - |
Turn the power switch on (IG).
Measure the voltage according to the value(s) in the table below.
| Tester Connection | Condition | Test Result | Suspected Trouble Area | Proceed to |
|---|---|---|---|---|
| M52-3 (MTRB) - Body ground | Power switch on (IG) | 9 to 14 V | ·
Wire harness or connector between leak detection pump and body ground ·
Leak detection pump |
A |
| Below 3 V | ·
Wire harness or connector between leak detection pump and ECM ·
ECM |
B |
A
B
Turn the power switch off.
Disconnect the canister pump module connector.
Measure the resistance according to the value(s) in the table below.
| Tester Connection | Condition | Specified Condition | Suspected Trouble Area | Proceed to |
|---|---|---|---|---|
| M52-4 (MGND) - Body ground | Always | Below 1 Ω | Leak detection pump | A |
| 10 kΩ or higher | Wire harness or connector between canister pump module and body ground | B |
A
B
Turn the power switch off.
Disconnect the canister pump module connector.
Disconnect the ECM connector.
Measure the resistance according to the value(s) in the table below.
- Standard Resistance:
Tester Connection Condition Specified Condition A40-18 (MPMP) - M52-3 (MTRB) Always Below 1 Ω A40-18 (MPMP) or M52-3 (MTRB) - Body ground Always 10 kΩ or higher
| Result | Suspected Trouble Area | Proceed to |
|---|---|---|
| OK | ECM | A |
| NG | Wire harness or connector between ECM and canister pump module | B |
A
B
Stop the engine.
Disconnect the EVAP hose from the intake manifold.
Put the engine in inspection mode (maintenance mode).
Click hereGeneral>INTRODUCTION>REPAIR INSTRUCTION>INSPECTION MODE PROCEDURE
Start the engine.
Use your finger to confirm that the port of the intake manifold has suction.
| Tester Connection | Suspected Trouble Area | Proceed to |
|---|---|---|
| Suction applied | EVAP hose between intake manifold and purge VSV | A |
| No suction | Intake manifold | B |
A
B
- HINT:
- ·
When reinstalling the fuel cap, tighten it firmly (only one click sound could be head).
·When replacing the fuel cap, use a fuel cap that meets OEM specifications, and install it firmly.
NEXT
- HINT:
-
When installing the fuel cap, tighten it firmly (only one click sound could be head).
NEXT
Disconnect the vent hose.
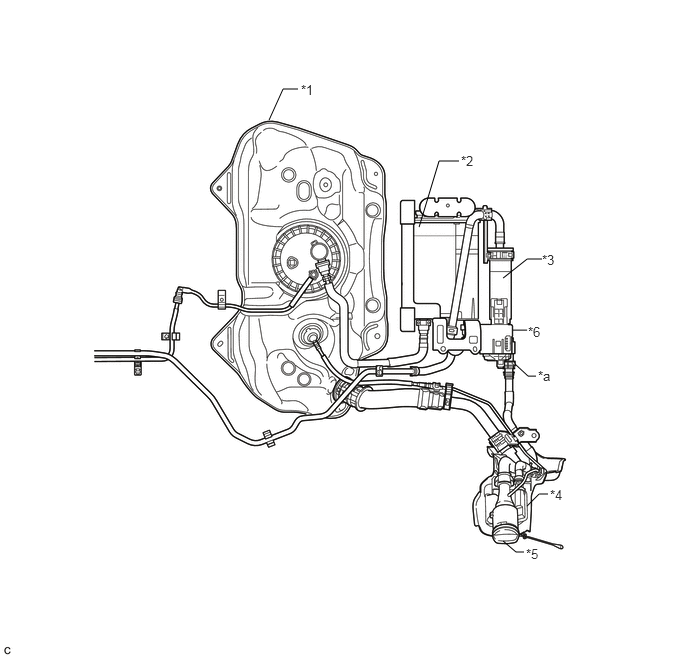
| *1 | Fuel Tank | *2 | Canister |
| *3 | No. 1 Canister | *4 | Canister Filter |
| *5 | Fuel Cap | *6 | Canister Pump Module |
| *a | Disconnect the vent hose | - | - |
Connect the EVAP pressure tester tool to the canister pump module with the adapter.
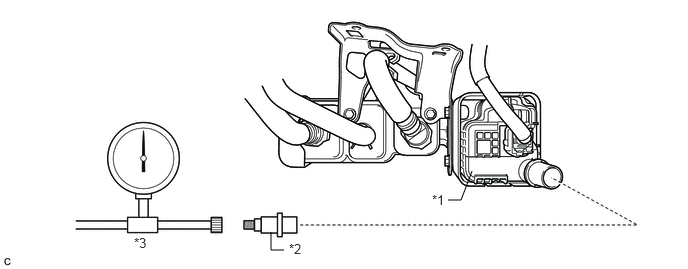
| *1 | Canister Pump Module | *2 | Adapter |
| *3 | EVAP Pressure Tester Tool | - | - |
Pressurize the EVAP system to 3.2 to 3.7 kPa(gauge) [24 to 27.75 mmHg(gauge)].
Apply soapy water to the piping and connecting parts of the EVAP system.
Look for areas where bubbles appear. This indicates the leak point.
Repair or replace the leak point.
- HINT:
-
Disconnect the hose between the canister and fuel tank from the canister. Block the canister side and conduct an inspection. In this way, the fuel tank can be excluded as an area suspected of causing fuel leaks.
NEXT
Replace the canister pump module.
- NOTICE:
- ·
When replacing the canister pump module, check the canister pump module interior, canister interior and No. 1 canister interior related pipes for water, fuel and other liquids. If liquids are present, check for disconnections and/or cracks in the following: 1) the pipe from the air inlet port to canister pump module; 2) the canister filter; and 3) the fuel tank vent hose. If liquids are present in the canister interior or No. 1 canister interior, replace the canister, No. 1 canister and canister pump module together.
·Check for filter blockage in the canister and No. 1 canister. If the charcoal filter inside the canister or No. 1 canister is clogged, replace the canister, No. 1 canister and canister pump module together.
·Check for filter blockage in the canister filter.
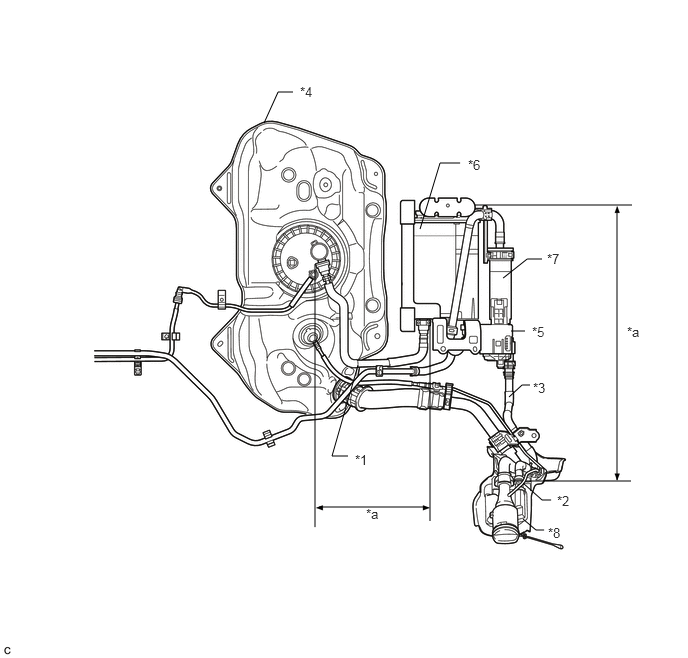
| *1 | Fuel Tank Vent Hose | *2 | Air Inlet Port |
| *3 | Vent Hose | *4 | Fuel Tank |
| *5 | Canister Pump Module | *6 | Canister |
| *7 | No. 1 Canister | *8 | Canister Filter |
| *a | Inspection Area
(check for disconnection and/or cracks) |
- | - |
Click hereEngine / Hybrid System>1NZ-FXE EMISSION CONTROL>CANISTER(w/ Canister Pump Module)>REMOVAL
NEXT
Replace the purge VSV.
Click hereEngine / Hybrid System>1NZ-FXE EMISSION CONTROL>PURGE VALVE(w/ Canister Pump Module)>REMOVAL
NEXT
NEXT
NEXT
Check that the EVAP purge port of the intake manifold is not clogged. If necessary, replace the intake manifold.
Click hereEngine / Hybrid System>1NZ-FXE INTAKE / EXHAUST>INTAKE MANIFOLD>REMOVAL
NEXT
Repair the malfunctioning areas indicated by the DTCs that had been confirmed when the vehicle was brought in.
NEXT
NEXT
Replace the canister pump module.
Click hereEngine / Hybrid System>1NZ-FXE EMISSION CONTROL>CANISTER(w/ Canister Pump Module)>REMOVAL
- NOTICE:
- ·
When replacing the canister pump module, check the canister pump module interior, canister interior and No. 1 canister interior related pipes for water, fuel and other liquids. If liquids are present, check for disconnections and/or cracks in the following: 1) the pipe from the air inlet port to the canister pump module; 2) the canister filter; and 3) the fuel tank vent hose. If liquids are present in the canister interior or No. 1 canister interior, replace the canister, No. 1 canister and canister pump module together.
·Check for filter blockage in the canister and No. 1 canister. If the charcoal filter inside the canister or No. 1 canister is clogged, replace the canister, No. 1 canister and canister pump module together.
·Check for filter blockage in the canister filter. If the canister filter has blockages, replace the canister filter.
| *1 | Fuel Tank Vent Hose | *2 | Air Inlet Port |
| *3 | Vent Hose | *4 | Fuel Tank |
| *5 | Canister Pump Module | *6 | Canister |
| *7 | No. 1 Canister | *8 | Canister Filter |
| *a | Inspection Area
(check for disconnection and/or cracks) |
- | - |
NEXT
- NOTICE:
- ·
The Evaporative System Check (Automatic Mode) consists of 6 steps performed automatically by the GTS. It takes a maximum of approximately 24 minutes.
·Do not perform the Evaporative System Check when the fuel tank is higher than 90% full because the cut-off valve may be closed, making the fuel tank leak check unavailable.
·Do not run the engine in this step.
·When the temperature of the fuel is 35°C (95°F) or higher, a large amount of vapor forms and any check results become inaccurate. When performing an Evaporative System Check, keep the fuel temperature less than 35°C (95°F).
Connect the GTS to the DLC3.
Turn the power switch on (IG).
Turn the GTS on.
Clear the DTCs.
Enter the following menus: Powertrain / Engine and ECT / Utility / Evaporative System Check / Automatic Mode.
After the Evaporative System Check is completed, check for pending DTCs by entering the following menus: Powertrain / Engine and ECT / Trouble Codes.
| Result | Proceed to |
|---|---|
| EVAP system DTCs are output | A |
| DTCs are not output
(Pending DTC is not output) |
B |
A
B
Replace the ECM.
Click hereEngine / Hybrid System>1NZ-FXE (ENGINE CONTROL)>ECM>REMOVAL
NEXT
Replace the canister.
Click hereEngine / Hybrid System>1NZ-FXE EMISSION CONTROL>CANISTER(w/ Canister Pump Module)>REMOVAL
- NOTICE:
- ·
When replacing the canister, check the canister pump module interior and No. 1 canister interior related pipes for water, fuel and other liquids. If liquids are present, check for disconnections and/or cracks in the following: 1) the pipe from the air inlet port to the canister pump module; 2) the canister filter; and 3) the fuel tank vent hose.
·Check for filter blockage in the canister filter. If the canister filter has blockages, replace the canister filter.
| *1 | Fuel Tank Vent Hose | *2 | Air Inlet Port |
| *3 | Vent Hose | *4 | Fuel Tank |
| *5 | Canister Pump Module | *6 | Canister |
| *7 | No. 1 Canister | *8 | Canister Filter |
| *a | Inspection Area
(check for disconnection and/or cracks) |
- | - |
NEXT
Replace the No. 1 canister.
Click hereEngine / Hybrid System>1NZ-FXE EMISSION CONTROL>CANISTER(w/ Canister Pump Module)>REMOVAL
- NOTICE:
- ·
When replacing the No. 1 canister, check the canister pump module interior and canister interior related pipes for water, fuel and other liquids. If liquids are present, check for disconnections and/or cracks in the following: 1) the pipe from the air inlet port to the canister pump module; 2) the canister filter; and 3) the fuel tank vent hose.
·Check for filter blockage in the canister filter. If the canister filter has blockages, replace the canister filter.
| *1 | Fuel Tank Vent Hose | *2 | Air Inlet Port |
| *3 | Vent Hose | *4 | Fuel Tank |
| *5 | Canister Pump Module | *6 | Canister |
| *7 | No. 1 Canister | *8 | Canister Filter |
| *a | Inspection Area
(check for disconnection and/or cracks) |
- | - |
NEXT
- NOTICE:
- ·
The Evaporative System Check (Automatic Mode) consists of 6 steps performed automatically by the GTS. It takes a maximum of approximately 24 minutes.
·Do not perform the Evaporative System Check when the fuel tank is higher than 90% full because the cut-off valve may be closed, making the fuel tank leak check unavailable.
·Do not run the engine in this step.
·When the temperature of the fuel is 35°C (95°F) or higher, a large amount of vapor forms and any check results become inaccurate. When performing an Evaporative System Check, keep the fuel temperature less than 35°C (95°F).
Connect the GTS to the DLC3.
Turn the power switch on (IG).
Turn the GTS on.
Clear the DTCs.
Enter the following menus: Powertrain / Engine and ECT / Utility / Evaporative System Check / Automatic Mode.
After the Evaporative System Check is completed, check for pending DTCs by entering the following menus: Powertrain / Engine and ECT / Trouble Codes.
- HINT:
-
If no pending DTCs are found, the repair has been successfully completed.
NEXT