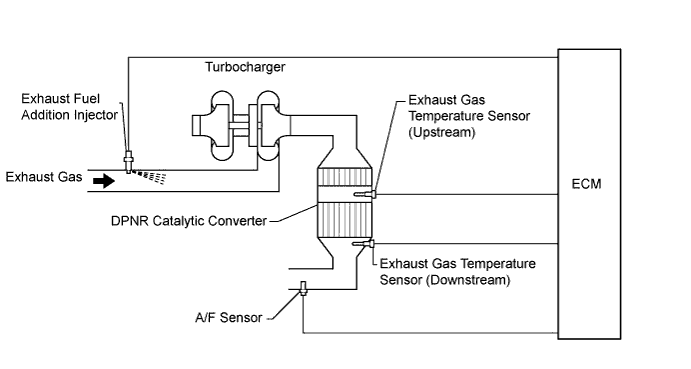
DTC P1386 Injector for Exhaust Fuel Addition |
| DTC Detection Drive Pattern | DTC Detection Condition | Trouble Area |
| After warming up the engine, perform Activate the DPF Rejuvenate (PM) in the Active Test menu using the intelligent tester, and drive at constant vehicle speed within 50 to 100 km/h (31 to 62 mph) for more than 15 minutes. Refer to Procedure 44 of Inspection Procedure below. | Exhaust fuel addition injector nozzle stuck open: Air-fuel ratio becomes richer than standard level. AF Lambda B1S1 is less than approximately 0.85 for 5 seconds. (1 trip detection logic) | Main Trouble Area
|
| Exhaust fuel addition injector nozzle stuck open: Exhaust gas temperature becomes higher than standard level. DPNR catalyst temperature becomes higher than 900°C (1572°F) for 5 seconds. (1 trip detection logic) | ||
| Drive at a constant speed of 70 km/h (44 mph) or more. | Excess or low fuel addition volume from the exhaust fuel addition injector: When exhaust fuel addition injector adds fuel, the air-fuel ratio decrease deviates from a value estimated by the ECM. (1 trip detection logic) |
| DTC No. | Data List |
| P1386 |
|
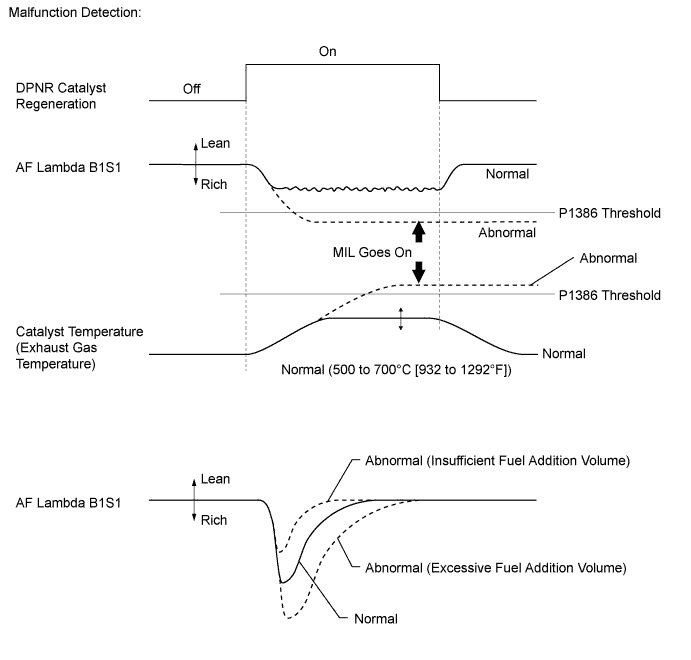
| Malfunction Condition | Malfunction Detection Condition | Fail-Safe Operation |
| Exhaust fuel addition injector is stuck open | DPNR catalyst temperature becomes higher than 900°C (1572°F) for 5 seconds | The engine power is not limited. |
| AF Lambda B1S1 is less than approximately 0.85 for 5 seconds | The engine power is reduced by 90%. | |
| Low or excess fuel addition volume from the exhaust fuel addition injector | During NOx reduction, the decrease in air-fuel ratio is too large or small compared with ECM calculation. | The engine power is not limited. |
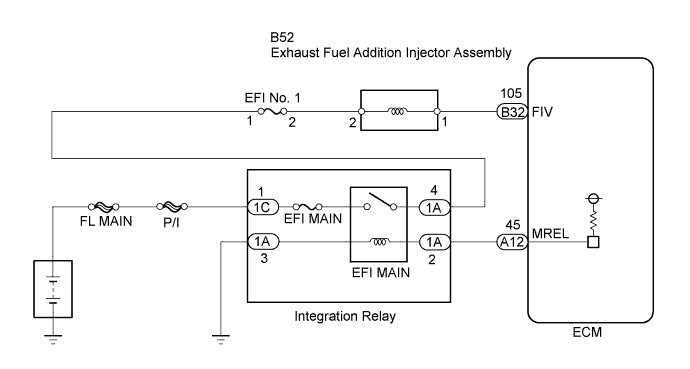
| 1.READ OUTPUT DTC (RECORD STORED DTC AND FREEZE FRAME DATA) |
Connect the intelligent tester to the DLC3.
Turn the ignition switch to ON and turn the tester on.
Enter the following menus: Powertrain / Engine and ECT / DTC.
Record the stored DTC and Freeze Frame Data.
| NEXT | |
 |
| 2.CHECK ANY OTHER DTC OUTPUT (IN ADDITION TO DTC P1386) |
Connect the intelligent tester to the DLC3.
Turn the ignition switch to ON and turn the tester on.
Enter the following menus: Powertrain / Engine and ECT / DTC.
Read Current DTCs.
| Result | Proceed to |
| P1386 | A |
| P1386 and other Current DTCs output | B |
|
| ||||
| A | |
|
| 3.CHECK FREEZE FRAME DATA (AF LAMBDA B1S1, EXHAUST TEMP B1S1, AND EXHAUST TEMP B1S2) |
Turn the tester on.
Read the values of AF Lambda B1S1, Exhaust Temperature B1S1 and Exhaust Temperature B1S2 from the Freeze Frame Data recorded previously.
Referring to the following table, proceed to the appropriate step according to the result of the data reading.
| Result | Proceed to | ||
| AF Lambda B1S1 | Exhaust Temperature B1S1 or Exhaust Temperature B1S2 | ||
| 0.85 or less | Any (0 to 1000°C) | A | |
| More than 0.85 | 900°C (1572°F) or higher | B*1 | |
| Except above | C | ||
|
| ||||
|
| ||||
| A | |
|
| 4.READ VALUE USING INTELLIGENT TESTER (AFS VOLTAGE B1S1) |
Connect the intelligent tester to the DLC3.
Start the engine.
Turn the tester on.
Enter the following menus: Powertrain / Engine and ECT / Data List / AFS Voltage B1S1, Exhaust Temperature B1S1, and Exhaust Temperature B1S2.
Drive the vehicle until Exhaust Temperature B1S1 and Exhaust Temperature B1S2 are 200°C (392°F) or higher.
Check if the air-fuel ratio (AFS Voltage B1S1) varies when the vehicle is accelerated and decelerated while maintaining a vehicle speed of 50 km/h (31 mph) or more.
| Result | Proceed to |
| Varies | A |
| Does not vary | B |
|
| ||||
| A | |
|
| 5.PERFORM ENGINE SPEED ACCELERATION (WHITE SMOKE AND FUEL SMELL) |
Disconnect the cable from the negative battery terminal for 1 minute or more, and then reconnect the cable.
After the engine starts, promptly accelerate the engine to approximately 3000 rpm with no load several times.
Check for white smoke and a fuel smell in the exhaust gas.
| Result | Proceed to |
| White smoke and/or fuel smell exists in the exhaust gas | A |
| Neither white smoke not fuel smell exists in the exhaust gas | B |
|
| ||||
| A | |
|
| 6.CHECK HARNESS AND CONNECTOR (RELAY - EXHAUST FUEL ADDITION INJECTOR - ECM) |
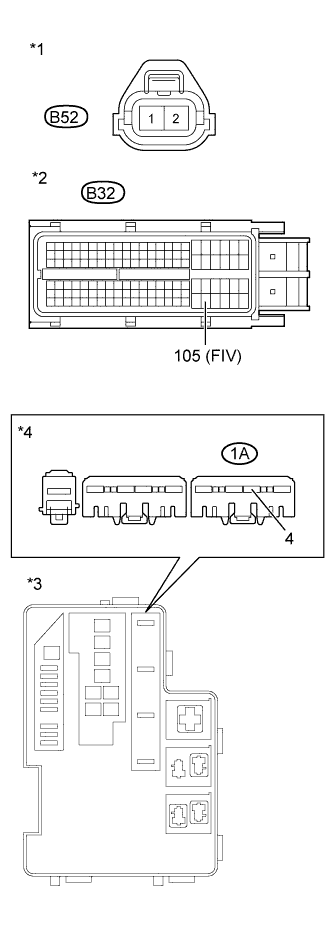 |
Disconnect the exhaust fuel addition injector assembly connector.
Disconnect the ECM connector.
Remove the integration relay from the engine room No. 1 relay block.
Measure the resistance according to the value(s) in the table below.
| Tester Connection | Condition | Specified Condition |
| B52-1 - B32-105 (FIV) | Always | Below 1 Ω |
| B52-2 - 1A-4 | Always | Below 1 Ω |
| Tester Connection | Condition | Specified Condition |
| B52-1 or B32-105 (FIV) - Body ground | Always | 10 kΩ or higher |
| B52-2 or 1A-4 - Body ground | Always | 10 kΩ or higher |
| *1 | Front view of wire harness connector (to Exhaust Fuel Addition Injector Assembly) |
| *2 | Front view of wire harness connector (to ECM) |
| *3 | Engine Room No. 1 Relay Block |
| *4 | Front view of wire harness connector (to Integration Relay) |
Reconnect the exhaust fuel addition injector assembly connector.
Reconnect the ECM connector.
Reinstall the integration relay.
|
| ||||
|
| ||||
| 7.REPAIR OR REPLACE HARNESS OR CONNECTOR |
Repair or replace the harness or connector.
| NEXT | |
|
| 8.REPLACE EXHAUST FUEL ADDITION INJECTOR |
Replace the exhaust fuel addition injector (Click here).
| NEXT | |
|
| 9.PERFORM ACTIVE TEST USING INTELLIGENT TESTER (ACTIVATE THE DPF REJUVENATE PM) |
Clear the DTC and Exhaust Fuel Addition FB value by disconnecting the cable from the negative battery terminal or removing the EFI (EFI MAIN) fuse for 1 minute or more.
Connect the intelligent tester to the DLC3.
Start the engine and drive the vehicle until the engine coolant temperature reaches 60°C (140°F) or higher.
Turn the tester on.
Enter the following menus: Powertrain / Engine and ECT / Active Test / Activate the DPF Rejuvenate (PM) / Data List / Exhaust Temperature B1S1, Exhaust Temperature B1S2, and AF Lambda B1S1.
Perform the Active Test while the vehicle is driven at a constant vehicle speed within 50 to 100 km/h (31 to 62 mph) (transmission in 3rd gear) for more than 15 minutes.
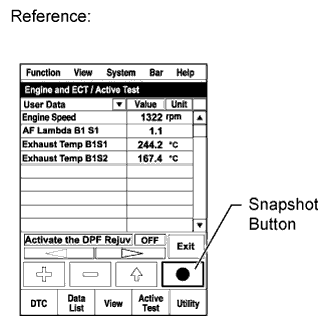 |
Take a snapshot with the intelligent tester when Exhaust Temperature B1S2 rises and becomes stable during driving.
Read the values of "Exhaust Temperature B1S1", "Exhaust Temperature B1S2" and "AF Lambda B1S1" in the Data List using the snapshot review function.
|
| ||||
| OK | ||
 | ||
| ||
| 10.EXHAUST GAS TEMPERATURE SENSOR DAMAGE CONFIRMED (PROCEDURE 10) |
| NEXT | |
|
| 11.PERFORM ENGINE SPEED ACCELERATION (CHECK FOR BLACK SMOKE) |
Start the engine and drive the vehicle until the engine coolant temperature reaches 60°C (140°F) or higher.
Stop the vehicle and allow the engine to idle.
Fully depress the accelerator pedal for 5 seconds, and then release it.*A
Repeat procedure *A 10 times.*B
Check for black smoke emission during procedures *A and *B.
|
| ||||
|
| ||||
| 12.CATALYTIC CONVERTER DAMAGE CONFIRMED (PROCEDURE 12) |
| NEXT | |
|
| 13.PERFORM ACTIVE TEST USING INTELLIGENT TESTER (PROCEDURE 13) (ACTIVATE THE DPF REJUVENATE PM) |
Clear the DTC and Exhaust Fuel Addition FB value by disconnecting the cable from the negative battery terminal or removing the EFI (EFI MAIN) fuse for 1 minute or more.
Connect the intelligent tester to the DLC3.
Start the engine and drive the vehicle until the engine coolant temperature reaches 60°C (140°F) or higher.
Turn the tester on.
Enter the following menus: Powertrain / Engine and ECT / Active Test / Activate the DPF Rejuvenate (PM) / Data List / Exhaust Temperature B1S1 and Exhaust Temperature B1S2.
Perform the Active Test while the vehicle is driven at a constant vehicle speed within 50 to 100 km/h (31 to 62 mph) (transmission in 3rd gear) for more than 15 minutes.
|
Take a snapshot with the intelligent tester when Exhaust Temperature B1S2 rises and becomes stable during driving.
Read the values of "Exhaust Temperature B1S1" and "Exhaust Temperature B1S2" in the Data List using the snapshot review function.
| Result | Proceed to | Note |
| The values of Exhaust Temperature B1S1 and Exhaust Temperature B1S2 are both within 500 to 700°C (932 to 1292°F) | A | Both Exhaust Temperature values are within the specified range. This indicates that there is probably not a malfunction in the exhaust fuel addition injector. Inspect engine systems other than the exhaust fuel addition injector. |
| Except above | B | Exhaust Temperature is outside the specified range. Replace the exhaust fuel addition injector and inspect other engine systems. |
|
| ||||
|
| ||||
| 14.CHECK HARNESS AND CONNECTOR (RELAY - EXHAUST FUEL ADDITION INJECTOR - ECM) |
|
Disconnect the exhaust fuel addition injector assembly connector.
Disconnect the ECM connector.
Remove the integration relay from the engine room No. 1 relay block.
Measure the resistance according to the value(s) in the table below.
| Tester Connection | Condition | Specified Condition |
| B52-1 - B32-105 (FIV) | Always | Below 1 Ω |
| B52-2 - 1A-4 | Always | Below 1 Ω |
| Tester Connection | Condition | Specified Condition |
| B52-1 or B32-105 (FIV) - Body ground | Always | 10 kΩ or higher |
| B52-2 or 1A-4 - Body ground | Always | 10 kΩ or higher |
| *1 | Front view of wire harness connector (to Exhaust Fuel Addition Injector Assembly) |
| *2 | Front view of wire harness connector (to ECM) |
| *3 | Engine Room No. 1 Relay Block |
| *4 | Front view of wire harness connector (to Integration Relay) |
Reconnect the exhaust fuel addition injector assembly connector.
Reconnect the ECM connector.
Reinstall the integration relay.
|
| ||||
|
| ||||
| 15.REPAIR OR REPLACE HARNESS OR CONNECTOR |
Repair or replace the harness or connector.
|
| ||||
| 16.REPLACE EXHAUST FUEL ADDITION INJECTOR |
Replace the exhaust fuel addition injector (Click here).
| NEXT | |
|
| 17.PERFORM ACTIVE TEST USING INTELLIGENT TESTER (ACTIVATE THE DPF REJUVENATE PM) |
Clear the DTC and Exhaust Fuel Addition FB value by disconnecting the cable from the negative battery terminal or removing the EFI (EFI MAIN) fuse for 1 minute or more.
Connect the intelligent tester to the DLC3.
Start the engine and drive the vehicle until the engine coolant temperature reaches 60°C (140°F) or higher.
Turn the tester on.
Enter the following menus: Powertrain / Engine and ECT / Active Test / Activate the DPF Rejuvenate (PM) / Data List / Exhaust Temperature B1S1 and Exhaust Temperature B1S2.
Perform the Active Test while the vehicle is driven at a constant vehicle speed within 50 to 100 km/h (31 to 62 mph) (transmission in 3rd gear) for more than 15 minutes.
|
Take a snapshot with the intelligent tester when Exhaust Temperature B1S2 rises and becomes stable during driving.
Read the values of "Exhaust Temperature B1S1" and "Exhaust Temperature B1S2" in the Data List using the snapshot review function.
| Result | Proceed to | Note |
| The values of Exhaust Temperature B1S1 and Exhaust Temperature B1S2 are both within 500 to 700°C (932 to 1292°F) | NEXT | Exhaust Temperature was outside the specified range in Procedure 13 and became within range after the exhaust fuel addition injector was replaced, so it can be determined that the flow volume from the exhaust fuel addition injector was incorrect. Perform the inspection procedures that follow to check the engine system for other fundamental causes of incorrect flow volume from the exhaust fuel addition injector. |
| Except above | NEXT | Exhaust Temperature was outside the specified range in Procedure 13 and remained outside the specified range after the exhaust fuel addition injector was replaced. This indicates that the cause is not an exhaust fuel addition injector malfunction, so inspect the engine system. |
|
| ||||
| 18.PERFORM ACTIVE TEST USING INTELLIGENT TESTER (PROCEDURE 18) (ACTIVATE THE DPF REJUVENATE PM) |
Clear the DTC and Exhaust Fuel Addition FB value by disconnecting the cable from the negative battery terminal or removing the EFI (EFI MAIN) fuse for 1 minute or more.
Connect the intelligent tester to the DLC3.
Start the engine and drive the vehicle until the engine coolant temperature reaches 60°C (140°F) or higher.
Turn the tester on.
Enter the following menus: Powertrain / Engine and ECT / Active Test / Activate the DPF Rejuvenate (PM) / Data List / Exhaust Temperature B1S1 and Exhaust Temperature B1S2.
Perform the Active Test while the vehicle is driven at a constant vehicle speed within 50 to 100 km/h (31 to 62 mph) (transmission in 3rd gear) for more than 15 minutes.
|
Take a snapshot with the intelligent tester when Exhaust Temperature B1S2 rises and becomes stable during driving.
Read the values of "Exhaust Temperature B1S1" and "Exhaust Temperature B1S2" in the Data List using the snapshot review function.
| Result | Proceed to | Note |
| The values of Exhaust Temperature B1S1 and Exhaust Temperature B1S2 are both within 500 to 700°C (932 to 1292°F) | A | Both Exhaust Temperature values are within the specified range. This indicates that there is probably not a malfunction in the exhaust fuel addition injector. Inspect engine systems other than the exhaust fuel addition injector. |
| Except above | B | Exhaust Temperature is outside the specified range. Replace the exhaust fuel addition injector and inspect other engine systems. |
|
| ||||
|
| ||||
| 19.REPLACE EXHAUST FUEL ADDITION INJECTOR |
Replace the exhaust fuel addition injector (Click here).
| NEXT | |
|
| 20.PERFORM ACTIVE TEST USING INTELLIGENT TESTER (ACTIVATE THE DPF REJUVENATE PM) |
Clear the DTC and Exhaust Fuel Addition FB value by disconnecting the cable from the negative battery terminal or removing the EFI (EFI MAIN) fuse for 1 minute or more.
Connect the intelligent tester to the DLC3.
Start the engine and drive the vehicle until the engine coolant temperature reaches 60°C (140°F) or higher.
Turn the tester on.
Enter the following menus: Powertrain / Engine and ECT / Active Test / Activate the DPF Rejuvenate (PM) / Data List / Exhaust Temperature B1S1 and Exhaust Temperature B1S2.
Perform the Active Test while the vehicle is driven at a constant vehicle speed within 50 to 100 km/h (31 to 62 mph) (transmission in 3rd gear) for more than 15 minutes.
|
Take a snapshot with the intelligent tester when Exhaust Temperature B1S2 rises and becomes stable during driving.
Read the values of "Exhaust Temperature B1S1" and "Exhaust Temperature B1S2" in the Data List using the snapshot review function.
| Result | Proceed to | Note |
| The values of Exhaust Temperature B1S1 and Exhaust Temperature B1S2 are both within 500 to 700°C (932 to 1292°F) | NEXT | Exhaust Temperature was outside the specified range in Procedure 18 and became within range after the exhaust fuel addition injector was replaced, so it can be determined that the flow volume from the exhaust fuel addition injector was incorrect. Perform the inspection procedures that follow to check the engine system for other fundamental causes of incorrect flow volume from the exhaust fuel addition injector. |
| Except above | NEXT | Exhaust Temperature was outside the specified range in Procedure 18 and remained outside the specified range after the exhaust fuel addition injector was replaced. This indicates that the cause is not an exhaust fuel addition injector malfunction, so inspect the engine system. |
| NEXT | |
|
| 21.INSPECT EGR VALVE ASSEMBLY |
Remove the EGR valve assembly (Click here).
Visually check the electric EGR control valve for deposits.
If there are deposits, clean the electric EGR control valve.
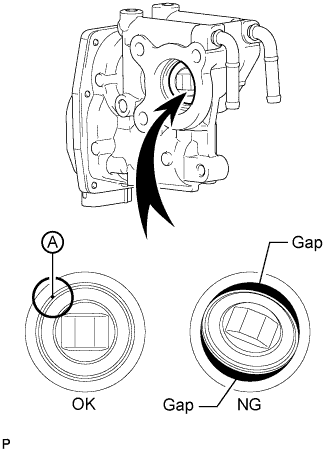 |
Hold the electric EGR control valve up to a light, and then from the side indicated by the arrow in the illustration, visually check that there is no gap between the valve and body.
|
| ||||
| A | |
|
| 22.REPLACE EGR VALVE ASSEMBLY |
Replace the EGR valve assembly (Click here).
| NEXT | |
|
| 23.REMOVE DEPOSIT (CLEAN EGR PASSAGE) |
Remove the intake manifold, No. 2 intake manifold, EGR valve assembly and No. 2 EGR pipe.
Remove the deposits from those parts and clean the parts.
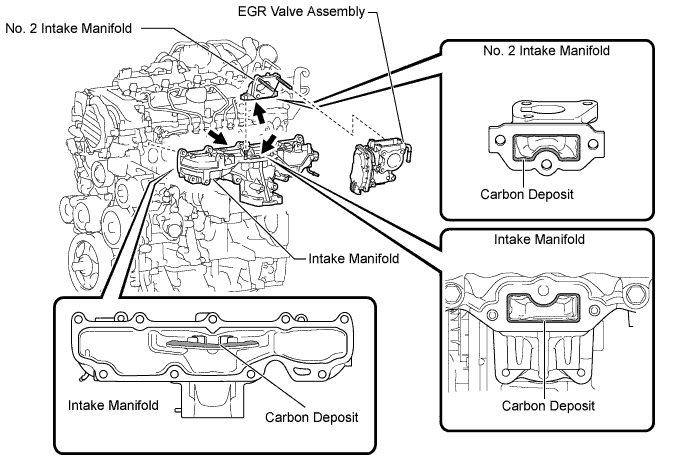
Reinstall the intake manifold, No. 2 intake manifold, EGR valve assembly and No. 2 EGR pipe.
| NEXT | |
|
| 24.READ VALUE USING INTELLIGENT TESTER (MAP AND ATMOSPHERIC PRESSURE) |
Connect the intelligent tester to the DLC3.
Turn the ignition switch to ON and turn the tester on.
Enter the following menus: Powertrain / Engine and ECT / Data List / MAP and Atmospheric Pressure.
Compare the values when the ignition switch is ON.
| Result | Proceed to |
| MAP and Atmosphere Pressure have the same value | A |
| MAP is different from actual atmospheric pressure | B |
| Atmosphere Pressure is different from actual atmospheric pressure | C |
|
| ||||
|
| ||||
|
| ||||
| 25.REPLACE MANIFOLD ABSOLUTE PRESSURE SENSOR |
Replace the manifold absolute pressure sensor.
|
| ||||
| 26.REPLACE ECM |
Replace the ECM (Click here).
|
| ||||
| 27.READ VALUE USING INTELLIGENT TESTER (MAP AND TARGET BOOSTER PRESSURE) |
Connect the intelligent tester to the DLC3.
Start the engine and drive the vehicle until the engine coolant temperature reaches 60°C (140°F) or higher.
Turn the tester on.
Enter the following menus: Powertrain / Engine and ECT / Data List / MAP and Target Booster Pressure.
Take a snapshot when the engine speed is maintained at 4500 rpm with no load.
Read the values of "MAP" and "Target Booster Pressure" in the Data List using the snapshot review function.
| Result | Proceed to |
| Difference between MAP and Target Booster Pressure is +/-15 kPa or more | A |
| Except above | B |
|
| ||||
| A | |
|
| 28.CHECK AIR INTAKE SYSTEM |
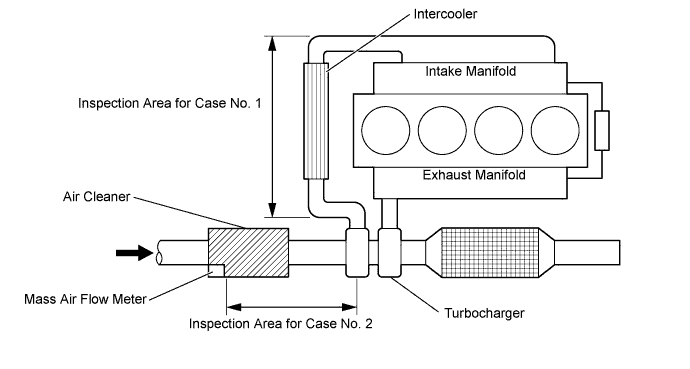
Check for air leaks and blockages between the air cleaner case and turbocharger, and between the turbocharger and intake manifold.
| Result | Proceed to |
| Leaks and/or blockages exist in the intake system | A |
| No leaks and/or blockages in the intake system | B |
|
| ||||
| A | |
|
| 29.REPAIR OR REPLACE AIR INTAKE SYSTEM |
Repair or replace the malfunctioning part in the air intake system.
| NEXT | |
|
| 30.READ VALUE USING INTELLIGENT TESTER (MAP AND TARGET BOOSTER PRESSURE) |
Connect the intelligent tester to the DLC3.
Start the engine and turn the tester on.
Enter the following menus: Powertrain / Engine and ECT / Data List / MAP and Target Booster Pressure.
Take a snapshot when the engine speed is maintained at 4500 rpm with no load.
Read the values of "MAP" and "Target Booster Pressure" in the Data List using the snapshot review function.
| Result | Proceed to |
| Difference between MAP and Target Booster Pressure is +/-15 kPa or higher | A |
| Except above | B |
|
| ||||
| A | |
|
| 31.CHECK AND REPLACE TURBOCHARGER SUB-ASSEMBLY |
Referring to DTC P0234, P0299 and/or P1251 check the turbocharger system and, if necessary, replace malfunctioning parts.
| NEXT | |
|
| 32.READ VALUE USING INTELLIGENT TESTER (MAF) |
Connect the intelligent tester to the DLC3.
Start the engine and drive the vehicle until the engine coolant temperature reaches 60°C (140°F) or higher.
Turn the tester on.
Enter the following menus: Powertrain / Engine and ECT / Data List / Engine Speed, MAF, MAP and Intake Air Temp (Turbo).
Maintain the engine at an engine speed of 4500 rpm with no load and take a note of the following values.
| Tester Display | Unit |
| Engine Speed | rpm |
| MAF | g/sec. |
| MAP | kPa |
| Intake Air Temp (Turbo) | °C |
Calculate the MAF value corrected to 4500 rpm by using the following formula.
| Item | Specified Condition |
| MAF corrected (for Manual Transaxle) | 92 to 132 g/sec. |
| MAF corrected (for Automatic Transaxle) | 90 to 135 g/sec. |
| Result | Proceed to |
| Outside standard range | A |
| Within standard range | B |
|
| ||||
| A | |
|
| 33.CHECK AIR INTAKE SYSTEM |
Check for air leaks and blockages between the air cleaner case and turbocharger, and between the turbocharger and intake manifold.
| Result | Proceed to |
| Leaks and/or blockages exist in the intake system | A |
| No leaks and/or blockages in the intake system | B |
|
| ||||
| A | |
|
| 34.REPAIR OR REPLACE AIR INTAKE SYSTEM |
Repair or replace the malfunctioning part in the air intake system.
| NEXT | |
|
| 35.READ VALUE USING INTELLIGENT TESTER (MAF) |
Connect the intelligent tester to the DLC3.
Start the engine and drive the vehicle until the engine coolant temperature reaches 60°C (140°F) or higher.
Turn the tester on.
Enter the following menus: Powertrain / Engine and ECT / Data List / Engine Speed, MAF, MAP and Intake Air Temp (Turbo).
Maintain the engine at an engine speed of 4500 rpm with no load and take a note of the following values.
| Tester Display | Unit |
| Engine Speed | rpm |
| MAF | g/sec. |
| MAP | kPa |
| Intake Air Temp (Turbo) | °C |
Calculate the MAF value corrected to 4500 rpm by using the following formula.
| Item | Specified Condition |
| MAF corrected (for Manual Transaxle) | 92 to 132 g/sec. |
| MAF corrected (for Automatic Transaxle) | 90 to 135 g/sec. |
| Result | Proceed to |
| Outside standard range | A |
| Within standard range | B |
|
| ||||
| A | |
|
| 36.REPLACE MASS AIR FLOW METER |
Replace the mass air flow meter (Click here).
| NEXT | |
|
| 37.READ VALUE USING INTELLIGENT TESTER (INJECTION VOLUME AND INJECTION FEEDBACK VAL #1 TO #4) |
Start the engine and drive the vehicle until the engine coolant temperature reaches 60°C (140°F) or higher.
Allow the engine to idle for 1 minute or more.
Connect the intelligent tester to the DLC3.
Turn the tester on.
Enter the following menus: Powertrain / Engine and ECT / Data List / Injection Volume and Injector Feedback Val. #1 to #4.
Read the values when the engine is idling, and write them down.
| Tester Display | Engine Condition | Specified Condition |
| Injection Volume | Idling | Less than 10 mm3/st |
| Injector Feedback Val. #1 Injector Feedback Val. #2 Injector Feedback Val. #3 Injector Feedback Val. #4 | Idling | -3.0 to 3.0 mm3/st |
| Result | Proceed to |
| Outside standard range | A |
| Within standard range | B |
|
| ||||
| A | |
|
| 38.PERFORM ACTIVE TEST USING INTELLIGENT TESTER (CONTROL THE CYLINDER #1 TO #4 FUEL CUT) |
Connect the intelligent tester to the DLC3.
Start the engine and turn the tester on.
Enter the following menus: Powertrain / Engine and ECT / Active Test / Control the Cylinder #1 to #4 Fuel Cut.
| NEXT | |
|
| 39.REPLACE FUEL INJECTOR |
Referring to the step above, identify the malfunctioning cylinder.
Replace the fuel injector of the malfunctioning cylinder (Click here).
If the value of Injection Volume is 10 mm3/st or more and the value of Injector Feedback Val. is within -3.0 to 3.0 mm3/st, replace the fuel injectors for all cylinders.
| NEXT | |
|
| 40.REGISTER INJECTOR COMPENSATION CODE AND PERFORM PILOT QUANTITY LEARNING |
Register the injector compensation code .
Perform the fuel injector pilot quantity learning .
| NEXT | |
|
| 41.BLEED AIR FROM FUEL SYSTEM |
Bleed the air from the fuel system .
| NEXT | |
|
| 42.REPLACE EXHAUST GAS TEMPERATURE SENSOR AND/OR CATALYTIC CONVERTER IF NECESSARY (PROCEDURE 42) |
| Procedure | Condition | Corresponding Part |
| 10 | Freeze frame data check result is Exhaust Temperature high | Replace exhaust gas temperature sensors |
| 12 | Smoke emitted when racing without load | Replace DPNR catalytic converter (manifold converter sub-assembly) |
Replace the DPNR catalytic converter (manifold converter sub-assembly) (Click here) or the exhaust gas temperature sensors (Click here).
Check the filter substrate from the downstream side for melting, cracks or breaks when replacing the DPNR catalytic converter.
| Result | Proceed to |
| Filter substrate has melting, cracks or breaks | A |
| Filter substrate has no melting, cracks or breaks | B |
| Only exhaust gas temperature sensors replaced | B |
When a DPNR catalytic converter is replaced, the catalyst record of DPNR thermal deterioration stored in the ECM must be cleared.
Connect the intelligent tester to the DLC3.
Turn the ignition switch to ON and turn the tester on.
Enter the following menus: Powertrain / Engine and ECT / Utility / Catalyst Record Clear.
|
| ||||
| A | |
|
| 43.REPLACE EXHAUST PIPE |
Replace the exhaust pipe (Click here).
| NEXT | |
|
| 44.PERFORM ACTIVE TEST USING INTELLIGENT TESTER (PROCEDURE 44) (ACTIVATE THE DPF REJUVENATE PM) |
Clear the DTC and Exhaust Fuel Addition FB value by disconnecting the cable from the negative battery terminal or removing the EFI (EFI MAIN) fuse for 1 minute or more.
Connect the intelligent tester to the DLC3.
Start the engine and drive the vehicle until the engine coolant temperature reaches 60°C (140°F) or higher.
Turn the tester on.
Enter the following menus: Powertrain / Engine and ECT / Active Test / Activate the DPF Rejuvenate (PM) / Data List / Exhaust Temperature B1S1 and Exhaust Temperature B1S2.
Perform the Active Test while the vehicle is driven at a constant vehicle speed within 50 to 100 km/h (31 to 62 mph) (transmission in 3rd gear) for more than 15 minutes.
|
Take a snapshot with the intelligent tester when Exhaust Temperature B1S2 rises and becomes stable during driving.
Read the values of "Exhaust Temperature B1S1" and "Exhaust Temperature B1S2" in the Data List using the snapshot review function.
| NEXT | ||
| ||
| ||

