REAR SUSPENSION REAR SUSPENSION MEMBER REMOVAL
PROCEDURE

 1.REMOVE REAR WHEEL
2.REMOVE REAR AXLE SHAFT NUT LH (for AWD)
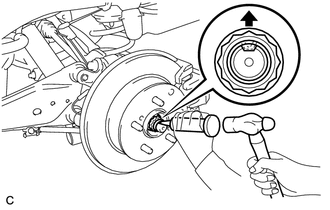
Using SST and a hammer, unstake the staked part of the rear axle shaft nut.
- SST
- 09930-00010 (09931-00010, 09931-00020)
- NOTICE:
-
Loosen the staked part of the rear axle shaft nut completely, otherwise the screw of the drive shaft may be damaged.
While applying the brakes, remove the rear axle shaft nut.
3.REMOVE REAR AXLE SHAFT NUT RH (for AWD)
- HINT:
-
Use the same procedure described for the LH side.
4.DISCONNECT SKID CONTROL SENSOR WIRE LH (for 2WD)
5.DISCONNECT SKID CONTROL SENSOR WIRE RH (for 2WD)
- HINT:
-
Use the same procedure described for the LH side.
6.DISCONNECT REAR SPEED SENSOR LH (for AWD)
7.DISCONNECT REAR SPEED SENSOR RH (for AWD)
- HINT:
-
Use the same procedure described for the LH side.
8.DISCONNECT NO. 3 PARKING BRAKE CABLE ASSEMBLY
9.DISCONNECT NO. 2 PARKING BRAKE CABLE ASSEMBLY
- HINT:
-
Use the same procedure described for the No. 3 parking brake cable assembly.
10.DISCONNECT REAR DISC BRAKE CALIPER ASSEMBLY LH
11.DISCONNECT REAR DISC BRAKE CALIPER ASSEMBLY RH
- HINT:
-
Use the same procedure described for the LH side.
12.REMOVE REAR DISC
Click hereBrake>BRAKE (REAR)>REAR BRAKE>REMOVAL
13.REMOVE PARKING BRAKE ASSEMBLY
14.REMOVE REAR AXLE HUB AND BEARING ASSEMBLY LH (for 2WD)
15.REMOVE REAR AXLE HUB AND BEARING ASSEMBLY RH (for 2WD)
- HINT:
-
Use the same procedure described for the LH side.
16.REMOVE REAR AXLE HUB AND BEARING ASSEMBLY LH (for AWD)
17.REMOVE REAR AXLE HUB AND BEARING ASSEMBLY RH (for AWD)
- HINT:
-
Use the same procedure described for the LH side.
18.REMOVE REAR SUSPENSION MEMBER BRACE LH
19.REMOVE REAR SUSPENSION MEMBER BRACE RH
- HINT:
-
Use the same procedure described for the LH side.
20.REMOVE REAR STABILIZER LINK ASSEMBLY LH
21.REMOVE REAR STABILIZER LINK ASSEMBLY RH
- HINT:
-
Use the same procedure described for the LH side.
22.REMOVE REAR STABILIZER BAR
23.REMOVE REAR NO. 1 SUSPENSION ARM ASSEMBLY LH
24.REMOVE REAR NO. 1 SUSPENSION ARM ASSEMBLY RH
- HINT:
-
Use the same procedure described for the LH side.
25.DISCONNECT REAR TRAILING ARM ASSEMBLY LH
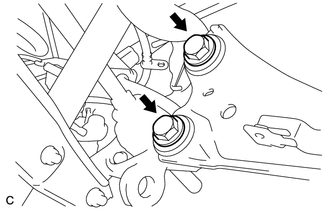
Remove the 2 bolts and disconnect the rear trailing arm.
26.DISCONNECT REAR TRAILING ARM ASSEMBLY RH
- HINT:
-
Use the same procedure described for the LH side.
27.LOOSEN REAR NO. 2 SUSPENSION ARM ASSEMBLY LH
28.LOOSEN REAR NO. 2 SUSPENSION ARM ASSEMBLY RH
- HINT:
-
Use the same procedure described for the LH side.
29.REMOVE REAR AXLE CARRIER SUB-ASSEMBLY LH
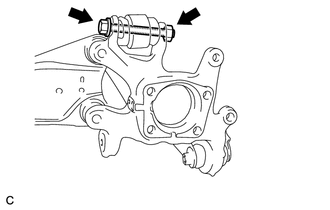
Remove the bolt and nut, disconnect the rear upper control arm and remove the rear axle carrier.
- NOTICE:
-
Since a stopper nut is used, loosen the bolt.
30.REMOVE REAR AXLE CARRIER SUB-ASSEMBLY RH
- HINT:
-
Use the same procedure described for the LH side.
31.REMOVE REAR SHOCK ABSORBER ASSEMBLY LH
32.REMOVE REAR SHOCK ABSORBER ASSEMBLY RH
- HINT:
-
Use the same procedure described for the LH side.
33.REMOVE REAR COIL SPRING LH
34.REMOVE REAR COIL SPRING RH
- HINT:
-
Use the same procedure described for the LH side.
35.REMOVE REAR UPPER COIL SPRING INSULATOR LH
36.REMOVE REAR UPPER COIL SPRING INSULATOR RH
- HINT:
-
Use the same procedure described for the LH side.
37.REMOVE REAR LOWER COIL SPRING INSULATOR LH
38.REMOVE REAR LOWER COIL SPRING INSULATOR RH
- HINT:
-
Use the same procedure described for the LH side.
39.REMOVE REAR NO. 2 SUSPENSION ARM ASSEMBLY LH
40.REMOVE REAR NO. 2 SUSPENSION ARM ASSEMBLY RH
- HINT:
-
Use the same procedure described for the LH side.
41.REMOVE REAR UPPER CONTROL ARM ASSEMBLY LH
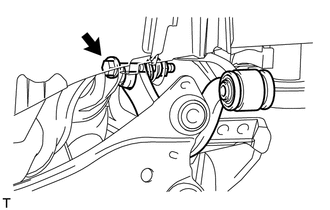
Remove the bolt, nut and upper control arm from the rear suspension member.
42.REMOVE REAR UPPER CONTROL ARM ASSEMBLY RH
- HINT:
-
Use the same procedure described for the LH side.
43.REMOVE PROPELLER WITH CENTER BEARING SHAFT ASSEMBLY (for AWD)
44.REMOVE REAR DIFFERENTIAL CARRIER ASSEMBLY (for AWD)
45.REMOVE REAR SUSPENSION MEMBER SUB-ASSEMBLY
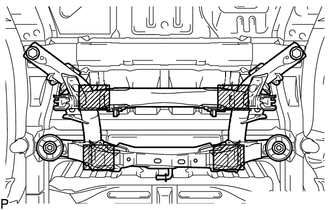
| *a | Attachment Placement Positions |
Place wooden blocks or plate lift attachments in the positions shown in the illustration and set an engine lifter underneath the suspension member.
- NOTICE:
- ·
Place the wooden blocks or plate lift attachments so that the rear suspension member sub-assembly is level.
·As the rear suspension member sub-assembly is very heavy, be sure to support it securely.
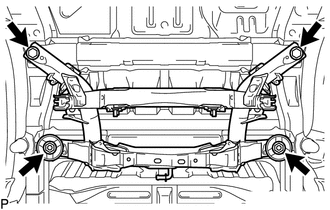
Remove the 2 bolts, 2 nuts, 2 rear upper body mounting cushions and rear suspension member sub-assembly.
46.REMOVE REAR NO. 1 DIFFERENTIAL MOUNT CUSHION (for AWD)