SLIDING ROOF / CONVERTIBLE SLIDING ROOF HOUSING(for Panoramic Moon Roof) REMOVAL
CAUTION / NOTICE / HINT
The necessary procedures (adjustment, calibration, initialization, or registration) that must be performed after parts are removed and installed, or replaced during sliding roof housing sub-assembly removal/installation are shown below.
| Replaced Part or Performed Procedure | Necessary Procedure | Effect/Inoperative Function when Necessary Procedure not Performed | Link |
|---|---|---|---|
|
*: When performing learning using the GTS. Click here( |
|||
| Removal and installation of auxiliary battery terminal | Perform steering sensor zero point calibration | Lane control system | ( ) |
| Parking support brake system (for HV model)* | |||
| Pre-collision system | |||
| Memorize steering angle neutral point | Parking assist monitor system | ()
|
|
| Panoramic view monitor system (for HV model) | ()
|
||
| Reset back door close position | Power back door system (for HV model) | ()
|
|
| Power back door initialization | Power door lock control system | ()
|
|
| Sliding roof ECU (Sliding roof drive gear sub-assembly) | Initialize panoramic moon roof system (Sliding roof) | ·
Auto operation function ·
Jam protection function ·
Key-off operation function ·
Key-linked function ·
Wireless transmitter-linked function ·
Sliding roof open warning function ·
Sliding roof may move in reverse or become misaligned |
()
|
| Sliding roof glass sub-assembly (Including removal and installation) | Initialize panoramic moon roof system (Sliding roof) | ·
Auto operation function ·
Jam protection function ·
Key-off operation function ·
Key-linked function ·
Wireless transmitter-linked function ·
Sliding roof open warning function ·
Sliding roof may move in reverse or become misaligned |
()
|
·
Sliding roof housing panel (Including removal and installation) ·
Slide roof rail sub-assembly (Including removal and installation) |
Initialize panoramic moon roof system (Sliding roof) | ·
Auto operation function ·
Jam protection function ·
Key-linked function ·
Wireless transmitter-linked function ·
Key-off operation function ·
Roof sunshade may move in reverse or become misaligned |
()
|
·
Roof sunshade ECU (sliding roof drive gear assembly) (Including removal and installation) ·
Sunshade trim sub-assembly (Including removal and installation) |
Initialize panoramic moon roof system (Roof sunshade) | ·
Auto operation function ·
Jam protection function ·
Key-linked function ·
Wireless transmitter-linked function ·
Key-off operation function ·
Roof sunshade may move in reverse or become misaligned |
()
|
- NOTICE:
-
After the ignition switch is turned off, the navigation system requires approximately a minute to record various types of memory and settings. As a result, after turning the ignition switch off, wait a minute or more before disconnecting the cable from the negative (-) auxiliary battery terminal.
- HINT:
-
Refer to Step 23 for the sliding roof weatherstrip removal procedure.
| Replaced Part or Performed Procedure | Necessary Procedure | Effect/Inoperative Function when Necessary Procedure not Performed | Link |
|---|---|---|---|
|
*: When performing learning using the GTS. Click here( |
|||
| Removal and installation of auxiliary battery terminal | Drive the vehicle until stop and start control is permitted (approximately 5 to 60 minutes) | Drive the vehicle until stop and start control is permitted (approximately 5 to 60 minutes) | for A25A-FKS:()
for M20A-FKS:( )
|
| Perform steering sensor zero point calibration | Lane control system | ()
|
|
| Parking support brake system* | |||
| Pre-collision system | |||
| Memorize steering angle neutral point | Parking assist monitor system | ()
|
|
| Panoramic view monitor system (for Gasoline model) | ()
|
||
| Reset back door close position | Power back door function | ()
|
|
| Power back door initialization | Power door lock control system | ()
|
|
| Sliding roof ECU (Sliding roof drive gear sub-assembly) | Initialize panoramic moon roof system (Sliding roof) | ·
Auto operation function ·
Jam protection function ·
Key-off operation function ·
Key-linked function ·
Wireless transmitter-linked function ·
Sliding roof open warning function ·
Sliding roof may move in reverse or become misaligned |
()
|
| Sliding roof glass sub-assembly (Including removal and installation) | Initialize panoramic moon roof system (Sliding roof) | ·
Auto operation function ·
Jam protection function ·
Key-off operation function ·
Key-linked function ·
Wireless transmitter-linked function ·
Sliding roof open warning function ·
Sliding roof may move in reverse or become misaligned |
()
|
·
Sliding roof housing panel (Including removal and installation) ·
Slide roof rail sub-assembly (Including removal and installation) |
Initialize panoramic moon roof system (Sliding roof) | ·
Auto operation function ·
Jam protection function ·
Key-off operation function ·
Key-linked function ·
Wireless transmitter-linked function ·
Sliding roof open warning function ·
Sliding roof may move in reverse or become misaligned |
()
|
·
Roof sunshade ECU (sliding roof drive gear assembly) (Including removal and installation) ·
Sunshade trim sub-assembly (Including removal and installation) |
Initialize panoramic moon roof system (Roof sunshade) | ·
Auto operation function ·
Jam protection function ·
Key-linked function ·
Wireless transmitter-linked function ·
Key-off operation function ·
Roof sunshade may move in reverse or become misaligned |
()
|
- NOTICE:
-
After the ignition switch is turned off, the navigation system requires approximately a minute to record various types of memory and settings. As a result, after turning the ignition switch off, wait a minute or more before disconnecting the cable from the negative (-) auxiliary battery terminal.
- HINT:
-
Refer to Step 23 for the sliding roof weatherstrip removal procedure.
PROCEDURE

 1. PRECAUTION
- CAUTION:
-
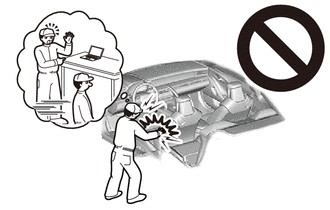
-
Be sure to read precaution thoroughly before servicing.
- ·
for HV Model with Occupant Classification System:
·for Gasoline Model with Occupant Classification System:
·w/o Occupant Classification System:
- NOTICE:
-
After turning the ignition switch off, waiting time may be required before disconnecting the cable from the negative (-) battery terminal. Therefore, make sure to read the disconnecting the cable from the negative (-) battery terminal notices before proceeding with work.
-
Click hereGeneral>INTRODUCTION>REPAIR INSTRUCTION>PRECAUTION
63218M
2.REMOVE SLIDING ROOF SIDE GARNISH LH (for Front Inner Side)
Move the sunshade trim sub-assembly to the fully open position.
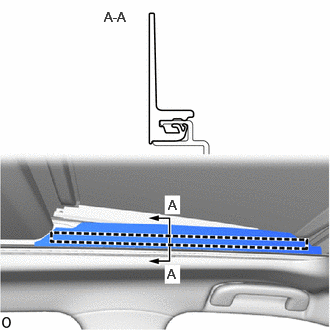
Detach the guide and remove the sliding roof side garnish LH.
63217K
3.REMOVE SLIDING ROOF SIDE GARNISH RH (for Front Inner Side)
- HINT:
-
Use the same procedure described for the LH side.
63218R
4.REMOVE SLIDING ROOF SIDE GARNISH LH (for Rear Side)
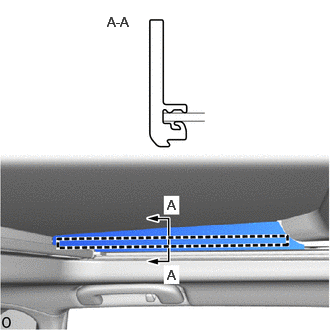
Detach the guide and remove the sliding roof side garnish LH.
63217R
5.REMOVE SLIDING ROOF SIDE GARNISH RH (for Rear Side)
- HINT:
-
Use the same procedure described for the LH side.
63218E
6.REMOVE FRONT SLIDING ROOF GARNISH LH (for Front Outer Side)
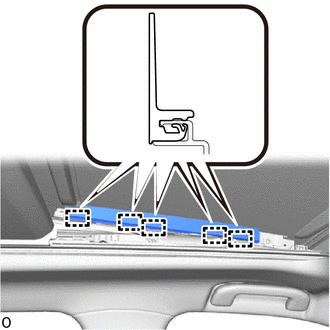
Detach the guide and remove the front sliding roof garnish LH.
63217E
7.REMOVE FRONT SLIDING ROOF GARNISH RH (for Front Outer Side)
- HINT:
-
Use the same procedure described for the LH side.
63201P
8.REMOVE SLIDING ROOF GLASS SUB-ASSEMBLY
- NOTICE:
- ·
Carrying the sliding roof housing sub-assembly from the vehicle must be performed by multiple people.
·Be careful not to damage the sliding roof glass sub-assembly, body exterior or interior parts.
·To prevent the sliding roof glass sub-assembly from becoming misaligned, move the sliding roof glass sub-assembly to the fully closed position before removing.
Move the sliding roof glass sub-assembly to the fully closed position.
Using a T25 "TORX" socket wrench, remove the 6 "TORX" screws and sliding roof glass sub-assembly.
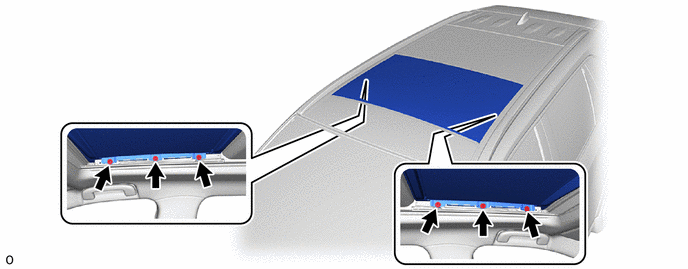
- NOTICE:
-
To prevent the sliding roof glass sub-assembly and sliding roof drive gear assembly from becoming misaligned, move the sliding roof glass sub-assembly to the fully closed position before removing it.
9.DISCONNECT CABLE FROM NEGATIVE AUXILIARY BATTERY TERMINAL
for A25A-FXS:
Click hereGeneral>MAINTENANCE>A25A-FXS AUXILIARY BATTERY>REMOVAL
for A25A-FKS:
for M20A-FKS:
Click hereGeneral>MAINTENANCE>M20A-FKS BATTERY>REMOVAL
- CAUTION:
-
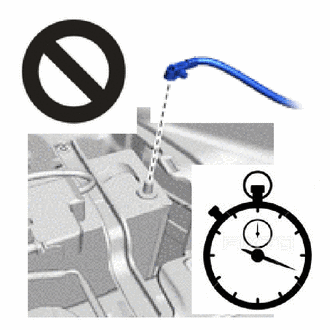
- ·
Wait at least 90 seconds after disconnecting the cable from the negative (-) auxiliary battery terminal to disable the SRS system.
·If the airbag deploys for any reason, it may cause a serious accident.
- NOTICE:
-
When disconnecting the cable, some systems need to be initialized after the cable is reconnected.
-
Click hereGeneral>INTRODUCTION>REPAIR INSTRUCTION>INITIALIZATION
10.REMOVE ROOF RACK ASSEMBLY LH
Click hereVehicle Exterior>EXTERIOR PANELS / TRIM>ROOF RACK>REMOVAL
- HINT:
-
Use the same procedure for the LH and RH sides.
62180A
11.REMOVE CURTAIN SHIELD AIRBAG ASSEMBLY LH
for Rollover Type:
Click hereVehicle Interior>SUPPLEMENTAL RESTRAINT SYSTEMS>CURTAIN SHIELD AIRBAG ASSEMBLY>REMOVAL
except Rollover Type:
Click hereVehicle Interior>SUPPLEMENTAL RESTRAINT SYSTEMS>CURTAIN SHIELD AIRBAG ASSEMBLY>REMOVAL
62170A
12.REMOVE CURTAIN SHIELD AIRBAG ASSEMBLY RH
- HINT:
-
Use the same procedure described for the LH side.
63218M
13.REMOVE SLIDING ROOF SIDE GARNISH LH
- HINT:
-
Perform the following procedures if replacing the sliding roof side garnish LH.
Apply protective tape around the sliding roof side garnish LH and body as shown in the illustration.
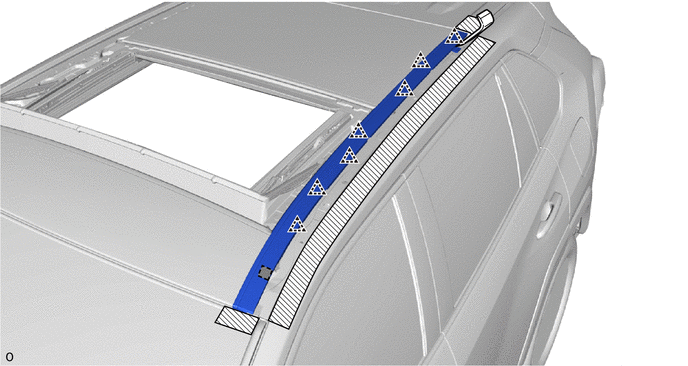

|
Protective Tape | 
|
Double-sided Tape |
Using a moulding remover D, detach the clip and double-sided tape to remove the sliding roof side garnish LH.
- NOTICE:
-
Be sure to replace the sliding roof side garnish LH with a new one.
63217K
14.REMOVE SLIDING ROOF SIDE GARNISH RH
- HINT:
-
Use the same procedure described for the LH side.
63242A
15.REMOVE FRONT SLIDING ROOF HOUSING MOUNTING BRACKET LH
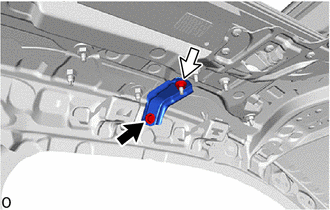

|
Bolt |

|
Nut |
Remove the bolt, nut and front sliding roof housing mounting bracket LH.
- NOTICE:
-
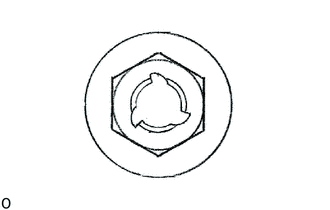
-
If the removed nut is the same shape as that shown in the illustration, replace it the supplied replacement part.
63241A
16.REMOVE FRONT SLIDING ROOF HOUSING MOUNTING BRACKET RH
- HINT:
-
Use the same procedure described for the LH side.
63244C
17.REMOVE CENTER SLIDING ROOF HOUSING MOUNTING BRACKET LH
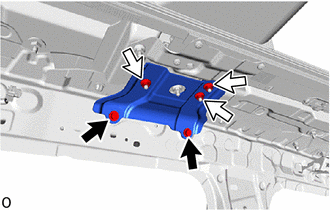
|
|
Bolt |
|
|
Nut |
Remove the 2 bolts, 3 nuts and center sliding roof housing mounting bracket LH.
- NOTICE:
-
-
If the removed nut is the same shape as that shown in the illustration, replace it the supplied replacement part.
63243C
18.REMOVE CENTER SLIDING ROOF HOUSING MOUNTING BRACKET RH
- HINT:
-
Use the same procedure described for the LH side.
63246D
19.REMOVE REAR SLIDING ROOF HOUSING MOUNTING BRACKET LH
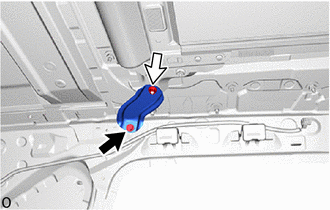
|
|
Bolt |
|
|
Nut |
Remove the bolt, nut and rear sliding roof housing mounting bracket LH.
- NOTICE:
-
-
If the removed nut is the same shape as that shown in the illustration, replace it the supplied replacement part.
63245D
20.REMOVE REAR SLIDING ROOF HOUSING MOUNTING BRACKET RH
- HINT:
-
Use the same procedure described for the LH side.
63203F
21.REMOVE SLIDING ROOF HOUSING SUB-ASSEMBLY
- NOTICE:
- ·
Carrying the sliding roof housing sub-assembly from the vehicle must be performed by multiple people.
·When separating the sliding roof housing sub-assembly, be careful not to damage the paint or interior and exterior ornaments.
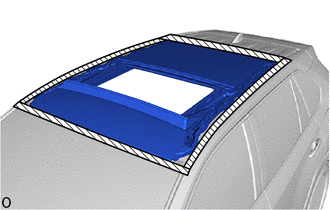
|
|
Protective Tape |
Apply protective tape to the area around the sliding roof housing sub-assembly on the vehicle body and windshield glass to prevent it from being scratched.
Remove the 18 nuts.
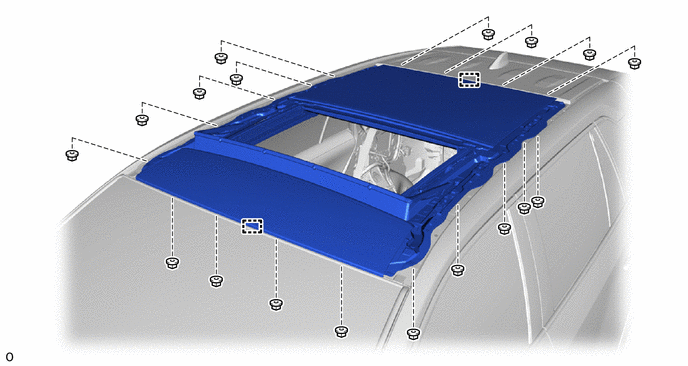
- NOTICE:
-
-
If the removed nut is the same shape as that shown in the illustration, replace it the supplied replacement part.
Detach the guide and remove the sliding roof housing sub-assembly.
22.REMOVE SLIDING ROOF WEATHER STRIP
- HINT:
-
Perform this procedure only when replacement of the sliding roof weatherstrip is necessary.
Remove the sliding roof weatherstrip from the sliding roof housing sub-assembly.
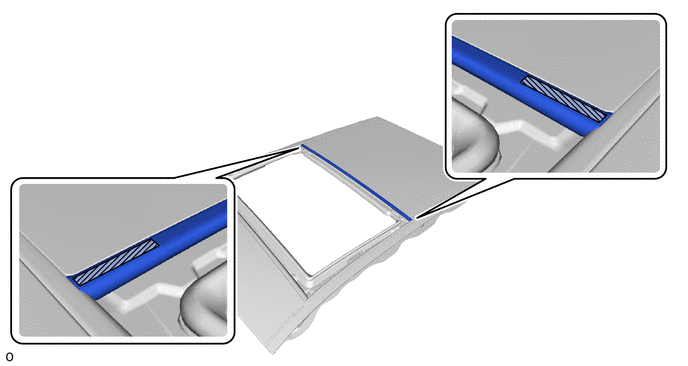
|
|
Double-sided Tape | - | - |