HYBRID / BATTERY CONTROL HV BATTERY(for NICKEL METAL HYDRIDE BATTERY) REMOVAL
CAUTION / NOTICE / HINT
The necessary procedures (adjustment, calibration, initialization, or registration) that must be performed after parts are removed and installed, or replaced during the HV battery removal/installation are shown below.
| Replaced Part or Performed Procedure | Necessary Procedures | Effect/Inoperative Function when Necessary Procedure not Performed | Link |
|---|---|---|---|
|
*: When performing learning using the GTS. Click here( |
|||
| Auxiliary battery terminal is disconnected/reconnected | Perform steering sensor zero point calibration | Lane control system | ( ) |
| Parking support brake system* | |||
| Pre-collision system | |||
| Memorize steering angle neutral point | Parking assist monitor system | ()
|
|
| Panoramic view monitor system | ()
|
||
| Reset back door close position | Power back door system | ()
|
|
| Power back door initialization | Power door lock control system | ()
|
|
| Replacement of HV battery | Battery status info update | HV battery status information cannot be updated | for 2WD:()
for 4WD/AWD:( )
|
| Replacement of hybrid battery terminal block | High voltage fuse accumulated load history reset | DTCs are stored | |
- CAUTION:
- ·
Orange wire harnesses and connectors indicate high-voltage circuits. To prevent electric shock, always follow the procedure described in the repair manual.
-
·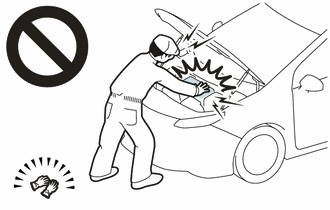
To prevent electric shock, wear insulated gloves when working on wire harnesses and components of the high voltage system.
- NOTICE:
- ·
After the power switch is turned off, the navigation system requires approximately a minute to record various types of memory and settings. As a result, after turning the power switch off, wait a minute or more before disconnecting the cable from the negative (-) auxiliary battery terminal.
·When the cable is disconnected from the negative (-) auxiliary battery terminal, some systems need to be initialized after the cable is reconnected.
Click hereGeneral>INTRODUCTION>REPAIR INSTRUCTION>INITIALIZATION
·If the HV battery has been struck or dropped, replace it.
·When connecting a connector to the HV battery, confirm that the connector is securely connected through the following:
- Push the connector until a click sound is heard.
- Visually check and confirm that the connector is securely connected by pulling on it.
·Make sure to insulate the high-voltage connectors and terminals of the HV battery with insulating tape after removing it.
If the HV battery is stored without insulating the connectors and terminals, electric shock or fire may result.
·When performing repairs around the HV battery, such as using a tap, do not allow metal shavings to enter the HV battery.
·Do not touch any high voltage wire harnesses, connectors or parts with bare hands.
·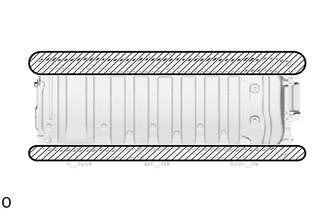
Hold the areas shown in the illustration and lift the HV battery.
·Do not allow foreign matter, such as grease or oil, to adhere to the bolts or nuts of the HV battery.
·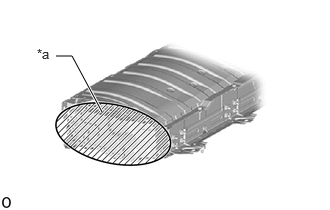 1.063,1.167 0.75,0.583 0.75,0.583 0.583,0.583 true 0.385,0.479 0.698,0.677 0.313,0.198 10 false *a
*a Opening
Do not put your hands into the openings of the HV battery.
·When removing/installing/moving the HV battery, make sure not to tilt it more than 80°.
·Do not climb on top of or stand on the HV battery.
·Do not allow any foreign matter or water to enter the HV battery.
·If any bolts, nuts or clips are dropped into the HV battery, make sure to remove them.
- HINT:
-
When disposing of an HV battery, make sure to return it through an authorized collection agent who is capable of handling it safely. If the HV battery is returned via the manufacturer specified route, it will be returned properly and in a safe manner by an authorized collection agent.
PROCEDURE

 1. PRECAUTION
- NOTICE:
-
After turning the power switch off, waiting time may be required before disconnecting the cable from the negative (-) auxiliary battery terminal. Therefore, make sure to read the disconnecting the cable from the negative (-) auxiliary battery terminal notices before proceeding with work.
G3834
2.REMOVE SERVICE PLUG GRIP
82111
3.DISCONNECT ENGINE ROOM MAIN WIRE
4.REMOVE CONNECTOR COVER ASSEMBLY
5.CHECK TERMINAL VOLTAGE
6.INSTALL CONNECTOR COVER ASSEMBLY
- CAUTION:
-
Be sure to wear insulated gloves.
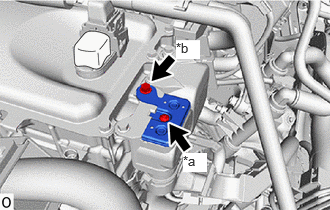
| *a | Bolt (A) |
| *b | Bolt (B) |
Using a T25 "TORX" socket wrench, install the connector cover assembly to the inverter with converter assembly with the bolt (A).
- Torque:
- 4.5 N*m (46 kgf*cm, 40 in.*lbf)
- NOTICE:
-
Do not touch the waterproof seal of the connector cover assembly.
Install the bolt (B).
- Torque:
- 8.0 N*m (82 kgf*cm, 71 in.*lbf)
82111
7.CONNECT ENGINE ROOM MAIN WIRE
G9230
8.REMOVE BATTERY COOLING BLOWER ASSEMBLY
G92N4A
9.REMOVE NO. 1 HV BATTERY COVER PANEL RH
- CAUTION:
-
Be sure to wear insulated gloves.
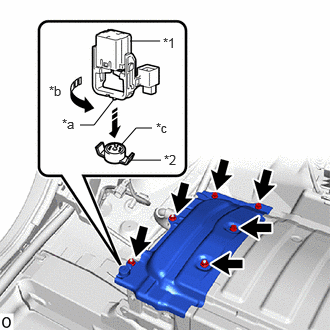
| *1 | Service Plug Grip |
| *2 | Battery Cover Lock Striker |
| *a | Projection |
| *b | Turn |
| *c | Button |
Using the service plug grip, remove the battery cover lock striker.
- HINT:
-
Insert the projection of the service plug grip and turn the button of the battery cover lock striker counterclockwise to release the lock.
Remove the 3 bolts, 3 nuts and No. 1 HV battery cover panel RH from the HV battery.
821H1
10.DISCONNECT FLOOR UNDER WIRE
- CAUTION:
-
Be sure to wear insulated gloves.
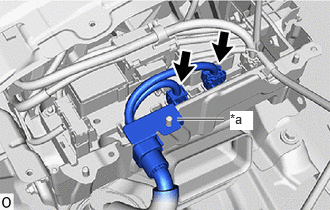
| *a | Shield Ground |
Disconnect the 2 HV battery junction block assembly connectors.
- NOTICE:
-
Insulate each disconnected high-voltage connector with insulating tape. Wrap the connector from the wire harness side to the end of the connector.
Disconnect the shield ground from the HV battery.
82161
11.DISCONNECT FLOOR WIRE
- CAUTION:
-
Be sure to wear insulated gloves.
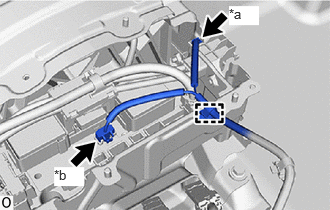
| *a | Electric Vehicle Battery Plug Assembly Connector |
| *b | HV Battery Junction Block Assembly Connector |
Disengage the clamp.
Disconnect the electric vehicle battery plug assembly connector.
Disconnect the HV battery junction block assembly connector.
899A0
12.REMOVE NO. 1 INDOOR ELECTRICAL KEY ANTENNA ASSEMBLY
82161
13.DISCONNECT FLOOR WIRE
- CAUTION:
-
Be sure to wear insulated gloves.
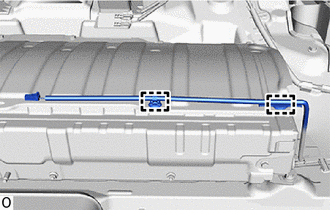
Disengage the 2 clamps to disconnect the floor wire.
G92F1
14.REMOVE NO. 1 HYBRID BATTERY EXHAUST DUCT
- CAUTION:
-
Be sure to wear insulated gloves.
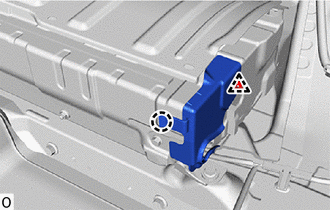
Remove the clip.
Disengage the claw to remove the No. 1 hybrid battery exhaust duct from the HV battery.
82161
15.DISCONNECT FLOOR WIRE
- CAUTION:
-
Be sure to wear insulated gloves.
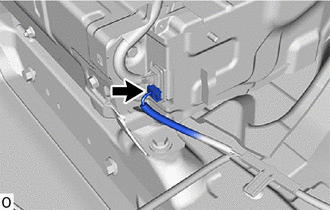
Disconnect the battery voltage sensor connector.
G9510
16.REMOVE HV BATTERY
- CAUTION:
-
Be sure to wear insulated gloves.
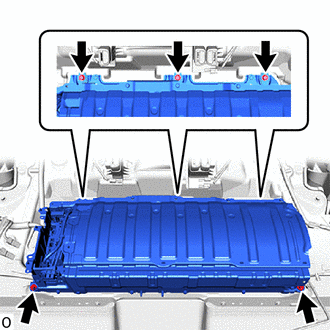
Remove the 5 bolts and HV battery from the vehicle body.
- NOTICE:
- ·
Do not allow foreign matter, such as grease or oil, to adhere to the bolts of the HV battery.
·To prevent the wire harness from being caught, make sure to bundle the wire harness using insulating tape or equivalent.
·Use cardboard or another similar material to protect the HV battery and vehicle body from damage.
·Since the HV battery is very heavy, 2 people are needed to remove it. When removing the HV battery, be careful not to damage the parts around it.
·When removing the HV battery from the vehicle, do not allow it to contact the vehicle.
·When removing/installing/moving the HV battery, make sure not to tilt it more than 80°.
·Insulate the disconnected terminals or connectors with insulating tape.
·If the HV battery has been struck or dropped, replace it.
G92M8
17.REMOVE UPPER NO. 2 HV BATTERY CARRIER BRACKET
- CAUTION:
-
Be sure to wear insulated gloves.
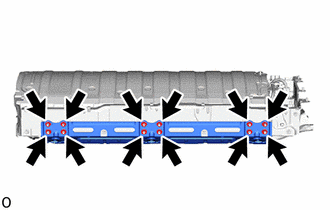
Remove the 12 nuts and upper No. 2 HV battery carrier bracket from the HV battery.
G920NB
18.REMOVE UPPER HV BATTERY COVER SUB-ASSEMBLY
G92Q1
19.REMOVE NO. 1 HV BATTERY SHIELD PANEL
89892A
20.REMOVE BATTERY VOLTAGE SENSOR
G92Z2
21.REMOVE HYBRID BATTERY TERMINAL BLOCK
G92Z0
22.REMOVE HV BATTERY JUNCTION BLOCK ASSEMBLY
G920R
23.REMOVE NO. 2 HYBRID BATTERY SHIELD SUB-ASSEMBLY
G92E1
24.REMOVE NO. 1 HV BATTERY INTAKE DUCT LH