SEAT FRONT SEAT ASSEMBLY(for Power Seat) REASSEMBLY
CAUTION / NOTICE / HINT
- NOTICE:
-
Wear protective gloves. Sharp areas on the parts may injure your hands.
- HINT:
- ·
Use the same procedure for the LH side and RH side.
·The procedure listed below is for the LH side.
PROCEDURE

 1.INSTALL FRONT POWER SEAT MOTOR ASSEMBLY (for Driver Side)
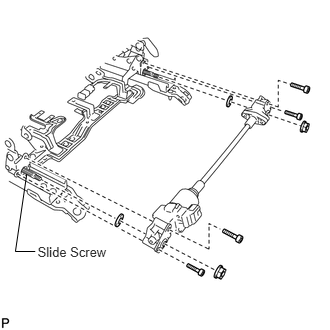
Install the front power seat motor assembly (slide motor) to the slide screws.
- NOTICE:
- ·
Make sure that the slide rail is locked in the rearmost position.
·If the serrations on the slide screw and front power seat motor assembly with slide cable do not align, grip the slide screw with needlenose pliers and install the front power seat motor assembly with slide cable while slightly moving the slide screw. In these cases, do not turn the slide screw 90° or more.
·Do not apply excessive force to the slide cable (do not bend the slide cable 60° or more).
Clean the slide screws with non-residue solvent and apply adhesive to their threads.
- Adhesive:
Toyota Genuine Adhesive 1324, Three Bond 1324 or equivalent
Using a 4 mm socket hexagon wrench, install the new 2 bolts.
- Torque:
- 5.0 N*m (51 kgf*cm, 44 in.*lbf)
Using a 4 mm socket hexagon wrench, install the 2 bolts.
- Torque:
- 5.0 N*m (51 kgf*cm, 44 in.*lbf)
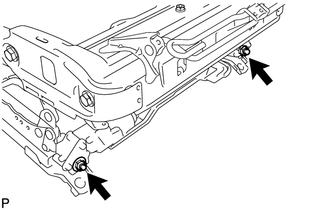
Install the new 2 nuts.
- Torque:
- 3.4 N*m (35 kgf*cm, 30 in.*lbf)
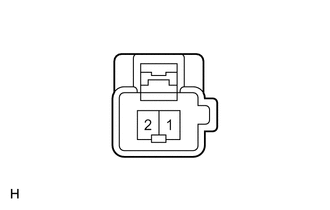
Connect the positive (+) battery terminal to terminal 1 of the power seat motor and the negative (-) battery terminal to terminal 2 and slide the seat and align the matchmarks.
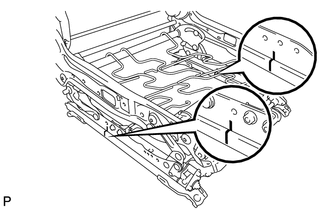
Check that the matchmarks are aligned on both sides.
If the matchmarks are not aligned, check the installation condition of the power seat motor assembly, and remove and reinstall the power seat motor assembly if necessary.
2.INSTALL FRONT POWER SEAT MOTOR ASSEMBLY (for Front Passenger Side)
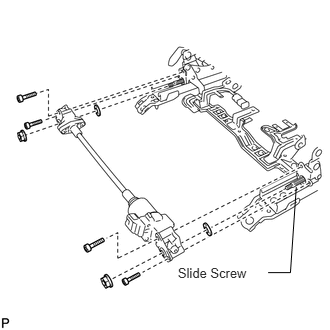
Install the front power seat motor assembly (slide motor) to the slide screws.
- NOTICE:
- ·
Make sure that the slide rail is locked in the rearmost position.
·If the serrations on the slide screw and front power seat motor assembly with slide cable do not align, grip the slide screw with needlenose pliers and install the front power seat motor assembly with slide cable while slightly moving the slide screw. In these cases, do not turn the slide screw 90° or more.
·Do not apply excessive force to the slide cable (do not bend the slide cable 60° or more).
Clean the slide screws with non-residue solvent and apply adhesive to their threads.
- Adhesive:
Toyota Genuine Adhesive 1324, Three Bond 1324 or equivalent
Using a 4 mm socket hexagon wrench, install the new 2 bolts.
- Torque:
- 5.0 N*m (51 kgf*cm, 44 in.*lbf)
Using a 4 mm socket hexagon wrench, install the 2 bolts.
- Torque:
- 5.0 N*m (51 kgf*cm, 44 in.*lbf)
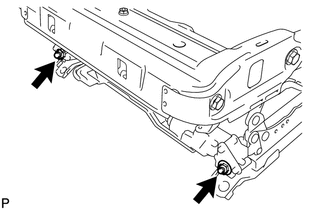
Install the new 2 nuts.
- Torque:
- 3.4 N*m (35 kgf*cm, 30 in.*lbf)
Connect the positive (+) battery terminal to terminal 2 of the power seat motor and the negative (-) battery terminal to terminal 1, and then slide the seat and align the matchmarks.
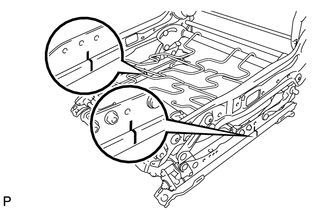
Check that the matchmarks are aligned on both sides.
If the matchmarks are not aligned, check the installation condition of the power seat motor assembly, and remove and reinstall the power seat motor assembly if necessary.
82192
3.INSTALL FRONT SEAT WIRE LH (for Driver Side)
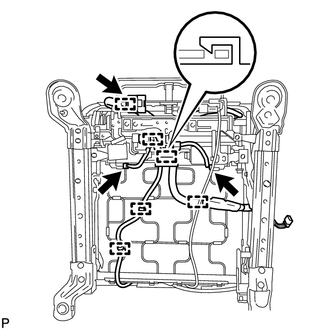
Connect the 3 connectors and attach the 6 wire harness clamps.
82191
4.INSTALL FRONT SEAT WIRE RH (for Front Passenger Side)
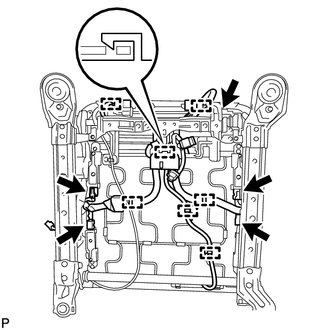
Connect the 5 connectors and attach the 7 wire harness clamps.
87501B
5.INSTALL SEAT HEATER CONTROL SUB-ASSEMBLY LH (w/ Seat Heater System)
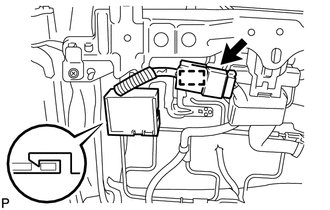
Attach the claw to install the seat heater control.
Attach the wire harness clamp and connect the connector.
85860
6.INSTALL SEAT CUSHION CLIMATE CONTROL BLOWER ASSEMBLY (w/ Climate Control Seat System)
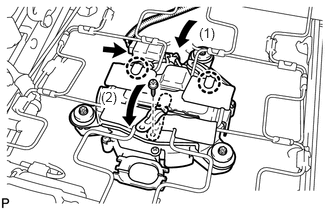
Attach the 2 claws and install the seat cushion climate control blower by pushing it forward.
Bend the bracket closed.
Using a T30 "TORX" socket, install the "TORX" screw.
- Torque:
- 2.6 N*m (27 kgf*cm, 23 in.*lbf)
Connect the connector.
85866A
7.INSTALL SEAT CUSHION CLIMATE CONTROL DUCT LH (w/ Climate Control Seat System)
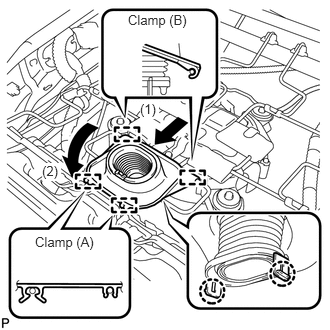
Attach the 2 claws to install the seat cushion climate control duct.
Attach the 2 clamps (B).
Attach the 2 clamps (A).
85869A
8.INSTALL SEATBACK CLIMATE CONTROL COVER LH NO. 2 (w/ Climate Control Seat System)
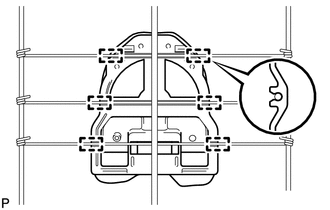
Attach the 6 clamps and install the seatback climate control cover LH No. 2.
85867A
9.INSTALL SEATBACK CLIMATE CONTROL BLOWER LH (w/ Climate Control Seat System)
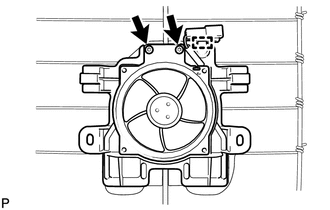
Install the seatback climate control cover LH No. 3.
Using a T30 "TORX" socket, install the seatback climate control blower with the 2 "TORX" screws.
Attach the connector.
85869A
10.INSTALL SEATBACK CLIMATE CONTROL COVER LH NO. 1 (w/ Climate Control Seat System)
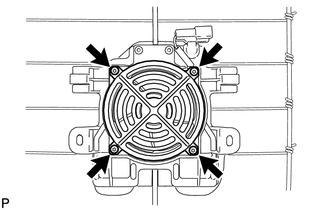
Using a T30 "TORX" socket, install the seatback climate control cover LH No. 1 with the 4 "TORX" screws.
72760D
11.INSTALL LUMBAR SUPPORT ADJUSTER ASSEMBLY LH (w/ Climate Control Seat System)
72760D
12.INSTALL LUMBAR SUPPORT ADJUSTER ASSEMBLY LH (w/o Climate Control Seat System)
71806C
13.INSTALL FRONT SEAT CUSHION SHIELD SUB-ASSEMBLY LH NO. 2
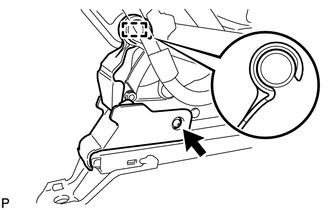
Attach the hook to install the cushion shield.
Install the screw.
71806B
14.INSTALL FRONT SEAT CUSHION SHIELD SUB-ASSEMBLY LH NO. 1
- HINT:
-
Use the same procedure for the LH side and RH side.
71813B
15.INSTALL FRONT SEATBACK SHIELD LH
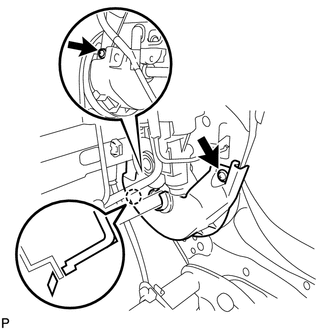
Attach the claw to install the seatback shield.
Install the 2 screws.
71814B
16.INSTALL FRONT SEATBACK SHIELD RH
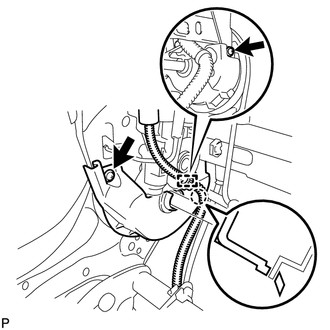
Attach the claw to install the seatback shield.
Install the 2 screws.
Attach the wire harness clamp.
71876
17.INSTALL RECLINING ADJUSTER INSIDE COVER LH
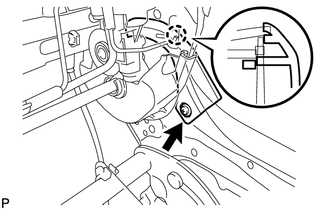
Attach the claw to install the reclining adjuster inside cover.
Install the screw.
71876A
18.INSTALL RECLINING ADJUSTER INSIDE COVER RH
- HINT:
-
Use the same procedure for the LH side and RH side.
87510N
19.INSTALL FRONT SEATBACK HEATER ASSEMBLY LH (w/ Seat Heater System)
71074S
20.INSTALL SEPARATE TYPE FRONT SEATBACK COVER
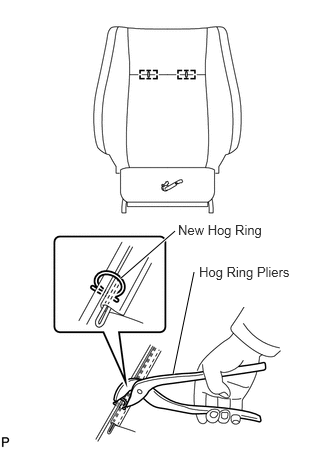
Using hog ring pliers, install the seatback cover to the seatback pad with 2 new hog rings.
- NOTICE:
- ·
Be careful not to damage the cover.
·When installing the hog rings, avoid wrinkling the cover.
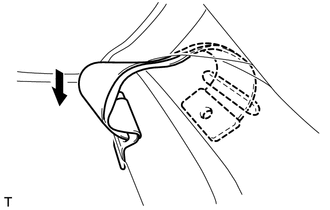
Connect the seatback cover bracket to the seatback pad.
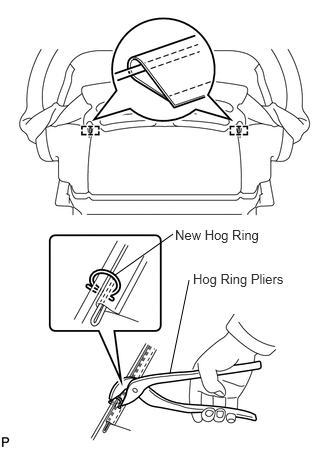
Install the seatback cover wires.
Using hog ring pliers, install 2 new hog rings to the seatback pad.
21.INSTALL SEATBACK COVER WITH PAD
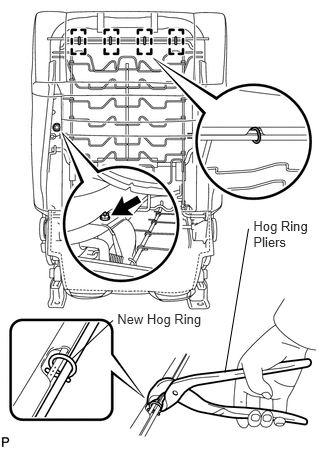
Install the seatback cover with pad to the seatback frame.
Lift the seatback cover and, using hog ring pliers, install 4 new hog rings to the seat frame.
Lift the seatback cover, attach the seatback cover bracket to the seat frame, and install the nut.
- Torque:
- 5.5 N*m (56 kgf*cm, 49 in.*lbf)
- CAUTION:
-
After the seatback trim cover is assembled, make sure that the side airbag strap is not twisted.
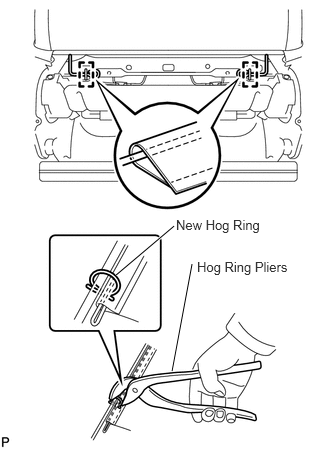
Install the seatback cover wires.
Using hog ring pliers, install 2 new hog rings to the seat frame.
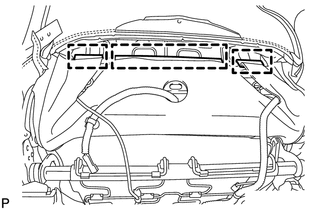
Attach the 3 hooks.
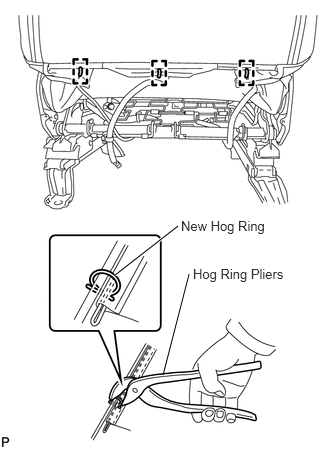
Using hog ring pliers, install 3 new hog rings to the seat frame.
71931A
22.INSTALL FRONT SEAT HEADREST SUPPORT
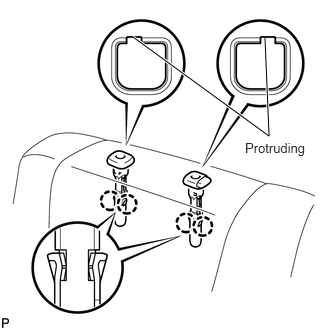
Align the protruding portion of the front seat headrest supports with the installation grooves of the front seatback frame.
Attach the 4 claws to install the 2 headrest supports.
87510L
23.INSTALL FRONT SEAT CUSHION HEATER ASSEMBLY LH (w/ Seat Heater System)
71072S
24.INSTALL SEPARATE TYPE FRONT SEAT CUSHION COVER (w/ Leg Support Adjustment Switch)
Using hog ring pliers, install the seat cushion cover to the seat cushion pad with 15 new hog rings.
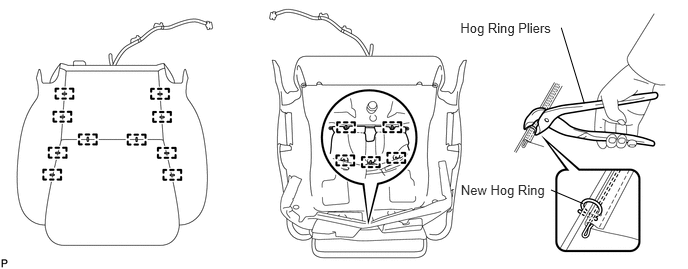
- NOTICE:
- ·
Be careful not to damage the cover.
·When installing the hog rings, avoid wrinkling the cover.
71072S
25.INSTALL SEPARATE TYPE FRONT SEAT CUSHION COVER (w/o Leg Support Adjustment Switch)
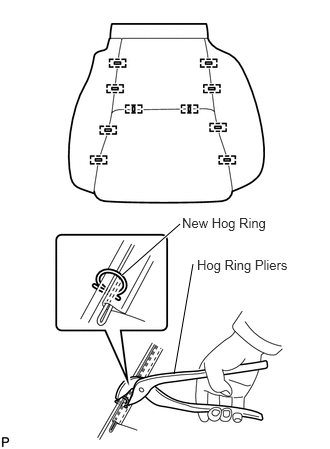
Using hog ring pliers, install the seat cushion cover to the seat cushion pad with 10 new hog rings.
- NOTICE:
- ·
Be careful not to damage the cover.
·When installing the hog rings, avoid wrinkling the cover.
26.INSTALL SEAT CUSHION COVER WITH PAD (w/ Leg Support Adjustment Switch)
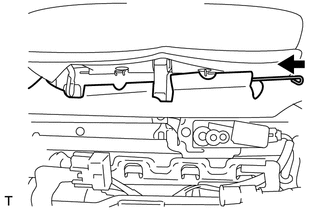
Install the seat cushion cover with pad to the seat frame.
Install the seat cushion cover wire.
Using hog ring pliers, install 4 new hog rings and attach the hooks.
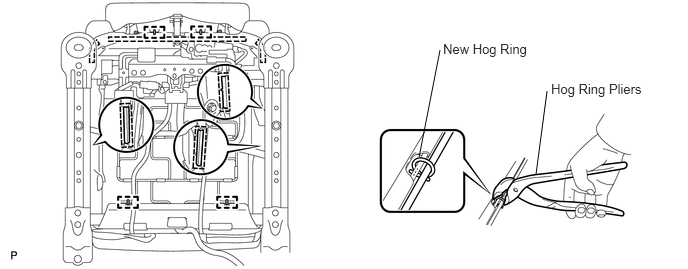
- HINT:
-
When installing the leg support hog rings, press the seat cushion cover with pad against the seat frame.
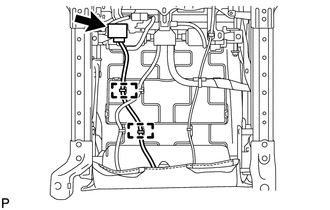
Connect the connector and attach the 2 wire harness clamps.
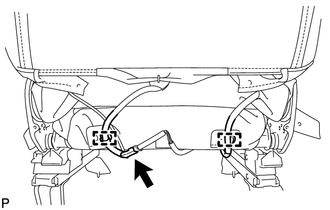
Connect the connector and attach the 2 wire harness clamps.
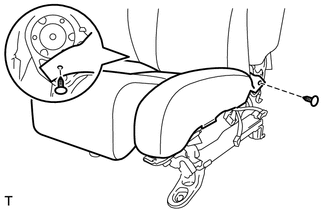
Install the 2 clips.
27.INSTALL SEAT CUSHION COVER WITH PAD (w/o Leg Support Adjustment Switch)
Attach the hooks to install the seat cushion cover with pad.
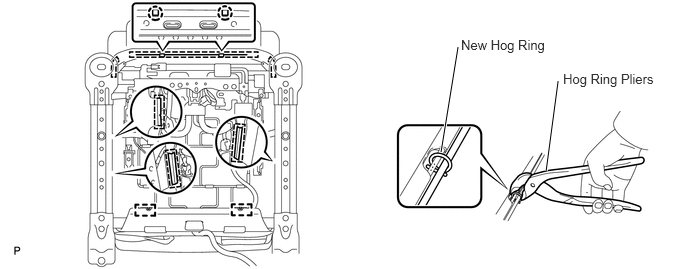
Using hog ring pliers, install 2 new hog rings.
Bend the 2 seat frame claws downward.
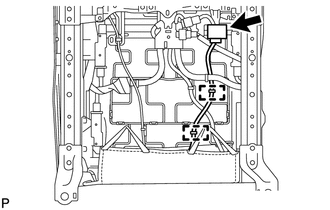
Connect the connector and attach the 2 wire harness clamps.
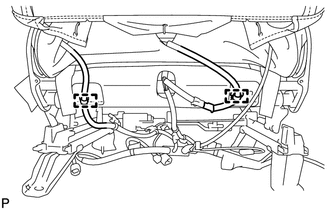
Connect the connector and attach the 2 wire harness clamps.
Install the 2 clips.
84922C
28.INSTALL FRONT POWER SEAT SWITCH LH
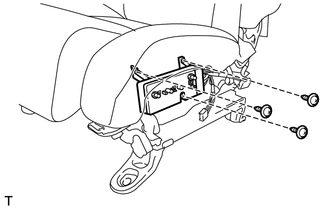
Install the switch with the 3 screws.
Connect the connectors.
71862
29.INSTALL FRONT SEAT CUSHION SHIELD INNER LH
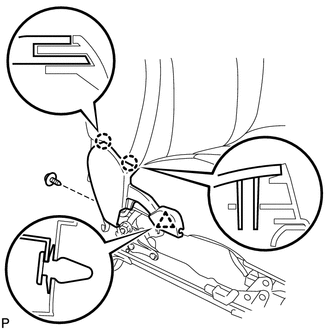
Attach the 2 claws and clip to install the cushion shield.
Install the screw.
73240
30.INSTALL FRONT SEAT INNER BELT ASSEMBLY LH
84920
31.INSTALL LEG SUPPORT ADJUSTMENT SWITCH (w/ Leg Support Adjustment Switch)
84922A
32.INSTALL FRONT POWER SEAT LUMBAR SWITCH
71812D
33.INSTALL FRONT SEAT CUSHION SHIELD LH
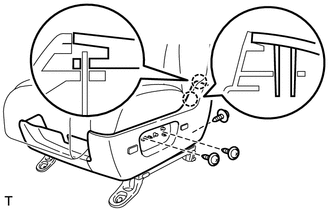
Connect the switch connectors.
Attach the 2 claws to install the cushion shield.
Install the 3 screws.
Install the 2 screws.
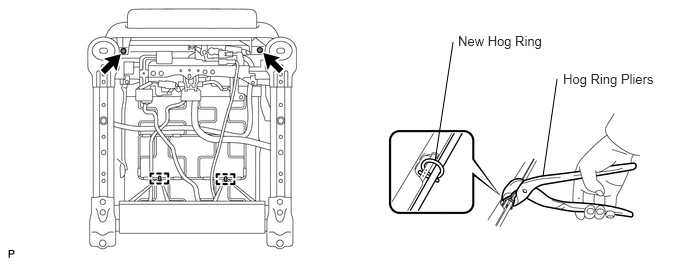
Using hog ring pliers, install the rubber band of the seatback cover to the seat frame with 2 new hog rings.
84921A
34.INSTALL RECLINING POWER SEAT SWITCH KNOB
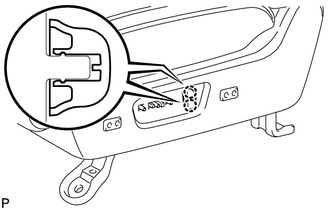
Attach the 2 claws to install the knob.
84921B
35.INSTALL SLIDE AND VERTICAL POWER SEAT SWITCH KNOB
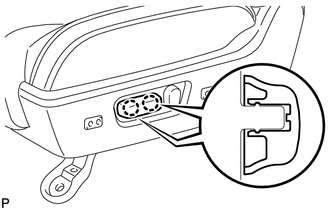
Attach the 2 claws to install the knob.
89178A
36.INSTALL SEAT POSITION AIRBAG SENSOR (for Driver Side)
89952
37.INSTALL OCCUPANT CLASSIFICATION ECU (for Front Passenger Side)