SEAT BELT FRONT SEAT OUTER BELT ASSEMBLY REMOVAL
CAUTION / NOTICE / HINT
- CAUTION:
- ·
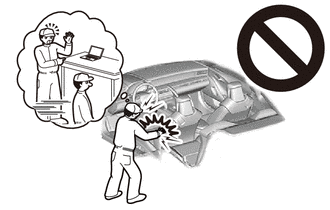
·Pyrotechnic components.
Danger! Life-threatening injuries!
-All work on pyrotechnic parts may be carried out by technically experienced and appropriately trained personnel only.
-Replace any damaged part or ones that have been dropped.
-For additional information see:
Click hereVehicle Interior>SUPPLEMENTAL RESTRAINT SYSTEMS>AIRBAG SYSTEM>PRECAUTION
- NOTICE:
- ·
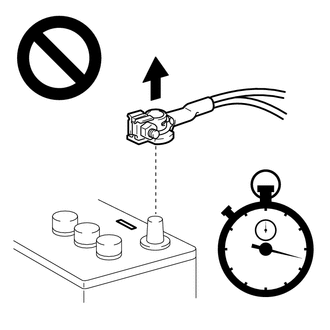
Before performing work on electronic components, disconnect the cable from the negative (-) battery terminal to prevent damage to the electrical system or components.
·When disconnecting the cable, turn the START-STOP button (engine switch) and headlight switch off and loosen the cable nut completely. Perform these operations without twisting or prying on the cable. Then disconnect the cable.
·Clock settings, radio settings, audio system memory, DTCs and other data will be cleared when the cable is disconnected from the negative (-) battery terminal. Write down any necessary data before disconnecting the cable.
- HINT:
- ·
Use the same procedure for RHD and LHD vehicles.
·The procedure listed below is for LHD vehicles.
·Use the same procedure for the driver side and front passenger side.
·The procedure listed below is for the driver side.
PROCEDURE

 1.DISCONNECT CABLE FROM NEGATIVE BATTERY TERMINAL
for B48:
Click hereGeneral>MAINTENANCE>B48 BATTERY>REMOVAL
for B58:
Click hereGeneral>MAINTENANCE>B58 BATTERY>REMOVAL
- CAUTION:
-
- ·
Wait at least 60 seconds after disconnecting the cable from the negative (-) battery terminal to disable the SRS system.
·If the airbag deploys for any reason, it may cause a serious accident.
62480A
2.REMOVE ROOF SIDE INNER GARNISH ASSEMBLY LH
62470A
3.REMOVE ROOF SIDE INNER GARNISH ASSEMBLY RH
- HINT:
-
Use the same procedure as for the LH side.
64288D
4.SEPARATE TRANSVERSE PIPE TRIM
73220
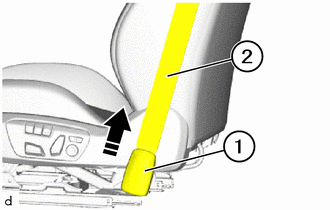
5.DISCONNECT FRONT SEAT OUTER BELT ASSEMBLY

|
Slide in this Direction |
Slide the cover (1) on the front seat outer belt assembly (2) in the upward direction.
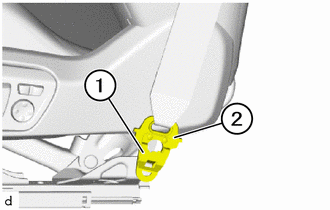
Turn the end fitting (2) to the rear.
Carefully pull the lock plate (1) outward to feed out the end fitting (2) to the front.
Remove the end fitting (2) outward.
62609
6.REMOVE SEAT BELT HOLE COVER SUB-ASSEMBLY LH
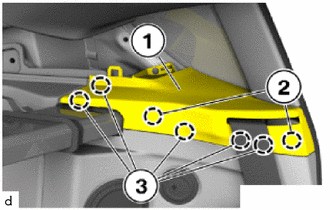
Detach the clips (2) and the claws (3) to remove the seat belt hole cover sub-assembly LH (1).
Slide the seat belt hole cover sub-assembly LH (1) out under the front door opening trim weatherstrip to remove it.
Slide the front seat outer belt assembly out through the slot of the seat belt hole cover sub-assembly LH (1).
62608
7.REMOVE SEAT BELT HOLE COVER SUB-ASSEMBLY RH
- HINT:
-
Use the same procedure as for the LH side.
64277L
8.REMOVE TRANSVERSE PIPE
62420A
9.REMOVE CENTER PILLAR GARNISH ASSEMBLY
|
|
Remove in this Direction (1) |

|
Remove in this Direction (2) |
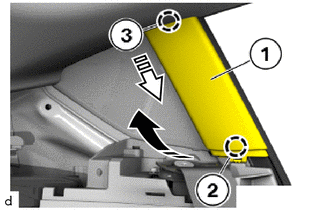
Detach the clamp (2).
Thread out the center pillar garnish assembly (1) under the front door opening trim weatherstrip.
Detach the guide (3) to remove the center pillar garnish assembly (1).
62636A
10.REMOVE QUARTER TRIM UPPER PANEL
|
|
Remove in this Direction (1) |
|
|
Remove in this Direction (2) |
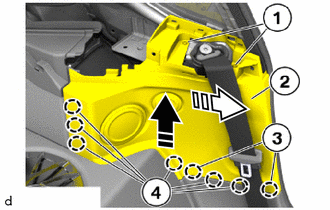
Loosen the T20 screws (1).
Thread out the quarter trim upper panel (2) under the front door opening trim weatherstrip.
Detach the claws (3) and guides (4) to remove the quarter trim upper panel (2) as shown in the illustration.
Take off the quarter trim upper panel (2) from the front seat outer belt assembly to remove.
81330
11.REMOVE NO. 1 LUGGAGE COMPARTMENT LIGHT ASSEMBLY (w/ Front Center Speaker)
81604
12.REMOVE TRIANGLE REFLECTOR SET (w/ Front Center Speaker)
64716D
13.REMOVE DECK TRIM REAR COVER (w/ Front Center Speaker)
66311
14.REMOVE ROPE HOOK (w/ Front Center Speaker)
w/ Courtesy Light:
Click hereAudio / Visual / Telematics>AUDIO / VIDEO>LUGGAGE SPEAKER>REMOVAL
64740B
15.REMOVE DECK TRIM SIDE BOARD AND DECK SIDE TRIM COVER LH (w/ Front Center Speaker)
86160Z
16.REMOVE REAR NO. 3 SPEAKER ASSEMBLY (w/ Front Center Speaker)
for 12 Speakers:
Click hereAudio / Visual / Telematics>AUDIO / VIDEO>QUARTER TRIM SPEAKER>REMOVAL
86160Y
17.REMOVE REAR NO. 2 SPEAKER ASSEMBLY (w/ Front Center Speaker)
for 10 Speakers:
- HINT:
-
Use the same procedure as for the rear No. 3 speaker assembly.
73220
18.REMOVE FRONT SEAT OUTER BELT ASSEMBLY
- CAUTION:
- ·
Pyrotechnic components.
Danger! Life-threatening injuries!
-All work on pyrotechnic parts may be carried out by technically experienced and appropriately trained personnel only.
-Replace any damaged part or ones that have been dropped.
-For additional information see:
Click hereVehicle Interior>SUPPLEMENTAL RESTRAINT SYSTEMS>AIRBAG SYSTEM>PRECAUTION
- NOTICE:
- ·
Electrostatic discharge.
Damage to or destruction of electrical components.
-Only touch the housings of electrical components. Do not touch pins or multi-pin connectors directly.
-For additional information see:
Click hereGeneral>INTRODUCTION>REPAIR INSTRUCTION>PRECAUTION
for Type A:
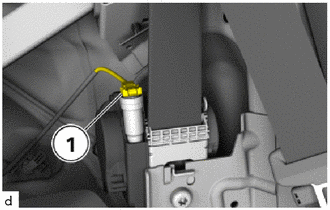
Disconnect the connector (1).
for Type B:
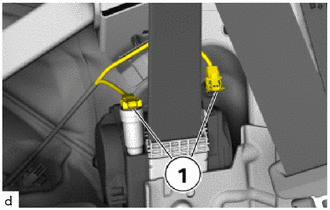
Disconnect the connectors (1).
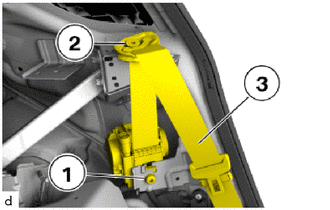
Loosen the T50 bolt (1) and bolt (2).
Remove the front seat outer belt assembly (3).
64034D
19.REMOVE REAR SPEAKER GRILLE SUB-ASSEMBLY
- HINT:
-
Perform this procedure only when replacement of the rear speaker grille sub-assembly is necessary.
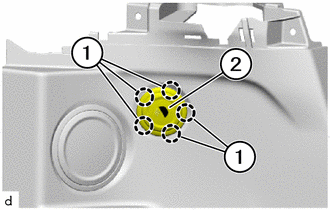
Detach the claws (1) to remove the rear speaker grille sub-assembly (2).
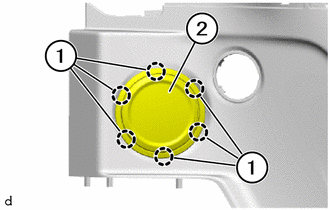
Detach the claws (1) to remove the rear speaker grille sub-assembly (2).