INTERIOR PANELS / TRIM ROOF HEADLINING REMOVAL
CAUTION / NOTICE / HINT
- CAUTION:
- ·
Working on 12 V vehicle electrical system.
Risk of short circuits! Risk of fire!
-Detach the cable from the negative (-) battery terminal.
- ·
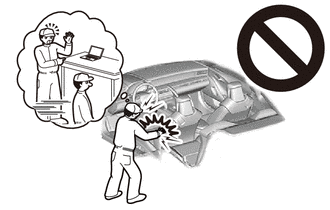
Pyrotechnic components.
Danger! Life-threatening injuries!
-All work on pyrotechnic parts may be carried out by technically experienced and appropriately trained personnel only.
-Some of these service operations affect the SRS airbag system. Read the precautionary notices concerning the SRS airbag system before servicing.
-Replace any damaged part or ones that have been dropped.
-For additional information see:
Click hereVehicle Interior>SUPPLEMENTAL RESTRAINT SYSTEMS>AIRBAG SYSTEM>PRECAUTION
- NOTICE:
- ·
Before performing work on electronic components, disconnect the cable from the negative (-) battery terminal to prevent damage to the electrical system or components.
·When disconnecting the cable, turn the START-STOP button (engine switch) and headlight switch off and loosen the cable nut completely. Perform these operations without twisting or prying on the cable. Then disconnect the cable.
·Clock settings, radio settings, audio system memory, DTCs and other data will be cleared when the cable is disconnected from the negative (-) battery terminal. Write down any necessary data before disconnecting the cable.
- HINT:
- ·
Use the same procedure for LHD and RHD vehicles.
·The following procedure is for LHD vehicles.
PROCEDURE

 64330D
1.REMOVE PACKAGE TRAY TRIM PANEL ASSEMBLY
for Manual Seat:
Operate the front seat adjuster assembly to move the front seat assembly RH to the foremost position.
for Power Seat:
Operate the power seat switch assembly to move the front seat assembly RH to the foremost position.
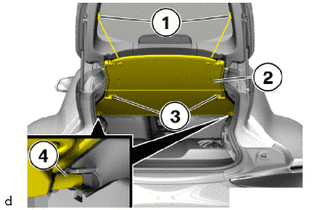
Detach the retaining straps (1).
Detach the rear mountings (3) to the top.
Detach the front guides (4) to the rear.
Fold the package tray trim panel assembly (2) together and remove.
- HINT:
-
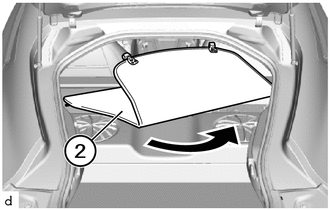 0,0 0,0 false

Turn in this Direction
-
Turn the package tray trim panel assembly (2) approximately 45° counterclockwise and remove it from the tailgate.
62480A
2.REMOVE ROOF SIDE INNER GARNISH ASSEMBLY LH
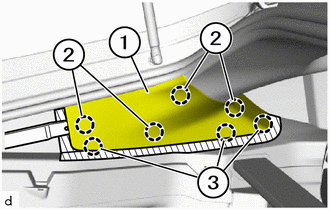

|
Protective Tape |
Apply protective tape as shown in the illustration.
Using a molding remover B, detach the clips (2) and guides (3).
Slide the roof side inner garnish assembly LH (1) out under the sealing lip of the back door weatherstrip and remove.
62470A
3.REMOVE ROOF SIDE INNER GARNISH ASSEMBLY RH
- HINT:
-
Use the same procedure as for the LH side.
4.REMOVE FRONT SEAT ASSEMBLY LH (for Manual Seat)
5.REMOVE FRONT SEAT ASSEMBLY RH (for Manual Seat)
- HINT:
-
Use the same procedure as for the LH side.
6.REMOVE FRONT SEAT ASSEMBLY LH (for Power Seat)
7.REMOVE FRONT SEAT ASSEMBLY RH (for Power Seat)
- HINT:
-
Use the same procedure as for the LH side.
58801D
8.REMOVE CONSOLE BOX ASSEMBLY
64288D
9.SEPARATE TRANSVERSE PIPE TRIM
- HINT:
-
Use the same procedures for the opposite side.
62609
10.REMOVE SEAT BELT HOLE COVER SUB-ASSEMBLY LH
62608
11.REMOVE SEAT BELT HOLE COVER SUB-ASSEMBLY RH
- HINT:
-
Use the same procedure as for the LH side.
64277L
12.REMOVE TRANSVERSE PIPE
62420A
13.REMOVE CENTER PILLAR GARNISH ASSEMBLY LH
62410A
14.REMOVE CENTER PILLAR GARNISH ASSEMBLY RH
- HINT:
-
Use the same procedure as for the LH side.
62636A
15.REMOVE QUARTER TRIM UPPER PANEL LH
62635A
16.REMOVE QUARTER TRIM UPPER PANEL RH
- HINT:
-
Use the same procedure as for the LH side.
74320
17.REMOVE VISOR ASSEMBLY LH
74310
18.REMOVE VISOR ASSEMBLY RH
- HINT:
-
Use the same procedure as for the LH side.
74348
19.REMOVE VISOR HOLDER
- HINT:
-
Use the same procedures for the opposite side.
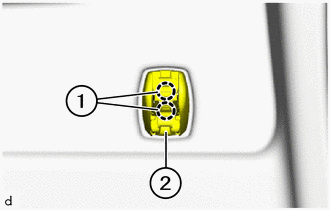
Push the clamps (1) together and pull the visor holder (2) out of the roof headlining assembly.
63605B
20.REMOVE ROOF CONSOLE BOX SUB-ASSEMBLY
86255
21.REMOVE MICROPHONE CASE
- HINT:
-
Use the same procedures for the opposite side.
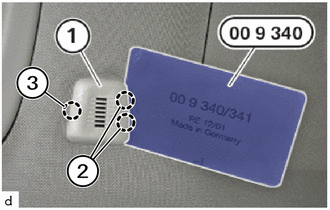
Using a special tool 0 493 687 (00 9 340), detach the claws (2) and guide (3) to remove the microphone case (1).
- SST
- 09800-WA180
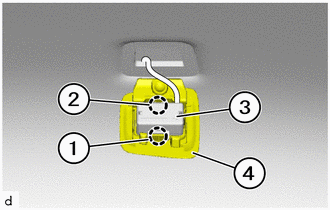
w/ Microphone:
Detach the claw (1) and guide (2) to remove the microphone case (4) from telephone microphone assembly (3).
81340
22.REMOVE VANITY LIGHT ASSEMBLY
- HINT:
-
Use the same procedures for the opposite side.
-
Click hereVehicle Interior>LIGHTING (INT)>VANITY LIGHT>REMOVAL
87834
23.REMOVE INNER REAR VIEW MIRROR STAY HOLDER COVER
62212
24.REMOVE FRONT PILLAR GARNISH LH
62211
25.REMOVE FRONT PILLAR GARNISH RH
- HINT:
-
Use the same procedure as for the LH side.
63310
26.REMOVE ROOF HEADLINING ASSEMBLY
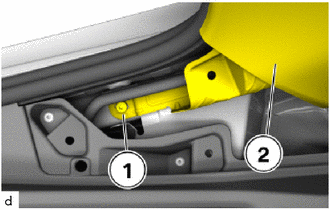
Loosen T30 screw (1) on the roof headlining assembly (2).
- HINT:
-
Use the same procedures for the opposite side.
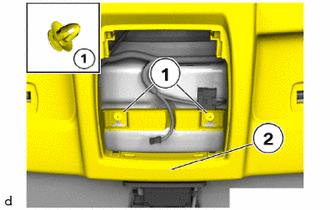
for Front Side:
Detach the clips (1) of the roof headlining assembly (2).
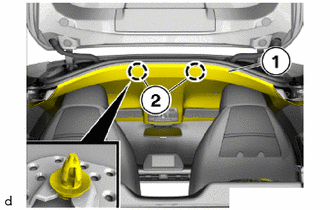
for Rear Side:
Detach the clips (2) of the roof headlining assembly (1).
Feed roof headlining assembly (1) out of the respective edge protection.
Turn the roof headlining assembly diagonally and bend slightly to remove it with an auxiliary person through the aperture of the passenger door as shown in the illustration.
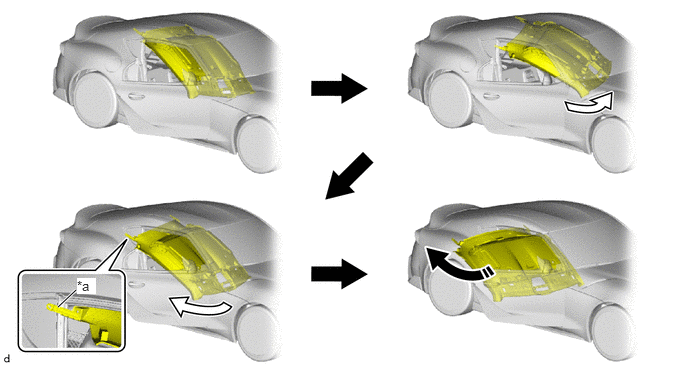
| *a | Rear RH Side of Roof Headlining Assembly | - | - |

|
Turn in this Direction | 
|
Remove in this Direction |
- NOTICE:
- ·
Make sure that wrinkles do not form in the roof headlining assembly during removal.
·Make sure that the roof headlining assembly does not get caught on anything as it may become bent or damaged.
·Do not damage the roof headlining assembly or vehicle interior.
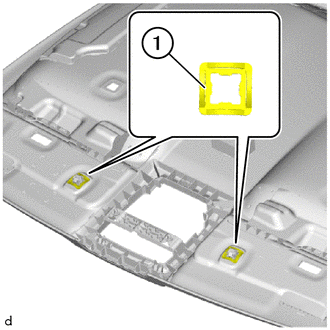
Remove the visor holder retainers (1).
64373A
27.REMOVE PACKAGE TRAY TRIM STOPPER
- HINT:
- ·
Perform this procedure only when replacement of the package tray trim stopper is necessary.
·Use the same procedures for the opposite side.
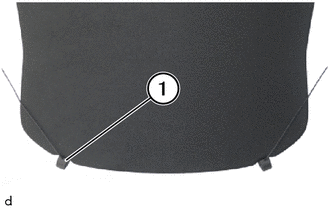
Remove the package tray trim stopper (1).