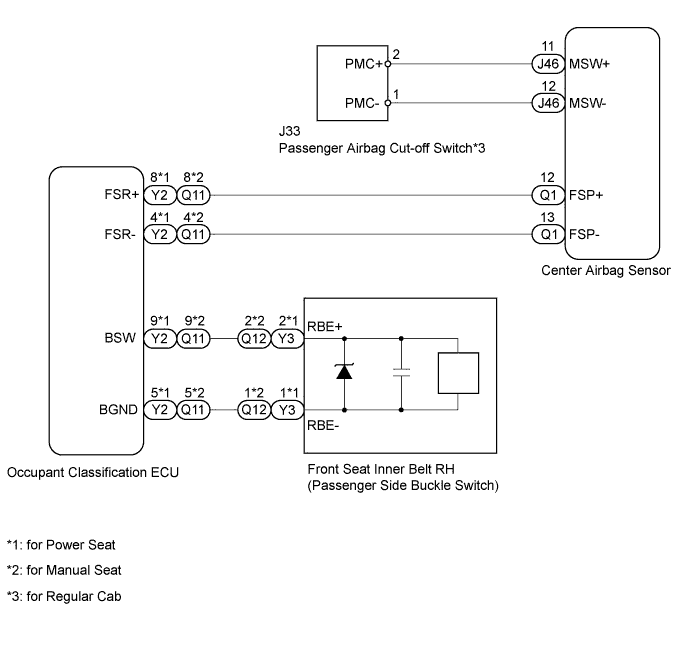
OCCUPANT CLASSIFICATION SYSTEM > Trouble in Passenger Airbag ON/OFF Indicator |
| 1.CHECK VEHICLE TYPE |
Proceed to the appropriate step according to the table below.
| Result | Proceed to |
| w/o Passenger airbag cut-off switch | A |
| w/ Passenger airbag cut-off switch | B |
|
| ||||
| A | |
 |
| 2.RETIGHTEN FRONT SEAT ASSEMBLY RH BOLT |
Turn the ignition switch OFF.
Loosen the 4 installation bolts of the front seat RH.
Tighten the 4 installation bolts of the front seat RH to the specified torque.
| NEXT | |
|
| 3.PERFORM ZERO POINT CALIBRATION |
Connect the Techstream to the DLC3.
Turn the ignition switch ON, and wait for at least 60 seconds.
Using the Techstream, perform the zero point calibration (Click here).
|
| ||||
| OK | ||
 | ||
| ||
| 4.READ VALUE USING TECHSTREAM (PASSENGER SIDE BUCKLE SWITCH) |
Turn the ignition switch ON, and wait for at least 60 seconds.
Using the Techstream, read the "Data List" (Click here).
| Tester Display | Measure Item / Range | Normal Condition | Diagnostic Note |
| Passenger Buckle SW | Passenger side buckle switch / Set, Unset or NG | Set: Passenger side seat belt is fastened Unset: Passenger side seat belt is unfastened NG: Passenger side seat belt is malfunctioning | - |
|
| ||||
| OK | |
|
| 5.READ VALUE USING TECHSTREAM (OCCUPANT DETECTION SENSOR) |
Fasten the passenger side seat belt.
Turn the ignition switch ON, and wait for at least 60 seconds.
Using the Techstream, read the "Data List" (Click here).
| Tester Display | Test Part | Control Range | Diagnostic Note |
| FL Sensor Voltage | Front left sensor voltage/ Min.: 0 V Max.: 19.8 V | 0 to 4.7 V | - |
| FR Sensor Voltage | Front right sensor voltage/ Min.: 0 V Max.: 19.8 V | 0 to 4.7 V | - |
| RL Sensor Voltage | Rear left sensor voltage/ Min.: 0 V Max.: 19.8 V | 0 to 4.7 V | - |
| RR Sensor Voltage | Rear right sensor voltage/ Min.: 0 V Max.: 19.8 V | 0 to 4.7 V | - |
| FL Sensor Weight Info | Front left sensor weight information/ Min.: -17 kg (-37.48 lb) Max.: 27 kg (59.52 lb) | -17 to 27 kg (-37.48 to 59.52 lb) | - |
| FR Sensor Weight Info | Front right sensor weight information/ Min.: -17 kg (-37.48 lb) Max.: 27 kg (59.52 lb) | -17 to 27 kg (-37.48 to 59.52 lb) | - |
| RL Sensor Weight Info | Rear left sensor weight information/ Min.: -17 kg (-37.48 lb) Max.: 37 kg (81.57 lb) | -17 to 37 kg (-37.48 to 81.57 lb) | - |
| RR Sensor Weight Info | Rear right sensor weight information/ Min.: -17 kg (-37.48 lb) Max.: 37 kg (81.57 lb) | -17 to 37 kg (-37.48 to 81.57 lb) | - |
| Total Weight Information | Total weight information/ Min.: -68 kg (-149.91 lb) Max.: 128 kg (282.19 lb) | -68 to 128 kg (-149.91 to 282.19 lb) | - |
| Result | Proceed to |
| Display is as specified in normal condition | A |
| Display is not as specified in normal condition (for Manual Seat) | B |
| Display is not as specified in normal condition (for Power Seat) | C |
|
| ||||
|
| ||||
| A | |
|
| 6.REPLACE FRONT SEAT FRAME WITH ADJUSTER ASSEMBLY RH |
Turn the ignition switch OFF.
Disconnect the negative (-) terminal cable from the battery, and wait for at least 90 seconds.
Replace the front seat frame with adjuster RH (Click here).
| NEXT | |
|
| 7.PERFORM ZERO POINT CALIBRATION |
Connect the negative (-) terminal cable to the battery, and wait for at least 2 seconds.
Connect the Techstream to the DLC3.
Turn the ignition switch ON, and wait for at least 60 seconds.
Using the Techstream, perform the zero point calibration (Click here).
| NEXT | |
|
| 8.PERFORM SENSITIVITY CHECK |
Using the Techstream, perform the sensitivity check (Click here).
| NEXT | ||
| ||
| ||
| 9.CHECK CONNECTOR |
Disconnect the connectors from the occupant classification ECU and front seat inner belt RH.
Check that the connectors (on the occupant classification ECU side and front seat inner belt RH side) are not damaged.
|
| ||||
| OK | |
|
| 10.REPLACE FRONT SEAT INNER BELT ASSEMBLY RH |
Turn the ignition switch OFF.
Disconnect the negative (-) terminal cable from the battery, and wait for at least 90 seconds.
Replace the front seat inner belt RH (Click here).
Connect the negative (-) terminal cable to the battery, and wait for at least 2 seconds.
| NEXT | |
|
| 11.PERFORM ZERO POINT CALIBRATION |
Connect the negative (-) terminal cable to the battery, and wait for at least 2 seconds.
Connect the Techstream to the DLC3.
Turn the ignition switch ON, and wait for at least 60 seconds.
Using the Techstream, perform the zero point calibration (Click here).
| NEXT | |
|
| 12.PERFORM SENSITIVITY CHECK |
Using the Techstream, perform the sensitivity check (Click here).
| NEXT | ||
| ||
| ||
| 13.CHECK INTEGRATION CONTROL AND PANEL ASSEMBLY (PASSENGER AIRBAG ON/OFF INDICATOR) |
Turn the ignition switch ON, and wait for at least 60 seconds.
The passenger airbag ON/OFF indicator (ON and OFF) comes on for approximately 4 seconds, then turns off for approximately 2 seconds.
Approximately 6 seconds after the ignition switch is turned ON, check that the passenger airbag ON/OFF indicator indicates ON/OFF according to the condition listed below.
| Front Seat Passenger | Passenger Airbag Cut-off Switch Position | ON Indicator | OFF Indicator | SRS Warning Light |
| Adult seated | ON | ON | OFF | OFF |
| Adult seated | OFF | OFF | ON | OFF |
| Child seated / Child restraint system set | AUTO | OFF | ON | OFF |
| Child seated / Child restraint system set | OFF | OFF | ON | OFF |
| Vacant | ON | OFF | OFF | OFF |
| Vacant | OFF | OFF | ON | OFF |
|
| ||||
| NG | |
|
| 14.RETIGHTEN FRONT SEAT ASSEMBLY RH BOLT |
Turn the ignition switch OFF.
Loosen the 4 installation bolts of the front seat RH.
Tighten the 4 installation bolts of the front seat RH to the specified torque.
| NEXT | |
|
| 15.PERFORM ZERO POINT CALIBRATION |
Connect the Techstream to the DLC3.
Turn the ignition switch ON, and wait for at least 60 seconds.
Using the Techstream, perform the zero point calibration (Click here).
|
| ||||
| OK | ||
| ||
| ||
| 16.READ VALUE USING TECHSTREAM (PASSENGER SIDE BUCKLE SWITCH) |
Turn the ignition switch ON, and wait for at least 60 seconds.
Using the Techstream, read the "Data List" (Click here).
| Tester Display | Measure Item / Range | Normal Condition | Diagnostic Note |
| Passenger Buckle SW | Passenger side buckle switch / Set, Unset or NG | Set: Passenger side seat belt is fastened Unset: Passenger side seat belt is unfastened NG: Passenger side seat belt is malfunctioning | - |
|
| ||||
| OK | |
|
| 17.CHECK CONNECTOR |
Check that the connectors (on the center airbag sensor side and airbag cut-off switch side) are not damaged.
|
| ||||
| OK | |
|
| 18.INSPECT AIRBAG CUT-OFF SWITCH |
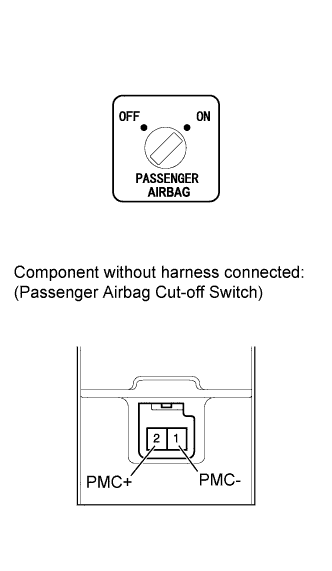 |
Disconnect the negative (-) terminal cable from the battery, and wait for at least 90 seconds.
Disconnect the J33 switch connector.
Measure the resistance according to the value(s) in the table below.
| Tester Connection | Switch Condition | Specified Condition |
| 1 (PMC-) - 2 (PMC+) | OFF | 80 to 120 Ω |
| ON | 320 to 480 Ω |
|
| ||||
| OK | |
|
| 19.INSPECT INSTRUMENT PANEL WIRE |
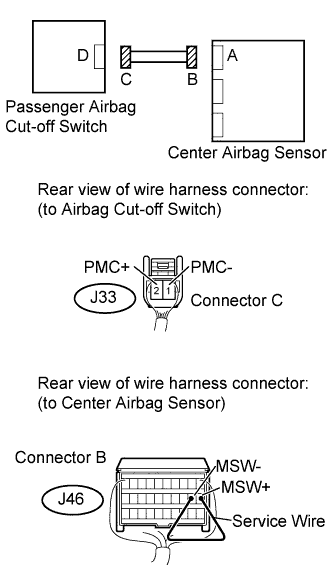 |
Connect the negative (-) terminal cable to the battery, and wait for at least 2 seconds.
Turn the ignition switch ON, and wait for at least 60 seconds.
Measure the voltage according to the value(s) in the table below.
| Tester Connection | Switch Condition | Specified Condition |
| J33-1 (PMC-) - Body ground | Ignition switch ON | Below 1 V |
| J33-2 (PMC+) - Body ground |
Turn the ignition switch OFF.
Disconnect the negative (-) terminal cable from the battery, and wait for at least 90 seconds.
Using a service wire, connect terminals 11 (MSW+) and 12 (MSW-) of connector B.
Measure the resistance according to the value(s) in the table below.
| Tester Connection | Condition | Specified Condition |
| J33-1 (PMC-) - J33-2 (PMC+) | Always | Below 1 Ω |
Disconnect the service wire from connector B.
Measure the resistance according to the value(s) in the table below.
| Tester Connection | Condition | Specified Condition |
| J33-1 (PMC-) - J33-2 (PMC+) | Always | 1 MΩ or higher |
| J33-1 (PMC-) - Body ground | ||
| J33-1 (PMC-) - Body ground |
|
| ||||
| OK | |
|
| 20.CHECK INTEGRATION CONTROL AND PANEL (PASSENGER AIRBAG ON/OFF INDICATOR) |
Connect the negative (-) terminal cable to the battery, and wait for 2 seconds.
Turn the ignition switch ON, and wait for at least 60 seconds.
The passenger airbag ON/OFF indicator (ON and OFF) comes on for approximately 4 seconds, then turns off for approximately 2 seconds.
Approximately 6 seconds after the ignition switch is turned ON, check that the passenger airbag ON/OFF indicator indicates ON/OFF according to the condition listed below.
| Front Seat Passenger | Passenger Airbag Cut-off Switch Position | ON Indicator | OFF Indicator | SRS Warning Light |
| Adult seated | ON | ON | OFF | OFF |
| Adult seated | OFF | OFF | ON | OFF |
| Child seated / Child restraint system set | AUTO | OFF | ON | OFF |
| Child seated / Child restraint system set | OFF | OFF | ON | OFF |
| Vacant | ON | OFF | OFF | OFF |
| Vacant | OFF | OFF | ON | OFF |
| Result | Proceed to |
| NG | A |
| OK (for Column Shift Type) | B |
| OK (for Floor Shift Type) | C |
|
| ||||
|
| ||||
| A | |
|
| 21.READ VALUE USING TECHSTREAM (SEAT BELT TENSION SENSOR) |
Fasten the passenger side seat belt.
Turn the ignition switch ON, and wait for at least 60 seconds.
Using the Techstream, read the "Data List" (Click here).
| Tester Display | Test Part | Control Range | Diagnostic Note |
| FL Sensor Voltage | Front left sensor voltage/ Min.: 0 V Max.: 19.8 V | 0 to 4.7 V | - |
| FR Sensor Voltage | Front right sensor voltage/ Min.: 0 V Max.: 19.8 V | 0 to 4.7 V | - |
| RL Sensor Voltage | Rear left sensor voltage/ Min.: 0 V Max.: 19.8 V | 0 to 4.7 V | - |
| RR Sensor Voltage | Rear right sensor voltage/ Min.: 0 V Max.: 19.8 V | 0 to 4.7 V | - |
| FL Sensor Weight Info | Front left sensor weight information/ Min.: -17 kg (-37.48 lb) Max.: 27 kg (59.52 lb) | -17 to 27 kg (-37.48 to 59.52 lb) | - |
| FR Sensor Weight Info | Front right sensor weight information/ Min.: -17 kg (-37.48 lb) Max.: 27 kg (59.52 lb) | -17 to 27 kg (-37.48 to 59.52 lb) | - |
| RL Sensor Weight Info | Rear left sensor weight information/ Min.: -17 kg (-37.48 lb) Max.: 37 kg (81.57 lb) | -17 to 37 kg (-37.48 to 81.57 lb) | - |
| RR Sensor Weight Info | Rear right sensor weight information/ Min.: -17 kg (-37.48 lb) Max.: 37 kg (81.57 lb) | -17 to 37 kg (-37.48 to 81.57 lb) | - |
| Total Weight Information | Total weight information/ Min.: -68 kg (-149.91 lb) Max.: 128 kg (282.19 lb) | -68 to 128 kg (-149.91 to 282.19 lb) | - |
| Result | Proceed to |
| Display is as specified in normal condition | A |
| Display is not as specified in normal condition (for Manual Seat) | B |
| Display is not as specified in normal condition (for Power Seat) | C |
|
| ||||
|
| ||||
| A | |
|
| 22.REPLACE FRONT SEAT FRAME WITH ADJUSTER ASSEMBLY RH |
Turn the ignition switch OFF.
Disconnect the negative (-) terminal cable from the battery, and wait for at least 90 seconds.
Replace the front seat from with adjuster RH (Click here).
| NEXT | |
|
| 23.PERFORM ZERO POINT CALIBRATION |
Connect the negative (-) terminal cable to the battery, and wait for at least 2 seconds.
Connect the Techstream to the DLC3.
Turn the ignition switch ON, and wait for at least 60 seconds.
Using the Techstream, perform the zero point calibration (Click here).
| NEXT | |
|
| 24.PERFORM SENSITIVITY CHECK |
Using the Techstream, perform the sensitivity check (Click here).
| NEXT | ||
| ||
| ||
| 25.CHECK CONNECTOR |
Disconnect the connectors from the occupant classification ECU and front seat inner belt RH.
Check that the connectors (on the occupant classification ECU side and front seat inner belt RH side) are not damaged.
|
| ||||
| OK | |
|
| 26.REPLACE FRONT SEAT INNER BELT ASSEMBLY RH |
Turn the ignition switch OFF.
Replace front seat inner belt RH (Click here).
| NEXT | |
|
| 27.PERFORM ZERO POINT CALIBRATION |
Connect the negative (-) terminal cable to the battery, and wait for at least 2 seconds.
Connect the Techstream to the DLC3.
Turn the ignition switch ON, and wait for at least 60 seconds.
Using the Techstream, perform zero point calibration (Click here).
| NEXT | |
|
| 28.PERFORM SENSITIVITY CHECK |
Using the Techstream, perform the sensitivity check (Click here).
| NEXT | ||
| ||
| ||

