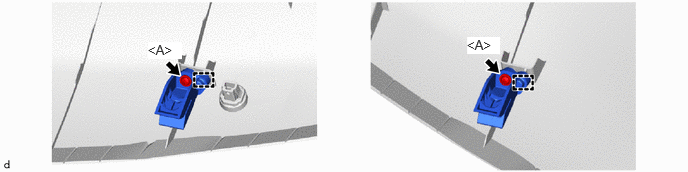
INTERIOR PANELS / TRIM INSTRUMENT PANEL SAFETY PAD REMOVAL
CAUTION / NOTICE / HINT
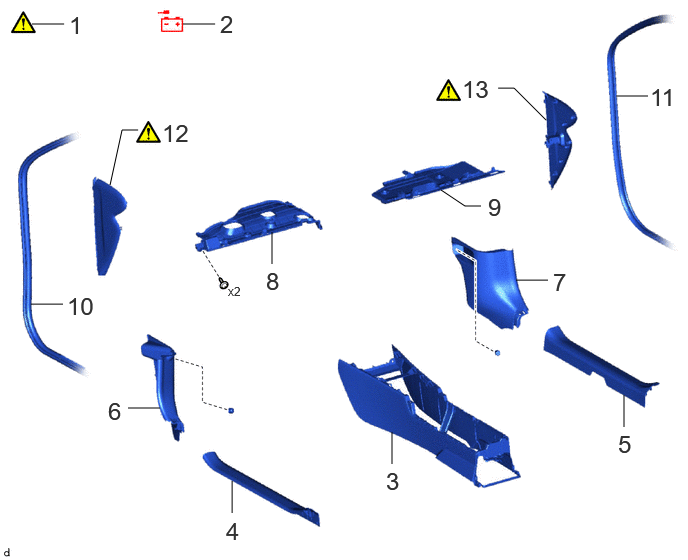
| Procedure | Part Name Code | 
|

|

|
|
|---|---|---|---|---|---|
| 1 | PRECAUTION | - | ( ) |
- | - |
| 2 | DISCONNECT CABLE FROM NEGATIVE AUXILIARY BATTERY TERMINAL | - | - | - | - |
| 3 | REAR CONSOLE BOX ASSEMBLY | 58910C | - | - | - |
| 4 | FRONT DOOR SCUFF PLATE LH | 67914B | - | - | - |
| 5 | FRONT DOOR SCUFF PLATE RH | 67913B | - | - | - |
| 6 | COWL SIDE TRIM BOARD LH | 62112 | - | - | - |
| 7 | COWL SIDE TRIM BOARD RH | 62111C | - | - | - |
| 8 | NO. 1 INSTRUMENT PANEL UNDER COVER SUB-ASSEMBLY | 55606 | - | - | - |
| 9 | NO. 2 INSTRUMENT PANEL UNDER COVER SUB-ASSEMBLY | 55607 | - | - | - |
| 10 | FRONT DOOR OPENING TRIM WEATHERSTRIP LH | 62312B | - | - | - |
| 11 | FRONT DOOR OPENING TRIM WEATHERSTRIP RH | 62311B | - | - | - |
| 12 | NO. 1 INSTRUMENT SIDE PANEL | 55317E | ()
|
- | - |
| 13 | NO. 2 INSTRUMENT SIDE PANEL | 55318F | ()
|
- | - |
| Procedure | Part Name Code |
|
|
|
|
|---|---|---|---|---|---|
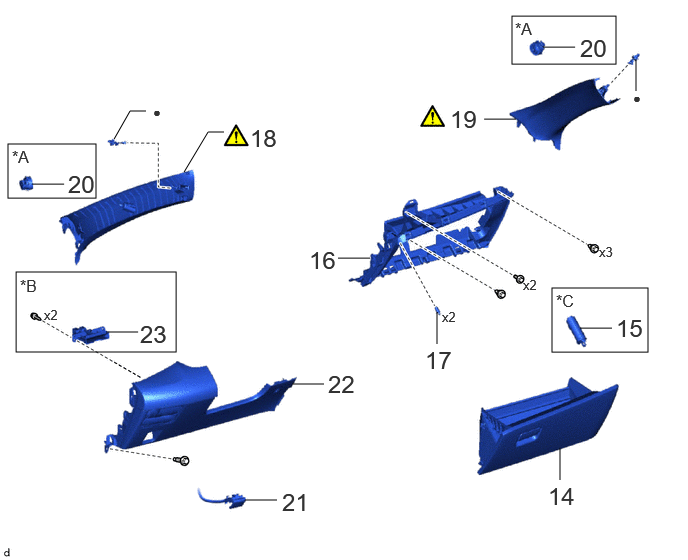
| 14 | GLOVE COMPARTMENT DOOR ASSEMBLY | 55550 | - | - | - |
| 15 | GLOVE COMPARTMENT DOOR STOPPER SUB-ASSEMBLY | 55054 | - | - | - |
| 16 | LOWER NO. 2 INSTRUMENT PANEL FINISH PANEL | 55433B | - | - | - |
| 17 | GLOVE COMPARTMENT DOOR CHECK CUSHION | 55557A | - | - | - |
| 18 | FRONT PILLAR GARNISH LH | 62212 | ()
|
- | - |
| 19 | FRONT PILLAR GARNISH RH | 62211 | ()
|
- | - |
| 20 | FRONT NO. 2 SPEAKER ASSEMBLY | 86160P | - | - | - |
| 21 | HOOD LOCK CONTROL LEVER SUB-ASSEMBLY | 53601 | - | - | - |
| 22 | LOWER INSTRUMENT PANEL FINISH PANEL ASSEMBLY | 55480D | - | - | - |
| 23 | INSTRUMENT PANEL HOLE COVER | 55548A | - | - | - |
| *A | for 6 or 8 Speakers | *B | for TMC Made |
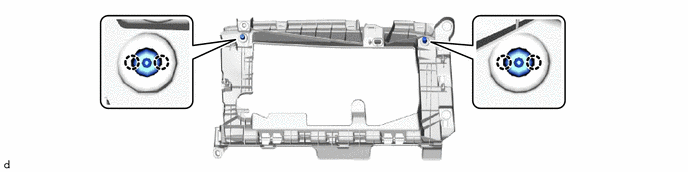
| *C | for TMMF Made | - | - |
| ● | Non-reusable part | - | - |
| Procedure | Part Name Code |
|
|
|
|
|---|---|---|---|---|---|
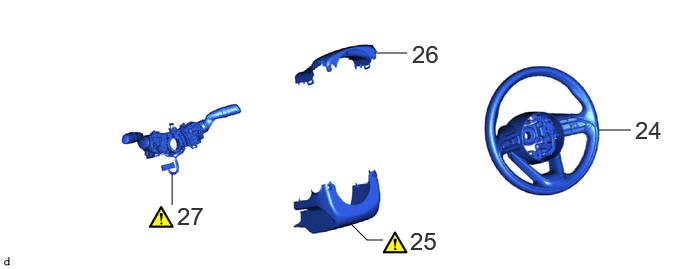
| 24 | STEERING WHEEL ASSEMBLY | 45100 | - | - | - |
| 25 | LOWER STEERING CLUMN COVER | 45287 | ()
|
- | - |
| 26 | UPPER STEERING CLUMN COVER | 45286B | - | - | - |
| 27 | TURN SIGNAL SWITCH ASSEMBLY WITH SPIRAL CABLE SUB-ASSEMBLY | - | ()
|
- | - |
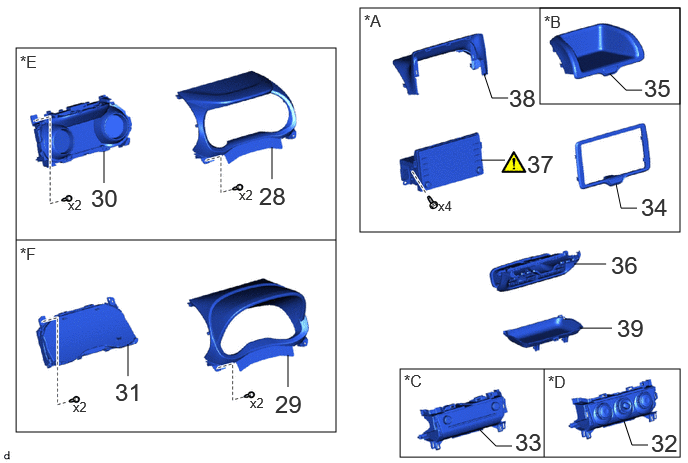
| Procedure | Part Name Code |
|
|
|
|
|---|---|---|---|---|---|
| 28 | INSTRUMENT CLUSTER FINISH PANEL ASSEMBLY | 55410C | - | - | - |
| 29 | INSTRUMENT CLUSTER FINISH PANEL ASSEMBLY | 55410C | - | - | - |
| 30 | COMBINATION METER ASSEMBLY | 83100 | - | - | - |
| 31 | COMBINATION METER ASSEMBLY | 83100 | - | - | - |
| 32 | INSTRUMENT CLUSTER FINISH LOWER CENTER PANEL SUB-ASSEMBLY WITH NO. 2 HEATER CONTROL SUB-ASSEMBLY | - | - | - | - |
| 33 | AIR CONDITIONING CONTROL ASSEMBLY | 55900 | - | - | - |
| 34 | INSTRUMENT CLUSTER FINISH CENTER PANEL SUB-ASSEMBLY | 55405B | - | - | - |
| 35 | INSTRUMENT CLUSTER FINISH CENTER PANEL SUB-ASSEMBLY | 55405B | - | - | - |
| 36 | INSTRUMENT PANEL CENTER REGISTER ASSEMBLY | 55670A | - | - | - |
| 37 | RADIO AND DISPLAY RECEIVER ASSEMBLY WITH BRACKET | 86140A | ()
|
- | - |
| 38 | INSTRUMENT CLUSTER FINISH CENTER PANEL ASSEMBLY | 55720A | - | - | - |
| 39 | INSTRUMENT PANEL CENTER TRAY | 55624A | - | - | - |
| *A | w/ Audio | *B | w/o Audio |
| *C | for Automatic Air Conditioning System | *D | for Manual Air Conditioning System |
| *E | for Digital Meter | *F | for Analog Meter |
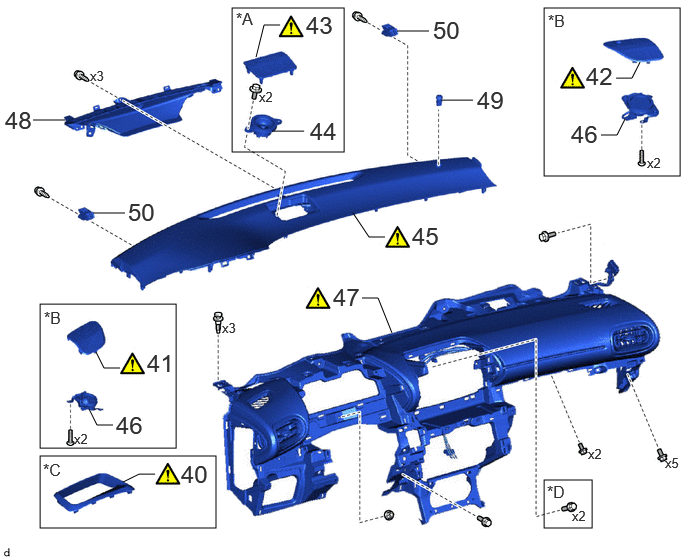
| Procedure | Part Name Code |
|
|
|
|
|---|---|---|---|---|---|
| 40 | INSTRUMENT CLUSTER FINISH END PANEL | 55414A | ()
|
- | - |
| 41 | NO. 1 INSTRUMENT PANEL SPEAKER PANEL SUB-ASSEMBLY | 55408F | ()
|
- | - |
| 42 | NO. 2 INSTRUMENT PANEL SPEAKER PANEL SUB-ASSEMBLY | 55409F | ()
|
- | - |
| 43 | NO. 1 SPEAKER OPENING COVER ASSEMBLY | 55510F | ()
|
- | - |
| 44 | NO. 4 FRONT SPEAKER ASSEMBLY | 86160L | - | - | - |
| 45 | INSTRUMENT MAIN PANEL | 55313A | ()
|
- | - |
| 46 | FRONT NO. 3 SPEAKER ASSEMBLY WITH BRACKET | - | - | - | - |
| 47 | INSTRUMENT PANEL SUB-ASSEMBLY | 55302C | ()
|
- | - |
| 48 | DEFROSTER NOZZLE ASSEMBLY | 55950G | - | - | - |
| 49 | AUTOMATIC LIGHT CONTROL SENSOR | 89120A | - | - | - |
| 50 | NO. 1 INSTRUMENT PANEL PIN | 55328 | - | - | - |
| *A | w/ Telematics Transceiver | *B | for 8 Speakers |
| *C | w/ Headup Display | *D | w/o Audio |
CAUTION / NOTICE / HINT
The necessary procedures (adjustment, calibration, initialization or registration) that must be performed after parts are removed and installed, or replaced during instrument panel sub-assembly removal/installation are shown below.
| Replacement Part or Procedure | Necessary Procedures | Effect/Inoperative Function When Necessary Procedures are not Performed | Link |
|---|---|---|---|
| Disconnect cable from negative (-) auxiliary battery terminal | Memorize steering angle neutral point | Parking assist monitor system | ()
|
| Panoramic view monitor system (w/o Advanced Park) | ()
|
- CAUTION:
-
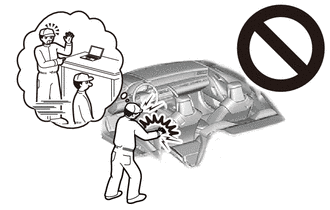
-
Some of these service operations affect the SRS airbag system. Read the precautionary notices concerning the SRS airbag system before servicing.
-
Click hereVehicle Interior>SUPPLEMENTAL RESTRAINT SYSTEMS>AIRBAG SYSTEM>PRECAUTION
- HINT:
- ·
When the cable is disconnected/reconnected to the auxiliary battery terminal, systems temporarily stop operating. However, each system has a function that completes learning the first time the system is used.
Learning completes when vehicle is driven
-Learning completes when vehicle is driven
Effect/Inoperative Function When Necessary Procedures are not Performed Necessary Procedures Link *1: for Gasoline Model
Lane tracing assist system Drive the vehicle straight ahead at 35 km/h (22 mph) or more for 5 second or more. ( )
Pre-collision system Parking support brake system Stop and start system *1 Drive the vehicle until stop and start control is permitted (approximately 5 to 60 minutes) ( )
-Learning completes when vehicle is operated normally
Effect/Inoperative Function When Necessary Procedures are not Performed Necessary Procedures Link Power door lock control system
·Back door opener
Perform door unlock operation with door control switch or electrical key transmitter sub-assembly switch. ( )
Power back door system Fully close the back door by hand.
- HINT:
-
Initialization is not necessary if the above procedures are performed while the back door is closed.
( )
Air conditioning system After the ignition switch is turned to ON, the servo motor standard position is recognized. -
·Use the same procedure for the RHD and LHD.
·The following procedure is for LHD.
PROCEDURE

 1. PRECAUTION
|
|
|
2.DISCONNECT CABLE FROM NEGATIVE AUXILIARY BATTERY TERMINAL
for M15A-FKS:
Click hereGeneral>MAINTENANCE>M15A-FKS AUXILIARY BATTERY>REMOVAL
for M15A-FXE:
Click hereGeneral>MAINTENANCE>M15A-FXE AUXILIARY BATTERY>REMOVAL
58910C
3.REMOVE REAR CONSOLE BOX ASSEMBLY
67914B
4.REMOVE FRONT DOOR SCUFF PLATE LH
67913B
5.REMOVE FRONT DOOR SCUFF PLATE RH
Use the same procedure as for the LH side.
62112
6.REMOVE COWL SIDE TRIM BOARD LH
62111C
7.REMOVE COWL SIDE TRIM BOARD RH
Use the same procedure as for the LH side.
55606
8.REMOVE NO. 1 INSTRUMENT PANEL UNDER COVER SUB-ASSEMBLY
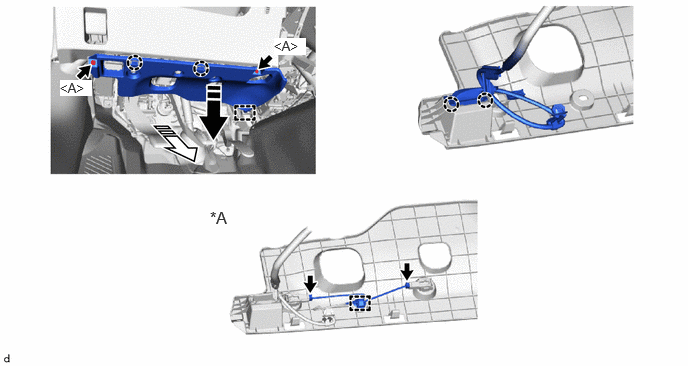
| *A | w/ Illumination | - | - |

|
Remove in this Direction (1) | 
|
Remove in this Direction (2) |
55607
9.REMOVE NO. 2 INSTRUMENT PANEL UNDER COVER SUB-ASSEMBLY
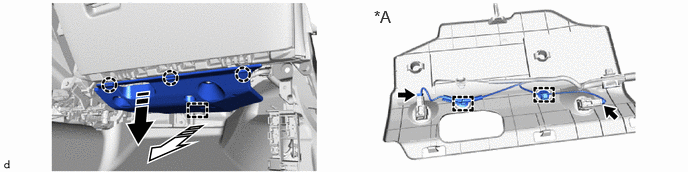
| *A | w/ Illumination | - | - |
|
|
Remove in this Direction (1) |
|
Remove in this Direction (2) |
62312B
10.DISCONNECT FRONT DOOR OPENING TRIM WEATHERSTRIP LH

62311B
11.DISCONNECT FRONT DOOR OPENING TRIM WEATHERSTRIP RH
Use the same procedure as for the LH side.
55317E
12.REMOVE NO. 1 INSTRUMENT SIDE PANEL
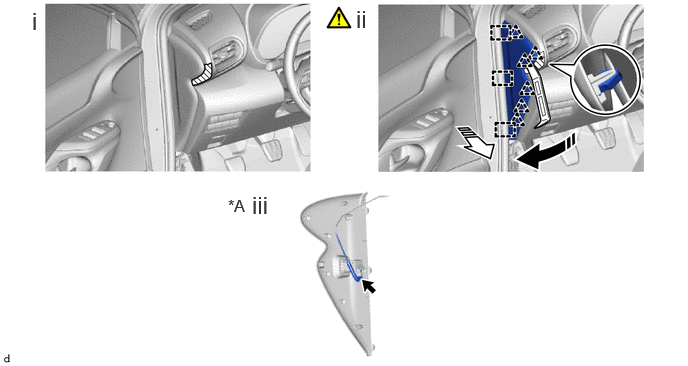
| *A | for Front Passenger side with Airbag Cut off Switch | - | - |
|
|
Remove in this Direction (1) |
|
Remove in this Direction (2) |
Apply protective tape to the locations shown in the illustration.
Using a molding remover A, disengage the clips and guides to remove the No.1 instrument side panel.
for Front Passenger side with Airbag Cut off Switch:
1. Disconnect the connector.
55318F
13.REMOVE NO. 2 INSTRUMENT SIDE PANEL
Use the same procedure as for the No. 1 side.
55550
14.REMOVE GLOVE COMPARTMENT DOOR ASSEMBLY
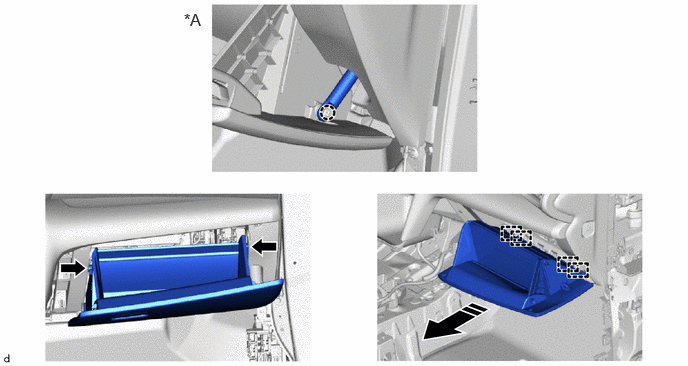
| *A | for TMMF Made | - | - |

|
Push |
|
Remove in this Direction |
55054
15.REMOVE GLOVE COMPARTMENT DOOR STOPPER SUB-ASSEMBLY (for TMMF Made)

55433B
16.REMOVE LOWER NO. 2 INSTRUMENT PANEL FINISH PANEL
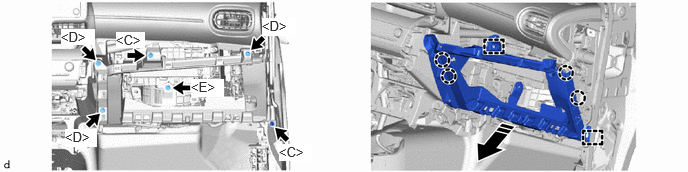
|
|
Remove in this Direction | - | - |
55557A
17.REMOVE GLOVE COMPARTMENT DOOR CHECK CUSHION
62212
18.REMOVE FRONT PILLAR GARNISH LH
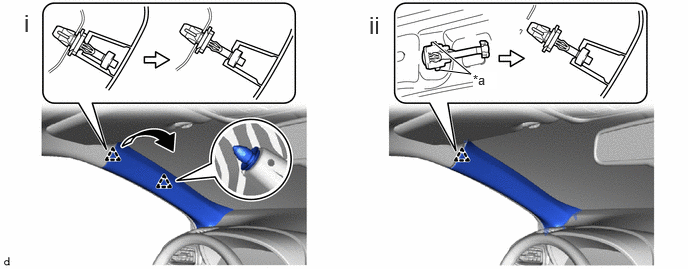
| *a | Release Lever | - | - |
|
|
Pull up | - | - |
Pull up the front pillar garnish LH to disengage the front pillar garnish clip and clip as shown in the illustration.
Push the release lever and separate the front pillar garnish clip from the vehicle body.
When the front pillar garnish clip cannot be removed using your fingers:
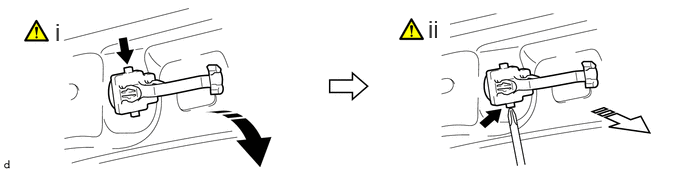
|
|
Lift in this Direction |
|
Remove in this Direction |
While pressing the part shown in the illustration with your finger, move the front pillar garnish clip in the direction indicated by the arrow.
While pulling the front pillar garnish clip in the direction indicated by the arrow, push the part shown in the illustration with the end of a screwdriver and remove the front pillar garnish clip.
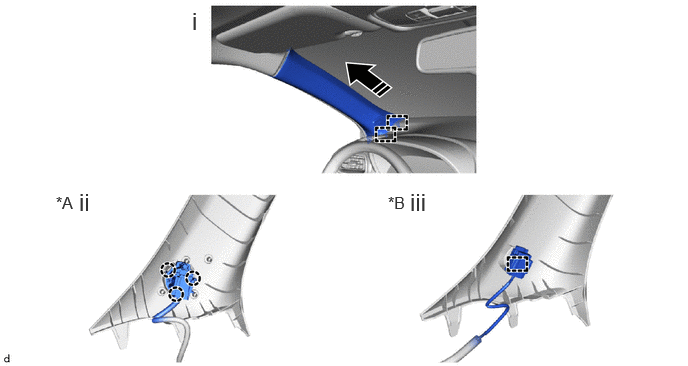
| *A | w/ Speaker | *B | w/o Speaker |
|
|
Remove in this Direction | - | - |
Disengage the guides to remove the front pillar garnish LH as shown in the illustration.
w/ Speaker:
1. Disengage the claws to disconnect the front No.2 speaker assembly.
w/o Speaker:
1. Disengage the clamp to disconnect the wire harness.

Remove the front pillar garnish clip from the front pillar garnish RH.
Protect the curtain shield airbag assembly.
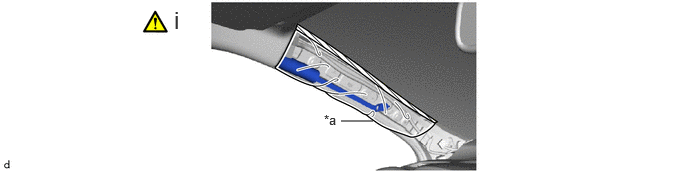
| *a | Protective Cover | - | - |

|
Adhesive Tape | - | - |
Completely cover the curtain shield airbag assembly with a cloth or nylon sheet and secure the ends of the cover with adhesive tape as shown in the illustration.
- NOTICE:
-
Cover the curtain shield airbag assembly with a protective cover as soon as the front pillar garnish LH is removed.
62211
19.REMOVE FRONT PILLAR GARNISH RH
Use the same procedure as for the LH side.
86160P
20.REMOVE FRONT NO. 2 SPEAKER ASSEMBLY (for 6 or 8 Speakers)
53601
21.DISCONNECT HOOD LOCK CONTROL LEVER SUB-ASSEMBLY

55480D
22.REMOVE LOWER INSTRUMENT PANEL FINISH PANEL ASSEMBLY
- HINT:
-
The illustrations are representative examples, and details may differ.
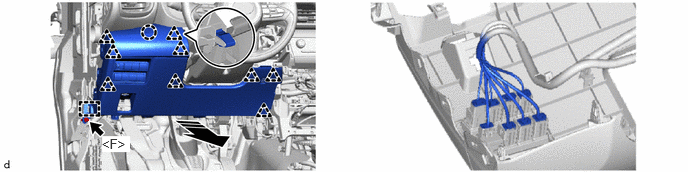
|
|
Remove in this Direction | - | - |
55548A
23.REMOVE INSTRUMENT PANEL HOLE COVER (for TMC Made)

45100
24.REMOVE STEERING WHEEL ASSEMBLY
45286
25.REMOVE LOWER STEERING COLUMN COVER
|
|
Click here()
|
45286
26.REMOVE UPPER STEERING COLUMN COVER
27.REMOVE TURN SIGNAL SWITCH ASSEMBLY WITH SPIRAL CABLE SUB-ASSEMBLY
|
|
Click here()
|
55410C
28.REMOVE INSTRUMENT CLUSTER FINISH PANEL ASSEMBLY (for Digital Meter)
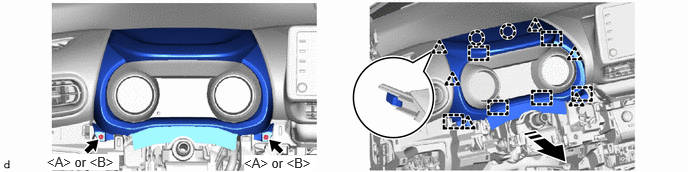
|
|
Remove in this Direction | - | - |
55410C
29.REMOVE INSTRUMENT CLUSTER FINISH PANEL ASSEMBLY (for Analog Meter)
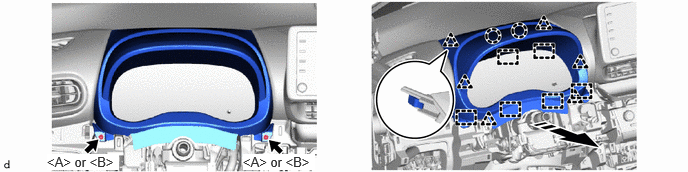
|
|
Remove in this Direction | - | - |
83100
30.REMOVE COMBINATION METER ASSEMBLY (for Digital Meter)
83100
31.REMOVE COMBINATION METER ASSEMBLY (for Analog Meter)
32.REMOVE INSTRUMENT CLUSTER FINISH LOWER CENTER PANEL SUB-ASSEMBLY WITH NO. 2 HEATER CONTROL SUB-ASSEMBLY (for Manual Air Conditioning System)
55900
33.REMOVE AIR CONDITIONING CONTROL ASSEMBLY (for Automatic Air Conditioning System)
55405B
34.REMOVE INSTRUMENT CLUSTER FINISH CENTER PANEL SUB-ASSEMBLY (w/ Audio)
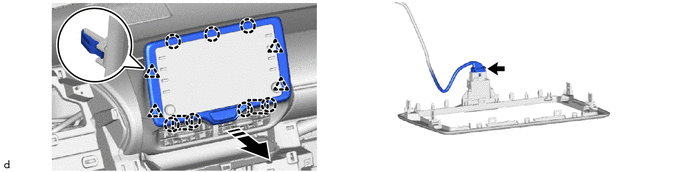
|
|
Remove in this Direction | - | - |
55405B
35.REMOVE INSTRUMENT CLUSTER FINISH CENTER PANEL SUB-ASSEMBLY (w/o Audio)
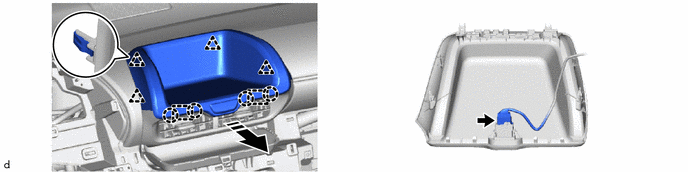
|
|
Remove in this Direction | - | - |
55670A
36.REMOVE INSTRUMENT PANEL CENTER REGISTER ASSEMBLY
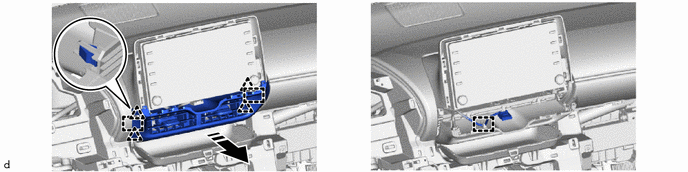
|
|
Remove in this Direction | - | - |
86140A
37.REMOVE RADIO AND DISPLAY RECEIVER ASSEMBLY WITH BRACKET (w/ Audio)
|
|
Click here()
|
55420A
38.REMOVE INSTRUMENT CLUSTER FINISH CENTER PANEL ASSEMBLY (w/ Audio)

|
|
Remove in this Direction | - | - |
55624A
39.REMOVE INSTRUMENT PANEL CENTER TRAY

|
|
Remove in this Direction | - | - |
55414A
40.REMOVE INSTRUMENT CLUSTER FINISH END PANEL (w/ Headup Display)
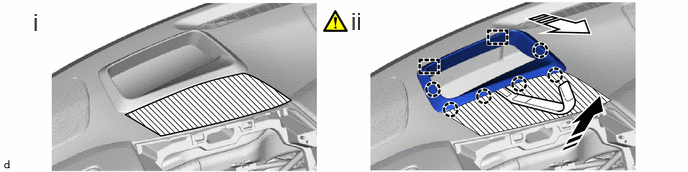
|
|
Remove in this Direction (1) |
|
Remove in this Direction (2) |
Apply protective tape to the locations shown in the illustration.
Using a molding remover A, disengage the claws and guides to remove the instrument cluster finish end panel as shown in the illustration.
55408F
41.REMOVE NO. 1 INSTRUMENT PANEL SPEAKER PANEL SUB-ASSEMBLY (for 8 Speakers)
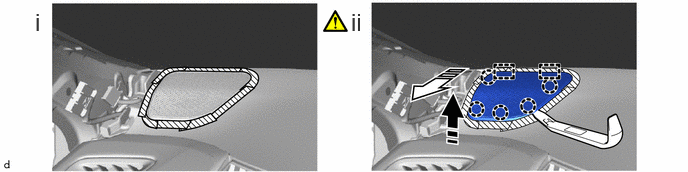
|
|
Remove in this Direction (1) |
|
Remove in this Direction (2) |
Apply protective tape to the locations shown in the illustration.
Using a molding remover A, disengage the claws and guides to remove the No. 1 instrument panel speaker panel sub-assembly as shown in the illustration.
55409F
42.REMOVE NO. 2 INSTRUMENT PANEL SPEAKER PANEL SUB-ASSEMBLY (for 8 Speakers)
Use the same procedure as for the No. 1 side.
55510F
43.REMOVE NO. 1 SPEAKER OPENING COVER ASSEMBLY (w/ Telematics Transceiver)
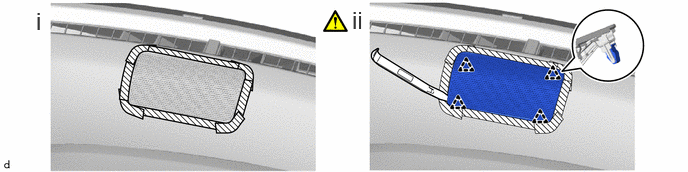
Apply protective tape to the locations shown in the illustration.
Using a molding remover A, disengage the clips to remove the No. 1 speaker opening cover assembly.
86160L
44.REMOVE NO. 4 FRONT SPEAKER ASSEMBLY (w/ Telematics Transceiver)
55313A
45.REMOVE INSTRUMENT MAIN PANEL
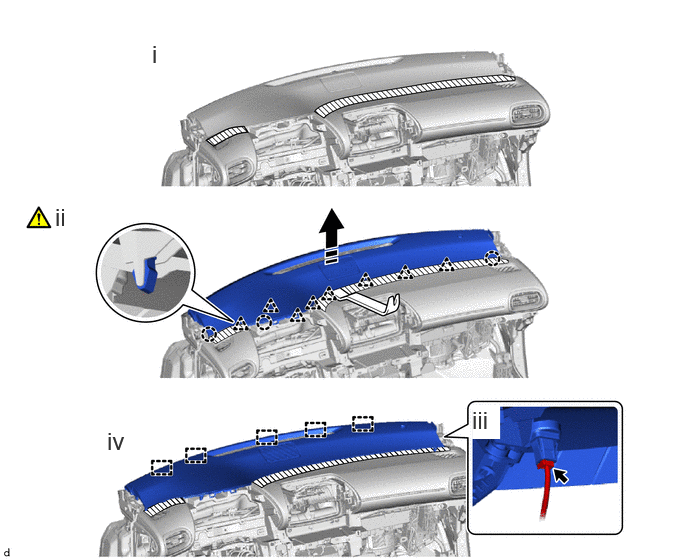
|
|
Remove in this Direction | - | - |
Apply protective tape to the locations shown in the illustration.
Using a molding remover B, disengage the clips and claws as shown in the illustration.
Disconnect the connector.
Disengage the guides to remove the instrument main panel as shown in the illustration.
46.REMOVE FRONT NO. 3 SPEAKER ASSEMBLY WITH BRACKET (for 8 Speakers)
55302C
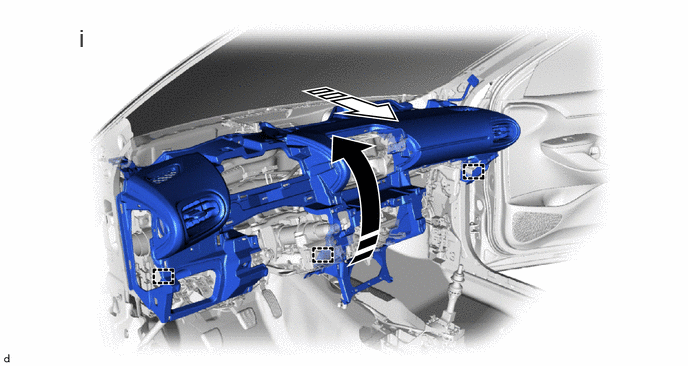
47.REMOVE INSTRUMENT PANEL SUB-ASSEMBLY
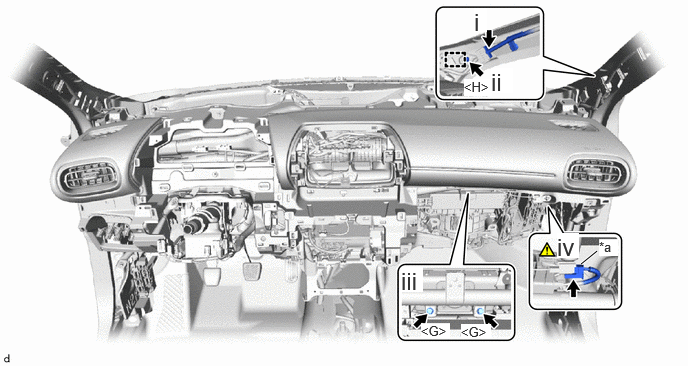
| *a | Airbag Connector | - | - |
Disconnect the connector.
Remove the bolt <H> and disengage the guide to separate the ground bracket.
Remove the 2 bolts <G>.
Disconnect the airbag connector.
- NOTICE:
-
When disconnecting airbag connector, take care not to damage the airbag wire harness.
- HINT:
-
Refer to How to Connect or Disconnect Airbag Connector:
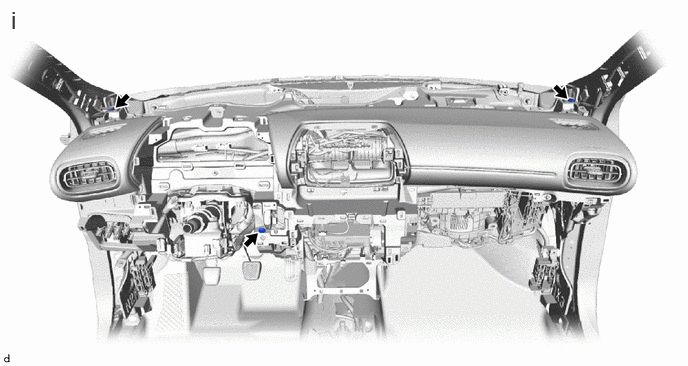
Remove the 3 clips.
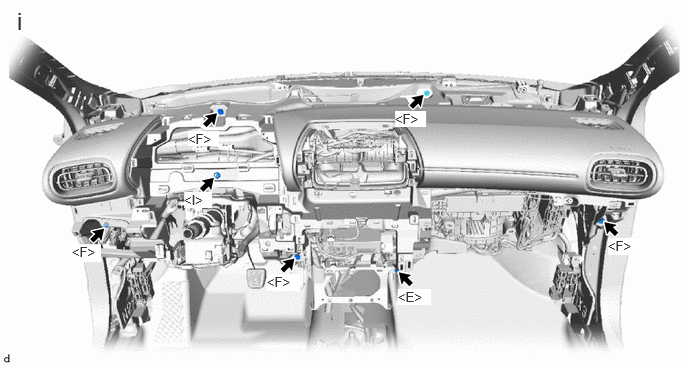
Remove the 5 bolts <F>, screw <E> and nut <I>.
w/o Audio:
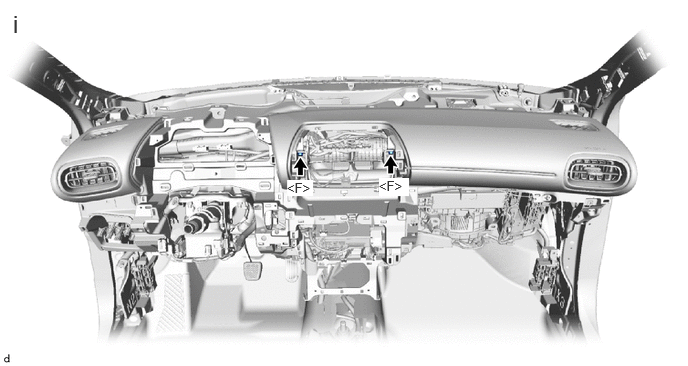
Remove the 2 bolts <F>.
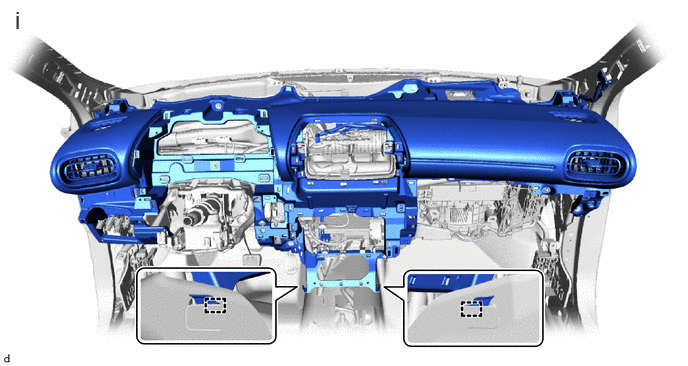
Disengage the hooks.
|
|
Remove in this Direction (1) |
|
Remove in this Direction (2) |
Disengage the guides to remove the instrument panel sub-assembly as shown in the illustration.
55950G
48.REMOVE DEFROSTER NOZZLE ASSEMBLY
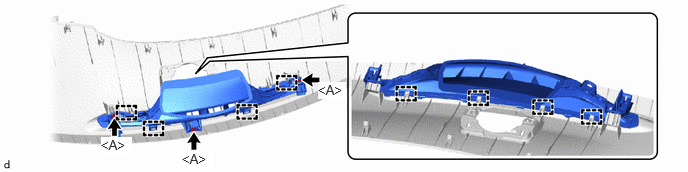
89120A
49.REMOVE AUTOMATIC LIGHT CONTROL SENSOR
55328
50.REMOVE NO. 1 INSTRUMENT PANEL PIN