G16E-GTS ENGINE MECHANICAL BALANCESHAFT ON-VEHICLE INSPECTION
PROCEDURE

 51410
1.REMOVE NO. 1 ENGINE UNDER COVER ASSEMBLY
2.DRAIN ENGINE OIL
3.DRAIN ENGINE COOLANT
16361A
4.REMOVE FAN AND GENERATOR V BELT
15609
5.REMOVE OIL FILTER BRACKET SUB-ASSEMBLY
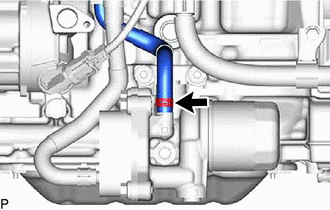
Slide the clip and separate the No. 6 water by-pass hose.
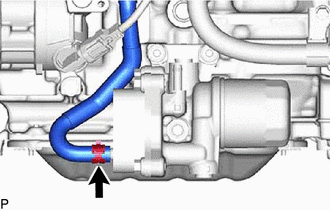
Slide the clip and separate the No. 5 water by-pass hose.
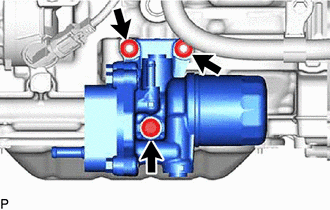
Remove the bolt, 2 nut and oil filter bracket sub-assembly from the cylinder block sub-aseembly.
88310
6.SEPARATE COMPRESSOR WITH PULLEY ASSEMBLY
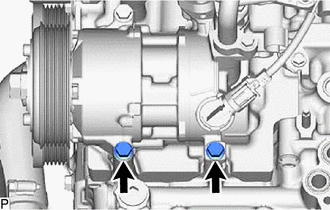
Remove the 2 bolts and separate the compressor with pulley assembly.
12584
7.SEPARATE NO. 4 CYLINDER BROCK INSULATOR
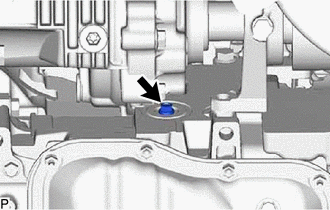
Remove the bolt and separate the No. 4 cylinder brock insulator.
12102A
8.REMOVE NO. 2 OIL PAN SUB-ASSEMBLY
12101
9.REMOVE OIL PAN SUB-ASSEMBLY
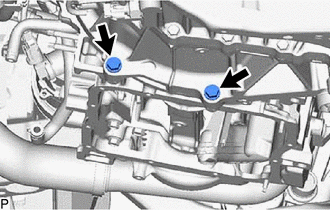
Remove the 2 bolts.
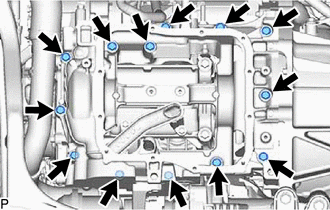
Remove the 13 bolts.
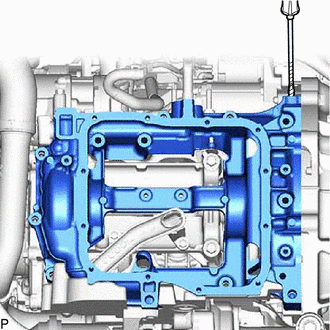
Using a screwdriver, remove the oil pan sub-assembly by prying between the oil pan sub-assembly and crankshaft bearing cap assembly at the places shown in the illustration.
- NOTICE:
-
Be careful not to damage the contact surfaces of the crankshaft bearing cap sub-aseembly and oil pan sub-assembly..
Remove the 2 o-rings from the crankshaft bearing cap assembly.
10.INSPECT BALANCESHAFT BACK LASH
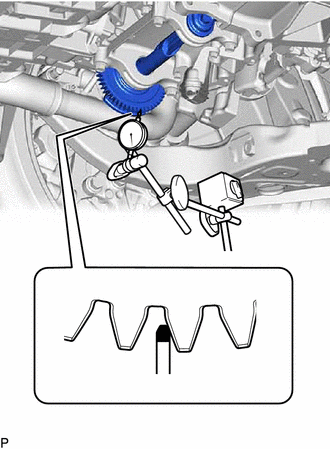
Install a dial indicator and magnetic base.
Set the tip of the dial indicator to the position shown in the illustration.
Push the balance shaft gear to one side and set the dial indicator to 0 point with the backlash blocked.
Move the balance shaft gear by hand and measure the backlash with the dial indicator.
- Standard Diameter:
0.055 to 0.105 mm (0.00217 to 0.00413 in.)
11.ADJUST BALANCESHAFT BACK LASH
Remove the engine balancer assembly.
Click hereEngine / Hybrid System>G16E-GTS (ENGINE MECHANICAL)>ENGINE UNIT>DISASSEMBLY
Remove the balanceshaft housing spacer.
Click hereEngine / Hybrid System>G16E-GTS (ENGINE MECHANICAL)>ENGINE UNIT>DISASSEMBLY
If the result is not within the specified range, select balanceshaft housing spacer that are thicker or thinner as necessary.
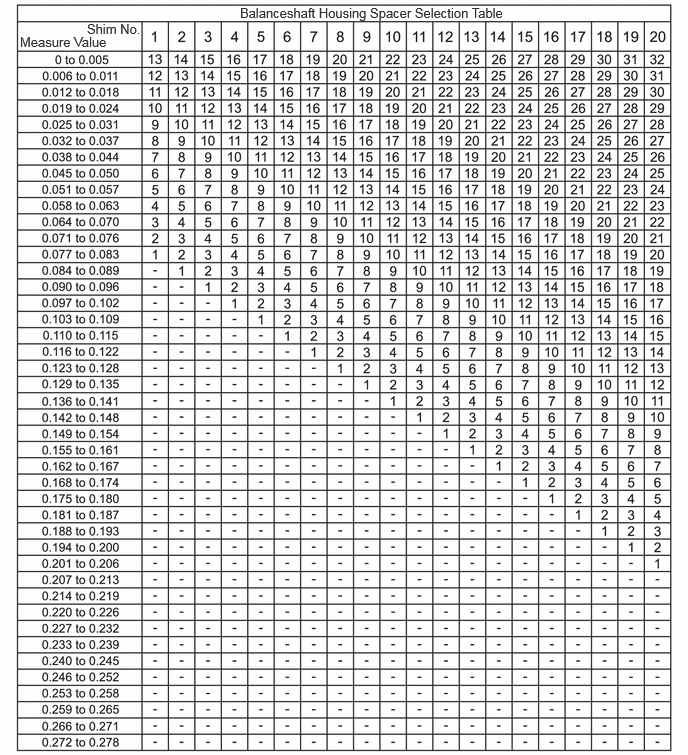
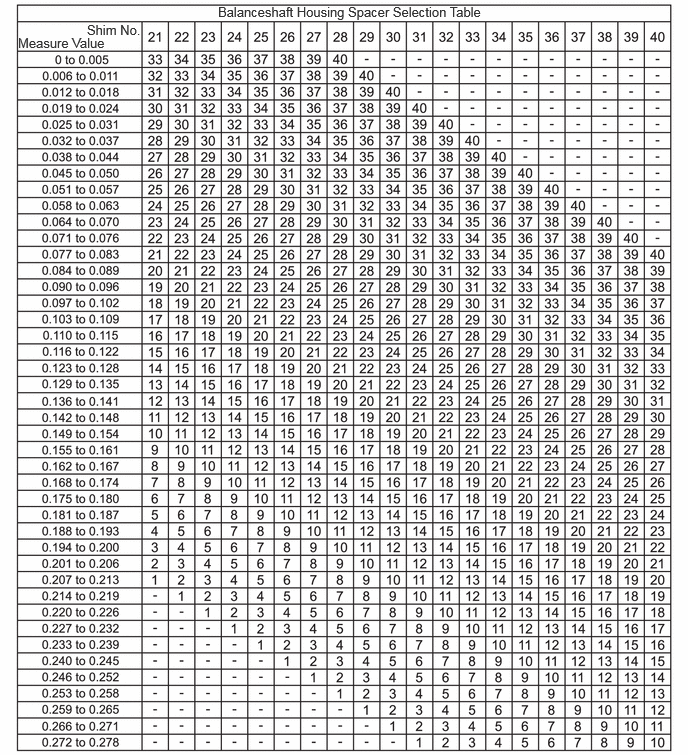
- HINT:
- ·
The backlash was 0.114 mm (0.00449 in.) with shim No. 12. Use shim No. 7.
·When adjusting the backlash in the short block condition, select a shim number that is one rank smaller than the specer selecied from the selection table.
·Try to adjust the backlash to the center of the specified values.
Install the balanceshaft housing spacer.
Click hereEngine / Hybrid System>G16E-GTS (ENGINE MECHANICAL)>ENGINE UNIT>REASSEMBLY
Install the engine balancer assembly.
Click hereEngine / Hybrid System>G16E-GTS (ENGINE MECHANICAL)>ENGINE UNIT>REASSEMBLY
12101
12.INSTALL OIL PAN SUB-ASSEMBLY
Install the new 2 o-ring to the crankshaft bearing cap sub-assembly.
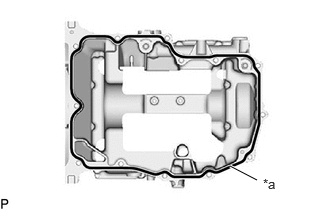
| *a | Seal Packing |
Apply seal packing in a continuous line as shown in the illustration.
- Seal Packing:
Toyota Genuine Seal Packing Black, Three Bond 1207B or equivalent
- Standard Seal Packing Dimension:
Area Specified Condition Continuous Line 2.5 to 3.5 mm (0.0984 to 0.138 in.)
- NOTICE:
- ·
Remove any oil from the contact surfaces.
·Install the oil pan sub-assembly within 3 minutes and tighten the bolts within 10 minutes of applying seal packing.
·Do not add engine oil for at least 2 hours after the installation.
·Make sure that the diameter at the start and end of each line of seal packing is 5 +/- 2 mm (0.197 +/- 0.0787 in.).
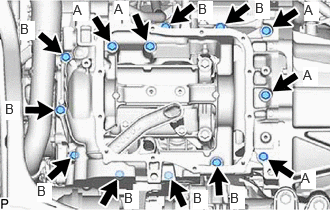
Temporarily install the oil pan sun-assembly with the 13 bolts.
- HINT:
Bolt Length Bolt (A) 70 mm (2.76 in.) Bolt (B) 30 mm (1.18 in.)
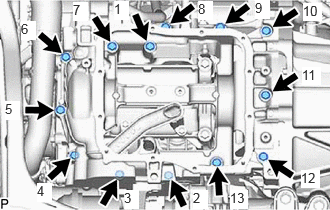
Tighten the 13 bolts in the order shown in the illustration to install the oil pan sub-assembly.
- Torque:
- 25 N・m (255 kgf・cm, )
Tighten the 2 bolts.
- Torque:
- 46 N・m (469 kgf・cm, )
12102A
13.INSTALL NO. 2 OIL PAN SUB-ASSEMBLY
88310
14.CONNECT COMPRESSOR WITH PULLEY ASSEMBLY
Tighten the 2 bolts and connect the compressor with pulley assembly..
- Torque:
- 25 N・m (255 kgf・cm, )
15609
15.INSTALL OIL FILTER BRACKET SUB-ASSEMBLY
Install the new 2 o-ring.
Install the bolt, 2 nuts and oil filter bracket sub-assembly to the oil pan sub-assembly.
- Torque:
- 21 N・m (214 kgf・cm, )
Install the No. 5 water by-pass hose and slide the 2 clips to secure it.
Install the No. 6 water by-pass hose and slide the 2 clips to secure it.
16361A
16.INSTALL FAN AND GENERATOR V BELT
17.ADD ENGINE COOLANT
18.ADD ENGINE OIL
19.INSPECT FOR ENGINE OIL LEAK
20.INSPECT COOLANT LEAKS
51410
21.INSTALL NO. 1 ENGINE UNDER COVER ASSEMBLY
22.INSPECT ENGINE OIL LEVEL
23.INSPECT ENGINE COOLANT QUALITY