G16E-GTS ENGINE MECHANICAL ENGINE UNIT REASSEMBLY
CAUTION / NOTICE / HINT
- NOTICE:
-
This procedure includes the installation of small-head bolts. Refer to Small-Head Bolts of Basic Repair Hint to identify the small-head bolts.
-
Click hereGeneral>INTRODUCTION>REPAIR INSTRUCTION>PRECAUTION
PROCEDURE

 1.INSTALL RING PIN
- NOTICE:
-
It is not necessary to remove the ring pins unless they are being replaced.
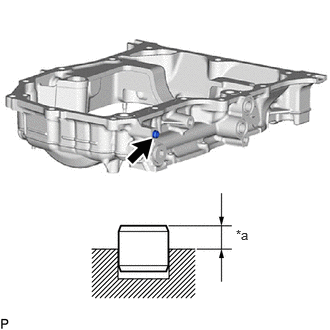
| *a | Protrusion Height |
Using a plastic hammer, tap in new ring pin to the oil pan sub-assembly.
- Standard Protrusion Height:
3.0 to 5.0 mm (0.118 to 0.197 in.)
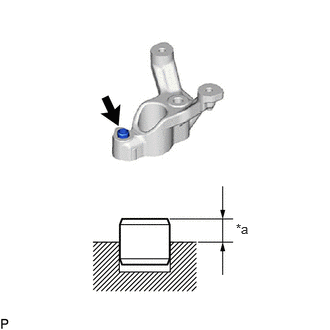
| *a | Protrusion Height |
Using a plastic hammer, tap in new ring pin to the camshaft position sensor holder.
- Standard Protrusion Height:
3.5 to 4.5 mm (0.138 to 0.177 in.)
2.INSTALL STUD BOLT
- NOTICE:
-
If a stud bolt is deformed or its threads are damaged, replace it.
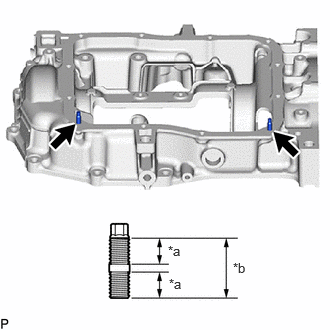
| *a | 9 mm (0.354 in.) |
| *b | 19 mm (0.748 in.) |
Using an E6 "TORX" socket wrench, install the 2 stud bolts to the oil pan sub-assembly.
- Torque:
- 4.0 N*m (41 kgf*cm, 35 in.*lbf)
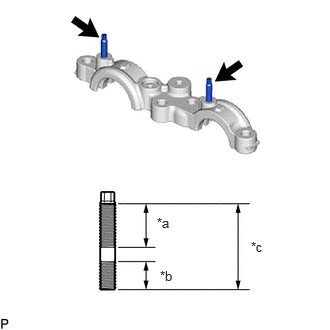
| *a | 16 mm (0.630 in.) |
| *b | 9 mm (0.354 in.) |
| *c | 21 mm (0.827 in.) |
Using an E6 "TORX" socket wrench, install the stud bolt to the camshaft bearing cap.
- Torque:
- 4.0 N*m (41 kgf*cm, 35 in.*lbf)
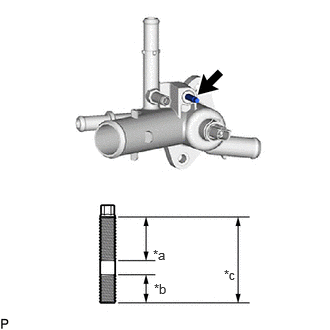
| *a | 16 mm (0.630 in.) |
| *b | 9 mm (0.354 in.) |
| *c | 21 mm (0.827 in.) |
Using an E6 "TORX" socket wrench, install the stud bolt to the water outlet sub-assembly.
- Torque:
- 4.0 N*m (41 kgf*cm, 35 in.*lbf)
3.INSPECT BALANCESHAFT BACKLASH
11401L
4.INSTALL REAR ENGINE OIL SEAL
5.INSTALL BALANCESHAFT HOUSING SPACER
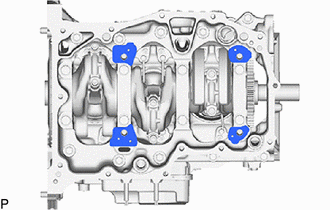
Install the balanceshaft housing spacer to the crankshaft bearing cap sub-assembly.
13620B
6.INSTALL ENGINE BALANCER ASSEMBLY
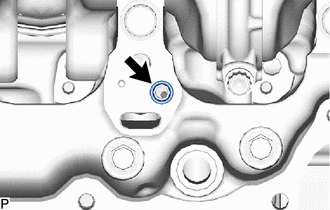
Install the new o-ring to the crankshaft bearing cap sub-assembly.
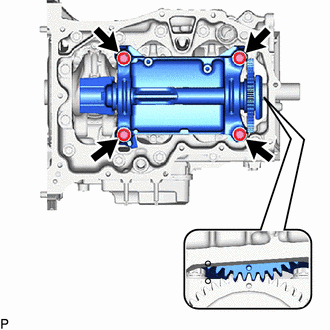
Install the engine balancer assembly to the crankshaft bearing cap sub-assembly with the 4 bolts.
- Torque:
- 1st : 43 N*m (438 kgf*cm, 32 ft.*lbf)
- 2nd : 54 N*m (551 kgf*cm, 40 ft.*lbf)
15104
7.INSTALL OIL STRAINER SUB-ASSEMBLY
Apply a light coat of engine oil to a new oil strainer gasket.
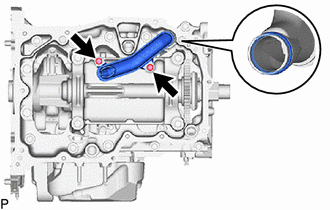
Install the oil strainer sub-assembly and oil strainer gasket to the stiffening crankcase assembly with the 2 bolts.
- Torque:
- 10 N*m (102 kgf*cm, 7 ft.*lbf)
12101
8.INSTALL OIL PAN SUB-ASSEMBLY
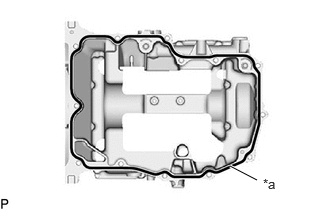
| *a | Seal Packing |
Apply seal packing in a continuous line as shown in the illustration.
- Seal Packing:
Toyota Genuine Seal Packing Black, Three Bond 1207B or equivalent
- Standard Seal Packing Dimension:
Area Specified Condition Continuous Line 2.5 to 3.5 mm (0.0984 to 0.138 in.)
- NOTICE:
- ·
Remove any oil from the contact surfaces.
·Install the oil pan sub-assembly within 3 minutes and tighten the bolts within 10 minutes of applying seal packing.
·Do not add engine oil for at least 2 hours after the installation.
·Make sure that the diameter at the start and end of each line of seal packing is 5 +/- 2 mm (0.197 +/- 0.0787 in.).
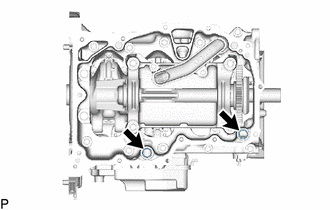
Install the 2 new o-ring to the crankshaft bearing cap assembly.
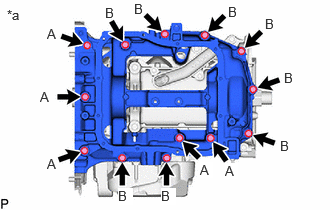
| *a | Bolt Type |
Temporarily install the oil pan sub-assembly with the 13 bolts.
- Bolt Length :
Item Length Bolt (A) 70 mm (2.76 in.) Bolt (B) 30 mm (1.18 in.)
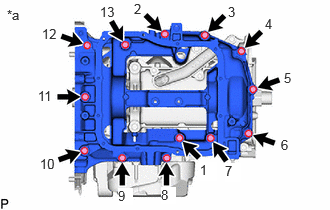
| *a | Tightening Order |
Tighten the 13 bolts in the order shown in the illustration to install the oil pan sub-assembly.
- Torque:
- 25 N*m (255 kgf*cm, 18 ft.*lbf)
12101D
9.INSTALL NO. 1 OIL PAN PLUG
Install a new gasket and the No. 1 oil pan plug to the oil pan sub-assembly.
- Torque:
- 44 N*m (449 kgf*cm, 32 ft.*lbf)
12102A
10.INSTALL NO. 2 OIL PAN SUB-ASSEMBLY
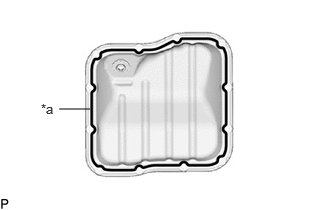
| *a | Seal Packing |
Apply seal packing in a continuous line as shown in the illustration.
- Seal Packing:
Toyota Genuine Seal Packing Black, Three Bond 1207B or equivalent
- Standard Seal Packing Dimension:
2.5 to 3.5 mm (0.0984 to 0.138 in.)
- NOTICE:
- ·
Remove any oil from the contact surfaces.
·Install the oil pan sub-assembly within 3 minutes and tighten the bolts and nuts within 10 minutes of applying seal packing.
·Do not start the engine for at least 2 hours after installation.
·Make sure that the diameter at the start and end of each line of seal packing is 5 +/- 2 mm (0.197 +/- 0.0787 in.).
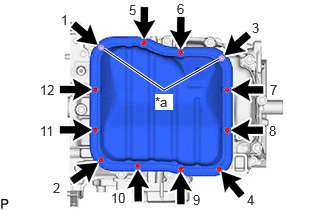
Install the No. 2 oil pan sub-assembly with the 9 bolts and 2 nuts in several steps in the order shown in the illustration.
- Torque:
- 10 N*m (102 kgf*cm, 7 ft.*lbf)
12101A
11.INSTALL OIL PAN DRAIN PLUG
Install a new gasket and the oil pan drain plug to the oil pan sub-assembly.
- Torque:
- 40 N*m (408 kgf*cm, 30 ft.*lbf)
15609
12.INSTALL OIL FILTER BRACKET SUB-ASSEMBLY
Install a 2 new gasket and the oil filter bracket sub-assembly to the oil pan sub-assembly.
- Torque:
- 21 N*m (214 kgf*cm, 15 ft.*lbf)
15710
13.INSTALL OIL COOLER ASSEMBLY
15600A
14.INSTALL OIL FILTER UNION
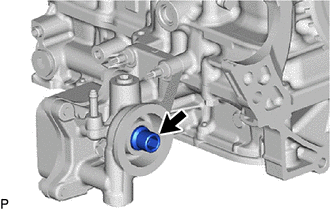
Using a 12 mm hexagon socket wrench, install the oil filter union to the stiffening crankcase assembly.
- Torque:
- 29.5 N*m (301 kgf*cm, 22 ft.*lbf)
15601
15.INSTALL OIL FILTER SUB-ASSEMBLY
11115
16.INSTALL CYLINDER HEAD GASKET
11101
17.INSTALL CYLINDER HEAD SUB-ASSEMBLY
- HINT:
-
The cylinder head set bolts are tightened in 3 progressive steps.
Place the cylinder head sub-assembly on the cylinder block sub-assembly.
- NOTICE:
- ·
Ensure that the contact surface of the cylinder head sub-assembly is free of oil.
·Place the cylinder head sub-assembly on the cylinder block sub-assembly gently in order not to damage the cylinder head gasket with the bottom of the cylinder head sub-assembly.
Install the 8 plate washers to the 8 cylinder head set bolts.
Apply a light coat of engine oil to the threads and under the heads of the cylinder head set bolts.
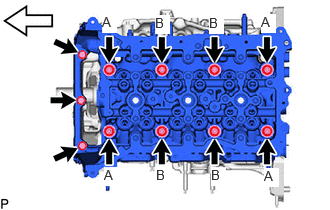

|
Front of Engine |
Install the 8 cylinder head set bolts and 3 boltsto the cylinder head sub-assembly.
- Bolt Diameter:
Item Diameter Bolt (A) 10 mm (0.394 in.) Bolt (B) 11 mm (0.433 in.)
Step 1:
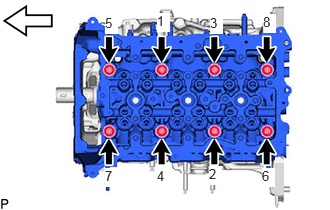
|
|
Front of Engine |
Using a 12 mm socket wrench, install and uniformly tighten the 8 cylinder head set bolts in several steps in the order shown in the illustration.
- NOTICE:
-
Be careful not to drop the plate washers into the cylinder head sub-assembly.
- Torque:
- Bolt (A) : 40 N*m (408 kgf*cm, 30 ft.*lbf)
- Bolt (B) : 50 N*m (510 kgf*cm, 37 ft.*lbf)
Step 2:
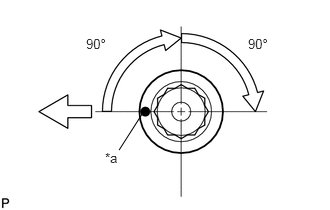
| *a | Paint Mark |
|
|
Front of Engine |
Mark each cylinder head set bolt head with paint as shown in the illustration.
Tighten the cylinder head set bolts 90° in the order shown in step 1.
Step 3:
Tighten the cylinder head set bolts another 90° in the order shown in step 1.
Check that the paint marks are now facing rearward.
- HINT:
-
Perform inspection after repair after replacing the cylinder head sub-assembly.
-
Click hereEngine / Hybrid System>G16E-GTS (ENGINE CONTROL)>SFI SYSTEM>INITIALIZATION
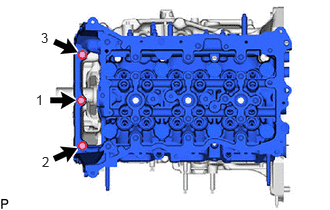
Install the 3 bolts in the order shown in the illustration.
- Torque:
- 25 N*m (255 kgf*cm, 18 ft.*lbf)
13716
18.INSTALL VALVE STEM CAP
Apply a light coat of engine oil to the valve stem cap ends.
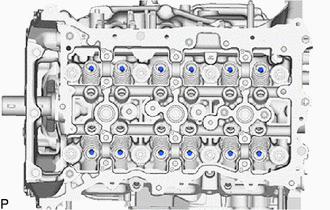
Install the 12 valve stem caps to the cylinder head sub-assembly.
- NOTICE:
- ·
Install the same parts in the same combination to their original locations.
·Do not drop the valve stem caps into the cylinder head sub-assembly.
13750
19.INSTALL VALVE LASH ADJUSTER ASSEMBLY
Inspect the 12 valve lash adjuster assemblies before installing them.
Click hereEngine / Hybrid System>G16E-GTS (ENGINE MECHANICAL)>ENGINE UNIT>INSPECTION
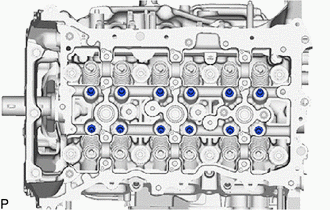
Install the 12 valve lash adjuster assemblies to the cylinder head sub-assembly.
- NOTICE:
-
Install the same parts in the same combination to their original locations.
13801
20.INSTALL NO. 1 VALVE ROCKER ARM SUB-ASSEMBLY
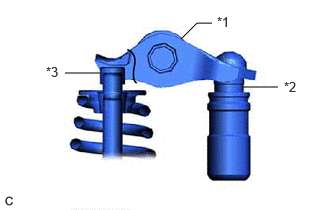
| *1 | No. 1 Valve Rocker Arm Sub-assembly |
| *2 | Valve Lash Adjuster Assembly |
| *3 | Valve Stem Cap |
Apply engine oil to the valve lash adjuster assembly tips and valve stem caps.
Install the 12 No. 1 valve rocker arm sub-assemblies as shown in the illustration.
- NOTICE:
-
Install the same parts in the same combination to their original locations.
21.INSTALL NO. 1 CAMSHAFT BEARING CAP
Install the No. 1 camshaft bearing cap to the cylinder head sub-assembly.
13502B
22.INSTALL EXHAUST CAMSHAFT SUB-ASSEMBLY
- HINT:
-
Perform inspection after repair after replacing the exhaust camshaft sub-assembly.
-
Click hereEngine / Hybrid System>G16E-GTS (ENGINE CONTROL)>SFI SYSTEM>INITIALIZATION
Clean the camshaft journals and camshaft bearing caps.
Apply a light coat of engine oil to the camshaft journals and camshaft bearing caps.
Install the exhaust camshaft sub-assembly to the camshaft bearing caps.
13501A
23.INSTALL INTAKE CAMSHAFT SUB-ASSEMBLY
- HINT:
-
Perform inspection after repair after replacing the intake camshaft sub-assembly.
-
Click hereEngine / Hybrid System>G16E-GTS (ENGINE CONTROL)>SFI SYSTEM>INITIALIZATION
Clean the camshaft journals and camshaft bearing caps.
Apply a light coat of engine oil to the camshaft journals, camshaft bearing caps.
Install the intake camshaft sub-assembly to the camshaft bearing caps.
24.INSTALL CAMSHAFT BEARING CAP
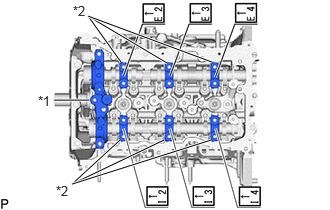
| *1 | No. 2 camshaft bearing cap |
| *2 | No. 4 camshaft bearing cap |
Set the No. 2 camshaft bearing cap and 6 No. 4 camshaft bearing caps.
- Installation Position of No. 2 Camshaft Bearing Cap:
Installation Position Inscribed No. Intake No. 1 cylinder I2 Intake No. 2 cylinder I3 Intake No. 3 cylinder I4 Exhaust No. 1 cylinder E2 Exhaust No. 2 cylinder E3 Exhaust No. 3 cylinder E4
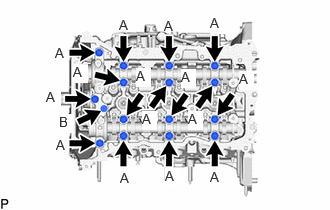
Install and uniformly tighten the 16 bolts.
- Torque:
- 18 N*m (184 kgf*cm, 13 ft.*lbf)
- Bolt Length:
Item Length Bolt (A) 65 mm (2.56 in.) Bolt (B) 40 mm (1.57 in.)
Check the torque of each bolt again.
19318
25.TEMPORARILY TIGHTEN CAMSHAFT POSITION SENSOR HOLDER
Temporarily tighten the camshaft position sensor holder with the bolt.
23476
26.INSTALL FUEL PUMP LIFTER HOUSING
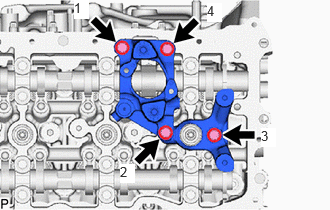
Install the 3 bolts in the order shown in the illustration.
- Torque:
- 21 N*m (214 kgf*cm, 15 ft.*lbf)
23477
27.INSTALL FUEL PUMP LIFTER GUIDE
Install the fuel pump lifter guide with the 2 bolts.
- Torque:
- 10 N*m (102 kgf*cm, 7 ft.*lbf)
13050
28.INSTALL CAMSHAFT TIMING GEAR ASSEMBLY
- HINT:
-
Perform inspection after repair after replacing the camshaft timing gear assembly.
-
Click hereEngine / Hybrid System>G16E-GTS (ENGINE CONTROL)>SFI SYSTEM>INITIALIZATION
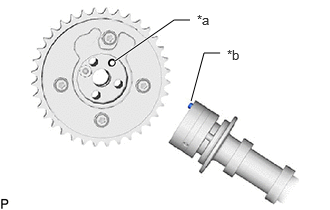
| *a | Knock Pin Hole |
| *b | Knock Pin |
Align and fit the knock pin of the intake camshaft sub-assembly to the knock pin hole of the camshaft timing gear assembly.
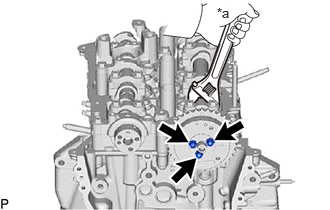
| *a | Hold |
Using a wrench, hold the hexagonal portion of the intake camshaft sub-assembly.
- NOTICE:
- ·
Be careful not to damage the camshaft housing sub-assembly, cylinder head sub-assembly or spark plug tube with the wrench.
Using a 5 mm hexagon socket wrench, install the camshaft timing gear assembly with the 3 bolts and install the camshaft timing oil control valve assembly (intake camshaft timing gear bolt assembly).
- Torque:
- 19 N*m (194 kgf*cm, 14 ft.*lbf)
13070A
29.INSTALL CAMSHAFT TIMING EXHAUST GEAR ASSEMBLY
- HINT:
-
Perform inspection after repair after replacing the camshaft timing exhaust gear assembly.
-
Click hereEngine / Hybrid System>G16E-GTS (ENGINE CONTROL)>SFI SYSTEM>INITIALIZATION
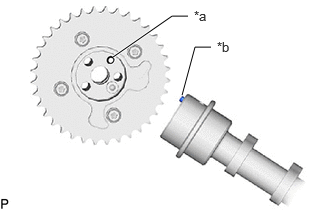
| *a | Knock Pin Hole |
| *b | Knock Pin |
Align and fit the knock pin of the exhaust camshaft sub-assembly to the knock pin hole of the camshaft timing exhaust gear assembly.
Using a wrench, hold the hexagonal portion of the exhaust camshaft sub-assembly.
- NOTICE:
- ·
Be careful not to damage the cylinder head sub-assembly or spark plug tube with the wrench.
·Do not disassemble the camshaft timing exhaust gear assembly.
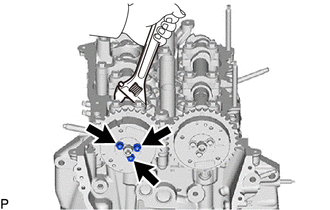
Using a 5 mm hexagon socket wrench, install the camshaft timing exhaust gear assembly with the 3 bolts and install the camshaft timing oil control valve assembly (exhaust camshaft timing gear bolt assembly).
- Torque:
- 19 N*m (194 kgf*cm, 14 ft.*lbf)
13471A
30.INSTALL CRANKSHAFT TIMING GEAR KEY
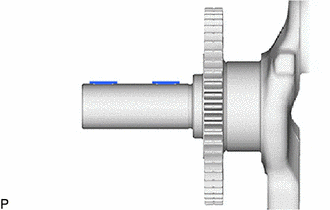
Using a plastic hammer, tap in the 2 crankshaft timing gear keys.
- HINT:
-
Tap in the crankshaft timing gear keys until they contact the crankshaft as shown in the illustration.
13521
31.INSTALL CRANKSHAFT TIMING GEAR OR SPROCKET
Install the crankshaft timing gear or sprocket to the crankshaft.
32.SET NO. 1 CYLINDER TO TDC (COMPRESSION)
Temporarily install the crankshaft pulley bolt.
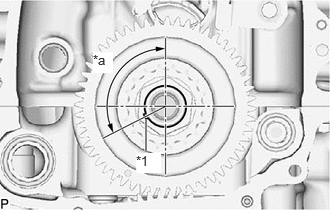
| *1 | Crankshaft Timing Gear Key |
| *a | 117.11° |
Rotate the crankshaft 117.11° counterclockwise to position the crankshaft timing gear key as shown in the illustration.
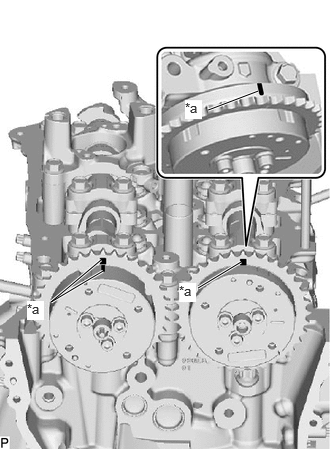
| *a | Timing Mark |
Check that the timing marks of the camshaft timing exhaust gear assembly and camshaft timing gear assembly are as shown in the illustration.
13561
33.INSTALL NO. 1 CHAIN VIBRATION DAMPER
Install the No. 1 chain vibration damper with the 2 bolts.
- Torque:
- 24 N*m (245 kgf*cm, 18 ft.*lbf)
13506
34.INSTALL CHAIN SUB-ASSEMBLY
Remove the crankshaft pulley bolt.
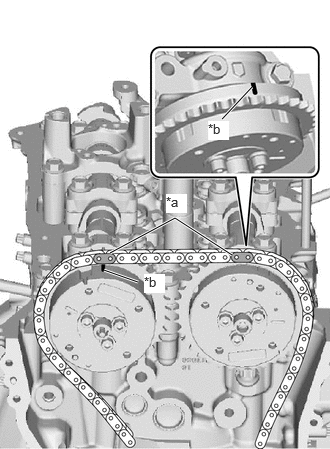
| *a | Paint Mark (pink) |
| *b | Timing Mark |
Align the paint mark (pink) of the chain sub-assembly with the timing mark of the canshaft ttiming gear assembly, camshaft timing exhaust gear assembly and install the chain sub-assembly to the canshaft ttiming gear assembly and camshaft timing exhaust gear assembly.
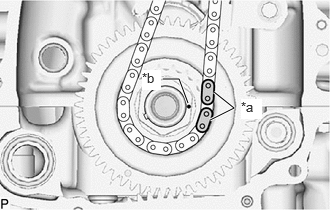
| *a | Paint Mark (Yellow) |
| *b | Timing Mark |
Align the paint mark (yellow) of the chain sub-assembly with the timing mark of the crankshaft timing sprocket and install the chain sub-assembly to the crankshaft timing sprocket.
13559
35.INSTALL CHAIN TENSIONER SLIPPER
Install the chain tensioner slipper with the bolt.
- Torque:
- 21 N*m (214 kgf*cm, 15 ft.*lbf)
87156N
36.INSTALL DAMPER PLATE SPACER
Install the damper plate spacer to the No. 2 camshaft bearing cap.
13566B
37.INSTALL TIMING CHAIN GUIDE
Install the timing chain guide with the 2 nuts.
- Torque:
- 10 N*m (102 kgf*cm, 7 ft.*lbf)
13540
38.INSTALL NO. 1 CHAIN TENSIONER ASSEMBLY
- HINT:
-
After replacing or removing and installing the No. 1 chain tensioner assembly, an abnormal noise may occur at start up until the oil in the line has had time to replenish.
Install the No. 1 chain tensioner assembly with the 2 bolts.
- Torque:
- 10 N*m (102 kgf*cm, 7 ft.*lbf)
Remove the hexagon wrench.
39.SET NO. 1 CYLINDER TO TDC (COMPRESSION)
11310
40.INSTALL TIMING CHAIN COVER ASSEMBLY
11301C
41.INSTALL TIMING CHAIN COVER OIL SEAL
11320B
42.INSTALL NO. 2 TIMING CHAIN COVER ASSEMBLY
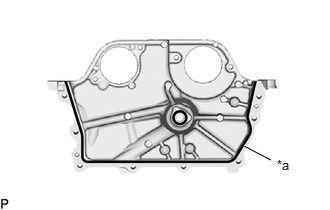
| *a | Seal Packing |
Apply seal packing in a continuous line as shown in the illustration.
- Seal Packing:
Toyota Genuine Seal Packing Black, Three Bond 1207B or equivalent
- Standard Seal Packing Dimension:
Area Specified Condition Continuous Line 2.5 to 3.5 mm (0.0984 to 0.138 in.)
- NOTICE:
- ·
Remove any oil from the contact surfaces.
·Install the No. 2 timing chain cover assembly within 3 minutes and tighten the bolts within 10 minutes of applying seal packing.
·Do not add engine oil for at least 2 hours after the installation.
·Make sure that the diameter at the start and end of each line of seal packing is 5 +/- 2 mm (0.197 +/- 0.0787 in.).
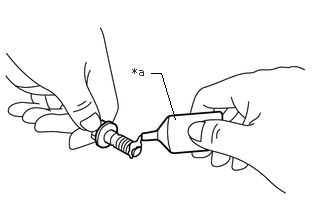
| *a | Adhesive |
Apply adhesive to 2 or 3 threads at the end of each of the 2 bolts (B).
- Adhesive:
Toyota Genuine Adhesive 1324, Three Bond 1324 or equivalent
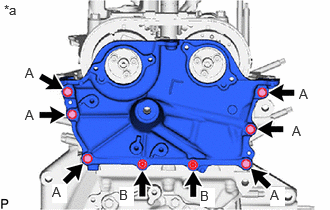
| *a | Bolt Type |
Temporarily tighten the No. 2 timing chain assembly with the 8 bolts.
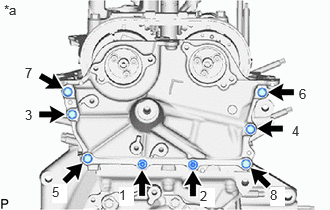
| *a | Tightening Order |
Tighten the 8 bolts in the order shown in the illustration.
- Torque:
- 12 N*m (122 kgf*cm, 9 ft.*lbf)
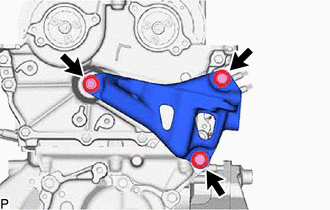
Install the engine mounting bracket RH with the 3 bolts in the order shown in the illustration.
- Torque:
- 43 N*m (438 kgf*cm, 32 ft.*lbf)
- NOTICE:
-
After applying seal packing to the No. 2 timing chain cover assembly, install the engine mounting bracket RH within 10 minutes.
12551A
43.INSTALL NO. 1 VACUUM PUMP BRACKET
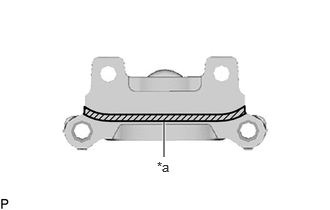
| *a | Seal Packing |
Apply seal packing in a continuous line as shown in the illustration.
- Seal Packing:
Toyota Genuine Seal Packing Black, Three Bond 1207B or equivalent
- Standard Seal Packing Dimension:
Area Specified Condition Continuous Line 3.0 to 4.0 mm (0.118 to 0.157 in.)
- NOTICE:
- ·
Remove any oil from the contact surfaces.
·Install the No. 2 timing chain cover assembly within 3 minutes and tighten the bolts within 10 minutes of applying seal packing.
·Do not add engine oil for at least 2 hours after the installation.
·Make sure that the diameter at the start and end of each line of seal packing is 5 +/- 2 mm (0.197 +/- 0.0787 in.).
Install the No. 1 vacuum pump bracket with the 4 bolts.
- Torque:
- 21 N*m (214 kgf*cm, 15 ft.*lbf)
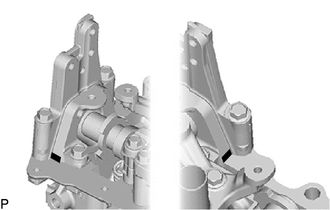
Wipe off any excess seal packing.
11193
44.INSTALL SPARK PLUG TUBE GASKET
Install 3 new spark plug tube gaskets to the cylinder head cover sub-assembly.
11201
45.INSTALL CYLINDER HEAD COVER SUB-ASSEMBLY
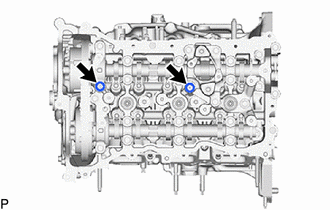
Install a new 2 camshaft bearing cap oil hole gaskets to the No. 2 camshaft bearing cap and fuel pump lifter housing.
- NOTICE:
-
Remove any oil from the contact surfaces.
Install 5 new cylinder head cover gaskets to the cylinder head cover sub-assembly.
- NOTICE:
-
Remove any oil from the contact surfaces.
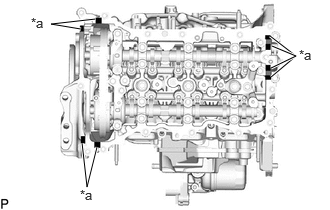
| *a | Seal Packing Diameter: 3.0 to 6.0 mm (0.118 to 0.236 in.) |

|
Seal Packing |
Apply seal packing as shown in the illustration.
- Seal Packing:
Toyota Genuine Seal Packing Black, Three Bond 1207B or equivalent
- Standard Seal Packing Diameter:
3.0 to 6.0 mm (0.118 to 0.236 in.)
- NOTICE:
- ·
Remove any oil from the contact surfaces.
·Install the cylinder head cover sub-assembly within 3 minutes and tighten the bolts within 15 minutes of applying seal packing.
·Do not start the engine for at least 2 hours after installation.
| *a | Adhesive |
Apply adhesive to 2 or 3 threads at the end of each of the bolt (D).
- Adhesive:
Toyota Genuine Adhesive 1324, Three Bond 1324 or equivalent
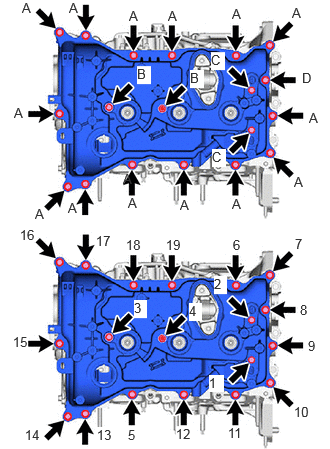
Install the 2 camshaft position sensors (for Exhaust Side and for Intake Side) and cylinder head cover sub-assembly with 2 bolts (B) and the 11 bolts (A,D) and 2 bolts (C) in the order shown in the illustration.
- Bolt Length:
Bolt Length Thread Diameter (A) 23.5 mm (0.925 in.) 6 mm (0.236 in.) (B) 45 mm (1.77 in.) 5.22 mm (0.206 in.) (C) 30 mm (1.18 in.) 5.22 mm (0.206 in.)
- Torque:
- 10 N*m (102 kgf*cm, 7 ft.*lbf)
- NOTICE:
- ·
If a camshaft position sensor (for Exhaust Side and for Intake Side) has been struck or dropped, replace it.
·Make sure that the 2 O-rings are not cracked or moved out of place when installing the 2 camshaft position sensors (for Exhaust Side and for Intake Side).
·Do not start the engine for at least 2 hours after installation.
16304
46.INSTALL OUTLET WATER SUB-ASSEMBLY
Install the outlet water sub-assembly and a new outlet water gasket to the cylinder head sub-assembly with the 2 nuts.
- Torque:
- 10 N*m (102 kgf*cm, 7 ft.*lbf)
13470
47.INSTALL CRANKSHAFT PULLEY ASSEMBLY
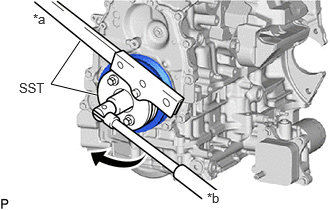
| *a | Hold |
| *b | Turn |
Align the crankshaft timing gear key with the key groove of the crankshaft pulley assembly.
Using SST, hold the crankshaft pulley assembly and install the crankshaft pulley set bolt.
- SST
- 09213-54015
09330-00021
- Torque:
- 260 N*m (2651 kgf*cm, 192 ft.*lbf)
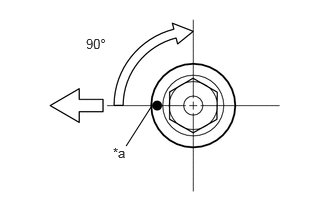
| *a | Paint Mark |
|
|
Front of Engine |
Mark each crankshaft pulley set bolt with paint as shown in the illustration.
Tighten the crankshaft pulley set bolt 90°.
29300
48.INSTALL VACUUM PUMP ASSEMBLY
12204C
49.INSTALL PCV VALVE (VENTILATION VALVE SUB-ASSEMBLY)
11401G
50.INSTALL CRANKSHAFT POSITION SENSOR
12108A
51.INSTALL OIL FILLER CAP GASKET
Install a new oil filler cap gasket to the oil filler cap sub-assembly.
12180E
52.INSTALL OIL FILLER CAP ASSEMBLY
Install the oil filler cap sub-assembly to the cylinder head cover sub-assembly.
16032
53.INSTALL ENGINE WATER PUMP ASSEMBLY (WATER INLET HOUSING)
16031
54.INSTALL WATER INLET WITH THERMOSTAT SUB-ASSEMBLY
15370
55.INSTALL CAM TIMING OIL CONTROL SOLENOID ASSEMBLY (for Intake Side)
15370
56.INSTALL CAM TIMING OIL CONTROL SOLENOID ASSEMBLY (for Exhaust Side)
89448D
57.INSTALL OIL PRESSURE AND TEMPERATURE SENSOR
19100P
58.INSTALL SPARK PLUG