LIGHTING SYSTEM > Turn Signal Light Circuit |
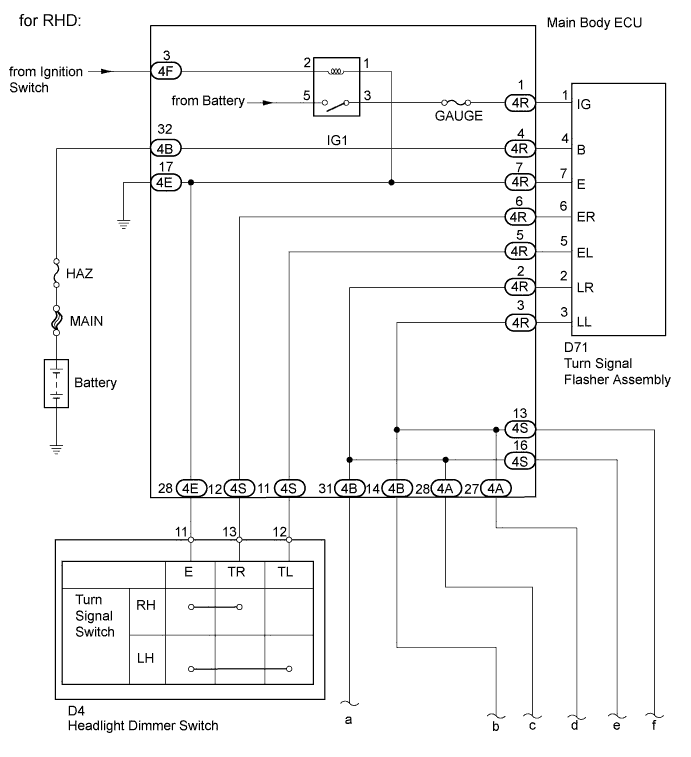
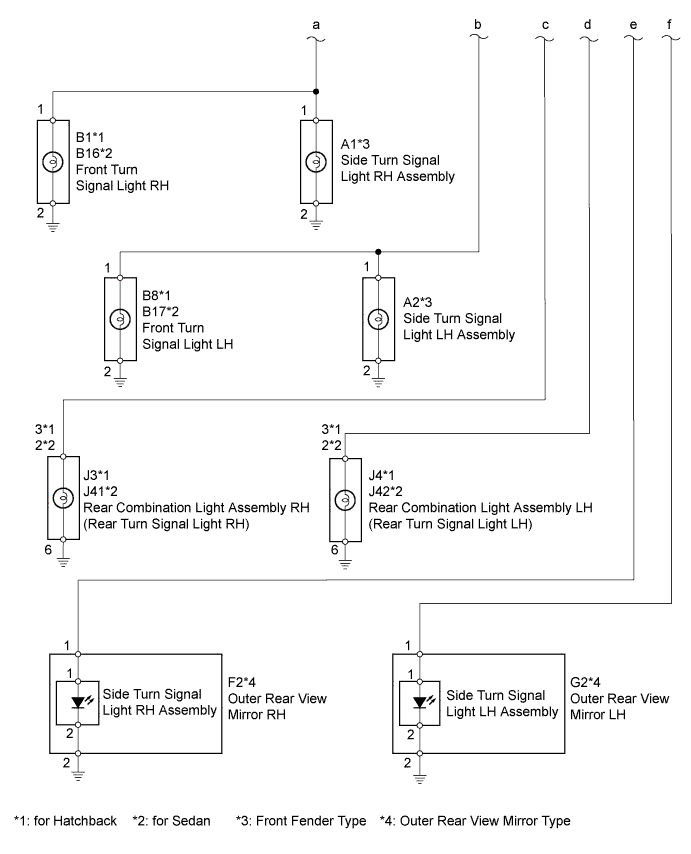
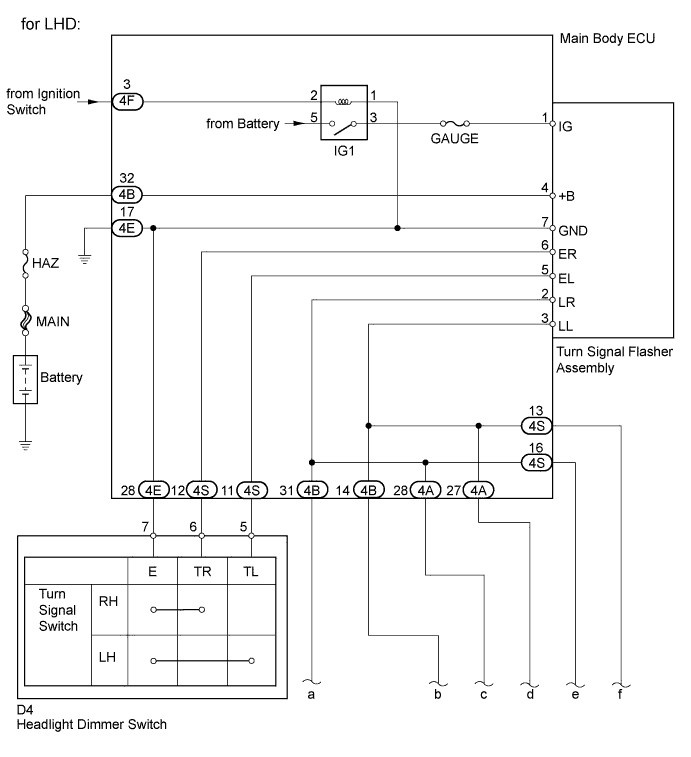
| 1.INSPECT VEHICLE TYPE |
Check the vehicle type.
| Vehicle Type | Proceed to |
| for LHD | A |
| for RHD | B |
|
| ||||
| A | |
 |
| 2.CHECK OPERATION |
When the turn signal light switch is operated, check that the appropriate turn signal light flashes.
| Result | Proceed to |
| No lights flash | A |
| Front turn signal light (LH or RH) does not flash | B |
| Side turn signal light (LH or RH) does not flash | C |
| Rear turn signal light (LH or RH) does not flash | D |
|
| ||||
|
| ||||
|
| ||||
| A | |
|
| 3.INSPECT HEADLIGHT DIMMER SWITCH |
Inspect the headlight dimmer switch (Click here)
|
| ||||
| OK | |
|
| 4.CHECK HARNESS AND CONNECTOR (HEADLIGHT DIMMER SWITCH - MAIN BODY ECU) |
Disconnect the D4 headlight dimmer switch connector.
Disconnect the 4E and 4S main body ECU connectors.
Measure the resistance according to the value(s) in the table below.
| Tester Connection | Condition | Specified Condition |
| D4-5 (TL) - 4S-11 | Always | Below 1 Ω |
| D4-5 (TL) or 4S-11 - Body ground | Always | 10 kΩ or higher |
| D4-6 (TR) - 4S-12 | Always | Below 1 Ω |
| D4-6 (TR) or 4S-12 - Body ground | Always | 10 kΩ or higher |
| D4-7 (E) - 4E-28 | Always | Below 1 Ω |
| D4-7 (E) or 4E-28 - Body ground | Always | 10 kΩ or higher |
Reconnect the main body ECU connectors.
Reconnect the headlight dimmer switch connector.
|
| ||||
| OK | |
|
| 5.CHECK HARNESS AND CONNECTOR (MAIN BODY ECU - BODY GROUND) |
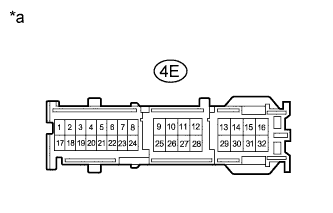 |
Disconnect the 4E main body ECU connector.
Measure the resistance according to the value(s) in the table below.
| Tester Connection | Condition | Specified Condition |
| 4E-17 - Body ground | Always | Below 1 Ω |
| *a | Front view of wire harness connector (to Main Body ECU) |
Reconnect the main body ECU connector.
|
| ||||
| OK | |
|
| 6.CHECK HARNESS AND CONNECTOR (MAIN BODY ECU - BATTERY) |
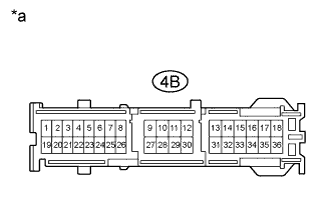 |
Disconnect the 4B main body ECU connector.
Measure the voltage according to the value(s) in the table below.
| Tester Connection | Condition | Specified Condition |
| 4B-32 - Body ground | Always | 11 to 14 V |
| *a | Front view of wire harness connector (to Main Body ECU) |
Reconnect the main body ECU connector.
|
| ||||
| OK | |
|
| 7.INSPECT MAIN BODY ECU |
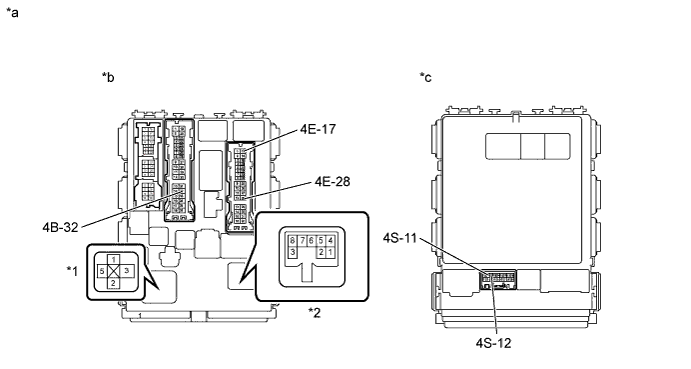
| *1 | IG1 Relay | *2 | Turn Signal Flasher Assembly |
| *a | Component without harness connected (Main Body ECU) | *b | Rear View |
| *c | Front View | - | - |
Remove the main body ECU.
Remove the IG1 relay from the main body ECU.
Measure the resistance according to the value(s) in the table below.
| Tester Connection | Condition | Specified Condition |
| 4B-32 - Turn signal flasher assembly-4 (+B) | Always | Below 1 Ω |
| 4E-17 - Turn signal flasher assembly-7 (GND) | Always | Below 1 Ω |
| 4E-28 - Turn signal flasher assembly-7(GND) | Always | Below 1 Ω |
| 4S-11 - Turn signal flasher assembly-5 (EL) | Always | Below 1 Ω |
| 4S-12 - Turn signal flasher assembly-6 (ER) | Always | Below 1 Ω |
| IG1 relay terminal 3 - Turn signal flasher assembly-1 (IG) | Always | Below 1 Ω |
Reinstall the IG1 relay.
Reinstall the main body ECU.
|
| ||||
| OK | ||
 | ||
| ||
| 8.INSPECT FRONT TURN SIGNAL LIGHT |
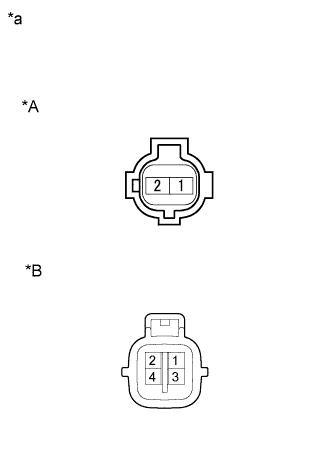 |
Remove the headlight assembly.
Apply battery voltage to the terminals and check that the front turn signal light illuminates.
| Measurement Condition | Specified Condition |
| Positive battery - Terminal 1 Negative battery - Terminal 2 | Front turn signal light illuminates |
| *A | for Hatchback |
| *B | for Sedan |
| *a | Component without harness connected (Front Turn Signal Light) |
| Result | Proceed to |
| OK | A |
| NG (Hatchback) | B |
| NG (Sedan) | C |
Reinstall the headlight assembly.
|
| ||||
|
| ||||
| A | |
|
| 9.CHECK HARNESS AND CONNECTOR (FRONT TURN SIGNAL LIGHT - MAIN BODY ECU) |
for Hatchback
Disconnect the B1 and B8 front turn signal light connectors.
for Sedan
Disconnect the B16 and B17 front turn signal light connectors.
Disconnect the 4B main body ECU connector.
Measure the resistance according to the value(s) in the table below.
| Tester Connection | Condition | Specified Condition |
| B1-1 - 4B-31 | Always | Below 1 Ω |
| B1-1 or 4B-31 - Body ground | Always | 10 kΩ or higher |
| B8-1 - 4B-14 | Always | Below 1 Ω |
| B8-1 or 4B-14 - Body ground | Always | 10 kΩ or higher |
| Tester Connection | Condition | Specified Condition |
| B16-1 - 4B-31 | Always | Below 1 Ω |
| B16-1 or 4B-31 - Body ground | Always | 10 kΩ or higher |
| B17-1 - 4B-14 | Always | Below 1 Ω |
| B17-1 or 4B-14 - Body ground | Always | 10 kΩ or higher |
Reconnect the main body ECU connector.
Reconnect the front turn signal light connectors.
|
| ||||
| OK | |
|
| 10.CHECK HARNESS AND CONNECTOR (FRONT TURN SIGNAL LIGHT - BODY GROUND) |
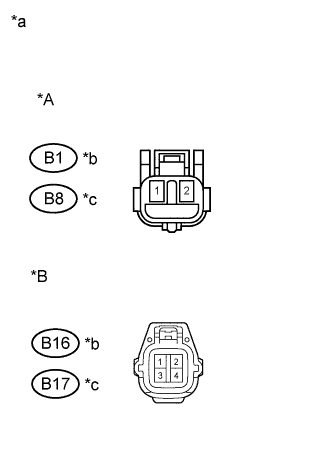 |
for Hatchback
Disconnect the B1 and B8 front turn signal light connectors.
for Sedan
Disconnect the B16 and B17 front turn signal light connectors.
Measure the resistance according to the value(s) in the table below.
| Tester Connection | Condition | Specified Condition |
| B1-2 - Body ground | Always | Below 1 Ω |
| B8-2 - Body ground | Always | Below 1 Ω |
| Tester Connection | Condition | Specified Condition |
| B16-2 - Body ground | Always | Below 1 Ω |
| B17-2 - Body ground | Always | Below 1 Ω |
| *A | for Hatchback |
| *B | for Sedan |
| *a | Front view of wire harness connector (to Front Turn Signal Light) |
| *b | RH Side |
| *c | LH Side |
Reconnect the front turn signal light connectors.
|
| ||||
| OK | |
|
| 11.INSPECT MAIN BODY ECU |
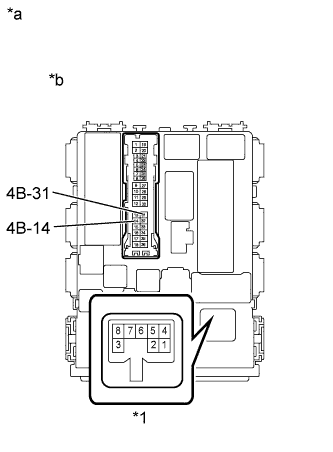 |
Remove the main body ECU.
Measure the resistance according to the value(s) in the table below.
| Tester Connection | Condition | Specified Condition |
| 4B-14 - Turn signal flasher assembly-3 (LL) | Always | Below 1 Ω |
| 4B-31 - Turn signal flasher assembly-2 (LR) | Always | Below 1 Ω |
| *1 | Turn Signal Flasher Assembly |
| *a | Component without harness connected (Main Body ECU) |
| *b | Rear View |
Reinstall the main body ECU.
|
| ||||
| OK | ||
| ||
| ||
| 12.INSPECT SIDE TURN SIGNAL LIGHT ASSEMBLY |
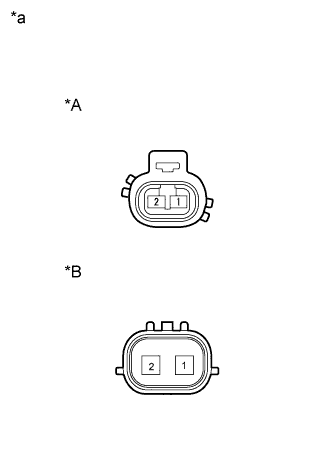 |
Remove the side turn signal light assembly.
Apply battery voltage to the terminals and check that the side turn signal light illuminates.
| Measurement Condition | Specified Condition |
| Positive battery - Terminal 1 Negative battery - Terminal 2 | Side turn signal light illuminates |
| *A | Front Fender Type |
| *B | Outer Rear View Mirror Type |
| *a | Component without harness connected (Side Turn Signal Light Assembly) |
| Result | Proceed to |
| OK (Front Fender Type) | A |
| OK (Outer Rear View Mirror Type) | B |
| NG (for Hatchback) | C |
| NG (for Sedan with Front Fender Type) | D |
| NG (for Sedan with Outer Rear View Mirror Type) | E |
Reinstall the side turn signal light assembly.
|
| ||||
|
| ||||
|
| ||||
|
| ||||
| A | |
|
| 13.CHECK HARNESS AND CONNECTOR (SIDE TURN SIGNAL LIGHT ASSEMBLY - MAIN BODY ECU) |
Disconnect the A1 and A2 side turn signal light assembly connectors.
Disconnect the 4B main body ECU connector.
Measure the resistance according to the value(s) in the table below.
| Tester Connection | Condition | Specified Condition |
| A1-1 - 4B-31 | Always | Below 1 Ω |
| A1-1 or 4B-31- Body ground | Always | 10 kΩ or higher |
| A2-1 - 4B-14 | Always | Below 1 Ω |
| A2-1 or 4B-14 - Body ground | Always | 10 kΩ or higher |
Reconnect the main body ECU connector.
Reconnect the side turn signal light assembly connectors.
|
| ||||
| OK | |
|
| 14.CHECK HARNESS AND CONNECTOR (SIDE TURN SIGNAL LIGHT ASSEMBLY - BODY GROUND) |
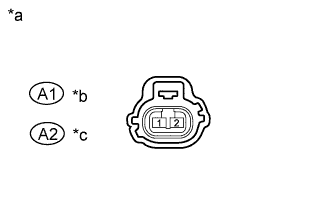 |
Disconnect the A1 and A2 side turn signal light assembly connectors.
Measure the resistance according to the value(s) in the table below.
| Tester Connection | Condition | Specified Condition |
| A1-2 - Body ground | Always | Below 1 Ω |
| A2-2 - Body ground | Always | Below 1 Ω |
| *a | Front view of wire harness connector (to Side Turn Signal Light Assembly) |
| *b | RH Side |
| *c | LH Side |
Reconnect the side turn signal light assembly connectors.
|
| ||||
| OK | |
|
| 15.INSPECT MAIN BODY ECU |
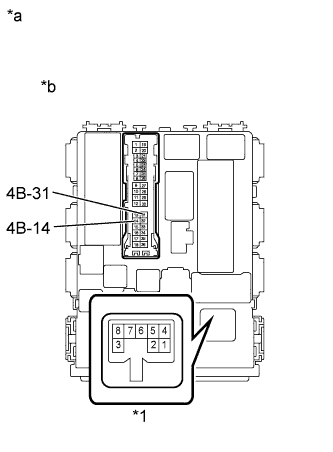 |
Remove the main body ECU.
Measure the resistance according to the value(s) in the table below.
| Tester Connection | Condition | Specified Condition |
| 4B-14 - Turn signal flasher assembly-3 (LL) | Always | Below 1 Ω |
| 4B-31 - Turn signal flasher assembly-2 (LR) | Always | Below 1 Ω |
| *1 | Turn Signal Flasher Assembly |
| *a | Component without harness connected (Main Body ECU) |
| *b | Rear view |
Reinstall the main body ECU.
|
| ||||
| OK | ||
| ||
| ||
| 16.INSPECT OUTER REAR VIEW MIRROR ASSEMBLY (SYSTEM VOLTAGE) |
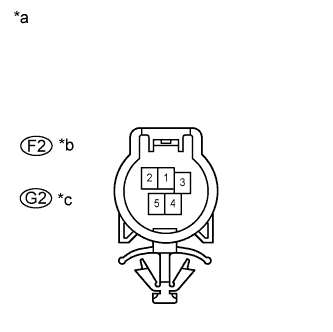 |
Disconnect the F2 and G2 outer rear view mirror assembly connectors.
Measure the voltage according to the value(s) in the table below.
| Tester Connection | Switch Condition | Specified Condition |
| F2-1 - Body ground | Turn signal (right turn) OFF → ON | Below 1 V → 11 to 14 V (60 to 120 times per minute |
| G2-1 - Body ground | Turn signal (left turn) OFF → ON | Below 1 V → 11 to 14 V (60 to 120 times per minute |
| *a | Front view of wire harness connector (to Outer Rear View Mirror Assembly) |
| *b | RH Side |
| *c | LH Side |
Reconnect the outer rear view mirror assembly connectors.
|
| ||||
| OK | |
|
| 17.CHECK HARNESS AND CONNECTOR (OUTER REAR VIEW MIRROR ASSEMBLY - BODY GROUND) |
|
Disconnect the F2 and G2 outer rear view mirror assembly connectors.
Measure the resistance according to the value(s) in the table below.
| Tester Connection | Switch Condition | Specified Condition |
| F2-2 - Body ground | Always | Below 1 Ω |
| G2-2 - Body ground | Always | Below 1 Ω |
| *a | Front view of wire harness connector (to Outer Rear View Mirror Assembly) |
| *b | RH Side |
| *c | LH Side |
Reconnect the outer rear view mirror assembly connectors.
|
| ||||
| OK | ||
| ||
| ||
| 18.CHECK HARNESS AND CONNECTOR (OUTER REAR VIEW MIRROR ASSEMBLY - MAIN BODY ECU) |
Disconnect the F2 and G2 outer rear view mirror assembly connectors.
Disconnect the 4S main body ECU connector.
Measure the resistance according to the value(s) in the table below.
| Tester Connection | Switch Condition | Specified Condition |
| F2-1 - 4S-16 | Always | Below 1 Ω |
| F2-1 or 4S-16 - Body ground | Always | 10 kΩ or higher |
| G2-1 - 4S-13 | Always | Below 1 Ω |
| G2-1 or 4S-13 - Body ground | Always | 10 kΩ or higher |
Reconnect the outer rear view mirror assembly connectors.
Reconnect the main body ECU connector.
|
| ||||
| OK | |
|
| 19.INSPECT MAIN BODY ECU |
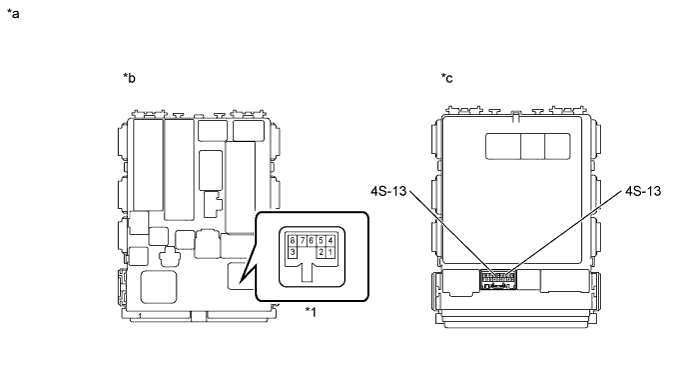
| *1 | Turn Signal Flasher Assembly | - | - |
| *a | Component without harness connected (Main Body ECU) | *b | Rear View |
| *c | Front View | - | - |
Remove the main body ECU.
Measure the resistance according to the value(s) in the table below.
| Tester Connection | Condition | Specified Condition |
| 4S-13 - Turn signal flasher assembly-3 (LL) | Always | Below 1 Ω |
| 4S-16 - Turn signal flasher assembly-2 (LR) | Always | Below 1 Ω |
Reinstall the main body ECU.
|
| ||||
| OK | ||
| ||
| ||
| 20.INSPECT REAR COMBINATION LIGHT ASSEMBLY |
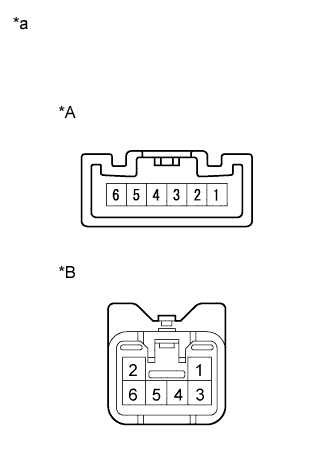 |
Remove the rear combination light assembly.
Apply battery voltage to the terminals and check that the rear turn signal light illuminates.
| Measurement Condition | Specified Condition |
| Positive battery - Terminal 3 Negative battery - Terminal 6 | Rear turn signal light illuminates |
| Measurement Condition | Specified Condition |
| Positive battery - Terminal 2 Negative battery - Terminal 6 | Rear turn signal light illuminates |
| *A | for Hatchback |
| *B | for Sedan |
| *a | Component without harness connected (Rear Combination Light Assembly) |
| Result | Proceed to |
| OK | A |
| NG (Hatchback) | B |
| NG (Sedan) | C |
Reinstall the rear combination light assembly.
|
| ||||
|
| ||||
| A | |
|
| 21.CHECK HARNESS AND CONNECTOR (REAR COMBINATION LIGHT ASSEMBLY - MAIN BODY ECU) |
for Hatchback
Disconnect the J3 and J4 Rear combination light assembly connectors.
for Sedan
Disconnect the J41 and J42 Rear combination light assembly connectors.
Disconnect the 4A main body ECU connector.
Measure the resistance according to the value(s) in the table below.
| Tester Connection | Condition | Specified Condition |
| J3-3 - 4A-28 | Always | Below 1 Ω |
| J3-3 or 4A-28 - Body ground | Always | 10 kΩ or higher |
| J4-3 - 4A-27 | Always | Below 1 Ω |
| J4-3 or 4A-27 - Body ground | Always | 10 kΩ or higher |
| Tester Connection | Condition | Specified Condition |
| J41-2 - 4A-28 | Always | Below 1 Ω |
| J41-2 or 4A-28 - Body ground | Always | 10 kΩ or higher |
| J42-2 - 4A-27 | Always | Below 1 Ω |
| J42-2 or 4A-27 - Body ground | Always | 10 kΩ or higher |
Reconnect the main body ECU connector.
Reconnect the rear combination light assembly connectors.
|
| ||||
| OK | |
|
| 22.CHECK HARNESS AND CONNECTOR (REAR COMBINATION LIGHT ASSEMBLY - BODY GROUND) |
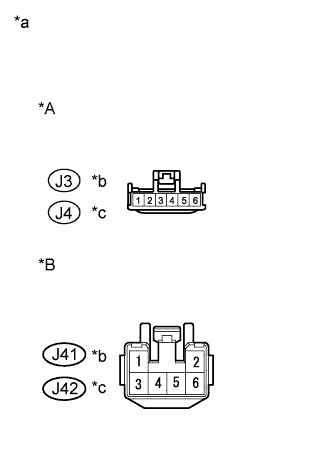 |
for Hatchback
Disconnect the J3 and J4 rear combination light assembly connectors.
for Sedan
Disconnect the J41 and J42 rear combination light assembly connectors.
Measure the resistance according to the value(s) in the table below.
| Tester Connection | Condition | Specified Condition |
| J3-6 - Body ground | Always | Below 1 Ω |
| J4-6 - Body ground | Always | Below 1 Ω |
| Tester Connection | Condition | Specified Condition |
| J41-6 - Body ground | Always | Below 1 Ω |
| J42-6 - Body ground | Always | Below 1 Ω |
| *A | for Hatchback |
| *B | for Sedan |
| *a | Front view of wire harness connector (to Rear Combination Light Assembly) |
| *b | RH Side |
| *c | LH Side |
Reconnect the rear combination light assembly connectors.
|
| ||||
| OK | |
|
| 23.INSPECT MAIN BODY ECU |
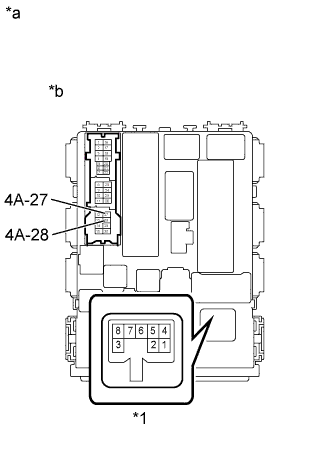 |
Remove the main body ECU.
Measure the resistance according to the value(s) in the table below.
| Tester Connection | Condition | Specified Condition |
| 4A-27 - Turn signal flasher assembly-3 (LL) | Always | Below 1 Ω |
| 4A-28 - Turn signal flasher assembly-2 (LR) | Always | Below 1 Ω |
| *1 | Turn signal Flasher Assembly |
| *a | Component without harness connected (Main Body ECU) |
| *b | Rear View |
Reinstall the main body ECU.
|
| ||||
| OK | ||
| ||
| ||
| 24.CHECK OPERATION |
When the turn signal light switch is operated, check that the appropriate turn signal light flashes.
| Result | Proceed to |
| No lights flash | A |
| Front turn signal light (LH or RH) does not flash | B |
| Side turn signal light (LH or RH) does not flash | C |
| Rear turn signal light (LH or RH) does not flash | D |
|
| ||||
|
| ||||
|
| ||||
| A | |
|
| 25.INSPECT HEADLIGHT DIMMER SWITCH |
Inspect the headlight dimmer switch (Click here).
|
| ||||
| OK | |
|
| 26.CHECK HARNESS AND CONNECTOR (HEADLIGHT DIMMER SWITCH - MAIN BODY ECU) |
Disconnect the D4 headlight dimmer switch connector.
Disconnect the 4E and 4S main body ECU connectors.
Measure the resistance according to the value(s) in the table below.
| Tester Connection | Condition | Specified Condition |
| D4-12 (TL) - 4S-11 | Always | Below 1 Ω |
| D4-12 (TL) or 4S-11 - Body ground | Always | 10 kΩ or higher |
| D4-13 (TR) - 4S-12 | Always | Below 1 Ω |
| D4-13 (TR) or 4S-12 - Body ground | Always | 10 kΩ or higher |
| D4-11 (E) - 4E-28 | Always | Below 1 Ω |
| D4-11 (E) or 4E-28 - Body Ground | Always | 10 kΩ or higher |
Reconnect the main body ECU connectors.
Reconnect the headlight dimmer switch connector.
|
| ||||
| OK | |
|
| 27.CHECK HARNESS AND CONNECTOR (MAIN BODY ECU - BODY GROUND) |
|
Disconnect the 4E main body ECU connector.
Measure the resistance according to the value(s) in the table below.
| Tester Connection | Condition | Specified Condition |
| 4E-17 - Body ground | Always | Below 1 Ω |
| *a | Front view of wire harness connector (to Main Body ECU) |
Reconnect the main body ECU connector.
|
| ||||
| OK | |
|
| 28.CHECK HARNESS AND CONNECTOR (MAIN BODY ECU - BATTERY) |
|
Disconnect the 4B main body ECU connector.
Measure the voltage according to the value(s) in the table below.
| Tester Connection | Condition | Specified Condition |
| 4B-32 - Body ground | Always | 11 to 14 V |
| *a | Front view of wire harness connector (to Main Body ECU) |
Reconnect the main body ECU connector.
|
| ||||
| OK | |
|
| 29.INSPECT MAIN BODY ECU |
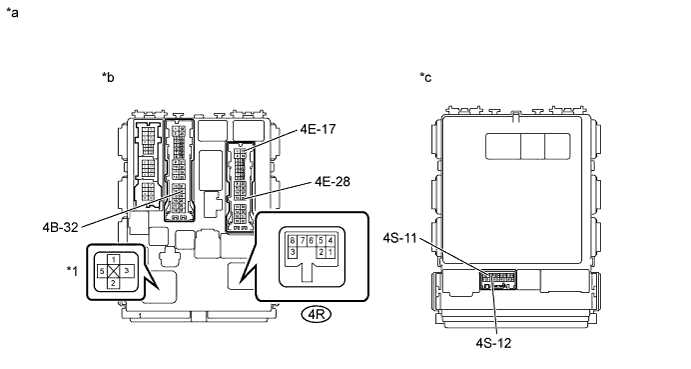
| *1 | IG1 Relay | - | - |
| *a | Component without harness connected (Main Body ECU) | *b | Rear View |
| *c | Front View | - | - |
Remove the main body ECU.
Remove the IG1 relay from the main body ECU.
Measure the resistance according to the value(s) in the table below.
| Tester Connection | Condition | Specified Condition |
| 4B-32 - 4R-4 | Always | Below 1 Ω |
| 4E-17 - 4R-7 | Always | Below 1 Ω |
| 4E-28 - 4R-7 | Always | Below 1 Ω |
| 4S-11 - 4R-5 | Always | Below 1 Ω |
| 4S-12 - 4R-6 | Always | Below 1 Ω |
| IG1 relay terminal 3 - 4R-1 | Always | Below 1 Ω |
Reinstall the IG1 relay.
Reinstall the main body ECU.
|
| ||||
| OK | |
|
| 30.CHECK HARNESS AND CONNECTOR (MAIN BODY ECU - TURN SIGNAL FLASHER ASSEMBLY) |
Disconnect the 4R main body ECU connector.
Disconnect the D71 turn signal flasher assembly connector.
Measure the resistance according to the value (s) in the table below.
| Tester Connection | Condition | Specified Condition |
| 4R-1 - D71-1 (IG) | Always | Below 1 Ω |
| 4R-4 - D71-4 (B) | Always | Below 1 Ω |
| 4R-5 - D71-5 (EL) | Always | Below 1 Ω |
| 4R-6 - D71-6 (ER) | Always | Below 1 Ω |
| 4R-7 - D71-7 (E) | Always | Below 1 Ω |
Reconnect the turn signal flasher assembly connector.
Reconnect the main body ECU connector.
|
| ||||
| OK | ||
| ||
| ||
| 31.INSPECT FRONT TURN SIGNAL LIGHT |
|
Remove the headlight assembly.
Apply battery voltage to the terminals and check that the front turn signal light illuminates.
| Measurement Condition | Specified Condition |
| Positive battery - Terminal 1 Negative battery - Terminal 2 | Front turn signal light illuminates |
| *A | for Hatchback |
| *B | for Sedan |
| *a | Component without harness connected (Front Turn Signal Light) |
| Result | Proceed to |
| OK | A |
| NG (for Hatchback) | B |
| NG (for Sedan) | C |
Reinstall the headlight assembly.
|
| ||||
|
| ||||
| A | |
|
| 32.CHECK HARNESS AND CONNECTOR (FRONT TURN SIGNAL LIGHT - MAIN BODY ECU) |
for Hatchback
Disconnect the B1 and B8 front turn signal light connectors.
for Sedan
Disconnect the B16 and B17 front turn signal light connectors.
Disconnect the 4B main body ECU connector.
Measure the resistance according to the value(s) in the table below.
| Tester Connection | Condition | Specified Condition |
| B1-1 - 4B-31 | Always | Below 1 Ω |
| B1-1 or 4B-31 - Body ground | Always | 10 kΩ or higher |
| B8-1 - 4B-14 | Always | Below 1 Ω |
| B8-1 or 4B-14 - Body ground | Always | 10 kΩ or higher |
| Tester Connection | Condition | Specified Condition |
| B16-1 - 4B-31 | Always | Below 1 Ω |
| B16-1 or 4B-31 - Body ground | Always | 10 kΩ or higher |
| B17-1 - 4B-14 | Always | Below 1 Ω |
| B17-1 or 4B-14 - Body ground | Always | 10 kΩ or higher |
Reconnect the main body ECU connector.
Reconnect the front turn signal light connectors.
|
| ||||
| OK | |
|
| 33.CHECK HARNESS AND CONNECTOR (FRONT TURN SIGNAL LIGHT - BODY GROUND) |
|
for Hatchback
Disconnect the B1 and B8 front turn signal light connectors.
for Sedan
Disconnect the B16 and B17 front turn signal light connectors.
Measure the resistance according to the value(s) in the table below.
| Tester Connection | Condition | Specified Condition |
| B1-2 - Body ground | Always | Below 1 Ω |
| B8-2 - Body ground | Always | Below 1 Ω |
| Tester Connection | Condition | Specified Condition |
| B16-2 - Body ground | Always | Below 1 Ω |
| B17-2 - Body ground | Always | Below 1 Ω |
| *A | for Hatchback |
| *B | for Sedan |
| *a | Front view of wire harness connector (to Front Turn Signal Light) |
| *b | RH Side |
| *c | LH Side |
Reconnect the front turn signal light connectors.
|
| ||||
| OK | |
|
| 34.INSPECT MAIN BODY ECU |
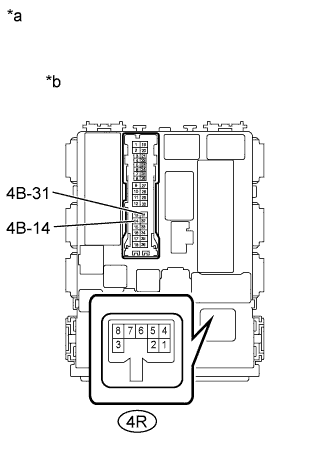 |
Remove the main body ECU.
Measure the resistance according to the value(s) in the table below.
| Tester Connection | Condition | Specified Condition |
| 4B-14 - 4R-3 | Always | Below 1 Ω |
| 4B-31 - 4R-2 | Always | Below 1 Ω |
| *a | Component without harness connected (Main Body ECU) |
| *b | Rear View |
Reinstall the main body ECU.
|
| ||||
| OK | |
|
| 35.CHECK HARNESS AND CONNECTOR (MAIN BODY ECU - TURN SIGNAL FLASHER ASSEMBLY) |
Disconnect the 4R main body ECU connector.
Disconnect the D71 turn signal flasher assembly connector.
Measure the resistance according to the value (s) in the table below.
| Tester Connection | Condition | Specified Condition |
| 4R-2 - D71-2 (LR) | Always | Below 1 Ω |
| 4R-3 - D71-3 (LL) | Always | Below 1 Ω |
Reconnect the turn signal flasher assembly connector.
Reconnect the main body ECU connector.
|
| ||||
| OK | ||
| ||
| ||
| 36.INSPECT SIDE TURN SIGNAL LIGHT ASSEMBLY |
|
Remove the side turn signal light assembly.
Apply battery voltage to the terminals and check that the side turn signal light illuminates.
| Measurement Condition | Specified Condition |
| Positive battery - Terminal 1 Negative battery - Terminal 2 | Side turn signal light illuminates |
| Result | Proceed to |
| OK (Front Fender Type) | A |
| OK (Outer Rear View Mirror Type) | B |
| NG (for Hatchback) | C |
| NG (for Sedan with Front Fender Type) | D |
| NG (for Sedan with Outer Rear View Mirror Type) | E |
| *A | Front Fender Type |
| *B | Outer Rear View Mirror Type |
| *a | Component without harness connected (Side Turn Signal Light Assembly) |
Reinstall the side turn signal light assembly.
|
| ||||
|
| ||||
|
| ||||
|
| ||||
| A | |
|
| 37.CHECK HARNESS AND CONNECTOR (SIDE TURN SIGNAL LIGHT ASSEMBLY - MAIN BODY ECU) |
Disconnect the A1 and A2 side turn signal light assembly connectors.
Disconnect the 4B main body ECU connector.
Measure the resistance according to the value(s) in the table below.
| Tester Connection | Condition | Specified Condition |
| A1-1 - 4B-31 | Always | Below 1 Ω |
| A1-1 or 4B-31 - Body ground | Always | 10 kΩ or higher |
| A2-1 - 4B-14 | Always | Below 1 Ω |
| A2-1 or 4B-14 - Body ground | Always | 10 kΩ or higher |
Reconnect the main body ECU connector.
Reconnect the side turn signal light assembly connectors.
|
| ||||
| OK | |
|
| 38.CHECK HARNESS AND CONNECTOR (SIDE TURN SIGNAL LIGHT ASSEMBLY - BODY GROUND) |
|
Disconnect the A1 and A2 side turn signal light assembly connectors.
Measure the resistance according to the value(s) in the table below.
| Tester Connection | Condition | Specified Condition |
| A1-2 - Body ground | Always | Below 1 Ω |
| A2-2 - Body ground | Always | Below 1 Ω |
| *a | Front view of wire harness connector (to Side Turn Signal Light Assembly) |
| *b | RH Side |
| *c | LH Side |
Reconnect the side turn signal light assembly connectors.
|
| ||||
| OK | |
|
| 39.INSPECT MAIN BODY ECU |
|
Remove the main body ECU.
Measure the resistance according to the value(s) in the table below.
| Tester Connection | Condition | Specified Condition |
| 4B-14 - 4R-3 | Always | Below 1 Ω |
| 4B-31 - 4R-2 | Always | Below 1 Ω |
| *a | Component without harness connected (Main body ECU) |
| *b | Rear View |
Reinstall the main body ECU.
|
| ||||
| OK | |
|
| 40.CHECK HARNESS AND CONNECTOR (MAIN BODY ECU - TURN SIGNAL FLASHER ASSEMBLY) |
Disconnect the 4R main body ECU connector.
Disconnect the D71 turn signal flasher assembly connector.
Measure the resistance according to the value (s) in the table below.
| Tester Connection | Condition | Specified Condition |
| 4R-2 - D71-2 (LR) | Always | Below 1 Ω |
| 4R-3 - D71-3 (LL) | Always | Below 1 Ω |
Reconnect the turn signal flasher assembly connector.
Reconnect the main body ECU connector.
|
| ||||
| OK | ||
| ||
| ||
| 41.INSPECT OUTER REAR VIEW MIRROR ASSEMBLY (SYSTEM VOLTAGE) |
|
Disconnect the F2 and G2 outer rear view mirror assembly connectors.
Measure the voltage according to the value(s) in the table below.
| Tester Connection | Switch Condition | Specified Condition |
| F2-1 - Body ground | Turn signal (right turn) OFF → ON | Below 1 V → 11 to 14 V (60 to 120 times per minute |
| G2-1 - Body ground | Turn signal (left turn) OFF → ON | Below 1 V → 11 to 14 V (60 to 120 times per minute |
| *a | Front view of wire harness connector (to Outer Rear View Mirror Assembly) |
| *b | RH Side |
| *c | LH Side |
Reconnect the outer rear view mirror assembly connectors.
|
| ||||
| OK | |
|
| 42.CHECK HARNESS AND CONNECTOR (OUTER REAR VIEW MIRROR ASSEMBLY - BODY GROUND) |
|
Disconnect the F2 and G2 outer rear view mirror assembly connectors.
Measure the resistance according to the value(s) in the table below.
| Tester Connection | Switch Condition | Specified Condition |
| F2-2 - Body ground | Always | Below 1 Ω |
| G2-2 - Body ground | Always | Below 1 Ω |
| *a | Front view of wire harness connector (to Outer Rear View Mirror Assembly) |
| *b | RH Side |
| *c | LH Side |
Reconnect the outer rear view mirror assembly connectors.
|
| ||||
| OK | ||
| ||
| ||
| 43.CHECK HARNESS AND CONNECTOR (OUTER REAR VIEW MIRROR ASSEMBLY - MAIN BODY ECU) |
Disconnect the F2 and G2 outer rear view mirror assembly connectors.
Disconnect the 4S main body ECU connector.
Measure the resistance according to the value(s) in the table below.
| Tester Connection | Switch Condition | Specified Condition |
| F2-1 - 4S-16 | Always | Below 1 Ω |
| F2-1 or 4S-16 - Body ground | Always | 10 kΩ or higher |
| G2-1 - 4S-13 | Always | Below 1 Ω |
| G2-1 or 4S-13 - Body ground | Always | 10 kΩ or higher |
Reconnect the outer rear view mirror assembly connectors.
Reconnect the main body ECU connector.
|
| ||||
| OK | |
|
| 44.INSPECT MAIN BODY ECU |
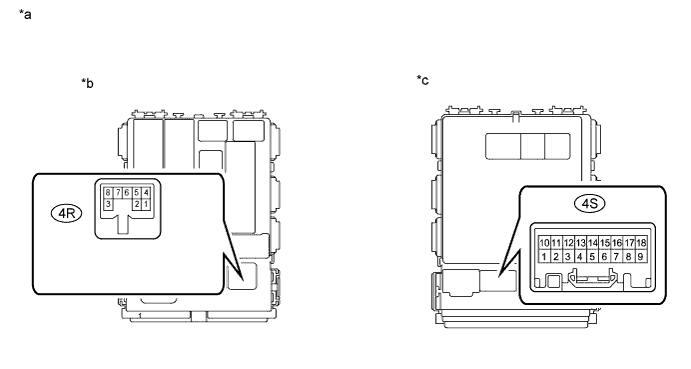
| *a | Component without harness connected (Main Body ECU) | *b | Rear View |
| *c | Front View | - | - |
Remove the main body ECU.
Measure the resistance according to the value(s) in the table below.
| Tester Connection | Condition | Specified Condition |
| 4S-13 - 4R-3 | Always | Below 1 Ω |
| 4S-16 - 4R-2 | Always | Below 1 Ω |
Reinstall the main body ECU.
|
| ||||
| OK | |
|
| 45.CHECK HARNESS AND CONNECTOR (MAIN BODY ECU - TURN SIGNAL FLASHER ASSEMBLY) |
Disconnect the 4R main body ECU connector.
Disconnect the D71 turn signal flasher assembly connector.
Measure the resistance according to the value (s) in the table below.
| Tester Connection | Condition | Specified Condition |
| 4R-2 - D71-2 (LR) | Always | Below 1 Ω |
| 4R-3 - D71-3 (LL) | Always | Below 1 Ω |
Reconnect the turn signal flasher assembly connector.
Reconnect the main body ECU connector.
|
| ||||
| OK | ||
| ||
| ||
| 46.INSPECT REAR COMBINATION LIGHT |
|
Remove the rear combination light assembly.
Apply battery voltage to the terminals and check that the rear turn signal light illuminates.
| Measurement Condition | Specified Condition |
| Positive battery - Terminal 3 Negative battery - Terminal 6 | Rear turn signal light illuminates |
| Measurement Condition | Specified Condition |
| Positive battery - Terminal 2 Negative battery - Terminal 6 | Rear turn signal light illuminates |
| *A | for Hatchback |
| *B | for Sedan |
| *a | Component without harness connected (Rear Combination Light Assembly) |
| Result | Proceed to |
| OK | A |
| NG (for Hatchback) | B |
| NG (for Sedan) | C |
Reinstall the rear combination light assembly.
|
| ||||
|
| ||||
| A | |
|
| 47.CHECK HARNESS AND CONNECTOR (REAR COMBINATION LIGHT ASSEMBLY - MAIN BODY ECU) |
for Hatchback
Disconnect the J3 and J4 Rear combination light assembly connectors.
for Sedan
Disconnect the J41 and J42 Rear combination light assembly connectors.
Disconnect the 4A main body ECU connector.
Measure the resistance according to the value(s) in the table below.
| Tester Connection | Condition | Specified Condition |
| J3-3 - 4A-28 | Always | Below 1 Ω |
| J3-3 or 4A-28 - Body ground | Always | 10 kΩ or higher |
| J4-3 - 4A-27 | Always | Below 1 Ω |
| J4-3 or 4A-27 - Body ground | Always | 10 kΩ or higher |
| Tester Connection | Condition | Specified Condition |
| J41-2 - 4A-28 | Always | Below 1 Ω |
| J41-2 or 4A-28 - Body ground | Always | 10 kΩ or higher |
| J42-2 - 4A-27 | Always | Below 1 Ω |
| J42-2 or 4A-27 - Body ground | Always | 10 kΩ or higher |
Reconnect the main body ECU connector.
Reconnect the rear combination light assembly connectors.
|
| ||||
| OK | |
|
| 48.CHECK HARNESS AND CONNECTOR (REAR COMBINATION LIGHT ASSEMBLY - BODY GROUND) |
|
for Hatchback
Disconnect the J3 and J4 Rear combination light assembly connectors.
for Sedan
Disconnect the J41 and J42 rear combination light assembly connectors.
Measure the resistance according to the value(s) in the table below.
| Tester Connection | Condition | Specified Condition |
| J3-6 - Body ground | Always | Below 1 Ω |
| J4-6 - Body ground | Always | Below 1 Ω |
| Tester Connection | Condition | Specified Condition |
| J41-6 - Body ground | Always | Below 1 Ω |
| J42-6 - Body ground | Always | Below 1 Ω |
| *A | for Hatchback |
| *B | for Sedan |
| *a | Front view of wire harness connector (to Rear Combination Light Assembly) |
| *b | RH Side |
| *c | LH Side |
Reconnect the rear combination light assembly connectors.
|
| ||||
| OK | |
|
| 49.INSPECT MAIN BODY ECU |
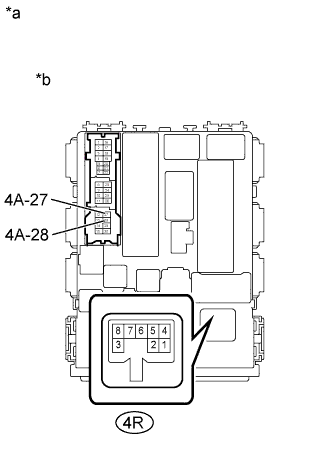 |
Remove the main body ECU.
Measure the resistance according to the value(s) in the table below.
| Tester Connection | Condition | Specified Condition |
| 4A-27 - 4R-3 | Always | Below 1 Ω |
| 4A-28 - 4R-2 | Always | Below 1 Ω |
| *a | Component without harness connected (Main Body ECU) |
| *b | Rear View |
Reinstall the main body ECU.
|
| ||||
| OK | |
|
| 50.CHECK HARNESS AND CONNECTOR (MAIN BODY ECU - TURN SIGNAL FLASHER ASSEMBLY) |
Disconnect the 4R main body ECU connector.
Disconnect the D71 turn signal flasher assembly connector.
Measure the resistance according to the value (s) in the table below.
| Tester Connection | Condition | Specified Condition |
| 4R-2 - D71-2 (LR) | Always | Below 1 Ω |
| 4R-3 - D71-3 (LL) | Always | Below 1 Ω |
Reconnect the turn signal flasher assembly connector.
Reconnect the main body ECU connector.
|
| ||||
| OK | ||
| ||
| ||

