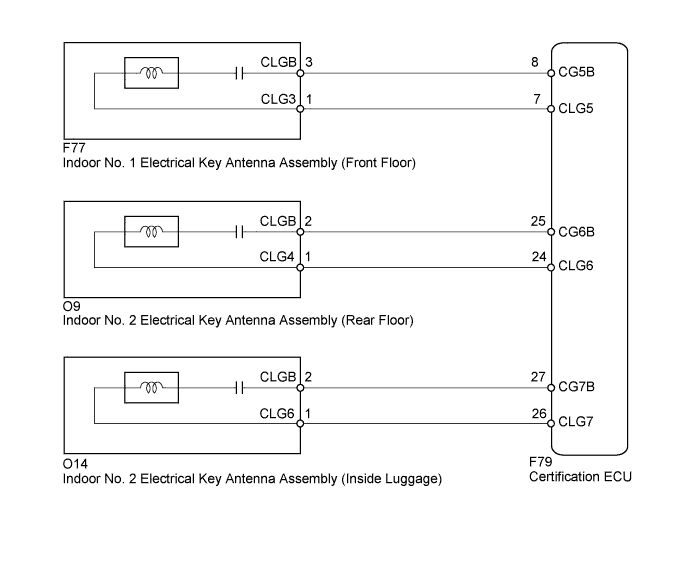
SMART KEY SYSTEM (for Entry Function) > Room Oscillator does not Recognize Key |
| 1.CHECK SMART KEY SYSTEM (START FUNCTION) |
 |
Remove the battery of the electrical key transmitter (Click here).
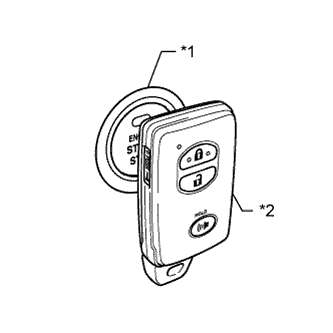
With the brake pedal depressed, touch the TOYOTA mark of the key to the engine switch.
When operating the engine switch, check whether the power source mode changes.
| *1 | Engine Switch |
| *2 | Electrical Key Transmitter |
|
| ||||
| OK | |
 |
| 2.CHECK WAVE ENVIRONMENT |
Install the battery to the electrical key transmitter (Click here).
Move the electrical key transmitter as described below and perform the operation inspection (Click here).
Bring the electrical key transmitter near the indoor No. 1 electrical key antenna (front floor) and perform an engine control system start check.
Bring the electrical key transmitter near the indoor No. 2 electrical key antenna (rear floor) and perform an engine control system start check.
Bring the electrical key transmitter near the indoor No. 2 electrical key antenna (inside luggage) and perform an engine control system start check.
|
| ||||
| OK | ||
 | ||
| ||
| 3.CHECK ELECTRICAL KEY ANTENNAS IN KEY DIAGNOSTIC MODE |
Check the following antennas in the key diagnostic mode (Click here).
Check the indoor No. 1 electrical key antenna (front floor).
When the electrical key transmitter is at the inspection point, check that the wireless door lock buzzer sounds.
Check the indoor No. 2 electrical key antenna (rear floor).
When the electrical key transmitter is at the inspection point, check that the wireless door lock buzzer sounds.
Check the indoor No. 2 electrical key antenna (inside luggage).
When the electrical key transmitter is at the inspection point, check that the wireless door lock buzzer sounds.
| Result | Proceed to |
| Front operation check fails | A |
| Rear operation check fails | B |
| Luggage operation check fails | C |
| Front, rear and luggage operation checks are normal | D |
|
| ||||
|
| ||||
|
| ||||
| A | |
|
| 4.CHECK HARNESS AND CONNECTOR (INDOOR NO. 1 ELECTRICAL KEY ANTENNA - CERTIFICATION ECU) |
Disconnect the F77 antenna connector.
Disconnect the F79 ECU connector.
Measure the resistance according to the value(s) in the table below.
| Tester Connection | Condition | Specified Condition |
| F77-1 (CLG3) - F79-7 (CLG5) | Always | Below 1 Ω |
| F77-3 (CLGB) - F79-8 (CG5B) | Always | Below 1 Ω |
| F77-1 (CLG3) - Body ground | Always | 10 kΩ or higher |
| F77-3 (CLGB) - Body ground | Always | 10 kΩ or higher |
|
| ||||
| OK | |
|
| 5.CHECK CERTIFICATION ECU |
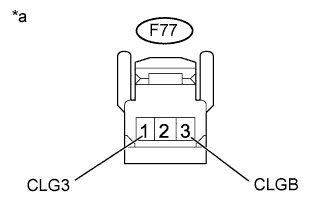 |
Disconnect the F77 antenna connector.
Measure the voltage according to the value(s) in the table below.
| Tester Connection | Switch Condition | Specified Condition |
| F77-1 (CLG3) - F77-3 (CLGB) | Engine switch off, all doors closed, key not in cabin and lock sensor off → on | No pulse generation → pulse generation |
| *a | Front view of wire harness connector (to Indoor No. 1 Electrical Key Antenna [Front Floor]) |
|
| ||||
| OK | |
|
| 6.REPLACE INDOOR NO. 1 ELECTRICAL KEY ANTENNA ASSEMBLY (FRONT FLOOR) |
Temporarily replace the indoor No. 1 electrical key antenna (front floor) with a new or normally functioning one (Click here).
| NEXT | |
|
| 7.CHECK ELECTRICAL KEY ANTENNA IN KEY DIAGNOSTIC MODE |
Check the following antenna in the key diagnostic mode (Click here).
Check the indoor No. 1 electrical key antenna (front floor).
When the electrical key transmitter is at the inspection point, check that the wireless door lock buzzer sounds.
|
| ||||
| OK | ||
| ||
| ||
| 8.CHECK HARNESS AND CONNECTOR (INDOOR NO. 2 ELECTRICAL KEY ANTENNA - CERTIFICATION ECU) |
Disconnect the O9 antenna connector.
Disconnect the F79 ECU connector.
Measure the resistance according to the value(s) in the table below.
| Tester Connection | Condition | Specified Condition |
| O9-1 (CLG4) - F79-24 (CLG6) | Always | Below 1 Ω |
| O9-2 (CLGB) - F79-25 (CG6B) | Always | Below 1 Ω |
| O9-1 (CLG4) - Body ground | Always | 10 kΩ or higher |
| O9-2 (CLGB) - Body ground | Always | 10 kΩ or higher |
|
| ||||
| OK | |
|
| 9.CHECK CERTIFICATION ECU |
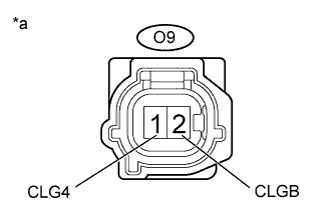 |
Disconnect the O9 antenna connector.
Measure the voltage according to the value(s) in the table below.
| Tester Connection | Switch Condition | Specified Condition |
| O9-1 (CLG4) - O9-2 (CLGB) | Engine switch off, all doors closed, key not in cabin and lock sensor off → on | No pulse generation → pulse generation |
| *a | Front view of wire harness connector (to Indoor No. 2 Electrical Key Antenna [Rear Floor]) |
|
| ||||
| OK | |
|
| 10.REPLACE INDOOR NO. 2 ELECTRICAL KEY ANTENNA ASSEMBLY (REAR FLOOR) |
Temporarily replace the indoor No. 2 electrical key antenna (rear floor) with a new or normally functioning one (Click here).
| NEXT | |
|
| 11.CHECK ELECTRICAL KEY ANTENNA IN KEY DIAGNOSTIC MODE |
Check the following antenna in the key diagnostic mode (Click here).
Check the indoor No. 2 electrical key antenna (rear floor).
When the electrical key transmitter is at the inspection point, check that the wireless door lock buzzer sounds.
|
| ||||
| OK | ||
| ||
| ||
| 12.CHECK HARNESS AND CONNECTOR (INDOOR NO. 2 ELECTRICAL KEY ANTENNA - CERTIFICATION ECU) |
Disconnect the O14 antenna connector.
Disconnect the F79 ECU connector.
Measure the resistance according to the value(s) in the table below.
| Tester Connection | Condition | Specified Condition |
| O14-1 (CLG6) - F79-26 (CLG7) | Always | Below 1 Ω |
| O14-2 (CLGB) - F79-27 (CG7B) | Always | Below 1 Ω |
| O14-1 (CLG6) - Body ground | Always | 10 kΩ or higher |
| O14-2 (CLGB) - Body ground | Always | 10 kΩ or higher |
|
| ||||
| OK | |
|
| 13.CHECK CERTIFICATION ECU |
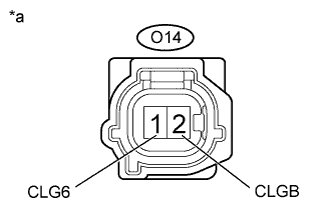 |
Disconnect the O14 antenna connector.
Measure the voltage according to the value(s) in the table below.
| Tester Connection | Switch Condition | Specified Condition |
| O14-1 (CLG6) - O14-2 (CLGB) | Engine switch off, all doors closed, key not in cabin and lock sensor off → on | No pulse generation → pulse generation |
| *a | Front view of wire harness connector (to Indoor No. 2 Electrical Key Antenna [Inside Luggage]) |
|
| ||||
| OK | |
|
| 14.REPLACE INDOOR NO. 2 ELECTRICAL KEY ANTENNA ASSEMBLY (INSIDE LUGGAGE) |
Temporarily replace the indoor No. 2 electrical key antenna (inside luggage) with a new or normally functioning one (Click here).
| NEXT | |
|
| 15.CHECK ELECTRICAL KEY ANTENNA IN KEY DIAGNOSTIC MODE |
Check the following antenna in the key diagnostic mode (Click here).
Check the indoor No. 2 electrical key antenna (inside luggage).
When the electrical key transmitter is at the inspection point, check that the wireless door lock buzzer sounds.
|
| ||||
| OK | ||
| ||
| ||

