TL70 MANUAL TRANSMISSION / TRANSAXLE MANUAL TRANSMISSION ASSEMBLY INSTALLATION
PROCEDURE

 33511G
1.INSTALL CONTROL SHAFT
33511
2.INSTALL FLOOR SHIFT CONTROL SHAFT
12371
3.INSTALL REAR NO. 1 ENGINE MOUNTING INSULATOR
Install the rear No. 1 engine mounting insulator to the manual transmission assembly with the 4 bolts.
- Torque:
- 40 N*m (408 kgf*cm, 30 ft.*lbf)
4.INSTALL MANUAL TRANSMISSION ASSEMBLY
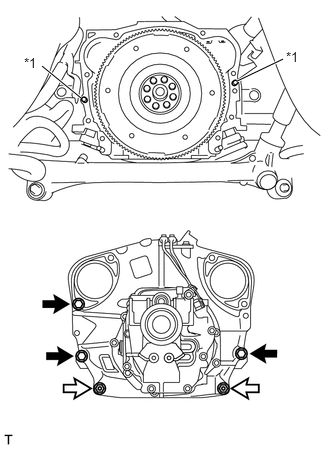
Confirm that 2 knock pins are on the manual transmission assembly contact surface of the engine cylinder block before manual transmission assembly installation.
Install the manual transmission assembly to the engine with the 3 bolts and 2 nuts.
| *1 | Knock Pin |

|
Bolt |

|
Nut |
- Torque:
- 50 N*m (510 kgf*cm, 37 ft.*lbf)
- NOTICE:
- ·
Do not apply excessive force to the transmission assembly as this will break the input shaft.
·Insert dowel pins into the dowel holes securely so that the end face of the transmission assembly fits close against the engine assembly before tightening the bolts.
33575
5.INSTALL FLOOR SHIFT CONTROL SHIFT LEVER RETAINER
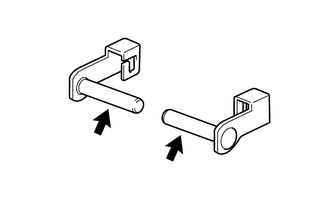
Apply a light coat of MP grease to new 2 shift lever pins.
|
|
MP grease |
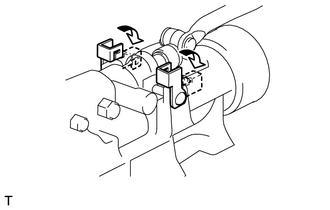
Install the floor shift control shift lever retainer with the 2 shift lever pins.
Secure the shift lever pins to the extension housing sub-assembly.
12372
6.INSTALL REAR NO. 2 ENGINE MOUNTING INSULATOR
Tilt up the manual transmission assembly.
Install the rear No. 2 engine mounting insulator to the rear No. 1 engine mounting insulator with 2 washers and 2 nuts.
- Torque:
- 55 N*m (561 kgf*cm, 41 ft.*lbf)
Install the rear No. 2 engine mounting insulator to the body with the 4 bolts.
- Torque:
- 65 N*m (663 kgf*cm, 48 ft.*lbf)
17455
7.INSTALL EXHAUST PIPE BRACKET
Install the exhaust pipe bracket with the 2 bolts.
- Torque:
- 23 N*m (235 kgf*cm, 17 ft.*lbf)
33555B
8.INSTALL SHIFT AND SELECT LEVER BOOT
Temporarily install a new shift and select lever boot to the floor shift lever assembly.
33530F
9.INSTALL FLOOR SHIFT LEVER ASSEMBLY
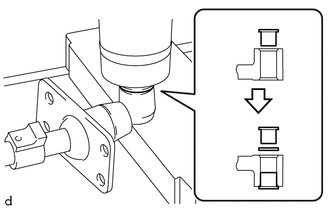
While holding the collar with your hand, press the collar slowly straight into the floor shift lever assembly hole using a press.
- NOTICE:
-
Be careful that your hand does not get caught.
Install the O-ring to the floor shift lever assembly.
While holding the collar with your hand, press the collar slowly straight into the floor shift lever assembly hole using a press.
- NOTICE:
-
Be careful that your hand does not get caught.
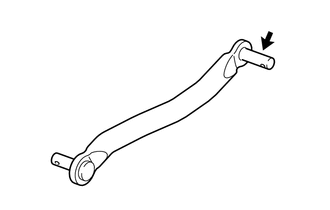
Apply a light coat of MP grease to the floor shift control shaft.
|
|
MP grease |
Install the plate washer to the floor shift lever assembly.
Install the shift lever assembly with the clip.
Install the shift and select lever boot.
- NOTICE:
-
Do not damage the shift and select lever boot.
17141
10.INSTALL EXHAUST MANIFOLD
11.INSTALL MANUAL TRANSMISSION ASSEMBLY
Install the bolt to the manual transmission assembly.
- Torque:
- 50 N*m (510 kgf*cm, 37 ft.*lbf)
31470
12.INSTALL CLUTCH RELEASE CYLINDER ASSEMBLY
Install the clutch release cylinder assembly with the 2 bolts.
- Torque:
- 37 N*m (377 kgf*cm, 27 ft.*lbf)
13.CONNECT WIRE HARNESS
Install the wire harness clamp bracket with the 2 bolts.
- Torque:
- 10 N*m (102 kgf*cm, 7 ft.*lbf)
Engage the wire harness clamp.
Connect the ground cable with the bolt.
- Torque:
- 13 N*m (133 kgf*cm, 10 ft.*lbf)
Connect the 2 connectors.
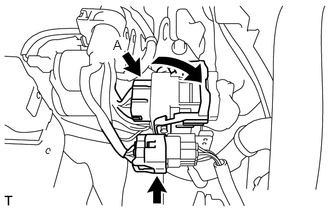
Connect the 2 connectors.
- HINT:
-
Press down the lever until the claw of the connector A makes a connection sound.
28100
14.INSTALL STARTER ASSEMBLY
15.INSTALL FRONT STABILIZER BAR
37100
16.INSTALL PROPELLER SHAFT WITH CENTER BEARING ASSEMBLY
17.CONNECT CABLE TO NEGATIVE BATTERY TERMINAL
18.ADD MANUAL TRANSMISSION OIL
19.INSPECT MANUAL TRANSMISSION OIL
20.INSPECT FOR MANUAL TRANSMISSION OIL LEAK
51444A
21.INSTALL REAR ENGINE UNDER COVER LH (w/ Floor Under Cover)
51443C
22.INSTALL REAR ENGINE UNDER COVER RH (w/ Floor Under Cover)
- HINT:
-
Use the same procedure for the RH side as for the LH side.
51442E
23.INSTALL NO. 2 ENGINE UNDER COVER
51441
24.INSTALL NO. 1 ENGINE UNDER COVER