K3-VE ENGINE MECHANICAL ENGINE ASSEMBLY REMOVAL
CAUTION / NOTICE / HINT
- NOTICE:
-
As the engine assembly with transmission is extremely heavy, the engine lifter may suddenly drop if the instructions listed in the repair manual are not followed. Therefore, always follow the instructions listed in the repair manual when performing this procedure.
PROCEDURE

 1.DISCHARGE FUEL SYSTEM PRESSURE
51441D
2.REMOVE ENGINE UNDER COVER (for Half Cover Type)
Remove the 3 bolts and clip, then remove the engine under cover.
51441
3.REMOVE NO. 1 ENGINE UNDER COVER (for Full Cover Type)
Remove the 8 bolts, then remove the No. 1 engine under cover.
51443
4.REMOVE REAR ENGINE UNDER COVER (for Full Cover Type)
Remove the 8 bolts and clip, then remove the rear engine under cover.
5.DRAIN ENGINE COOLANT
6.DRAIN ENGINE OIL
17881
7.REMOVE NO. 1 AIR CLEANER HOSE
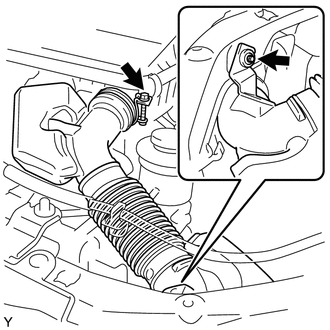
Loosen the air cleaner hose clamp bolt and remove the bolt, then remove the No. 1 air cleaner hose.
17700
8.REMOVE AIR CLEANER ASSEMBLY
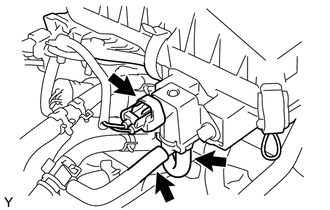
Disconnect the VSV connector.
Disconnect the No. 1 charcoal canister outlet hose and No. 2 charcoal canister outlet hose.
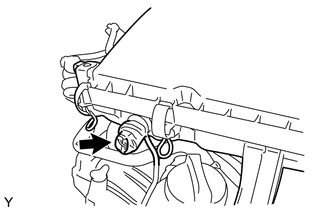
Remove the air temperature sensor.
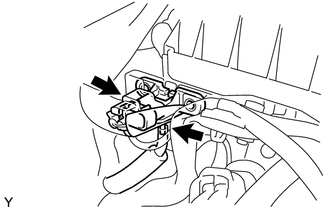
Disconnect the manifold absolute pressure sensor connector.
Disconnect the vacuum hose.
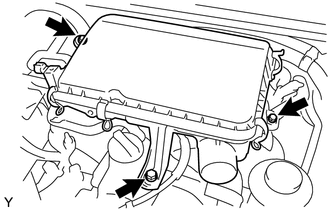
Remove the 3 bolts, then remove the intake air cleaner assembly.
78180P
9.DISCONNECT ACCELERATOR CONTROL CABLE ASSEMBLY
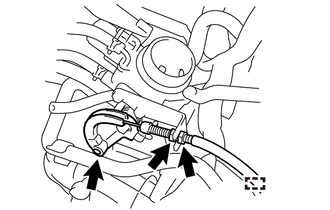
Remove the clamp.
Loosen the 2 nuts, then remove the accelerator control cable assembly.
44773F
10.DISCONNECT UNION TO CHECK VALVE HOSE
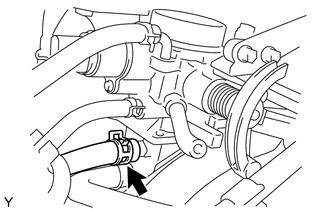
Disconnect the union to check valve hose from the intake manifold.
16361A
11.REMOVE FAN AND GENERATOR V BELT
27020
12.REMOVE GENERATOR ASSEMBLY
16571
13.REMOVE INLET RADIATOR HOSE
16572
14.REMOVE OUTLET RADIATOR HOSE
32921D
15.REMOVE INLET OIL COOLER HOSE (for Automatic Transaxle)
32922A
16.REMOVE OUTLET OIL COOLER HOSE (for Automatic Transaxle)
17.SEPARATE COOLER COMPRESSOR ASSEMBLY (for LHD)
Disconnect the connector.
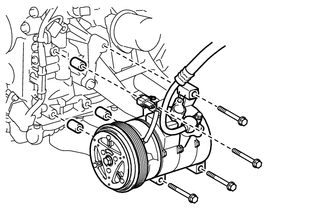
Remove the 4 bolts and 3 cooler brackets, then separate the cooler compressor assembly.
- HINT:
-
Remove the cooler compressor assembly together with the low and high pressure hoses, then suspend them from the body with a piece of rope.
18.SEPARATE COOLER COMPRESSOR ASSEMBLY (for RHD)
Disconnect the connector.
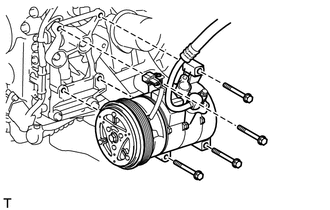
Remove the 4 bolts, then separate the cooler compressor assembly.
- HINT:
-
Remove the cooler compressor assembly together with the low and high pressure hoses, then suspend them from the body with a piece of rope.
55642
19.REMOVE NO. 2 INSTRUMENT PANEL UNDER COVER
20.REMOVE GLOVE COMPARTMENT DOOR
11452
21.REMOVE OIL LEVEL DIPSTICK GUIDE
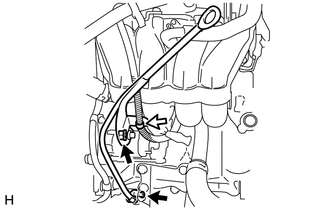
Disconnect the wire harness from the bracket of the oil level gauge guide.
Remove the 2 bolts and the oil level gauge guide.
Remove the O-ring.
22.DISCONNECT ENGINE WIRE (for RHD)
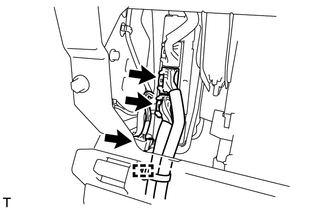
Disconnect the 3 connectors and disengage the clamp, and then disconnect the ECM.
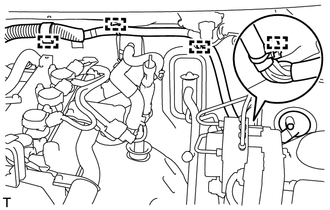
Disengage the 4 clamps.
Pull of the grommet.
23.DISCONNECT ENGINE WIRE (for LHD)
- HINT:
-
Use the same procedures described for the RHD side.
82046D
24.REMOVE BODY GROUND WIRE
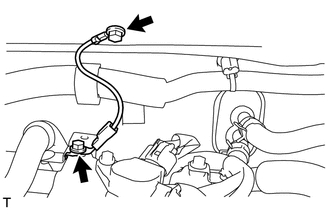
Remove the 2 bolts and the body ground wire.
77740
25.REMOVE CHARCOAL CANISTER ASSEMBLY
26.DISCONNECT NO. 2 ENGINE WIRE
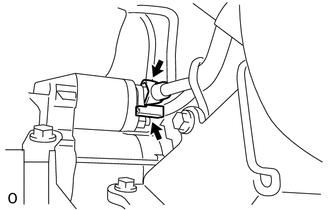
Disconnect the starter connector.
Remove the nut, then disconnect the No. 2 engine wire.
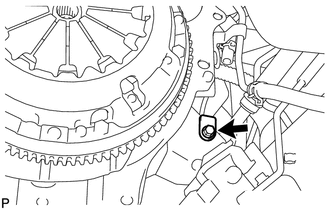
Remove the bolt, then disconnect the No. 2 engine wire.
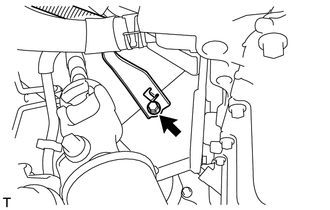
Remove the bolt, then disconnect the No. 2 engine wire.
Check that the engine wire is disconnected between the body and engine assembly with transaxle.
23841B
27.REMOVE EFI FUEL PIPE CLAMP
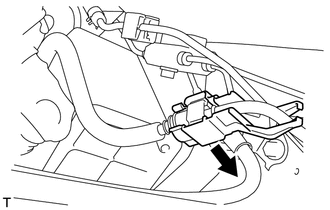
Remove the EFI fuel pipe clamp.
28.REMOVE FUEL TUBE SUB-ASSEMBLY
Remove any dirt and foreign matter from the pipe and connector before performing this step.
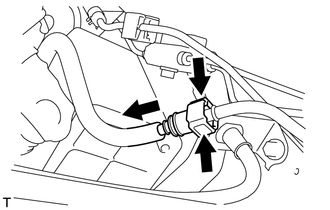
Pinch the tube connector and pull out the fuel pipe. (Click here Engine / Hybrid System>K3-VE FUEL>FUEL SYSTEM>PRECAUTION)
- NOTICE:
- ·
Check for dirt or other foreign matter on the parts to be disconnected and clean them if necessary.
·The fuel tube connector seals with an O-ring. Ensure that there is no damage or foreign matter on the contact surface.
·If the connector and the pipe are stuck, push and pull on the connector to release them while pinching the retainer. Pull the connector out of the pipe carefully.
·Do not use any tools.
·Do not bend or twist the tubes.
·Protect the contact surface by covering it with a plastic bag.
·Do not damage any of the clips. If a clip is damaged, replace it.
16261
29.REMOVE WATER BY-PASS HOSE (w/ Heater)
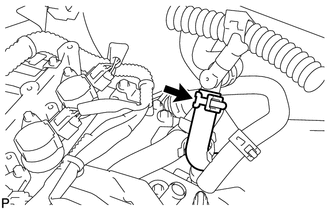
Disconnect the water by-pass hose from the water hose joint.
87246X
30.REMOVE HEATER WATER HOSE (w/ Heater)
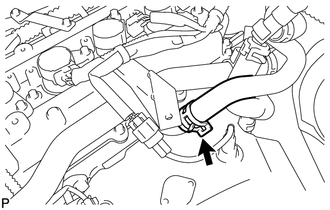
Disconnect the heater water hose from the radiator pipe sub-assembly.
31.SEPARATE STEERING INTERMEDIATE SHAFT ASSEMBLY
31340
32.SEPARATE CLUTCH RELEASE CABLE ASSEMBLY (for Manual Transmission)
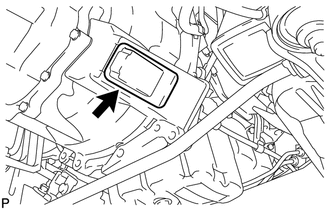
Remove the clutch housing cover from the clutch housing.
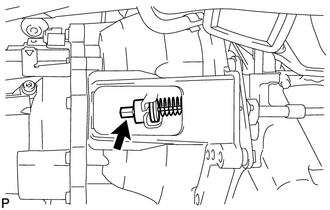
Disconnect the clutch release cable assembly from the clutch release fork.
- HINT:
- ·
If necessary, loosen the adjusting nut in advance.
·Pushing the clutch release fork toward the front of the vehicle will make it easier to remove the clutch release cable assembly.
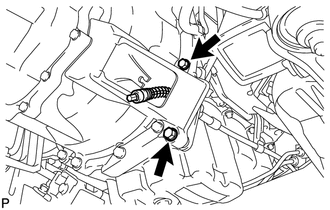
Remove the 2 bolts and disconnect the clutch release cable assembly from the clutch housing.
48820
33.SEPARATE FRONT STABILIZER LINK ASSEMBLY
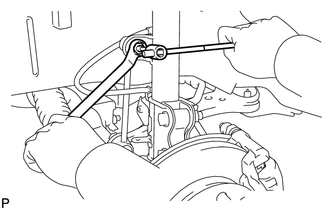
Separate the nut and front stabilizer link assembly.
- HINT:
- ·
If the ball joint turns together with the nut, use a socket hexagon wrench 6 to hold the stud.
·The removal procedure for the RH side is the same as that for the LH side.
48824
34.REMOVE FRONT STABILIZER BRACKET
35.SEPARATE FRONT DISC BRAKE CALIPER ASSEMBLY LH
(Click here Brake>BRAKE (FRONT)>FRONT BRAKE>REMOVAL)
36.SEPARATE FRONT DISC BRAKE CALIPER ASSEMBLY RH
- HINT:
-
Use the same procedures described for the LH side.
89543
37.SEPARATE FRONT SPEED SENSOR LH (w/ ABS)
89542
38.SEPARATE FRONT SPEED SENSOR RH (w/ ABS)
- HINT:
-
Use the same procedures described for the LH side.
39.REMOVE FRONT AXLE ASSEMBLY LH
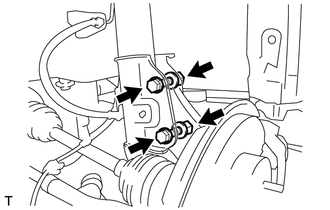
Remove the 2 bolts and 2 nuts, then separate front axle assembly LH.
40.REMOVE FRONT AXLE ASSEMBLY RH
- HINT:
-
Use the same procedures described for the LH side.
41.REMOVE PROPELLER SHAFT ASSEMBLY
17410
42.REMOVE FRONT EXHAUST PIPE ASSEMBLY
43.DISCONNECT TRANSMISSION CONTROL CABLE ASSEMBLY (for Automatic Transmission)
44.DISCONNECT TRANSMISSION CONTROL CABLE ASSEMBLY (for Manual Transmission)
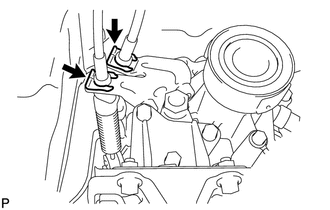
Remove the 2 clips from the transmission control cable bracket.
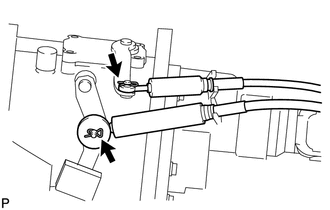
Remove the 2 clips and the washer and disconnect the 2 transmission control cables.
45.DISCONNECT CONNECTOR (for Automatic Transmission)
Disconnect the solenoid wire connector.
Disconnect the park/neutral position switch connector.
Disconnect the input speed sensor connector.
Disconnect the output speed sensor connector.
46.DISCONNECT CONNECTOR (for Manual Transmission)
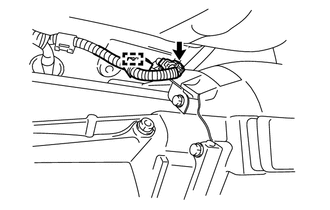
Disconnect the back-up light switch connector and the wire harness clamp.
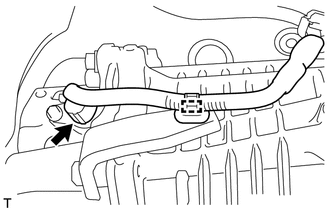
Disconnect the speedometer sensor connector and the wire harness clamp.
51202D
47.REMOVE FRONT LOWER SUSPENSION CROSSMEMBER SUB-ASSEMBLY
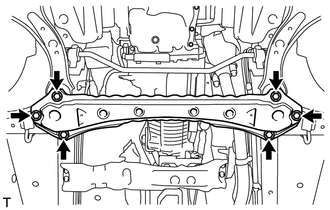
Remove the 6 bolts and the front lower suspension crossmember sub-assembly.
48.REMOVE ENGINE AND TRANSMISSION ASSEMBLY
Set the engine lifter.
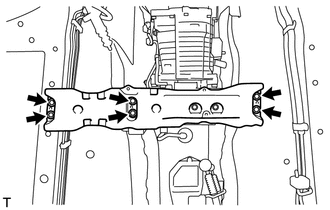
Remove the 6 bolts and the rear engine support member sub-assembly.
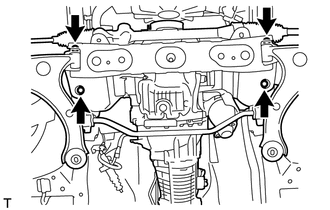
Remove the 4 bolts, operate the engine lifter, and then remove the engine assembly with transmission and front suspension crossmember sub-assembly from the vehicle.
- NOTICE:
- ·
Place the plate lift attachments so that the engine assembly with transmission is level.
- ·
As the engine assembly with transmission is very heavy, be sure to support it securely.
49.INSTALL ENGINE HANGER
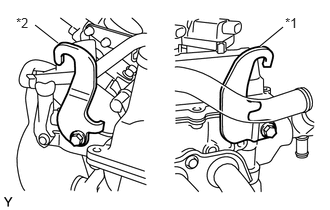
| *1 | No. 1 Engine hanger |
| *2 | No. 2 Engine hanger |
Install the 2 engine hangers with the 2 bolts as illustrated.
| No. 1 Engine hanger | 12281-97401 |
| No. 2 Engine hanger | 12282-97403 |
| Bolt | 91671-80820 |
Attach the engine sling device to the engine hangers.
Using an engine sling device and a chain block, hold the engine.
50.REMOVE ENGINE WIRE
Disconnect all of the clamps and connectors and remove the engine wire from the engine assembly.
51201
51.REMOVE FRONT SUSPENSION CROSSMEMBER SUB-ASSEMBLY
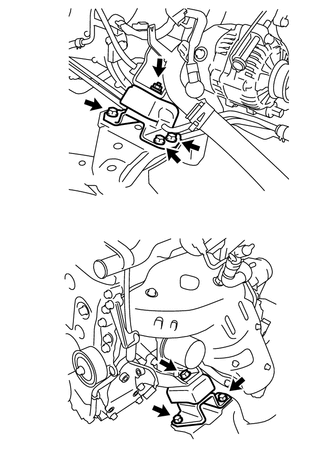
Remove the 5 bolts and 2 nuts, shown in the illustration, then remove the engine mounting insulator.
Operate the engine sling device and chain block, then remove the engine assembly.
52.REMOVE OIL COOLER TUBE SUB-ASSEMBLY (for Automatic Transmission)
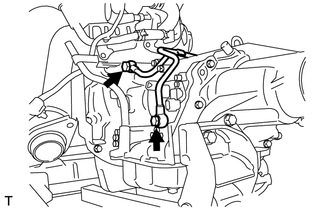
Remove the 2 union bolts.
Remove the bolt (A).
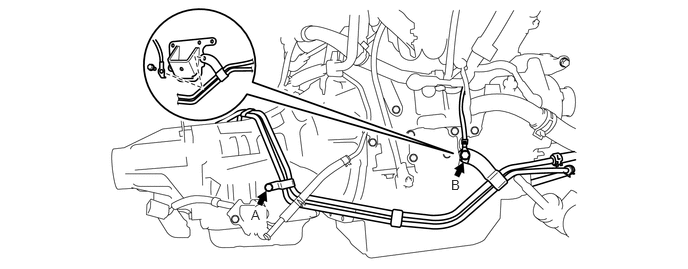
Remove the bolt (B) and then remove the oil cooler tube.
53.REMOVE STARTER ASSEMBLY
33030
54.REMOVE MANUAL TRANSMISSION ASSEMBLY (for Manual Transmission)
35000
55.REMOVE AUTOMATIC TRANSMISSION ASSEMBLY (for Automatic Transmission)
31210
56.REMOVE CLUTCH COVER ASSEMBLY (for Manual Transmission)
(Click here Drivetrain>CLUTCH>CLUTCH UNIT(for 3SZ-VE)>REMOVAL)
31250
57.REMOVE CLUTCH DISC ASSEMBLY (for Manual Transmission)
(Click here Drivetrain>CLUTCH>CLUTCH UNIT(for 3SZ-VE)>REMOVAL)
13405
58.REMOVE FLYWHEEL SUB-ASSEMBLY (for Manual Transmission)
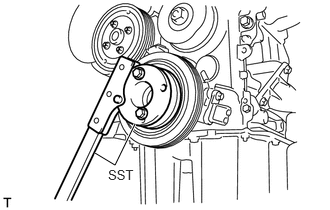
Hold the crankshaft pulley with SST.
- SST
- 09330-00021
09213-54015 (91651-60855)
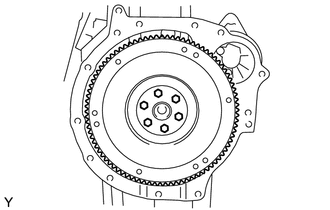
Remove the 6 bolts, then remove the flywheel sub-assembly and flywheel spacer ring.
32101
59.REMOVE DRIVE PLATE AND RING GEAR SUB-ASSEMBLY (for Automatic Transmission)
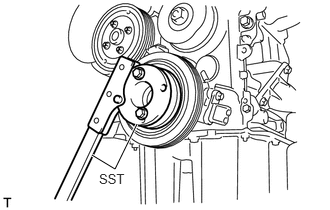
Hold the crankshaft pulley with SST.
- SST
- 09330-00021
09213-54015 (91651-60855)
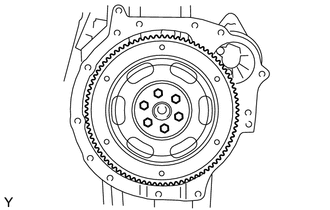
Remove the 6 bolts, then remove the drive plate and ring gear sub-assembly.
11355
60.REMOVE REAR END PLATE
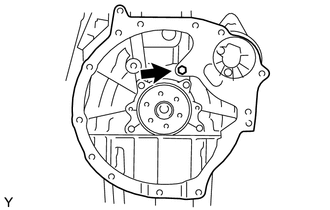
Remove the bolt and rear end plate.