HEATING / AIR CONDITIONING COMPRESSOR REMOVAL
CAUTION / NOTICE / HINT
The necessary procedures (adjustment, calibration, initialization, or registration) that must be performed after parts are removed, installed, or replaced during the compressor with motor assembly removal/installation are shown below.
| Replaced Part or Performed Procedure | Necessary Procedure | Effect/Inoperative Function when Necessary Procedure not Performed | Link |
|---|---|---|---|
| Disconnect cable from negative (-) auxiliary battery terminal | Memorize steering angle neutral point | Panoramic view monitor system | ( ) |
- HINT:
-
When the cable is disconnected / reconnected to the auxiliary battery terminal, systems temporarily stop operating. However, each system has a function that completes learning the first time the system is used.
- ·
Learning completes when vehicle is driven
Effect/Inoperative Function When Necessary Procedures are not Performed Necessary Procedures Link *1: When performing learning using the GTS
Click here(
)
Lane tracing assist system Drive the vehicle straight ahead at 35 km/h (22 mph) or more for 5 second or more. ( )
Pre-collision system Simple intelligent parking assist system*1 Parking support brake system*1 Toyota parking assist-sensor system*1
·Learning completes when vehicle is operated normally
Effect/Inoperative Function When Necessary Procedures are not Performed Necessary Procedures Link Power door lock control system
·Back door opener
Perform door unlock operation with door control switch or electrical key transmitter sub-assembly switch. ( )
Air conditioning system After the ignition switch is turned to ON, the servo motor standard position is recognized. -
- CAUTION:
- ·
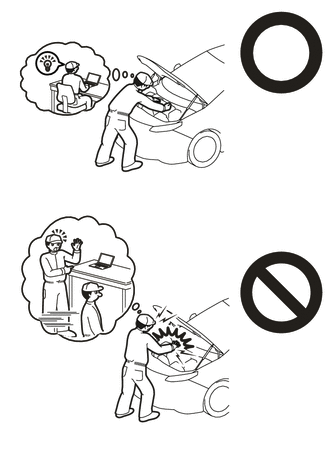
This vehicle has contains high voltage circuits standardized with orange colored wiring and connectors, so follow the instructions in this manual to perform the procedures correctly.
-for M20A-FXS:
Click hereEngine / Hybrid System>M20A-FXS (HYBRID / BATTERY CONTROL)>HYBRID CONTROL SYSTEM>PRECAUTION
-for 2ZR-FXE with NICKEL METAL HYDRIDE BATTERY:
-for 2ZR-FXE with LITHIUM-ION BATTERY:
·If the correct procedures are not followed according to the instructions in this manual, there is a danger of electric shock from the high voltage circuits.
·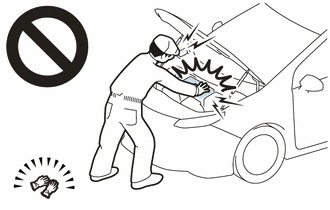
Be sure to wear insulating gloves when working on high voltage wiring or components.
·If work is performed without wearing insulating gloves, there is a danger of electric shock.
PROCEDURE

 1.RECOVER REFRIGERANT FROM REFRIGERATION SYSTEM
for HFC-134a(R134a):
Click hereVehicle Interior>HEATING / AIR CONDITIONING>REFRIGERANT (for HFC-134a(R134a))>REPLACEMENT
for HFO-1234yf(R1234yf):
Click hereVehicle Interior>HEATING / AIR CONDITIONING>REFRIGERANT(for HFO-1234yf(R1234yf))>REPLACEMENT
G3834
2.REMOVE SERVICE PLUG GRIP
for 2ZR-FXE:
Click hereEngine / Hybrid System>2ZR-FXE (HYBRID / BATTERY CONTROL)>SERVICE PLUG GRIP>REMOVAL
for M20A-FXS:
Click hereEngine / Hybrid System>M20A-FXS (HYBRID / BATTERY CONTROL)>SERVICE PLUG GRIP>REMOVAL
82121
3.DISCONNECT ENGINE WIRE
for 2ZR-FXE:
Click hereEngine / Hybrid System>2ZR-FXE (HYBRID / BATTERY CONTROL)>FRAME WIRE>REMOVAL
for M20A-FXS:
Click hereEngine / Hybrid System>M20A-FXS (HYBRID / BATTERY CONTROL)>FRAME WIRE>REMOVAL
4.REMOVE CONNECTOR COVER ASSEMBLY
for 2ZR-FXE:
Click hereEngine / Hybrid System>2ZR-FXE (HYBRID / BATTERY CONTROL)>INVERTER WITH CONVERTER>REMOVAL
for M20A-FXS:
Click hereEngine / Hybrid System>M20A-FXS (HYBRID / BATTERY CONTROL)>INVERTER WITH CONVERTER>REMOVAL
5.CHECK TERMINAL VOLTAGE
for 2ZR-FXE:
Click hereEngine / Hybrid System>2ZR-FXE (HYBRID / BATTERY CONTROL)>INVERTER WITH CONVERTER>REMOVAL
for M20A-FXS:
Click hereEngine / Hybrid System>M20A-FXS (HYBRID / BATTERY CONTROL)>INVERTER WITH CONVERTER>REMOVAL
6.INSTALL CONNECTOR COVER ASSEMBLY
for 2ZR-FXE with NICKEL METAL HYDRIDE BATTERY
for 2ZR-FXE with LITHIUM-ION BATTERY
for M20A-FXS:
Click hereEngine / Hybrid System>M20A-FXS (HYBRID / BATTERY CONTROL)>HV BATTERY>REMOVAL
82121
7.CONNECT ENGINE WIRE
for 2ZR-FXE:
Click hereEngine / Hybrid System>2ZR-FXE (HYBRID / BATTERY CONTROL)>FRAME WIRE>INSTALLATION
for M20A-FXS:
Click hereEngine / Hybrid System>M20A-FXS (HYBRID / BATTERY CONTROL)>FRAME WIRE>INSTALLATION
51441
8.REMOVE NO. 1 ENGINE UNDER COVER ASSEMBLY
for 2ZR-FXE:
Click hereEngine / Hybrid System>2ZR-FXE (ENGINE MECHANICAL)>ENGINE ASSEMBLY>REMOVAL
for M20A-FXS:
Click hereEngine / Hybrid System>M20A-FXS (ENGINE MECHANICAL)>ENGINE ASSEMBLY>REMOVAL
88703
9.DISCONNECT DISCHARGE HOSE SUB-ASSEMBLY
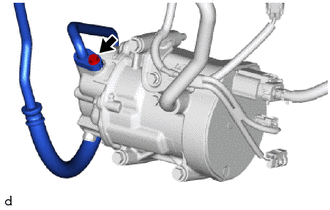
Remove the bolt to disconnect the discharge hose sub-assembly from the compressor with motor assembly.
Remove the O-ring from the refrigerant discharge hose sub-assembly.
- NOTICE:
-
Wrap protective tape around the connecting portions of the disconnected refrigerant discharge hose sub-assembly and compressor with motor assembly to prevent contamination by foreign matter or water droplets.
88704
10.DISCONNECT SUCTION HOSE SUB-ASSEMBLY
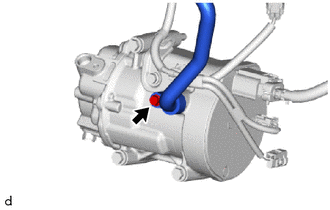
Remove the bolt to disconnect the suction hose sub-assembly from the compressor with motor assembly.
Remove the O-ring from the suction hose sub-assembly.
- NOTICE:
-
Wrap protective tape around the connecting portions of the disconnected suction hose sub-assembly and the compressor with motor assembly to prevent contamination by foreign matter or water droplets.
88370
11.REMOVE COMPRESSOR WITH MOTOR ASSEMBLY (for 2ZR-FXE)
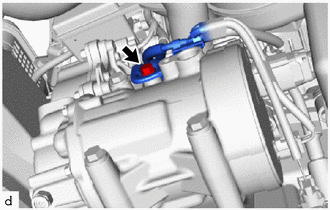
Remove the bolt and disconnect the bracket.
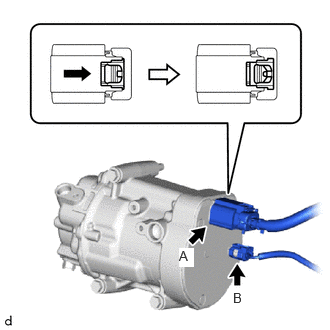
Slide the green-colored lock of the connector A as shown in the illustration to release it and disconnect the connector.
- CAUTION:
-
Make sure to wear insulating gloves.
- NOTICE:
-
Insulate the disconnected terminals and connector with insulating tape.
Disconnect the connector B.
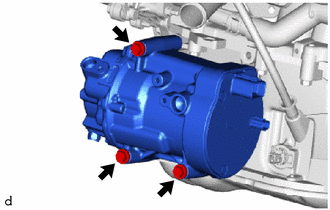
Remove the 3 bolts and compressor with motor assembly.
88370
12.REMOVE COMPRESSOR WITH MOTOR ASSEMBLY (for M20A-FXS)
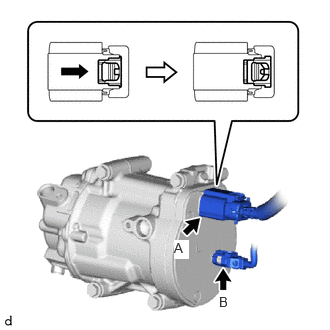
Slide the green-colored lock of the connector A as shown in the illustration to release it and disconnect the connector.
- CAUTION:
-
Make sure to wear insulating gloves.
- NOTICE:
-
Insulate the disconnected terminals and connector with insulating tape.
Disconnect the connector B.
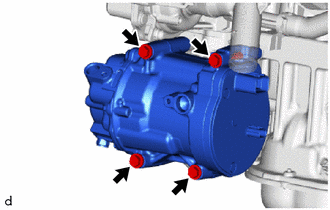
Remove the 4 bolts and compressor with motor assembly.