INTERIOR PANELS / TRIM ROOF HEADLINING REMOVAL
PROCEDURE

 1. PRECAUTION
- NOTICE:
-
After turning the ignition switch off, waiting time may be required before disconnecting the cable from the negative (-) battery terminal. Therefore, make sure to read the disconnecting the cable from the negative (-) battery terminal notices before proceeding with work.
-
Click hereGeneral>INTRODUCTION>REPAIR INSTRUCTION>PRECAUTION
2.DISCONNECT CABLE FROM NEGATIVE BATTERY TERMINAL
- CAUTION:
-
Wait at least 90 seconds after disconnecting the cable from the negative (-) battery terminal to disable the SRS system.
- NOTICE:
-
When disconnecting the cable, some systems need to be initialized after the cable is reconnected.
-
Click hereGeneral>INTRODUCTION>REPAIR INSTRUCTION>INITIALIZATION
67914
3.REMOVE FRONT DOOR SCUFF PLATE LH
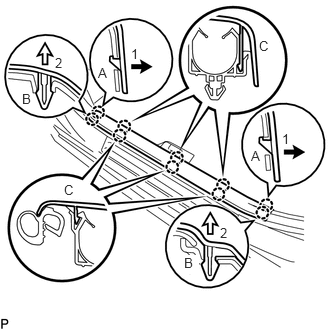
Disengage the 2 claws (A) in the direction indicated by the arrows (1) shown in the illustration.
Disengage the 2 claws (B) in the direction indicated by the arrows (2) shown in the illustration.
Disengage the 6 claws (C) to remove the front door scuff plate LH.
62112A
4.REMOVE COWL SIDE TRIM SUB-ASSEMBLY LH
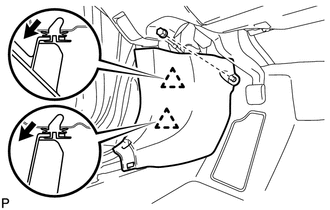
Remove the clip.
Pull the cowl side trim sub-assembly LH as shown in the illustration to disengage the 2 clips and remove the cowl side trim sub-assembly LH.
62312B
5.REMOVE FRONT DOOR OPENING TRIM WEATHERSTRIP LH
Remove the front door opening trim weatherstrip LH.
62212
6.REMOVE FRONT PILLAR GARNISH LH (w/o Curtain Shield Airbag)
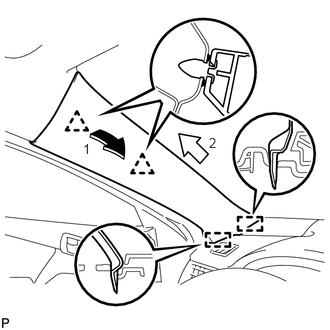
Pull the upper part of the garnish toward the inside of the cabin and disengage the 2 clips.
Disengage the 2 guides and remove the front pillar garnish LH.
62212
7.REMOVE FRONT PILLAR GARNISH LH (w/ Curtain Shield Airbag)
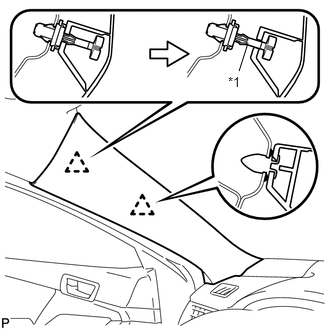
| *1 | Front Pillar Garnish Clip |
Pull the upper part of the front pillar garnish LH toward the inside of the cabin to disengage the clip and the front pillar garnish LH from the base of the front pillar garnish clip.
- HINT:
-
Let the front pillar garnish LH hang from the front pillar garnish clip.
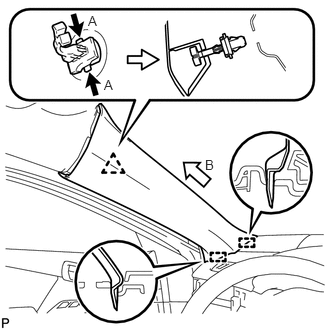
While pushing the tabs of the front pillar garnish clip in the direction indicated by the arrows (A) shown in the illustration, disengage the front pillar garnish clip.
- NOTICE:
-
Disengage the front pillar garnish clip by hand. Using a tool may damage the front pillar garnish clip.
Pull the garnish in the direction indicated by the arrow (B) shown in the illustration to disengage the 2 guides and remove the front pillar garnish LH.
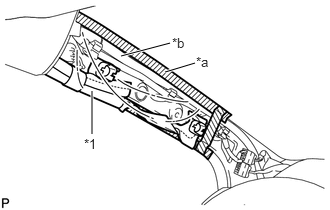
| *1 | Curtain Shield Airbag Assembly LH |
| *a | Adhesive Tape |
| *b | Protective Cover |
Protect the curtain shield airbag assembly LH.
Cover the curtain shield airbag assembly LH with a piece of cloth or nylon and secure the edges of the cover with tape as shown in the illustration.
- NOTICE:
-
Cover the curtain shield airbag assembly LH with a protective cover as soon as the front pillar garnish LH is removed.
67913
8.REMOVE FRONT DOOR SCUFF PLATE RH
- HINT:
-
Use the same procedure as for the LH side.
62111A
9.REMOVE COWL SIDE TRIM SUB-ASSEMBLY RH
- HINT:
-
Use the same procedure as for the LH side.
62311B
10.REMOVE FRONT DOOR OPENING TRIM WEATHERSTRIP RH
- HINT:
-
Use the same procedure as for the LH side.
62211
11.REMOVE FRONT PILLAR GARNISH RH
- HINT:
-
Use the same procedure as for the LH side.
12.REMOVE REAR SEAT CUSHION ASSEMBLY (for Fixed Seat Type)
72693
13.REMOVE REAR SEAT CUSHION LOCK HOOK (for Fixed Seat Type)
14.REMOVE REAR SEATBACK ASSEMBLY (for Fixed Seat Type)
15.REMOVE REAR SEAT CUSHION ASSEMBLY (for Fold Down Seat Type)
72693
16.REMOVE REAR SEAT CUSHION LOCK HOOK (for Fold Down Seat Type)
17.REMOVE REAR SIDE SEATBACK ASSEMBLY LH (for Fold Down Seat Type)
18.REMOVE REAR SIDE SEATBACK ASSEMBLY RH (for Fold Down Seat Type)
19.REMOVE REAR SEATBACK ASSEMBLY LH (for Fold Down Seat Type)
20.REMOVE REAR SEATBACK ASSEMBLY RH (for Fold Down Seat Type)
67918A
21.REMOVE REAR DOOR SCUFF PLATE LH
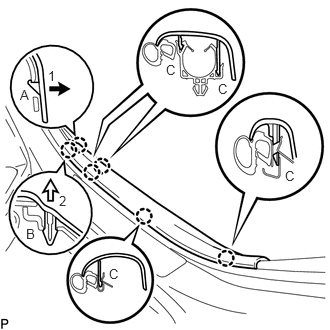
Disengage the claw (A) in the direction indicated by the arrow (1) shown in the illustration.
Disengage the claw (B) in the direction indicated by the arrow (2) shown in the illustration.
Disengage the 4 claws (C) to remove the rear door scuff plate LH.
- HINT:
-
Disengage the claws from the front side of the rear door scuff plate LH.
62332A
22.REMOVE REAR DOOR OPENING TRIM WEATHERSTRIP LH
Remove the rear door opening trim weatherstrip LH.
73233
23.REMOVE LAP BELT OUTER ANCHOR COVER (for LH Side)
73220
24.DISCONNECT FRONT SEAT OUTER BELT ASSEMBLY LH
62414A
25.REMOVE CENTER PILLAR LOWER GARNISH LH
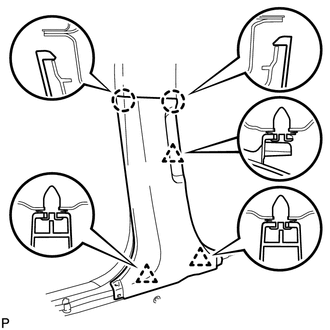
Disengage the 2 claws and 3 clips, and remove the center pillar lower garnish LH.
62412B
26.REMOVE CENTER PILLAR UPPER GARNISH LH
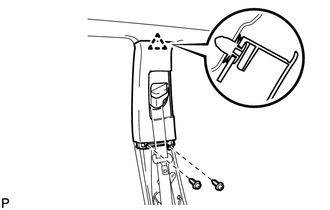
Remove the 2 screws.
Disengage the clip.
Pass the floor anchor of the front seat outer seat belt assembly LH through the center pillar upper garnish LH and remove the center pillar upper garnish LH.
62472A
27.REMOVE ROOF SIDE INNER GARNISH LH
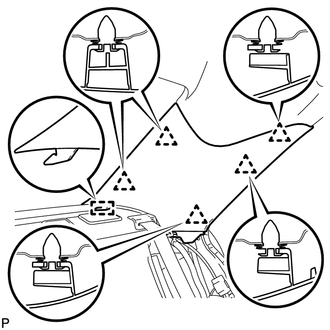
Disengage the 5 clips.
Disengage the guide and remove the roof side inner garnish LH.
67917A
28.REMOVE REAR DOOR SCUFF PLATE RH
- HINT:
-
Use the same procedure as for the LH side.
62331A
29.REMOVE REAR DOOR OPENING TRIM WEATHERSTRIP RH
- HINT:
-
Use the same procedure as for the LH side.
73233
30.REMOVE LAP BELT OUTER ANCHOR COVER (for RH Side)
- HINT:
-
Use the same procedure as for the LH side.
73210
31.DISCONNECT FRONT SEAT OUTER BELT ASSEMBLY RH
- HINT:
-
Use the same procedure as for the LH side.
62413A
32.REMOVE CENTER PILLAR LOWER GARNISH RH
- HINT:
-
Use the same procedure as for the LH side.
62411B
33.REMOVE CENTER PILLAR UPPER GARNISH RH
- HINT:
-
Use the same procedure as for the LH side.
62471A
34.REMOVE ROOF SIDE INNER GARNISH RH
- HINT:
-
Use the same procedure as for the LH side.
35.REMOVE FRONT SEAT ASSEMBLY LH
for Manual Seat: Click hereVehicle Interior>SEAT>FRONT SEAT ASSEMBLY(for Manual Seat)>REMOVAL
for Power Seat: Click hereVehicle Interior>SEAT>FRONT SEAT ASSEMBLY(for Power Seat)>REMOVAL
36.REMOVE FRONT SEAT ASSEMBLY RH
- HINT:
-
Use the same procedure as for the LH side.
37.REMOVE INSTRUMENT PANEL SAFETY PAD
87834
38.REMOVE INNER REAR VIEW MIRROR STAY HOLDER COVER (w/ EC Mirror)
w/o Lane Departure Alert System: Click hereVehicle Interior>MIRROR (INT)>INNER REAR VIEW MIRROR>REMOVAL
89943
39.REMOVE RAIN SENSOR COVER (w/ Lane Departure Alert System)
86466C
40.REMOVE NO. 2 LANE DEPARTURE WARNING CAMERA COVER (w/ Lane Departure Alert System)
86466
41.REMOVE NO. 1 LANE DEPARTURE WARNING CAMERA COVER (w/ Lane Departure Alert System)
63650A
42.REMOVE ROOF CONSOLE BOX ASSEMBLY (w/o Sliding Roof)
63650A
43.REMOVE ROOF CONSOLE BOX ASSEMBLY (w/ Sliding Roof)
81240
44.REMOVE NO. 1 ROOM LIGHT ASSEMBLY (w/o Sliding Roof)
81360T
45.REMOVE SPOT LIGHT ASSEMBLY (w/ Sliding Roof)
74610A
46.REMOVE ASSIST GRIP SUB-ASSEMBLY (for Front Passenger Side)
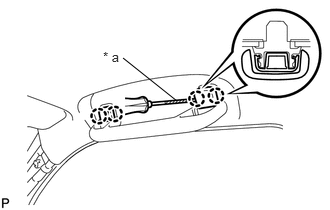
| *a | Protective Tape |
Using a screwdriver, disengage the 4 claws and remove the 2 assist grip covers.
- NOTICE:
-
Do not forcibly pry the assist grip covers to prevent them from being deformed.
- HINT:
-
Tape the screwdriver tip before use.
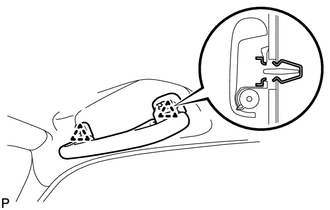
Disengage the 2 clips and remove the assist grip sub-assembly.
Remove the 2 clips from the vehicle body.
74610A
47.REMOVE ASSIST GRIP SUB-ASSEMBLY
- HINT:
-
Use the same procedure as for the front passenger side.
74630E
48.REMOVE REAR ASSIST GRIP ASSEMBLY LH
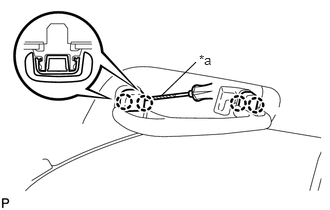
| *a | Protective Tape |
Using a screwdriver, disengage the 4 claws and remove the 2 assist grip covers.
- NOTICE:
-
Do not forcibly pry the assist grip covers to prevent them from being deformed.
- HINT:
-
Tape the screwdriver tip before use.
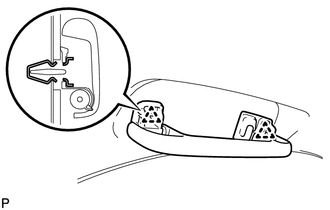
Disengage the 2 clips and remove the rear assist grip assembly LH.
Remove the 2 clips from the vehicle body.
74620C
49.REMOVE REAR ASSIST GRIP ASSEMBLY RH
- HINT:
-
Use the same procedure as for the LH side.
63318C
50.REMOVE SLIDING ROOF OPENING TRIM MOULDING (w/ Sliding Roof)
Remove the sliding roof opening trim moulding.
74325
51.REMOVE VISOR BRACKET COVER (for LH Side)
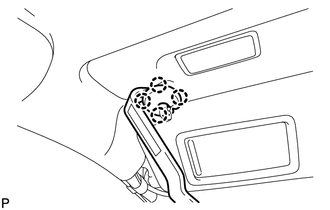
Using a moulding remover, disengage the 4 claws and remove the visor bracket cover.
74320
52.REMOVE VISOR ASSEMBLY LH
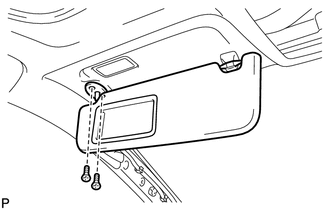
Remove the 2 screws and visor assembly LH.
74325
53.REMOVE VISOR BRACKET COVER (for RH Side)
- HINT:
-
Use the same procedure as for the LH side.
74310
54.REMOVE VISOR ASSEMBLY RH
- HINT:
-
Use the same procedure as for the LH side.
74348
55.REMOVE VISOR HOLDER
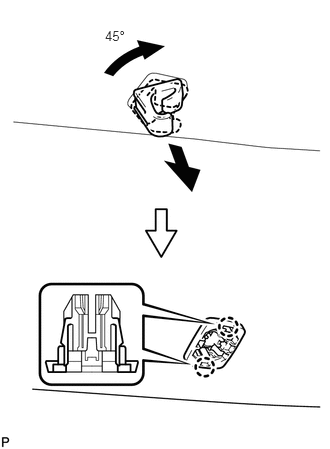
Turn the visor holder approximately 45° and pull it out as shown in the illustration.
Disengage the 2 claws and remove the visor holder.
- HINT:
-
Use the same procedure for the other visor holder.
56.REMOVE ROOF HEADLINING ASSEMBLY (w/o Sliding Roof)
w/ EC Mirror:
Disconnect the connector from the inner rear view mirror.
w/ Lane Departure Alert System:
Disconnect the connector from the rain sensor.
Disconnect the connector from the lane departure warning camera.
Remove the bolt and disconnect the bracket from the front pillar RH.
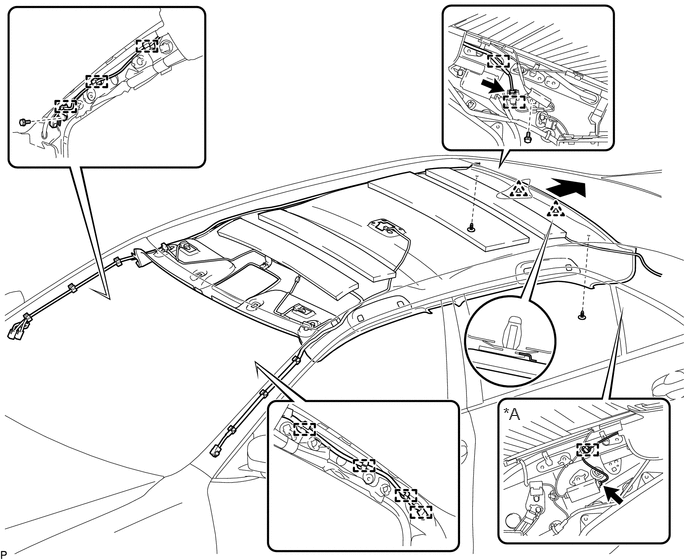
| *A | w/ Digital Audio Broadcasting Antenna | - | - |
Disengage the 3 clamps from the front pillar RH.
Disengage the 4 clamps from the front pillar LH.
Disengage the 2 clamps and disconnect the connector from the rear pillar RH.
w/ Digital Audio Broadcasting Antenna:
Disengage the clamp and disconnect the connector from the rear pillar LH.
Remove the 2 clips.
Slide the roof headlining assembly to disengage the 2 clips as shown in the illustration.
- HINT:
-
Leave the 2 clips in the vehicle.
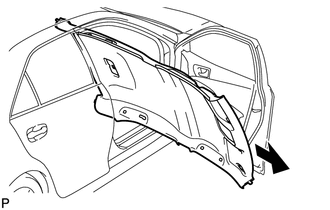
Remove the roof headlining assembly from the vehicle through the front passenger side door.
- NOTICE:
-
Do not damage the roof headlining assembly or vehicle interior.
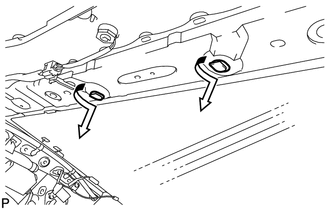
Remove the 2 clips from the vehicle body as shown in the illustration.
57.REMOVE ROOF HEADLINING ASSEMBLY (w/ Sliding Roof)
w/ EC Mirror:
Disconnect the connector from the inner rear view mirror.
w/ Lane Departure Alert System:
Disconnect the connector from the rain sensor.
Disconnect the connector from the lane departure warning camera.
Disconnect the connector from the sliding roof drive gear assembly.
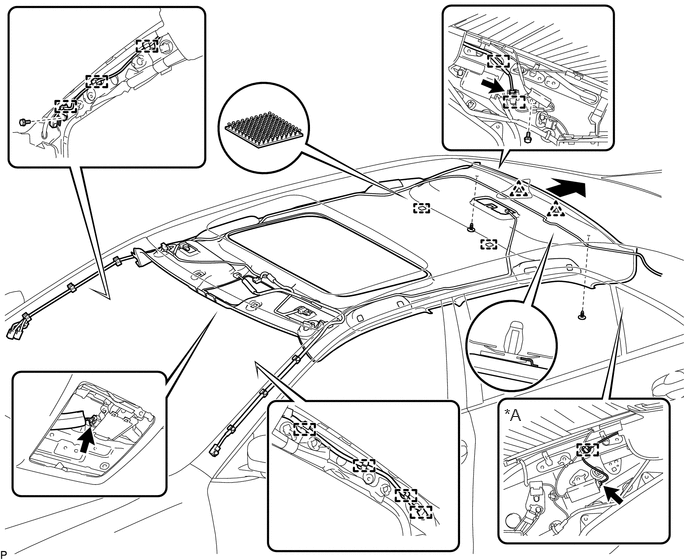
| *A | w/ Digital Audio Broadcasting Antenna | - | - |
Remove the bolt and disconnect the bracket from the front pillar RH.
Disengage the 3 clamps from the front pillar RH.
Disengage the 4 clamps from the front pillar LH.
Disengage the 2 clamps and disconnect the connector from the rear pillar RH.
w/ Digital Audio Broadcasting Antenna:
Disengage the clamp and disconnect the connector from the rear pillar LH.
Remove the 2 clips.
Disengage the 2 fasteners.
Slide the roof headlining assembly to disengage the 2 clips as shown in the illustration.
- HINT:
-
Leave the 2 clips in the vehicle.
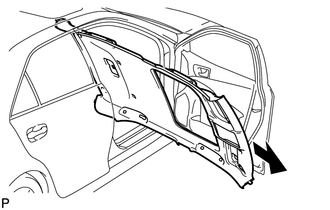
Remove the roof headlining assembly from the vehicle through the front passenger side door.
- NOTICE:
-
Do not damage the roof headlining assembly or vehicle interior.
Remove the 2 clips from the vehicle body as shown in the illustration.