AXLE AND DIFFERENTIAL REAR AXLE HUB ON-VEHICLE INSPECTION
CAUTION / NOTICE / HINT
- NOTICE:
-
When the brake pedal is first depressed after replacing the brake pads or pushing back the disc brake piston, DTC C1214 may be output. As there is no malfunction, clear the DTC.
- HINT:
- ·
Use the same procedure for the RH side and LH side.
·The procedure listed below is for the LH side.
PROCEDURE

 1. PRECAUTION
- NOTICE:
-
After turning the power switch off, waiting time may be required before disconnecting the cable from the negative (-) auxiliary battery terminal. Therefore, make sure to read the disconnecting the cable from the negative (-) auxiliary battery terminal notice before proceeding with work.
-
Click hereGeneral>INTRODUCTION>REPAIR INSTRUCTION>PRECAUTION
2.REMOVE WINDSHIELD WIPER MOTOR AND LINK ASSEMBLY
55702A
3.REMOVE FRONT OUTER COWL TOP PANEL SUB-ASSEMBLY
4.DISABLE BRAKE CONTROL
5.REMOVE REAR WHEEL
6.SEPARATE REAR DISC BRAKE CALIPER ASSEMBLY
42491
7.REMOVE PARKING BRAKE SHOE ADJUSTING HOLE PLUG
Click hereBrake>BRAKE (REAR)>REAR BRAKE>REMOVAL
42431
8.REMOVE REAR DISC
Click hereBrake>BRAKE (REAR)>REAR BRAKE>REMOVAL
9.INSPECT REAR AXLE HUB BEARING LOOSENESS
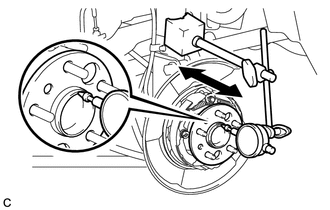
Using a dial indicator, check for looseness near the center of the rear axle hub.
- Maximum looseness:
0.05 mm (0.00197 in.)
- NOTICE:
- ·
Ensure that the dial indicator is set perpendicular to the measurement surface.
·Keep the magnet of the dial indicator away from the rear axle hub and bearing assembly.
If the looseness exceeds the maximum, replace the rear axle hub and bearing assembly.
10.INSPECT REAR AXLE HUB RUNOUT
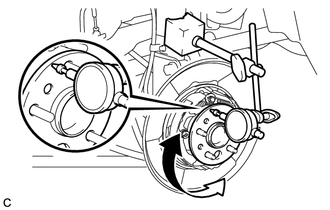
Using a dial indicator, check for runout on the surface of the rear axle hub outside the rear axle hub bolt.
- Maximum runout:
0.07 mm (0.00276 in.)
- NOTICE:
- ·
Ensure that the dial indicator is set perpendicular to the measurement surface.
·Make sure to install the tip of the dial indicator towards the outside of the rear axle hub bolt.
·Keep the magnet of the dial indicator away from the rear axle hub and bearing assembly.
If the runout exceeds the maximum, replace the rear axle hub and bearing assembly.
42431
11.INSTALL REAR DISC
42491
12.INSTALL PARKING BRAKE SHOE ADJUSTING HOLE PLUG
13.INSTALL REAR DISC BRAKE CALIPER ASSEMBLY
14.CONNECT CABLE TO AUXILIARY BATTERY NEGATIVE TERMINAL
Connect the cable to the negative (-) auxiliary battery terminal.
Click herePower Source / Network>2AR-FXE BATTERY / CHARGING>AUXILIARY BATTERY>INSTALLATION
Connect the reservoir level switch connector.
Clear the DTCs.
55702A
15.INSTALL FRONT OUTER COWL TOP PANEL SUB-ASSEMBLY
16.INSTALL WINDSHIELD WIPER MOTOR AND LINK ASSEMBLY
17.ADJUST PARKING BRAKE
18.INSTALL REAR WHEEL
- Torque:
- 103 N*m (1049 kgf*cm, 76 ft.*lbf)