INSTALLATION
Removal / installation · Vehicles built Jul 2007 – Jul 2009
| 1. INSTALL NO. 2 CYLINDER HEAD GASKET |

Remove any old packing (FIPG) material.
- HINT:
- Do not drop any oil on the contact surface of the cylinder head and cylinder block.
Apply a continuous bead of seal packing (diameter 2.5 to 3.0 mm (0.098 to 0.118 in.)) to a new cylinder head gasket as shown in the illustration.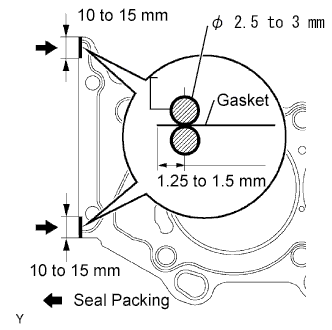

- Seal packing:
- Toyota Genuine Seal Packing Black, Three Bond 1207B or the equivalent
- NOTICE:
- Install the cylinder head within 3 minutes of applying the seal packing. Tighten the cylinder head bolts within 15 minutes of installing the cylinder head. Otherwise, the seal packing must be removed and reapplied.
Place the cylinder head gasket on the cylinder block surface with the Lot No. stamp facing upward.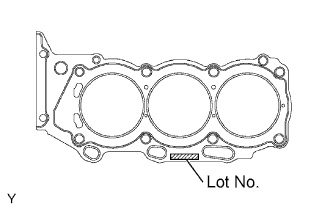
- NOTICE:
- Orient the cylinder head gasket correctly.
- Place the cylinder head carefully in order not to damage the gasket with the bottom part of the head.
- Orient the cylinder head gasket correctly.
| 2. INSTALL CYLINDER HEAD LH |
Place the cylinder head on the cylinder head gasket.
Install the 8 cylinder head bolts.
- HINT:
- The cylinder head bolts are tightened in 2 successive steps (steps (*1) and (*2)).
- If any cylinder head bolts are broken or deformed, replace them.
- The cylinder head bolts are tightened in 2 successive steps (steps (*1) and (*2)).
Apply a light coat of engine oil to the threads of the cylinder head bolts.
Install the plate washer onto the cylinder head bolt.
Using several steps, uniformly tighten each bolt with a 10 mm bi-hexagon wrench in the sequence shown in the illustration. (*1)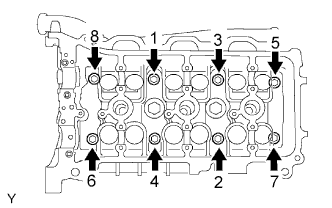
- Torque:
- 36 N*m{ 367 kgf*cm , 27 ft.*lbf }
- NOTICE:
- Do not drop the washers into the cylinder head.
Mark the front side of each cylinder head bolt with paint.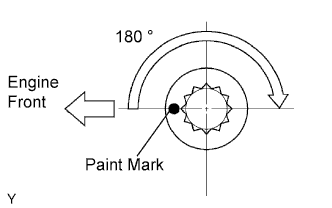
Retighten the cylinder head bolts 180° as shown. (*2)
Check that the painted marks are now at 180° from the engine front.
Install the 2 cylinder head bolts.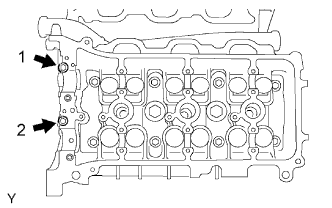
Apply a light coat of engine oil to the threads of the cylinder head bolts.
Using several steps, uniformly install and tighten the 2 cylinder head bolts in the sequence shown in the illustration.
- Torque:
- 30 N*m{ 306 kgf*cm , 22 ft.*lbf }
Install the ground cable with the bolt.
- Torque:
- 8.0 N*m{ 82 kgf*cm , 71 ft.*lbf }
Install the air fuel ratio sensor connector bracket with bolt.
- Torque:
- 19 N*m{ 189 kgf*cm , 14 ft.*lbf }
| 3. INSTALL CAMSHAFTS (for Bank 2) |
- NOTICE:
- Keep the camshaft level while it is being removed. The camshaft thrust clearance is very small and failing to keep it level could crack or damage the cylinder head journal surface, which receives the thrust force. This could subsequently lead the camshaft to seize or break. Perform the following steps to avoid such problems.
Set the crankshaft position.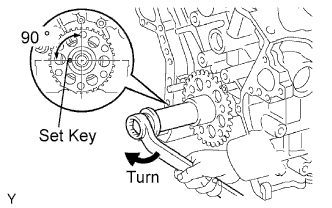
Using the crankshaft pulley set bolt, turn the crankshaft, and set the crankshaft set key in the left horizontal position.
- NOTICE:
- Installing the crankshaft at the wrong angle could cause the piston head and valve head to come into contact with each other when installing the camshaft. This could cause damage, so always set the crankshaft at the correct angle.
Apply new engine oil to the thrust portion and journal of the camshafts.
Place the 2 camshafts onto the cylinder head with the cam lobes of No. 1 cylinder facing in the directions shown in the illustration.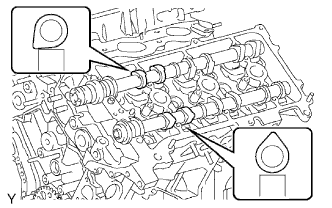
Install the 8 bearing caps in the proper locations as shown.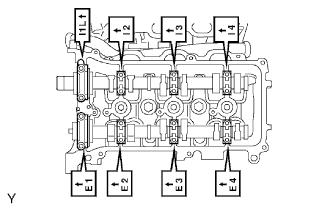
Apply a light coat of engine oil to the threads and under the leads of the bearing cap bolts.
Using several steps, uniformly install and tighten the 16 bearing cap bolts in the sequence shown in the illustration.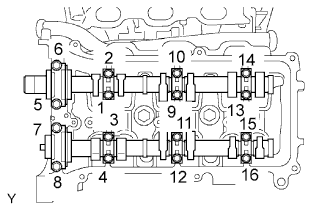
- Torque:
- 10 mm (0.39 in.) head:
- 9.0 N*m{ 92 kgf*cm , 80 in.*lbf }
- 12 mm (0.47 in.) head:
- 24 N*m{ 245 kgf*cm , 18 ft.*lbf }
| 4. INSTALL NO. 3 CHAIN TENSIONER ASSEMBLY |
While pushing in the tensioner, insert a pin of φ 1.0 mm (0.039 in.) into the hole to fix it.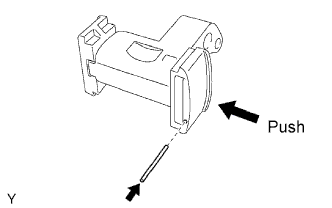
Install the No. 2 chain tensioner with the bolt.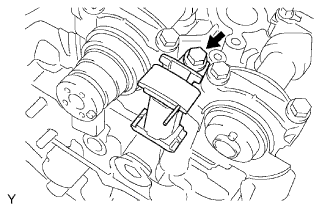
- Torque:
- 19 N*m{ 194 kgf*cm , 14 ft.*lbf }
| 5. INSTALL CAMSHAFT TIMING GEARS AND NO. 2 CHAIN (for Bank 2) |
Align the yellow mark links with the timing marks (1 dot mark and 2 dot marks) of the camshaft timing gears as shown in the illustration.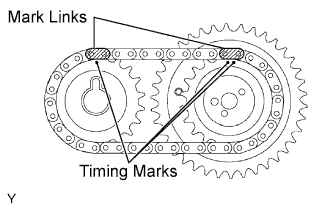
Align the timing marks on the camshaft timing gears with the timing marks on the bearing caps, and install the camshaft timing gears with the chain onto the LH camshafts.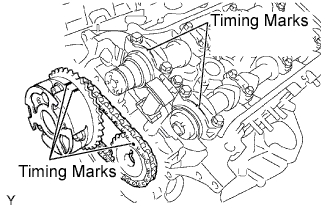
Temporarily install the 2 camshaft timing gear bolts.
- NOTICE:
- Do not push the camshaft timing gear assembly against the camshaft forcibly when installing it.
Hold the hexagonal portion of the camshaft with a wrench, and tighten the 2 bolts.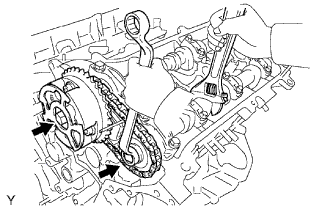
- Torque:
- 100 N*m{ 1020 kgf*cm , 74 ft.*lbf }
Remove the pin from tensioner No. 2.
| 6. INSTALL NO. 1 CHAIN VIBRATION DAMPER |
Install the chain vibration damper with the 2 bolts.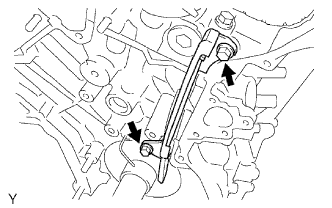
- Torque:
- 19 N*m{ 194 kgf*cm , 14 ft.*lbf }
| 7. INSTALL CYLINDER HEAD GASKET |
Remove any old packing (FIPG) material.
- HINT:
- Do not drop any oil on the contact surfaces of the cylinder head and cylinder block.
Apply a continuous bead of seal packing (diameter 2.5 to 3 mm (0.098 to 0.118 in.)) to a new cylinder head gasket as shown in the illustration.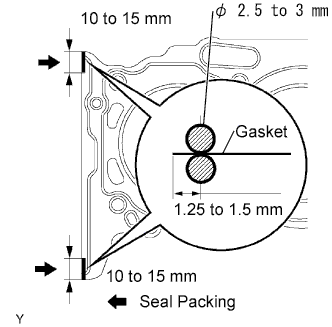
- Seal packing:
- Toyota Genuine Seal Packing Black, Three Bond 1207B or the equivalent
- NOTICE:
- Install the cylinder head within 3 minutes of applying the seal packing. Tighten the cylinder head bolts within 15 minutes of installing the cylinder head. Otherwise, the seal packing must be removed and reapplied.
Place the cylinder head gasket on the cylinder block surface with the Lot No. stamp facing upward.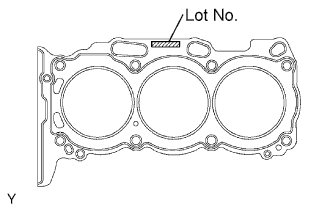
- NOTICE:
- Orient the cylinder head gasket correctly.
- Place the cylinder head carefully in order not to damage the gasket.
- Orient the cylinder head gasket correctly.
| 8. INSTALL CYLINDER HEAD SUB-ASSEMBLY |
Place the cylinder head on the cylinder head gasket.
Install the 8 cylinder head bolts.
- HINT:
- The cylinder head bolts are tightened in 2 successive steps (steps (*1) and (*2)).
- If any cylinder head bolts are broken or deformed, replace them.
- The cylinder head bolts are tightened in 2 successive steps (steps (*1) and (*2)).
Apply a light coat of engine oil to the threads of the cylinder head bolts.
Install the plate washer onto the cylinder head bolt.
Using several steps, tighten each bolt uniformly with a 10 mm bi-hexagon wrench in the sequence shown in the illustration. (*1)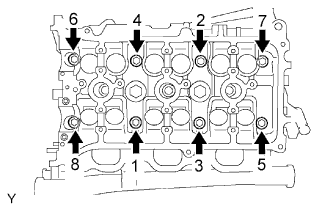
- Torque:
- 36 N*m{ 367 kgf*cm , 27 ft.*lbf }
- NOTICE:
- Do not drop the washers into the cylinder head.
Mark the front side of each cylinder head bolt with paint.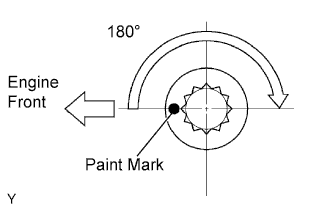
Retighten the cylinder head bolts 180° as shown. (*2)
Check that the painted marks are now at 180° from the engine front.
Install the ground cable with the bolt.
- Torque:
- 8.0 N*m{ 82 kgf*cm , 71 in.*lbf }
| 9. INSTALL NO. 2 CAMSHAFT BEARING |
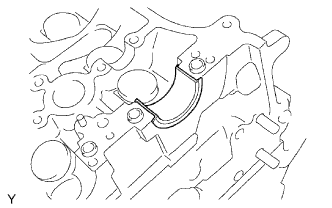 |
Install the No. 2 camshaft bearing onto the cylinder head.
- NOTICE:
- Clean the installation planes of the back side of the bearing and cylinder head and keep them free of oil.
| 10. INSTALL CAMSHAFTS (for Bank 1) |
- NOTICE:
- Keep the camshaft level while it is being removed. The camshaft thrust clearance is very small and failing to keep it level could crack or damage the cylinder head journal surface, which receives the thrust force. This could subsequently lead the camshaft to seize or break. Perform the following steps to avoid such problems.
Set the crankshaft position.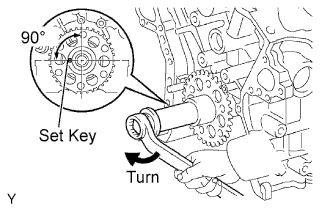
Using the crankshaft pulley set bolt, turn the crankshaft, and set the crankshaft set key in the left horizontal position.
- NOTICE:
- Installing the crankshaft at the wrong angle could cause the piston head and valve head to come into contact with each other when installing the camshaft. This could cause damage, so always set the crankshaft at the correct angle.
Apply new engine oil to the thrust portion and journal of the camshafts.
Place the 2 camshafts onto the cylinder head with the cam lobes of No. 1 cylinder facing in the directions shown in the illustration.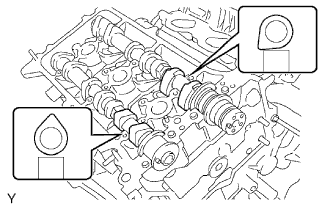
Install the 8 bearing caps in the proper locations as shown.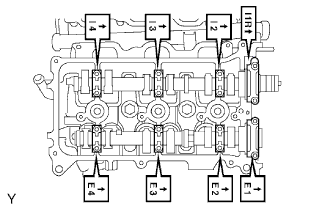
Apply a light coat of engine oil to the threads and under the heads of the bearing cap bolts.
Using several steps, uniformly install and tighten the 16 bearing cap bolts in the sequence shown in the illustration.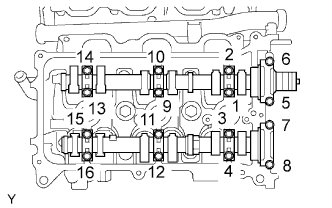
- Torque:
- 10 mm (0.39 in.) head:
- 9.0 N*m{ 92 kgf*cm , 80 in.*lbf }
- 12 mm (0.47 in.) head:
- 24 N*m{ 245 kgf*cm , 18 ft.*lbf }
Turn the camshafts clockwise until the knock pin comes to a position 90° to the cylinder head.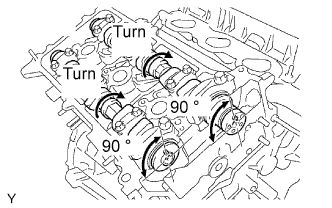
| 11. INSTALL NO. 2 CHAIN TENSIONER ASSEMBLY |
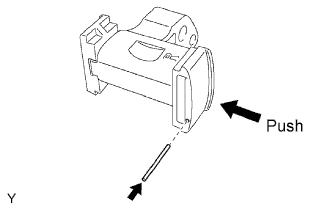 |
While pushing in the tensioner, insert a pin of φ 1.0 mm (0.039 in.) into the hole to fix it.
Install the No. 2 chain tensioner with the bolt.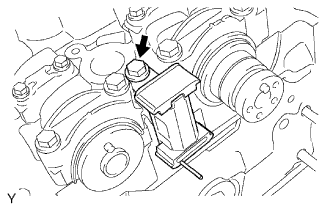
- Torque:
- 19 N*m{ 194 kgf*cm , 14 ft.*lbf }
| 12. INSTALL CAMSHAFT TIMING GEARS AND NO. 2 CHAIN (for Bank 1) |
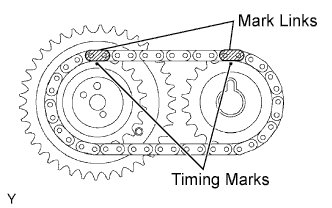 |
Align the yellow mark links with the timing marks (1 dot mark) of the camshaft timing gears as shown in the illustration.
Align the timing marks on the camshaft timing gears with the timing marks on the bearing caps, and install the camshaft timing gears with the chain onto the RH camshafts.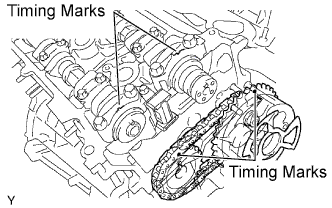
Temporarily install the 2 camshaft timing gear bolts.
- NOTICE:
- Do not push the camshaft timing gear assembly against the camshaft forcibly when installing it.
Hold the hexagonal portion of the camshaft with a wrench, and tighten the 2 bolts.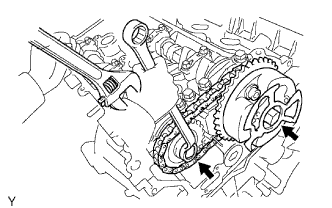
- Torque:
- 100 N*m{ 1020 kgf*cm , 74 ft.*lbf }
Remove the No. 2 pin from the tensioner.
| 13. INSTALL WATER BY-PASS JOINT REAR |
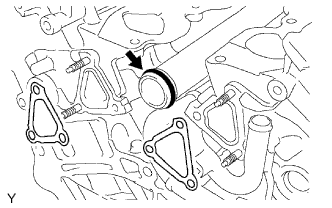 |
Install a new O-ring onto the water outlet pipe.
Apply soapy water to the O-ring.
Install 2 new gaskets and water by-pass joint rear with the 2 bolts and 4 nuts.
- Torque:
- 9.0 N*m{ 92 kgf*cm , 80 in.*lbf }
Connect the engine coolant temperature sensor connector.
| 14. CONNECT HEATER WATER INLET HOSE |
| 15. INSTALL INTAKE MANIFOLD |
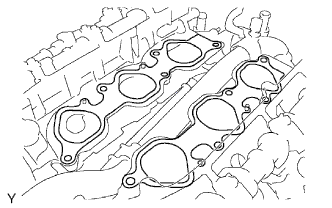 |
Set a new gasket on each cylinder head.
- NOTICE:
- Align the port holes of the gasket and cylinder head.
- Orient the gasket correctly.
- Align the port holes of the gasket and cylinder head.
Set the intake manifold on the cylinder heads.
Install and tighten the 10 bolts uniformly in several steps.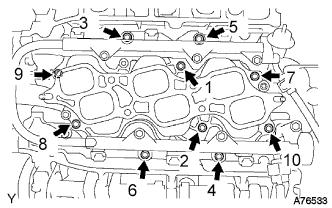
- Torque:
- 26 N*m{ 265 kgf*cm , 19 ft.*lbf }
Connect the 6 fuel injector connectors.
| 16. CONNECT NO. 2 FUEL PIPE SUB-ASSEMBLY |
Install the No. 2 surge tank stay with the 2 bolts.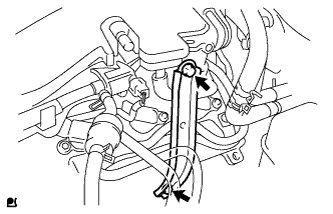
- Torque:
- 21 N*m{ 214 kgf*cm , 15 ft.*lbf }
| 17. CONNECT NO. 1 FUEL PIPE SUB-ASSEMBLY |
Push the tube connector into the pipe until the tube connector makes a "click" sound.
- NOTICE:
- Check if there is any damage or foreign matter on the connected part of the fuel pipe.
- After connecting, check that the pipe and connector are securely connected by pulling them.
- Check if there is any damage or foreign matter on the connected part of the fuel pipe.
Install the fuel pipe clamp.
| 18. INSTALL EXHAUST MANIFOLD SUB-ASSEMBLY LH |
Set a new gasket to the bank 2 cylinder head with the oval shape facing forward.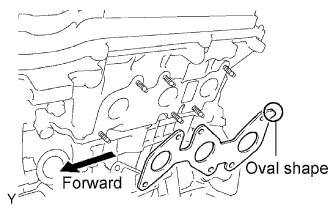
- NOTICE:
- Orient the new gasket correctly.
Install the exhaust manifold with the 6 nuts.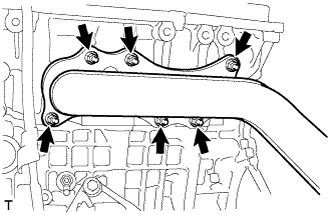
- Torque:
- 30 N*m{ 306 kgf*cm , 22 ft.*lbf }
Connect the air fuel ratio sensor connector.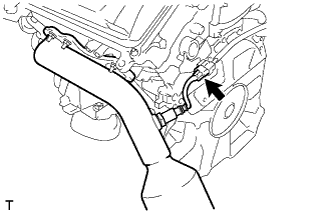
| 19. INSTALL NO. 2 MANIFOLD STAY |
Install the No. 2 manifold stay with the 3 bolts.
- Torque:
- 40 N*m{ 408 kgf*cm , 30 ft.*lbf }
| 20. INSTALL EXHAUST MANIFOLD SUB-ASSEMBLY RH |
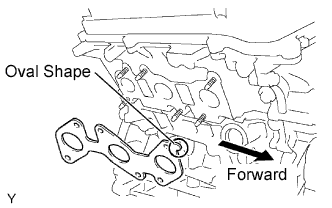 |
Set a new gasket to the bank 1 cylinder head with the oval shape facing forward.
- NOTICE:
- Orient the new gasket correctly.
Install the exhaust manifold with the 6 nuts.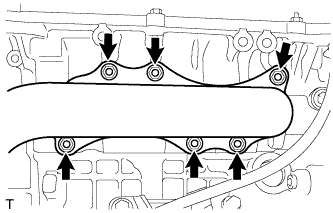
- Torque:
- 30 N*m{ 306 kgf*cm , 22 ft.*lbf }
Connect the air fuel ratio sensor connector.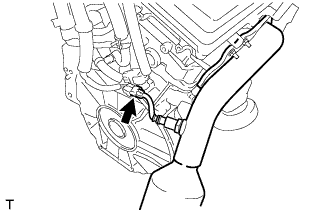
| 21. INSTALL MANIFOLD STAY |
Install the manifold stay with the 3 bolts.
- Torque:
- 40 N*m{ 408 kgf*cm , 30 ft.*lbf }
| 22. INSTALL FRONT EXHAUST PIPE ASSEMBLY |
Check the free length.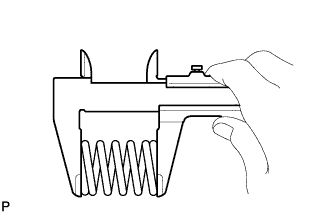
Using vernier calipers, measure the free length of the compression spring.
- Minimum:
- for Automatic Transmission:
- 40.5mm (1.594 in.)
- for Manual Transmission:
- 38.9mm (1.530 in.)
Install a new gasket onto the exhaust manifold RH.
Install a new gasket onto the exhaust front pipe.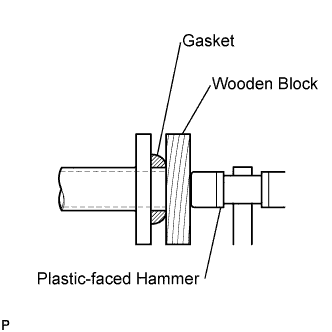
Using a wooden block and plastic-faced hammer, tap in the new gasket until it is flush with the exhaust front pipe.
- NOTICE:
- Make sure that the gasket is in the correct direction when installing.
- Do not reuse the removed gasket.
- Make sure that the gasket is in the correct direction when installing.
Install the exhaust front pipe with new 2 nuts.
- Torque:
- 54 N*m{ 554 kgf*cm , 40 ft.*lbf }
Install the exhaust center pipe onto the front exhaust pipe with the 2 bolts and 2 springs.
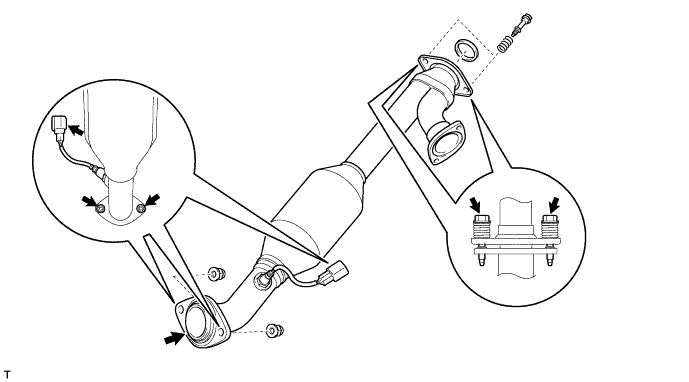
- Torque:
- 43 N*m{ 438 kgf*cm , 32 ft.*lbf }
Connect the oxygen sensor connector.
| 23. INSTALL NO. 2 FRONT EXHAUST PIPE ASSEMBLY |
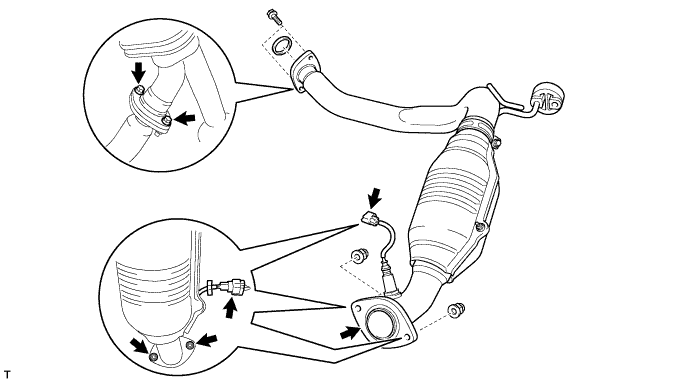
Install a new gasket onto the exhaust manifold LH.
Install a new gasket onto the No. 2 front exhaust pipe.
Install the No. 2 front exhaust pipe with the 2 new nuts and 2 bolts.
- Torque:
- Nut:
- 54 N*m{ 554 kgf*cm , 40 ft.*lbf }
- Bolt:
- 48 N*m{ 489 kgf*cm , 35 ft.*lbf }
Connect the oxygen sensor connector.
| 24. INSTALL EXHAUST PIPE STOPPER BRACKET (for 4WD) |
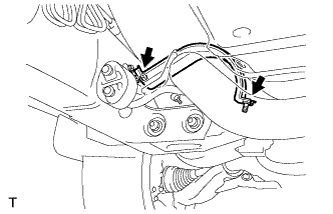 |
Install the exhaust pipe stopper bracket with the 2 bolts.
- Torque:
- 19 N*m{ 193 kgf*cm , 14 ft.*lbf }
| 25. INSTALL NO. 1 COOL AIR INLET |
Install the cool air inlet with the 2 bolts.
- Torque:
- 12 N*m{ 122 kgf*cm , 9.0 ft.*lbf }
| 26. INSTALL CHAIN SUB-ASSEMBLY |
| 27. CHECK FOR FUEL LEAKAGE |
| 28. CHECK FOR EXHAUST GAS LEAKAGE |
| 29. INSPECT IGNITION TIMING |
- NOTICE:
- Turn all the electrical systems OFF.
- Conduct the inspection when the cooling fan motor is turned OFF.
- Turn all the electrical systems OFF.
Warm up the engine.
When using the intelligent tester:
Connect the intelligent tester to the DLC3.
Select the following menu items: Powertrain / Engine and ECT / Date List / IGN Advance.
Inspect the ignition timing during idling.
- Ignition timing:
- 7 to 24°CA BTDC during idling (Transmission in neutral position)
Check that the ignition timing advances immediately when the engine speed is increased.
When not using intelligent tester: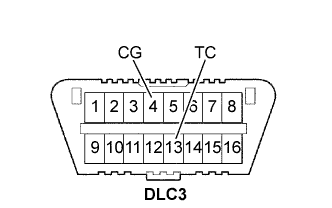
Using SST, connect the terminals 13 (TC) and 4 (CG) of the DLC3.
- SST
- 09843-18040
- NOTICE:
- Do not connect the terminals incorrectly as it causes breakage of the engine.
Remove the air cleaner.
Pull out the wire harness shown in the illustration.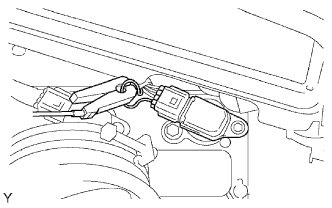
Connect the tester probe of a timing light to the wire of the ignition coil connector for the No. 1 cylinder.
- NOTICE:
- Use timing light that detects the first signal.
- Use timing light that detects the first signal.
- After checking, wrap the wire harness with tape.
- After checking, wrap the wire harness with tape.
Inspect the ignition timing during idling.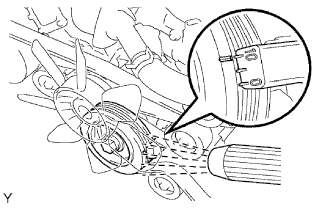
- Ignition timing:
- 8 to 12°CA BTDC during idling (Transmission in neutral position)
Remove SST from the DLC3.
Inspect the ignition timing during idling.
- Ignition timing:
- 7 to 24°CA BTDC during idling (Transmission in neutral position)
Install the air cleaner.
| 30. INSPECT ENGINE IDLING SPEED |
- NOTICE:
- Turn all the electrical systems OFF.
- Operate the inspection when the cooling fan motor is turned OFF.
- Turn all the electrical systems OFF.
Warm up the engine.
When using the intelligent tester:
Connect the intelligent tester to the DLC3.
Select the following menu items: Powertrain / Engine and ECT / Date List / Engine Speed.
Inspect the engine idling speed.
- Idling speed:
- 650 to 750 rpm (Transmission in neutral position)
When not using the intelligent tester: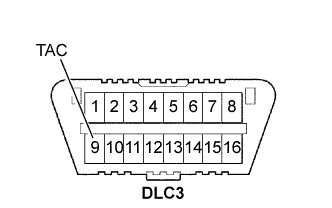
Using SST, connect the terminal 9 (TAC) of the DLC3.
- SST
- 09843-18030
Race the engine speed at 2500 rpm for approximately 90 seconds.
Inspect the engine idling speed.
- Idling speed:
- 650 to 750 rpm (Transmission in neutral position)
| 31. REMOVE COMPRESSION |
Warm up and stop the engine.
Remove the circuit opening relay (Click here).
Remove the V-bank cover (Click here).
Remove the air cleaner assembly (Click here).
Remove the throttle body bracket (Click here).
Remove the oil baffle plate (Click here).
Remove the No. 1 surge tank stay (Click here).
Remove the No. 2 surge tank stay (Click here).
Remove the ignition coils (Click here).
Remove the spark plugs.
Inspect the cylinder compression pressure.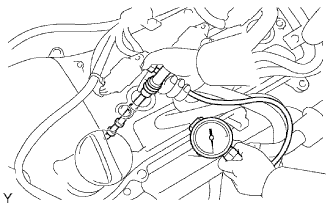
Insert a compression gauge into the spark plug hole. (*1)
Fully open the throttle. (*2)
While cranking the engine, measure the compression pressure. (*3)
- Compression pressure:
- 1300 kPa (13.3 kgf/cm2, 189 psi)
- Minimum pressure:
- 1000 kPa (10.2 kgf/cm2, 145 psi)
- Difference between cylinders:
- 100 kPa (1.0 kgf/cm2, 15 psi)
- NOTICE:
- Use a fully-charged battery so the engine speed can be increased to 2500 rpm or more.
- Use a fully-charged battery so the engine speed can be increased to 2500 rpm or more.
- Inspect the other cylinders in the same way.
- Inspect the other cylinders in the same way.
- Measure the compression in as short a time as possible.
- Measure the compression in as short a time as possible.
If the cylinder compression is low, pour a small amount of engine oil into the cylinder through the spark plug hole and repeat steps (*1) through (*3) for cylinders with low compression.
- If adding oil increases the compression, the piston rings and/or cylinder bore may be worn or damaged.
- If the pressure stays low, a valve may be stuck or seated improperly, or there may be leakage from the gasket.
- If adding oil increases the compression, the piston rings and/or cylinder bore may be worn or damaged.
| 32. INSPECT CO/HC |
Start the engine.
Run the engine at 2500 rpm for approximately 180 seconds.
Insert the CO/HC meter testing probe at least 40 cm (1.3 ft) into the tailpipe during idling.
Immediately check the CO/HC concentration during idling and/or while running at 2500 rpm.
- HINT:
- Complete the measurement within 3 minutes.
- Complete the measurement within 3 minutes.
- When carrying out the 2 mode (with the engine idling/running at 2500 rpm) test, the measurement orders are prescribed by the applicable local regulations.
- When carrying out the 2 mode (with the engine idling/running at 2500 rpm) test, the measurement orders are prescribed by the applicable local regulations.
If the CO/HC concentration does not comply with regulations, troubleshoot in the order given below.
Check the heated oxygen sensor operation.
CO
HC
Problems
Causes
Normal
High
Rough idling
- Faulty ignition:
- Incorrect timing
- Fouled, shorted or improperly gapped plugs
- Incorrect valve clearance
- Leaking intake and exhaust valves
- Leaking cylinders
Low
High
Rough idling
(Fluctuating HC reading)
- Vacuum leaks:
- PCV hoses
- Intake manifold
- Throttle body
- IAC valve
- Brake booster line
- Lean mixture causing misfire
High
High
Rough idling
(Black smoke from exhaust)
- Restricted air filter
- Plugged PCV valve
- Faulty EFI systems:
- Faulty pressure regulator
- Faulty engine coolant temperature sensor
- Faulty mass air flow meter
- Faulty ECM
- Faulty injectors
- Faulty throttle position sensor
- Faulty ignition:
| 33. INSPECT AND ADJUST FRONT WHEEL ALIGNMENT |