RC60J MANUAL TRANSMISSION / TRANSAXLE MANUAL TRANSMISSION ASSEMBLY(for 7GR-FKS) INSTALLATION
PROCEDURE

 33146
1.INSTALL EXTENSION HOUSING DUST(MTM) DEFLECTOR
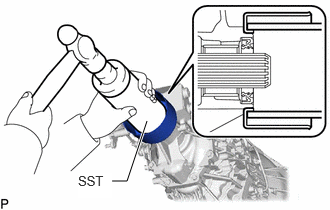
Using SST and hammer, tap in the extension housing dust(MTM) deflector.
- SST
- 09513-36040
33826A
2.INSTALL NO. 2 TRANSMISSION CONTROL CABLE BRACKET
Install the No. 2 transmission control cable bracket to the manual transmission assembly with the 2 bolts.
- Torque:
- 28 N*m (286 kgf*cm, 21 ft.*lbf)
3.INSTALL WIRING HARNESS CLAMP BRACKET
w/o Secondary Air Injection System (w/o Sensor):
Install the 5 wiring harness clamp brackets to the manual transmission assembly with the 5 bolts.
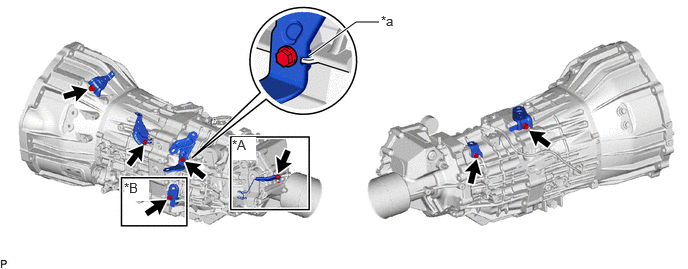
| *A | w/ Secondary Air Injection System | *B | w/ Sensor |
| *a | Align the cutout on the wiring harness clamp bracket with the protrusion of the manual transmission assembly. | - | - |
- Torque:
- 13 N*m (133 kgf*cm, 10 ft.*lbf)
w/o Secondary Air Injection System (w/ Sensor):
Install the 6 wiring harness clamp brackets to the manual transmission assembly with the 6 bolts.
- Torque:
- 13 N*m (133 kgf*cm, 10 ft.*lbf)
w/ Secondary Air Injection System (w/o Sensor):
Install the 6 wiring harness clamp brackets to the manual transmission assembly with the 6 bolts.
- Torque:
- 13 N*m (133 kgf*cm, 10 ft.*lbf)
33827
4.INSTALL NO. 3 TRANSMISSION CONTROL CABLE BRACKET
Install the No. 3 transmission control cable bracket to the manual transmission assembly with the 2 bolts.
- Torque:
- 28 N*m (286 kgf*cm, 21 ft.*lbf)
5.INSTALL MANUAL TRANSMISSION ASSEMBLY
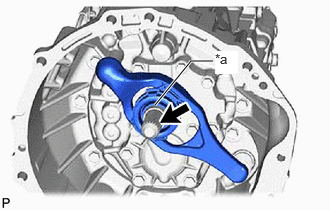
| *a | Contact surface of the bearing |

|
Toyota Genuine Clutch Spline Grease or equivalent |
Apply the clutch spline grease to the spline of the input shaft.
- Grease:
Toyota Genuine Clutch Spline Grease or equivalent
- NOTICE:
-
Make sure that no grease adheres to the contact surface of the bearing.
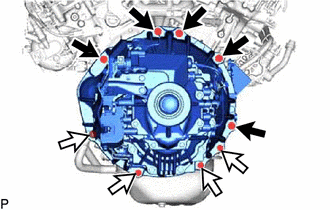
|
|
Bolt A |

|
Bolt B |
Install the manual transmission assembly with the 9 bolts.
- Torque:
- for bolt A : 71.5 N*m (729 kgf*cm, 53 ft.*lbf)
- for bolt B : 37.3 N*m (380 kgf*cm, 28 ft.*lbf)
- HINT:
Item Length Bolt A 50 mm (1.97 in.) Bolt B 45 mm (1.77 in.)
6.CONNECT WIRE HARNESS
Connect the wire harness with the 3 bolts.
- Torque:
- 13 N*m (133 kgf*cm, 10 ft.*lbf)
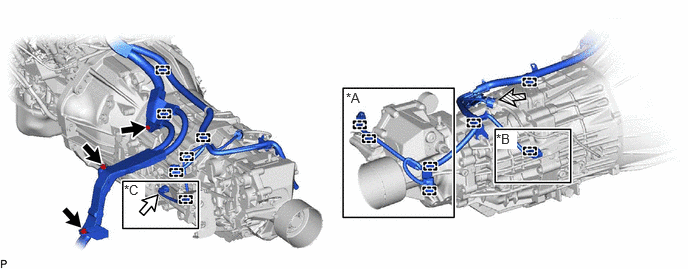
| *A | w/ Secondary Air Injection System | *B | w/o Secondary Air Injection System |
| *C | w/ Sensor | - | - |
|
|
Bolt |
|
Transmission Revolution Sensor Connector |

|
Back-up Light Switch Assembly Connector | - | - |
Connect the back-up light switch assembly connector.
w/o Secondary Air Injection System (w/o Sensor):
Attach the 8 wire harness clamps.
w/o Secondary Air Injection System (w/ Sensor):
Connect the transmission revolution sensor connector and attach the 9 wire harness clamps.
w/ Secondary Air Injection System (w/o Sensor):
Attach the 11 wire harness clamps.
12380
7.INSTALL REAR ENGINE MOUNTING INSULATOR ASSEMBLY
Install the rear engine mounting insulator assembly to the manual transmission assembly with the 4 bolts.
- Torque:
- 48 N*m (489 kgf*cm, 35 ft.*lbf)
57209B
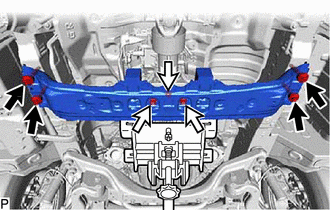
8.INSTALL REAR ENGINE MOUNTING MEMBER SUB-ASSEMBLY
|
|
Bolt |
|
|
Nut |
Install the rear engine mounting member sub-assembly to the body with the 4 bolts.
- Torque:
- 80 N*m (816 kgf*cm, 59 ft.*lbf)
Install the 3 nuts to the rear engine mounting member sub-assembly.
- Torque:
- 48 N*m (489 kgf*cm, 35 ft.*lbf)
w/ Cover:
Install the step plate cover RH.
Click hereEngine / Hybrid System>7GR-FKS (ENGINE MECHANICAL)>ENGINE ASSEMBLY>INSTALLATION
58041C
9.INSTALL FRONT NO. 1 FLOOR HEAT INSULATOR SUB-ASSEMBLY
Install the front No. 1 floor heat insulator sub-assembly to the body with the 3 bolts.
- Torque:
- 5.5 N*m (56 kgf*cm, 49 in.*lbf)
51446B
10.INSTALL NO. 2 ENGINE UNDER COVER BRACKET
Install the No. 2 engine under cover bracket to the frame with the 2 bolts.
- Torque:
- 45 N*m (459 kgf*cm, 33 ft.*lbf)
w/ Urea SCR System:
Connect the urea tube with heater assembly.
Click hereEngine / Hybrid System>1GD-FTV (ENGINE MECHANICAL)>ENGINE ASSEMBLY>INSTALLATION
33820B
11.CONNECT TRANSMISSION CONTROL CABLE ASSEMBLY (for Transmission Assembly Side)
33825
12.INSTALL TRANSMISSION CONTROL CABLE INSULATOR
Install the transmission control cable insulator to the manual transmission assembly with the 3 bolts.
- Torque:
- 28 N*m (286 kgf*cm, 21 ft.*lbf)
31482
13.INSTALL CLUTCH RELEASE CYLINDER TO FLEXIBLE HOSE TUBE
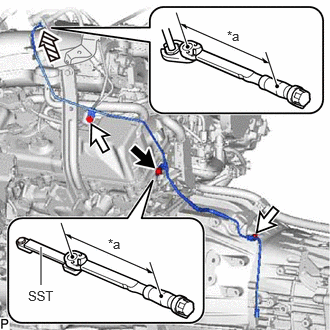
| *a | Torque Wrench Fulcrum Length |
|
|
Bolt A |
|
|
Bolt B |
|
|
Flare Nut (Clutch Release Cylinder to Flexible Hose Tube) |
Install the clutch release cylinder to flexible hose tube to the manual transmission assembly and engine assembly.
Temporarily install the flare nut of the clutch release cylinder to flexible hose tube to the flexible hose.
for Bolt A:
Using a 10 mm union nut wrench and SST, install the bolt.
- SST
- 09961-00950
- Torque:
- Specified tightening torque : 13.5 N*m (138 kgf*cm, 10 ft.*lbf)
- HINT:
- ·
Calculate the torque wrench reading when changing the fulcrum length of the torque wrench.
Click hereGeneral>INTRODUCTION>REPAIR INSTRUCTION>PRECAUTION
·When using SST (fulcrum length of 150 mm (5.9055 in.)) + union nut wrench (fulcrum length of 22 mm (0.8661 in.)) + torque wrench (fulcrum length of 162 mm (6.3779 in.)): 6.5 N*m (66 kgf*cm, 58 in.*lbf)
for Bolt B:
Install the 2 bolts.
- Torque:
- 13.5 N*m (138 kgf*cm, 10 ft.*lbf)
Using a 10 mm union nut wrench, tighten the flare nut of the clutch release cylinder to flexible hose tube.
- Torque:
- Specified tightening torque : 15.2 N*m (155 kgf*cm, 11 ft.*lbf)
- HINT:
- ·
Calculate the torque wrench reading when changing the fulcrum length of the torque wrench.
Click hereGeneral>INTRODUCTION>REPAIR INSTRUCTION>PRECAUTION
·When using a union nut wrench (fulcrum length of 22 mm (0.866 in.)) + torque wrench (fulcrum length of 162 mm (6.38 in.)): 13.4 N*m (137 kgf*cm, 10 ft.*lbf)
31470
14.INSTALL CLUTCH RELEASE CYLINDER ASSEMBLY
31490
15.INSTALL CLUTCH ACCUMULATOR ASSEMBLY
31482D
16.INSTALL CLUTCH RELEASE CYLINDER TO ACCUMULATOR TUBE
31349
17.INSTALL CLUTCH CABLE HEAT INSULATOR
18.INSTALL CLUTCH ACCUMULATOR HEAT INSULATOR
19.BLEED AIR FROM CLUTCH PIPE LINE
Click hereDrivetrain>CLUTCH>CLUTCH SYSTEM>BLEEDING
20.CHECK FOR CLUTCH FLUID LEAKAGE
- HINT:
-
Check for leaks in the clutch system.
21.CHECK FLUID LEVEL IN RESERVOIR
Click hereDrivetrain>CLUTCH>CLUTCH SYSTEM>BLEEDING
22.ADD MANUAL TRANSMISSION OIL
28100
23.INSTALL STARTER ASSEMBLY
37100
24.INSTALL PROPELLER SHAFT WITH CENTER BEARING ASSEMBLY
for Standard Roof:
Click hereDrivetrain>DRIVE SHAFT / PROPELLER SHAFT>PROPELLER SHAFT ASSEMBLY (for Standard Roof)>INSTALLATION
for High Roof:
Click hereDrivetrain>DRIVE SHAFT / PROPELLER SHAFT>PROPELLER SHAFT ASSEMBLY (for High Roof)>INSTALLATION
17141
25.INSTALL EXHAUST MANIFOLD
28800
26.CONNECT CABLE TO NEGATIVE BATTERY TERMINAL
33820B
27.ADJUST TRANSMISSION CONTROL CABLE ASSEMBLY
28. INITIALIZATION AFTER RECONNECTING BATTERY TERMINAL
Click hereGeneral>SETUP>WHEN DISCONNECTING OR RECONNECTING BATTERY TERMINAL>WORK PROCEDURE
- HINT:
-
When disconnecting and reconnecting the battery, there is an automatic learning function that completes learning when the respective system is used.
-
Click hereGeneral>SETUP>WHEN DISCONNECTING OR RECONNECTING BATTERY TERMINAL>AUTOMATIC LEARNING CHART