BRAKE SYSTEM (OTHER) BRAKE BOOSTER(for Gasoline Model RHD) INSTALLATION
PROCEDURE

 44785
1.INSTALL BRAKE BOOSTER GASKET
Install a new brake booster gasket to the brake booster assembly.
44610
2.INSTALL BRAKE BOOSTER ASSEMBLY
Temporarily install the brake booster assembly to the vehicle body.
- NOTICE:
-
Do not apply excessive force to the brake lines.
- HINT:
-
Temporarily install the brake booster assembly while avoiding the brake lines etc.
Temporarily install the lock nut and brake master cylinder push rod clevis to the brake booster assembly.
- NOTICE:
-
Fully tighten the lock nut when adjusting the brake pedal height.
Install the 4 nuts to secure the brake booster assembly.
- Torque:
- 12.7 N*m (130 kgf*cm, 9 ft.*lbf)
Connect the vacuum sensor assembly connector.
Remove the protective tape.
47264A
3.INSTALL PUSH ROD PIN
47371M
4.INSTALL NO. 13 BRAKE TUBE CLAMP
Install the No. 13 brake tube clamp to the vehicle body with the bolt.
- Torque:
- 7.0 N*m (71 kgf*cm, 62 in.*lbf)
47371B
5.INSTALL NO. 6 BRAKE TUBE CLAMP
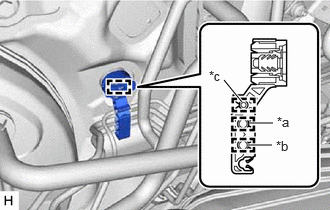
| *a | From 1st Chamber of Brake Master Cylinder Sub-assembly |
| *b | From 2nd Chamber of Brake Master Cylinder Sub-assembly |
| *c | To Front Disc Brake Cylinder Assembly RH |
Engage the 4 clamps to install a new No. 6 brake tube clamp
- NOTICE:
-
Do not kink or damage the brake lines.
44773F
6.CONNECT UNION TO CHECK VALVE HOSE
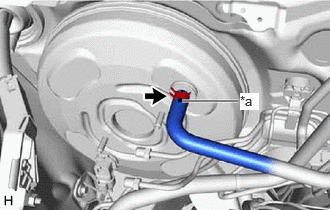
| *a | Paint Mark |
Connect the union to check valve hose to the brake booster assembly, and slide the clip to secure it.
- NOTICE:
- ·
When connecting the union to check valve hose, face the paint mark up.
·Make sure that the tabs of the clip are facing upward.
82111
7.INSTALL ENGINE ROOM MAIN WIRE
Install the engine room main wire with the nut and clamp.
- Torque:
- 12.5 N*m (127 kgf*cm, 9 ft.*lbf)
88710G
8.INSTALL NO. 2 AIR CONDITIONING TUBE AND ACCESSORY ASSEMBLY
Remove the vinyl tape from the No. 2 air conditioning tube and accessory assembly and air conditioning unit assembly.
Sufficiently apply compressor oil to 2 new O-rings and the fitting surface of the No. 2 air conditioning tube and accessory assembly.
- Compressor Oil:
ND-OIL 12 or equivalent
Install the 2 O-rings to the No. 2 air conditioning tube and accessory assembly.
- NOTICE:
-
Keep the O-ring and O-ring fitting surfaces free of foreign matter.
Connect the No. 2 air conditioning tube and accessory assembly to the air conditioning unit assembly.
Engage the 2 clamps to install the No. 2 air conditioning tube and accessory assembly.
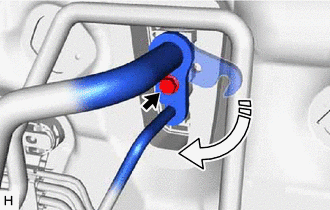

|
Rotate in this Direction |
Insert the hose joint into the fitting hole securely and install the bolt.
- Torque:
- 9.8 N*m (100 kgf*cm, 87 in.*lbf)
47202
9.INSTALL BRAKE MASTER CYLINDER RESERVOIR SUB-ASSEMBLY
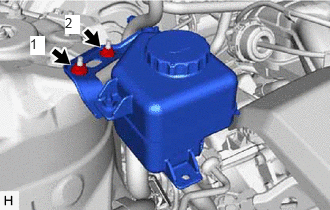
Install the brake master cylinder reservoir sub-assembly with the 2 nuts in the order shown in the illustration.
- Torque:
- 9.0 N*m (92 kgf*cm, 80 in.*lbf)
Engage the clamp to install the engine room main wire.
Connect the engine room main wire to the brake master cylinder reservoir sub-assembly.
47201B
10.INSTALL BRAKE MASTER CYLINDER O-RING
11.INSTALL BRAKE MASTER CYLINDER SUB-ASSEMBLY
47234L
12.CONNECT NO. 1 RESERVOIR HOSE
73900
13.INSTALL LOWER NO. 1 INSTRUMENT PANEL AIRBAG ASSEMBLY
55446A
14.INSTALL NO. 1 SWITCH HOLE BASE
55045
15.INSTALL LOWER INSTRUMENT PANEL FINISH PANEL SUB-ASSEMBLY
53601
16.CONNECT HOOD LOCK CONTROL LEVER SUB-ASSEMBLY
17.CONNECT CABLE TO NEGATIVE BATTERY TERMINAL
Click hereGeneral>MAINTENANCE>2GR-FKS BATTERY>INSTALLATION
- NOTICE:
-
When disconnecting the cable, some systems need to be initialized after the cable is reconnected.
-
Click hereGeneral>INTRODUCTION>REPAIR INSTRUCTION>INITIALIZATION
18.BLEED BRAKE SYSTEM
19.INSPECT AND ADJUST BRAKE PEDAL
55606
20.INSTALL NO. 1 INSTRUMENT PANEL UNDER COVER SUB-ASSEMBLY
62111A
21.INSTALL COWL SIDE TRIM SUB-ASSEMBLY RH
- HINT:
-
Use the same procedure as for the LH side.
-
Click hereVehicle Interior>INTERIOR PANELS / TRIM>ROOF HEADLINING>INSTALLATION
67913
22.INSTALL FRONT DOOR SCUFF PLATE RH
- HINT:
-
Use the same procedure as for the LH side.
-
Click hereVehicle Interior>INTERIOR PANELS / TRIM>ROOF HEADLINING>INSTALLATION
23.CHARGE AIR CONDITIONING SYSTEM WITH REFRIGERANT
24.WARM UP ENGINE
25.INSPECT FOR REFRIGERANT LEAK
55704B
26.INSTALL COWL VENTILATOR PANEL SUB-ASSEMBLY
27.INSTALL FRONT UPPER SUSPENSION TO COWL BRACE SUB-ASSEMBLY LH
53607B
28.INSTALL FRONT UPPER SUSPENSION TO COWL BRACE SUB-ASSEMBLY RH
- HINT:
-
Perform the same procedure as for the LH side.
53892C
29.INSTALL FRONT FENDER SPLASH SHIELD SEAL FRONT LH
53891C
30.INSTALL FRONT FENDER SPLASH SHIELD SEAL FRONT RH
- HINT:
-
Perform the same procedure as for the LH side.
53808A
31.INSTALL FENDER SPLASH SHIELD SUB-ASSEMBLY REAR LH
53807A
32.INSTALL FENDER SPLASH SHIELD SUB-ASSEMBLY REAR RH
- HINT:
-
Perform the same procedure as for the LH side.
33.INSTALL WINDSHIELD WIPER MOTOR AND LINK ASSEMBLY
34.INSPECT SRS WARNING LIGHT