HEATING / AIR CONDITIONING CONDENSER REMOVAL
CAUTION / NOTICE / HINT
The necessary procedures (adjustment, calibration, initialization, or registration) that must be performed after parts are removed and installed, or replaced during cooler condenser assembly removal/installation are shown below.
| Replaced Part or Performed Procedures | Necessary Procedures | Effect/Inoperative Function When Necessary Procedures are not Performed | Link |
|---|---|---|---|
|
*: Even when not replacing the part, it is necessary to perform the specified necessary procedures after installation. |
|||
| Front bumper assembly* | ·
Measurement of ultrasonic sensor detection angle ·
Ultrasonic sensor detection angle registration |
Parking Support Brake System | ( ) |
| Front television camera view adjustment | Panoramic View Monitor System | ()
|
|
| Replaced Part or Performed Procedures | Necessary Procedures | Effect/Inoperative Function When Necessary Procedures are not Performed | Link |
|---|---|---|---|
|
*: Even when not replacing the part, it is necessary to perform the specified necessary procedures after installation. |
|||
| Front bumper assembly* | ·
Measurement of ultrasonic sensor detection angle ·
Ultrasonic sensor detection angle registration |
Parking Support Brake System | ()
|
| Front television camera view adjustment | Panoramic View Monitor System | ()
|
|
PROCEDURE

 1. RECOVER REFRIGERANT FROM REFRIGERATION SYSTEM
2.REMOVE FRONT BUMPER ASSEMBLY (w/o Grille Shutter)
53019F
3.REMOVE RADIATOR SHUTTER SUB-ASSEMBLY (w/ Grille Shutter)
52611
4.REMOVE FRONT BUMPER ENERGY ABSORBER
52021
5.REMOVE FRONT BUMPER REINFORCEMENT SUB-ASSEMBLY
53510
6.REMOVE HOOD LOCK ASSEMBLY
for LHD:
Click hereVehicle Exterior>DOOR / HATCH>HOOD LOCK CONTROL CABLE ASSEMBLY>REMOVAL
for RHD:
Click hereVehicle Exterior>DOOR / HATCH>HOOD LOCK CONTROL CABLE ASSEMBLY>REMOVAL
17750A
7.REMOVE INLET AIR CLEANER ASSEMBLY (for 2GR-FKS)
17750A
8.REMOVE INLET AIR CLEANER ASSEMBLY (for A25A-FXS)
53205
9.REMOVE UPPER RADIATOR SUPPORT SUB-ASSEMBLY (for 2GR-FKS)
53205
10.REMOVE UPPER RADIATOR SUPPORT SUB-ASSEMBLY (for A25A-FXS)
88790B
11.REMOVE THERMISTOR ASSEMBLY (w/o Grille Shutter)
16595B
12.REMOVE NO. 1 RADIATOR AIR GUIDE LH
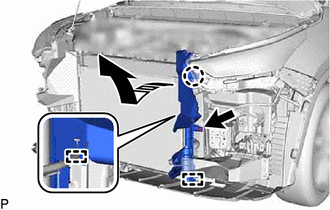

|
Remove in this Direction |
Remove the clip.
Disengage the claw and 2 guides, and remove the No. 1 radiator air guide LH as shown in the illustration.
16593B
13.REMOVE NO. 1 RADIATOR AIR GUIDE RH
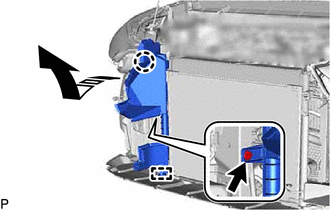
|
|
Remove in this Direction |
Remove the clip.
Disengage the claw and guide, and remove the No. 1 radiator air guide RH as shown in the illustration.
G9010A
14.DISCONNECT RADIATOR ASSEMBLY (for HV Model)
for Inverter Coolant:
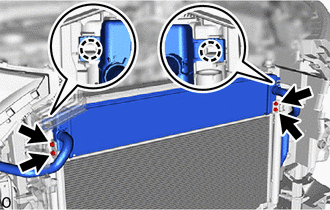
Remove the 4 bolts.
Disengage the 2 claws and disconnect the radiator assembly.
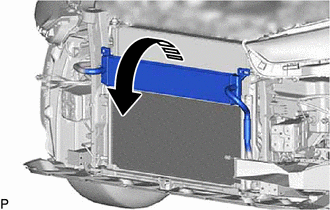
|
|
Separate in this Direction |
Separate the radiator assembly as shown in the illustration.
- NOTICE:
-
Do not apply excessive force to the No. 3 inverter cooling hose and No. 4 inverter cooling hose.
88703
15.DISCONNECT DISCHARGE HOSE SUB-ASSEMBLY (for Gasoline Model)
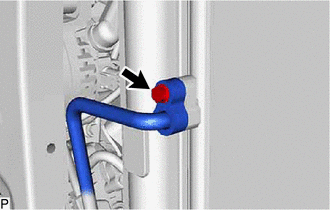
Remove the bolt.
Disconnect the discharge hose sub-assembly.
Remove the O-ring from the discharge hose sub-assembly.
- NOTICE:
-
Seal the openings of the disconnected parts using vinyl tape to prevent entry of moisture and foreign matter.
88703
16.DISCONNECT DISCHARGE HOSE SUB-ASSEMBLY (for HV Model)
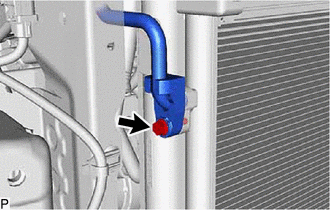
Remove the bolt.
Disconnect the discharge hose sub-assembly.
Remove the O-ring from the discharge hose sub-assembly.
- NOTICE:
-
Seal the openings of the disconnected parts using vinyl tape to prevent entry of moisture and foreign matter.
88710
17.DISCONNECT AIR CONDITIONING TUBE ASSEMBLY (for Gasoline Model)
While pressing the end of the air conditioning tube assembly into the end of the cooler condenser assembly, use pliers to squeeze together both sides of the piping clamp until it breaks apart.
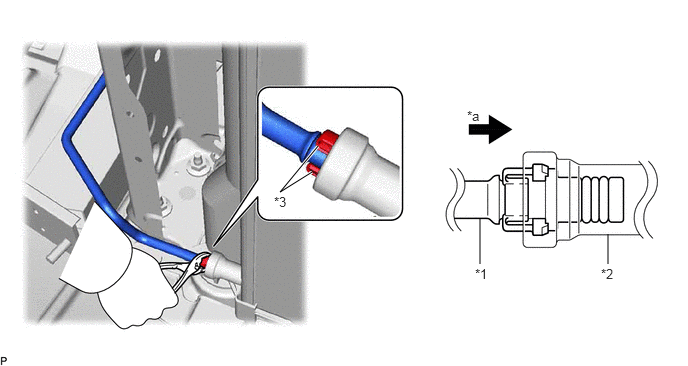
| *1 | Air Conditioning Tube Assembly | *2 | Cooler Condenser Assembly |
| *3 | Piping Clamp | - | - |
| *a | Press In | - | - |
- NOTICE:
- ·
If any foreign matter is attached to the connecting parts, brush it off or use compressed air to remove it before disconnecting the parts.
·Make sure that fragments of the piping clamp do not enter the piping.
Disconnect the air conditioning tube assembly.
- NOTICE:
-
Remove any foreign matter from the connecting parts of the air conditioning tube assembly and cooler condenser assembly.
Remove the 2 O-rings from the air conditioning tube assembly.
- NOTICE:
-
Seal the openings of the disconnected parts with vinyl tape to prevent entry of moisture and foreign matter.
Remove the piping clamp.
88710
18.DISCONNECT AIR CONDITIONING TUBE ASSEMBLY (for HV Model)
While pressing the end of the air conditioning tube assembly into the end of the cooler condenser assembly, use pliers to squeeze together both sides of the piping clamp until it breaks apart.
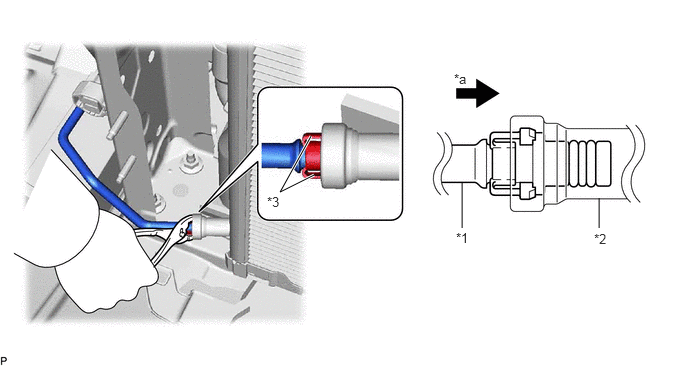
| *1 | Air Conditioning Tube Assembly | *2 | Cooler Condenser Assembly |
| *3 | Piping Clamp | - | - |
| *a | Press In | - | - |
- NOTICE:
- ·
If any foreign matter is attached to the connecting parts, brush it off or use compressed air to remove it before disconnecting the parts.
·Make sure that fragments of the piping clamp do not enter the piping.
Disconnect the air conditioning tube assembly.
- NOTICE:
-
Remove any foreign matter from the connecting parts of the air conditioning tube assembly and cooler condenser assembly.
Remove the 2 O-rings from the air conditioning tube assembly.
- NOTICE:
-
Seal the openings of the disconnected parts with vinyl tape to prevent entry of moisture and foreign matter.
Remove the piping clamp.
88460
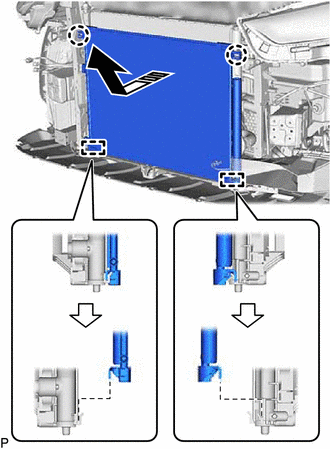
19.REMOVE COOLER CONDENSER ASSEMBLY (for Gasoline Model)
|
|
Remove in this Direction |
Disengage the 2 claws and 2 guides, and remove the cooler condenser assembly as shown in the illustration.
- NOTICE:
-
Do not damage the cooler condenser assembly or radiator assembly when removing the cooler condenser assembly.
88460
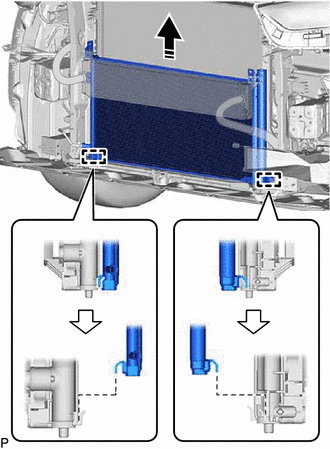
20.REMOVE COOLER CONDENSER ASSEMBLY (for HV Model)
|
|
Remove in this Direction |
Disengage the 2 guides to remove the cooler condenser assembly as shown in the illustration.
- NOTICE:
-
Do not damage the cooler condenser assembly or radiator assembly when removing the cooler condenser assembly.