2014 Hilux · Service Manual ENGINE

REMOVAL

Removal / installation · Vehicles built from Aug 2013

Versions by build date: Jun 2011 – Jul 2012 Aug 2012 – Jul 2013 from Aug 2013

NOTICE:
  1. When replacing the injectors (including shuffling the injectors between the cylinders), common rail or cylinder head, it is necessary to replace the injection pipes with new ones.
  2. When replacing the fuel supply pump, common rail, cylinder block, cylinder head, cylinder head gasket or timing gear case, it is necessary to replace the fuel inlet pipe with a new one.


1. DISCONNECT CABLE FROM NEGATIVE BATTERY TERMINAL

NOTICE:
When disconnecting the cable, some systems need to be initialized after the cable is reconnected (Click here).


2. REMOVE NO. 1 ENGINE UNDER COVER (for 4WD and Pre-Runner)

3. DRAIN ENGINE COOLANT

CAUTION:
Do not remove the radiator reservoir cap while the engine and radiator are still hot. Pressurized, hot engine coolant and steam may be released and cause serious burns.

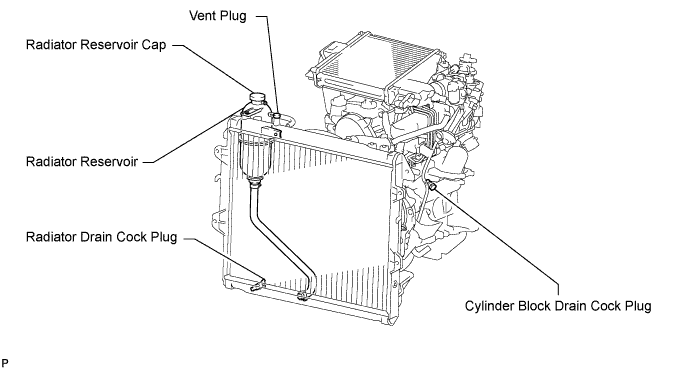
  1. Loosen the radiator drain cock plug.

    HINT:
    Collect the coolant in a container and dispose of it according to the regulations in your area.

  1. A099591E01
    Drain the coolant by removing the reservoir cap and, using a wrench, remove the vent plug.

  1. Loosen the cylinder block drain cock plug.

    A147246E01


4. DRAIN ENGINE OIL
  1. Remove the oil filter cap.

  1. Remove the oil drain plug, and drain the engine oil from the oil pan.

    NOTICE:
    Collect the oil in an oil disposal container.


5. LOOSEN FUEL TANK CAP ASSEMBLY

6. REMOVE INTAKE MANIFOLD (w/ EGR Cooler)
(Click here)

7. REMOVE INTAKE MANIFOLD (w/ EGR System without EGR Cooler)
(Click here)

8. REMOVE INTAKE MANIFOLD (w/o EGR System)
(Click here)

9. REMOVE GLOW PLUG ASSEMBLY (w/ EGR Cooler)
(Click here)

10. REMOVE GLOW PLUG ASSEMBLY (w/o EGR Cooler)
(Click here)

11. REMOVE COMMON RAIL ASSEMBLY (w/ EGR Cooler)
(Click here)

12. REMOVE COMMON RAIL ASSEMBLY (w/o EGR Cooler)
(Click here)

13. REMOVE TIMING BELT
(Click here)

14. REMOVE INJECTOR ASSEMBLY (w/ EGR Cooler)
(Click here)

15. REMOVE INJECTOR ASSEMBLY (w/o EGR Cooler)
(Click here)

16. REMOVE TURBOCHARGER SUB-ASSEMBLY (w/ EGR Cooler)
(Click here)

17. REMOVE TURBOCHARGER SUB-ASSEMBLY (w/o EGR Cooler)
(Click here)

18. DISCONNECT COOLER COMPRESSOR ASSEMBLY (w/ Air Conditioning System)
  1. Remove the 4 bolts and disconnect the cooler compressor.

    HINT:
    It is not necessary to completely remove the compressor. With the hoses connected to the compressor, hang the compressor on the vehicle body with a rope.

19. REMOVE NO. 1 COMPRESSOR MOUNTING BRACKET (w/ Air Conditioning System)
  1. Remove the 4 bolts and No. 1 compressor mounting bracket.


20. REMOVE EXHAUST MANIFOLD

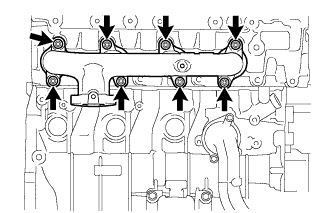
  1. A152664
    Remove the 8 nuts and exhaust manifold.


21. DISCONNECT WIRE HARNESS

22. REMOVE CAMSHAFT TIMING PULLEY

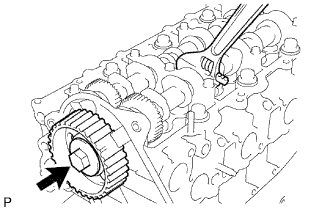
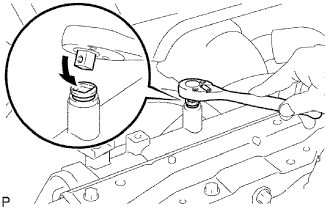
  1. A060182E01
    Remove the bolt of the camshaft timing pulley by holding the camshaft with a wrench.

    NOTICE:
    Make sure to remove the bolt of the camshaft timing pulley with the timing belt not installed.

  1. Remove the camshaft timing pulley.


23. REMOVE NO. 1 TIMING BELT IDLER SUB-ASSEMBLY

24. REMOVE NO. 2 TIMING BELT COVER
  1. Remove the 4 bolts, nuts and No. 2 timing belt cover.


25. REMOVE CYLINDER BLOCK INSULATOR (w/ EGR Cooler)

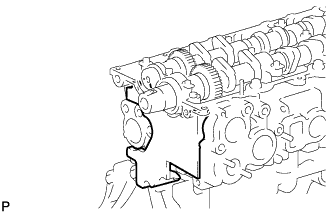
  1. A149941
    Remove the cylinder block insulator from the cylinder head.


26. REMOVE CAMSHAFT

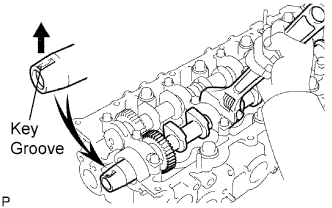
  1. A060148E02
    Face the key groove of the camshaft upward by turning the camshaft with a wrench.

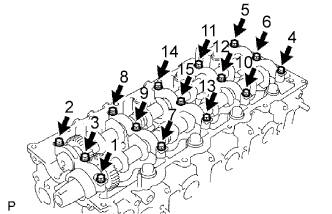
  1. A060147E01
    Uniformly loosen the 15 bearing cap bolts in several passes in the sequence shown in the illustration.

  1. Remove the 5 bearing caps, oil seal and 2 camshafts.


27. REMOVE CYLINDER HEAD SUB-ASSEMBLY

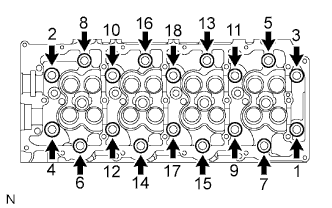
A059194E01
  1. Uniformly loosen and remove the 18 cylinder head bolts in several passes in the sequence shown in the illustration.

    NOTICE:
    Head warpage or cracking could result from removing bolts in the incorrect order.

  1. Lift the cylinder head from the dowels on the cylinder block, and place the cylinder head on wooden blocks on a bench.

    HINT:
    If the cylinder head is difficult to lift, use a screwdriver to pry between the cylinder head and block.

    NOTICE:
    Be careful not to damage the contact surfaces of the cylinder head and cylinder block.


28. REMOVE CYLINDER HEAD GASKET
← REMOVAL (Aug 2012 – Jul 2013)DISASSEMBLY (from Jun 2011) →